PC Slower Than It Used to Be?
A free scan shows the junk files, broken settings and background clutter dragging Windows down - then fixes them in one click.Free scan · Windows 10 & 11Crashes, No Sound, or Screen Glitches?
Random freezes, missing sound and display glitches usually trace back to one bad driver. Find and replace yours safely.Free scan · under a minuteInstall the Simple Voice Chat component that matches your server platform, install the compatible client component for every player who will speak, restart the server, and make the voice UDP port reachable. Mod-loader servers use a mod in mods; Bukkit-style servers use a plugin in plugins. The default voice port is 24454 over UDP.
Playing with friends? Godlike.Host runs hosted Minecraft Java servers from 10 data-center locations, with free DDoS protection.
What Simple Voice Chat installation involves
Simple Voice Chat has two required sides: a server component that provides the voice service and a client component that gives each player the voice-chat interface and audio connection. Installing only one side is not enough. A player who lacks the client component may still join the Minecraft server, but cannot use its voice features.
As an Amazon Associate I earn from qualifying purchases.
The server component must match both your Minecraft version and the way your server runs. Fabric, NeoForge, Forge and Quilt servers use the corresponding mod. Bukkit, Spigot and Paper servers use the corresponding plugin. A proxy deployment, such as Velocity or BungeeCord, has an additional proxy-specific setup rather than being covered automatically by the backend installation.
Voice audio does not travel through the normal Minecraft connection. It uses a separate UDP connection, normally on port 24454. That distinction explains why players can join the world successfully while the voice icon still reports that voice chat is not connected.
#1 Best Overall

- 285G LIGHTWEIGHT BUILD — Experience superior audio and game for hours without being weighed down by the headset
- TRIFORCE 40MM DRIVERS — Cutting-edge proprietary design divides the driver into 3 parts for the individual tuning of highs, mids, and lows —producing brighter, clearer audio with richer highs and more powerful lows
- HYPERCLEAR CARDIOID MIC — An improved pickup pattern ensures more voice and less noise with the sweet spot easily placed at the mouth because of the mic’s bendable design
- HYBRID FABRIC AND MEMORY FOAM EAR CUSHIONS — Wrapped in a combination of breathable fabric and plush leatherette to provide a snug fit to ensure constant comfort for prolonged gaming
- 7.1 SURROUND SOUND — Provides accurate positional audio that lets you pinpoint intuitively where every sound is coming from. *Only available on Windows 10 64-bit
Check your server before downloading anything
- Identify the platform: record whether the server is Fabric, NeoForge, Forge, Quilt, Bukkit, Spigot, Paper or a proxy-backed arrangement.
- Identify the Minecraft version: the server component and each client component must be built for a compatible game version.
- Confirm file access: you need access to the server’s file manager, SFTP location or local server directory so you can place a JAR in the correct folder.
- Confirm UDP networking: self-hosted servers need permission to open a UDP port in the operating-system firewall and router. Managed hosts require a panel or support process that exposes UDP ports.
- Plan for every voice user: anyone who should speak or hear others needs the compatible client component installed before testing.
Download the build from the Simple Voice Chat project listing after checking those details. Do not choose a file merely because its name contains “voice chat”; the loader and Minecraft version are the compatibility checks that matter.
Choose the correct server installation path
| Server platform | Server file type | Destination | Client requirement |
|---|---|---|---|
| Fabric | Fabric mod JAR | mods |
Compatible client component for each voice user |
| NeoForge | NeoForge mod JAR | mods |
Compatible client component for each voice user |
| Forge | Forge mod JAR | mods |
Compatible client component for each voice user |
| Quilt | Quilt mod JAR | mods |
Compatible client component for each voice user |
| Bukkit, Spigot or Paper | Server plugin JAR | plugins |
Compatible client component for each voice user |
| Velocity or BungeeCord proxy | Backend component plus proxy-specific setup | Follow the project’s proxy layout | Compatible client component for each voice user |
Never put a plugin JAR in a mod-loader server’s mods directory, and do not put a Fabric, Forge, NeoForge or Quilt mod in plugins. The server may ignore the file, fail during startup or appear to load without providing a working voice service.
What’s actually slowing this PC down?
Pick the symptom - the matching free tool is one click away.
Install the server component
Fabric, NeoForge, Forge or Quilt
- Stop the Minecraft server cleanly. Installing while the process is writing files can leave an incomplete configuration or a locked JAR.
- Open the server’s main directory and locate
mods. If the directory does not exist, check that the selected loader is installed and has started at least once; do not substitute apluginsdirectory. - Copy the matching Simple Voice Chat mod JAR into
mods. Keep the downloaded filename intact so you can identify the build later. - Start the server and watch the startup log for the voice-chat service. A clean startup confirms that the loader recognized the mod; it does not yet prove that the UDP port is reachable from outside.
Bukkit, Spigot or Paper
- Stop the server and open its main directory.
- Copy the matching Simple Voice Chat plugin JAR into
plugins. Do not use a mod-loader JAR for this installation. - Start the server and inspect the log for the plugin’s initialization message. If the server reports an incompatible plugin or fails to load it, stop and obtain the build for the exact server platform and Minecraft version.
On the first successful startup, the component creates its server configuration. Let the server finish starting once before changing settings, then stop it again if you need to edit the generated file. Editing while the process is running can be overwritten when the server shuts down.
Install the client component for players
Every player who will use voice chat needs a compatible client component. The exact installation method follows that player’s Minecraft setup: a mod-loader client receives the matching client mod, while a client arrangement supported by the project’s plugin-based ecosystem follows its documented client requirements. The important rule is that the client build must match the server’s Minecraft and platform expectations.
Rank #2

- Enjoy expansive cinematic sound. Big 50 mm audio drivers deliver an incredible sound experience
- Hear Enemies From All Sides. DTS Headphone:X 2.0 surround sound(1) lets you hear enemies sneaking behind you, special ability cues, and immersive environments. It’s positional clarity that can make the difference between victory and defeat. Experience three-dimensional audio that goes beyond 7.1 channels to make you feel like you’re right in the middle of the action. (1) DTS Headphone:X 2.0 requires Logitech G HUB Software.
- Be Heard Loud and Clear. The big 6 mm boom mic makes sure you’re heard by gaming partners and mutes when flipped up.
- Use One Headset For Most Game Platforms. Your headphones work with your PC or Mac via USB DAC or 3.5 mm cable, mobile devices with 3.5 mm cable or with gaming consoles including PlayStationⓇ 5 and PlayStationⓇ 4 (USB wireless stereo sound only), Nintendo Switch (wireless stereo sound when docked)
- Game for Hours in Comfort. Everything about these headphones is about comfort: The deluxe lightweight leatherette ear cups and headband are made to keep pressure off your ears. Ear cups rotate up to 90 degrees for convenience.
- Give each player the project build that corresponds to the server’s Minecraft version and loader.
- Have the player place the client file in the location used by that client installation, normally its mod directory when the client uses a mod loader.
- Launch Minecraft with the same profile that contains the component, then join the server.
- Repeat for every person who needs to speak or listen. Players without the client component can connect to the world but will not gain the voice-chat functions.
Do not ask players to install a newer client build “just to try it” while the server remains on an older build. A mismatch is one of the first causes to investigate when the connection indicator stays disconnected.
Find and edit the server configuration
The generated file is named voicechat-server.properties. Its location depends on the server family:
The Tool Desk
Outbyte Driver Updater FREEFix the driver behind crashes, sound loss and screen glitchesFind Drivers →Outbyte PC Repair FREEClear out junk files and repair common Windows errorsFree Scan →- Fabric, NeoForge, Forge or Quilt:
config/voicechat/voicechat-server.properties - Bukkit, Spigot or Paper:
plugins/voicechat/voicechat-server.properties
Open the file only after the first startup has created it. The setting that controls the voice endpoint is the port property. If you change it, save the file, restart the server and expose the identical number externally. A different number in the provider panel, firewall, router and configuration produces a disconnected client even though the server itself appears healthy.
Keep voice traffic on its own UDP port. The configuration reference warns that audio packets always use UDP on the configured port, independently of the game server’s other networking, and strongly recommends not reusing the Minecraft server port. Query traffic on that port can crash the server. The default 24454 is therefore the starting point unless your host or network design requires another available UDP port.
Rank #3

- [Wide Compatibility] This professional gaming headset for PC gamers is compatible with PC (Windows 7/8/10), PS4/PS5 console, laptops, and other devices with a USB audio port.(Note: EKSA E1000 is not compatible with game controllers.)
- [Driver-free 7.1 Surround Sound] Enjoy an instant immersive gaming experience with its 7.1 surround sound. EKSA PC gaming headset has a built-in USB audio sound chip and 50mm magnetic neodymium driver that gives you a vivid surrounding sound field. No extra downloads or hassle to get the best experience, just plug and play.
- [Noise Cancelling Microphone] The EKSA gaming headset for PS5 reduces distracting background noise and guarantees loud and crystal-clear communication with its 120° adjustable high-sensitive microphone. The headset’s omnidirectional noise reduction tech allows you to enjoy quality sound when gaming or in-game chats.
- [Comfortable Ergonomic Design] Premium soft memory protein earmuffs ensure ultimate comfort even for a prolonged period. In addition, there’s absolute comfort during lengthy gaming sessions with an adjustable headband designed for balanced weight distribution and reduced clamping force. Short cables are also not your problem anymore as its 2.2m extremely durable cable allows you to enjoy your game with no boundary.
- [2 Years Warranty] EKSA gaming headsets are under strict quality inspection on each production line. We offer 24-hour customer support and a 2-year warranty. We will make our most incredible effort to take responsibility for your shopping experience.
Open the UDP port
Self-hosted server
- Choose the configured voice port, using
24454unless you changed theportproperty. - Create an inbound firewall rule on the machine running Minecraft that allows UDP traffic to that port.
- If the server is behind a home or office router, forward the same UDP port to the server machine’s local IP address.
- Restart the server after applying the rule and test from a client outside the local network when possible. A local test alone can conceal a router forwarding error.
Managed hosting panel
Open the host’s networking or port-allocation panel and request or assign a UDP allocation for the voice port. Some panels expose Minecraft’s normal connection port but do not expose additional UDP ports by default. If the panel offers separate TCP and UDP choices, select UDP. Apply the allocation to the same port number entered in voicechat-server.properties; contact the host if the service allows only a fixed range or requires a support ticket.
Why the normal Minecraft port is not a substitute
Players connect to the world over the normal Minecraft connection, but voice packets use a separate UDP socket. Forwarding only the game port leaves the audio endpoint unreachable. Conversely, opening a UDP port without placing the correct server component on that port gives clients nothing to connect to.
Do these 3 things before closing this tab:
1Fix the driver behind crashes, sound loss and screen glitches2Repair Windows errors before they cause bigger problems3Scan for outdated or missing drivers - takes under a minuteConfigure microphone and speakers in Minecraft
- Join the server with the client component installed.
- Press V to open the Simple Voice Chat GUI.
- Open the voice-chat settings.
- Select the microphone you want to use and the speaker or headset that should play incoming audio.
- Run the built-in microphone and speaker tests. Confirm that the input meter responds to speech and that the playback test is audible at a safe volume.
A USB headset with a microphone is optional; the software does not require a particular headset. The test controls are useful for separating an audio-device problem from a server-network problem: if the local tests fail, correct the operating-system device selection first; if they pass but the connection remains unavailable, continue with the server and UDP checks.
Proxy deployments need an extra setup
Velocity and BungeeCord arrangements route players through a proxy before they reach a backend server. Installing the backend component alone does not guarantee that the proxy path exposes the voice service. Follow the project’s proxy-specific instructions in addition to installing the component on the backend server, and verify which server in the chain owns the externally reachable UDP port.
Rank #4

- TRIFORCE 40 MM DRIVERS — Razer patented 3-part driver design pushes out exceptional highs, mids and lows that doesn’t muddy, providing a more dynamic listening experience for deeper immersion
- RETRACTABLE HYPERCLEAR CARDIOID MIC — The improved pickup pattern in the microphone ensures more voice and less noise, while its retractable design allows for optimal positioning or protection when not in use
- 7.1 SURROUND SOUND — With our advanced 7.1 surround sound, enjoy true-to-life acoustics that optimize the game’s sound design and hear everything as if you were right in the middle of it all
- COMFORTABLE MEMORY FOAM CUSHIONS — Features hybrid fabric and leatherette cushions with close-fitting earcups that provide superior sound isolation and comfort, even during long gaming sessions
- CONVERTIBLE TYPE C & TYPE A CABLE — Enjoy immersive audio across various platforms with just a single headset; switch between PC, consoles, phones, and more with a convertible Type C and Type A cable
Test the complete path with a client that connects exactly as ordinary players do. If direct backend testing works but proxy testing does not, concentrate on the proxy configuration and its port exposure rather than reinstalling the client repeatedly.
Troubleshoot “voice chat not connected”
Use this order so that the inexpensive compatibility checks come before network changes.
1. Verify platform and Minecraft-version matches
- Confirm that the server JAR is for the actual loader or plugin platform, not merely for a similar name.
- Confirm that each player’s client component targets the same compatible Minecraft version.
- Read the server startup log for a load error, dependency error or message showing that the voice service never started.
If the component is absent from the startup log, stop the server and correct the file selection or directory before testing ports.
2. Check the directory
Mod-loader servers must load the file from mods; Bukkit-style servers must load it from plugins. A correctly named file in the wrong directory is still an unusable installation. Remove duplicate or wrong-platform copies so the server cannot select an unintended build.
Best Value
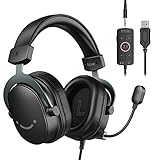
- [Immerse in Soundscapes] Dive into a soundscape with 7.1 surround sound that makes audio details come to life. The FIFINE H9 gaming headset envelop you in a immersive gaming aura that transcends reality. 50mm driver reverberates every explosion, gunfire and environmental sound in intense gaming through your wired gaming headset. This headset for gaming pull you to get more achievement and improve the accuracy of FPS and ARPG.
- [Unleash Various Compatibility] Offer this headset for gamers that fits all their devices. The Wired Gaming headset with 3.5mm and USB connector is effortlessly connected to a wide range of gaming device. USB headphones with mic plug and play compatible with PS4/PS5 or Switch Docked Mode, while 3.5mm jack works and performs greatly on XBOX contoller, game console controllers or phone/tablet. The gaming headphones gives a seamless transition among ARPG, FPS and more gaming realms.
- [Provide Relaxing Comfort] Softly lightweight touch on the earmuffs cushion and adjustable headband release heaviness. This PS5 headset satisfies long-lasting comfort during immersive gaming sessions. The USB headphone fits your head to provide passive noise cancellation. You will hear the enemy footsteps from the next room in FPS, rather than ambient noise around your gaming zone. The breathability of Xbox headset with 3.5mm jack prevent sweating in pre-long intense sessions and no fatigue.
- [Capture Bright Clarity] Plug the detachable microphone, and team up with friends and family with the streaming PC headset for immediate strategic chatting to dominate the gaming arena. Microphone with sensitivity of -42dB timely captures your voice during intense situation to deliver uninterrupted feedback to your teammates. Gamer headset with mic creates a higher level of cooperation in multi-player game, or resonates with victory in RTS.
- [Reach Fingertips Control Easily] No more software installation for functionality, intuitive USB CONTROL BOX of the computer headset allows you to adjust the volume of MICROPHONE & HEADPHONES along side with MUTE SWITCH, without losing concentration on your gaming battlefield. Braided headset cable with a total length of 10ft can be accessed to the back of the PC host without difficulty. (Turn up the mic volume and push the mute switch to “mic on” via the USB control box when testing the mic.)
3. Check the generated configuration
Confirm that the file exists at the path for your server family and that the port value is the one you intend to expose. After changing it, restart the server. If the file has not been generated, the component did not complete a successful startup and network troubleshooting is premature.
Free tools Windows power users keep installed
One-click scans. No signup required.
4. Check every network layer
- Verify the host panel allocation, if you use managed hosting.
- Verify the operating-system firewall rule on a self-hosted machine.
- Verify router forwarding to the correct internal machine when the server is behind NAT.
- Verify that each layer uses UDP and the same port number.
The official setup documentation separates hosting-provider and self-hosted procedures because these layers are controlled differently. A server can be fully operational for Minecraft while its voice UDP port is blocked by any one of them.
5. Check proxy-specific settings
For Velocity or BungeeCord, confirm that the proxy instructions were applied as well as the backend instructions. Do not assume that a backend port automatically becomes reachable through the proxy.
6. Re-test the client audio path
Press V, open settings and run the microphone and speaker tests. If local tests work and the server log shows the service started, the remaining fault is usually reachability or a version mismatch rather than the selected microphone.
Installation choices by server situation
| Situation | Best-fit path | Decision point |
|---|---|---|
| Players already use Fabric, NeoForge, Forge or Quilt | Install the matching mod on the server and compatible clients | Every voice user must be able to run the required client component |
| Players use an unmodified client while the server is Bukkit, Spigot or Paper | Install the matching plugin on the server, then follow the project’s client requirements | Confirm what client component the intended player setup supports |
| Home-hosted server | Use the appropriate server component and configure firewall plus router forwarding | You control the UDP rules and local addressing |
| Managed host | Use the host’s supported component and port-allocation workflow | Ensure the provider permits an additional UDP port |
| Velocity or BungeeCord network | Install backend components and complete proxy-specific setup | Determine where the public voice endpoint is exposed |
The deciding constraint is not the number of players; it is the combination of server platform, client capabilities and control over UDP forwarding. Resolve those three questions before selecting a download.
Recommended Free Tools
Final pre-launch checklist
- Server platform and Minecraft version identified.
- Matching mod placed in
mods, or matching plugin placed inplugins. - Server restarted and voice service visible in the startup log.
- Client component installed for every player who needs voice.
voicechat-server.propertiesfound in the platform-specific path.portrecorded and exposed as UDP, normally24454.- Firewall, router or hosting-panel rules use the same UDP port.
- Proxy-specific setup completed where applicable.
- Microphone and speaker tests pass from the V settings screen.
Once all nine checks pass, reconnect a client and test with another player. If the icon remains disconnected, return to the compatibility and UDP checks rather than changing unrelated Minecraft server settings.
Quick Recap
Product prices and availability are accurate as of the date/time indicated and are subject to change. Any price and availability information displayed on Amazon at the time of purchase will apply.




