Reattach the Backplate (If You’re Reinstalling It)
If you removed the CPU backplate to access the motherboard or reseat hardware, you’ll need to put it back correctly. Start by aligning the backplate holes with the motherboard standoffs (or the mounting posts). Don’t force it—if it doesn’t sit flush, something is misaligned.
Next, reinstall the screws in a cross pattern (a star pattern) so pressure distributes evenly. Tighten them gradually, alternating between screws rather than fully tightening one at a time. Over-tightening can crack the motherboard or warp components, so stop once snug resistance is felt.
As an Amazon Associate I earn from qualifying purchases.
Reconnect Power and Double-Check Everything
Before you close up the system, take a quick pass through your work:
- Confirm the CPU cooler is mounted correctly and tightened evenly.
- Make sure the CPU power connector (usually a 4-pin or 8-pin EPS) is seated firmly.
- Check any cables you moved for damage or looseness.
- Ensure the backplate is fully seated and the screws aren’t protruding or uneven.
If you used thermal paste, remember that thermal paste application should be clean and deliberate—if you’re unsure you applied the right amount, it’s better to redo it properly than risk poor heat transfer.
#1 Best Overall
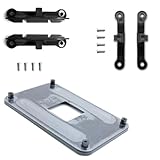
- ✅ - Universal Fit for AMD AM5 & AM4 Sockets. This all-in-one bracket is your permanent solution. It works perfectly with both the latest AMD AM5 and the popular AM4 motherboards. No more searching for compatible parts when you upgrade—one kit covers your needs.
- 📦 Includes 1 Universal Backplate + 2 FULL Hardware Sets. Get everything you need in one box! The kit features a smart design: 1 universal metal backplate, plus two separate, complete sets of standoffs and screws (one for AM5, one for AM4). Just pick the set for your socket. No missing parts.
- ⚡ Anti-Static Layer for Safer Installation. Key components feature an anti-static protective layer. This adds a crucial safeguard for your valuable CPU and motherboard during installation, giving you peace of mind while you build or upgrade your system.
- 🔩 Premium & Durable Metal Construction. Built with thickened, cold-rolled steel for a rock-solid hold. It’s corrosion-resistant and precisely machined to prevent warping or thread stripping. Ensures even pressure and reliable performance for years to come.
- 🎯 The Ultimate Cooler Compatibility Solution. Tired of upgrade headaches? This bracket is the answer. Whether you’re building a new PC, swapping motherboards, or installing a high-performance cooler, it guarantees a perfect, secure fit. Protect your investment and unlock the full potential of your cooling system.
Post-Removal Checklist (Before You Boot)
When everything is reassembled, do a quick sanity check:
- Visually inspect the area around the CPU socket for bent pins or debris.
- Wipe away any stray paste (only if you accidentally spread it where it shouldn’t be).
- Verify the fan is connected and that the cooler mounting hardware looks straight.
Then, power on and watch temperatures. If the system boots but runs unusually hot, shut it down immediately and re-check cooler mounting and thermal paste coverage.
Rank #2

- Wide Intel Socket Compatibility: Fits Intel LGA 1851, 1700, 1151, 1150, 1155, 1156, 1366 sockets. Universal backplate for most standard air & AIO liquid CPU coolers, suitable for upgrades or replacements
- Non-Conductive Safe Design: Crafted from high-quality durable plastic, this non-conductive backplate prevents motherboard short circuits, ensuring safe, reliable installation for all your PC components
- Cost-Effective Replacement Solution: Suitable for lost or damaged original cooler backplates. Remount your existing CPU cooler without buying an entirely new cooling system, saving time and money
- Universal Standard Mounting Fit: Designed for coolers with standard mounting hole patterns. Compatible with most common CPU coolers that require a backplate for installation
- Important Compatibility Note: Backplate ONLY. Mounting screws, standoffs, and other hardware are NOT included. Confirm your motherboard socket and cooler require a backplate before purchase
Troubleshooting: If Something Goes Wrong
Here are a few common issues people run into when removing or reinstalling a CPU backplate—and what to do about them.
What’s actually slowing this PC down?
Pick the symptom - the matching free tool is one click away.
The Backplate Won’t Come Off
If the backplate feels stuck, don’t keep prying. Double-check that all screws are fully removed (some builds use captive screws or hidden fasteners). Also make sure you loosened the CPU cooler mounting evenly before attempting to remove the backplate—uneven pressure can cause binding.
Rank #3

- Compatible Range: The Backplate is only Compatible with INTEL socket, LGA 775/1150/1151/1155/1156/1200/1366/1700.
- Adjustable: This Backplate is easy to operate and simple to use, can be flexibly adjusted the size according to the hole position of motherboard.
- Strong and Long-lasting, Made of high quality Plastic (non-conductive). Color: Black + Yellow
- Thread: M3 (Mounting screws not included)
- Package Includes: 1 x Adjustable motherboard Backplate.
Screws Keep Stripping or Won’t Catch
Stripped screw heads usually mean misalignment or using the wrong tool. Use the correct screwdriver size (precision bits matter), apply steady downward pressure, and avoid “wobbling” the bit. If a screw is truly damaged, stop and replace it rather than forcing it.
CPU Cooler Mount Feels Crooked
If the cooler is not seated evenly after reassembly, it can lead to poor contact and high temps. Loosen the mounting hardware and remount in a cross pattern, tightening gradually and evenly.
Rank #4

- ✅This CPU Fan Cooling Mounting Sheet Plate is designed specifically for AMD Socket AM4 motherboards, compatible with B350, X370, A320, X470 and other AM4 chipsets.
- ✅Made of durable steel and plastic, it provides good heat dissipation, prevents deformation, and offers a long service life with reliable performance.
- ✅ Good heat dissipation ensures the CPU works properly even under heavy loads, protecting your processor from overheating.
- ✅There is a small hole on the pin that aligns with the motherboard, making installation firm and practical. The mounting hole distance is 90x54mm, fitting standard AM4 boards.
- ✅ Color: Silver and Black. Package includes: 1PC AM4 Backplane. (CPU fan and cooler not included).
High Temperatures After Reassembly
High CPU temps typically come from insufficient mounting pressure, poor thermal paste application, or a cooler that isn’t fully seated. Power down, re-check mounting screws, and confirm the fan and pump (if applicable) are connected properly.
Do these 3 things before closing this tab:
1Repair Windows errors before they cause bigger problems2Fix the driver behind crashes, sound loss and screen glitches3Clear out junk files and repair common Windows errorsCleaning and Handling Tips (To Keep Things Safe)
Good habits make CPU work much less risky:
- Handle the motherboard and CPU carefully; avoid touching the contacts or pins.
- Use isopropyl alcohol and lint-free wipes for cleaning thermal paste residue.
- Keep static protection in mind—an anti-static wrist strap and ESD-safe workspace reduce risk.
- Work slowly. Most “mistakes” happen when you rush or apply force.
If you’re reusing components, inspect them before reinstalling—especially screws, standoffs, and the cooler mounting hardware.
Best Value

- Complete Package for Easy Installation: The package includes 2 pairs of CPU fan mounting brackets and 1 screwdriver, ensuring you have everything needed for a hassle-free installation. Perfect for both replacements and upgrades to your cooling system
- Standard AM4 CPU Backplate Bracket: This bracket is designed for AM4 CPU sockets, making it a perfect replacement for damaged radiator brackets. It ensures compatibility with most AM4 motherboards, providing a secure fit for your CPU heatsink
- Premium Quality Materials: Crafted from durable metal and plastic, this bracket offers excellent heat dissipation and high-temperature resistance. It's built to withstand long-term use, with high resistance to deformation and wear
- Essential for Heat Dissipation: The bracket helps install a heatsink fan on the CPU, ensuring effective heat dissipation and optimal CPU performance. It aids in maintaining normal CPU function by keeping it cool during operation
- Ideal for Hook-Type Air-Cooled Heatsinks: This bracket is specifically designed for use with hook-type air-cooled heatsinks, making it a reliable choice for cooling solutions in AM4 socket CPUs. It guarantees a secure and stable mounting for your heatsink
Bottom Line
Removing a CPU backplate safely is mostly about preparation and restraint: power down completely, manage static risk, loosen hardware evenly, and avoid forcing anything that doesn’t come off smoothly. If you follow a methodical step-by-step process and keep screws organized, you’ll minimize the chances of damage.
Once the backplate is out (or back in), do a quick post-reassembly checklist and monitor temperatures on first boot. That last part is what turns a “successful removal” into a reliably working setup.
Quick Recap
Product prices and availability are accurate as of the date/time indicated and are subject to change. Any price and availability information displayed on Amazon at the time of purchase will apply.
Quick wins for a faster PC:
Repair Windows errors before they cause bigger problemsFix Now →Scan for outdated or missing drivers - takes under a minuteDriver Scan →



