PC Slower Than It Used to Be?
A free scan shows the junk files, broken settings and background clutter dragging Windows down - then fixes them in one click.Free scan · Windows 10 & 11Crashes, No Sound, or Screen Glitches?
Random freezes, missing sound and display glitches usually trace back to one bad driver. Find and replace yours safely.Free scan · under a minuteFor an Arduino Uno R3, connect the LCD’s SDA pin to A4/SDA and SCL to A5/SCL. Connect power and ground according to the LCD module’s specifications, then use Arduino’s Wire library or a compatible LCD library to communicate with the display. The module’s voltage, I2C address, screen dimensions, and library API are not universal, so confirm them before uploading a sketch.
What you need to check before wiring
- An Arduino Uno R3 and an I2C LCD module with its backpack.
- The module documentation, to confirm its supply voltage and pin labels.
- The display’s I2C address and screen geometry, plus a library whose API matches your sketch.
Arduino’s I2C guide notes that breakout supply requirements can be 5V or 3.3V depending on the module. Do not assume a particular voltage based only on the fact that the display uses I2C. The Uno R3 datasheet identifies A4/SDA and A5/SCL as its I2C data and clock lines. Arduino’s I2C guide and the Uno R3 datasheet provide the relevant board and interface details.
As an Amazon Associate I earn from qualifying purchases.
Wire the LCD to the Uno R3
| LCD connection | Arduino Uno R3 connection | What it does |
|---|---|---|
| SDA | A4/SDA | I2C data |
| SCL | A5/SCL | I2C clock |
| VCC | 5V or 3.3V only as specified for the module | Power |
| GND | GND | Ground reference |
Use the labels printed on the actual module, and follow its documentation for VCC and GND. The wiring above is for the Uno R3; confirm the pin mapping for a different Uno revision or another Arduino board rather than assuming it is identical.
Recommended Free Tools
Choose a library and confirm the display details
Arduino’s Wire library provides the low-level I2C communication used by Arduino sketches and is included with Arduino board packages. Its documented functions include begin(), beginTransmission(), write(), and endTransmission(). Arduino describes Wire as the library it uses to communicate with I2C devices in its I2C documentation.
#1 Best Overall
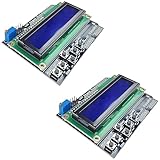
- ALL-IN-ONE DISPLAY & KEYPAD MODULE: This 1602 LCD Keypad Shield combines a 16x2 character LCD display with built-in navigation buttons (select, up, down, left, right), offering an easy-to-use interface for Arduino Uno R3/R4 and Mega boards—perfect for interactive projects, sensor monitoring, and menu navigation.
- 2-PACK FOR DOUBLE THE CREATIVITY: Includes two LCD keypad shields for Arduino, ideal for prototyping multiple Arduino projects at once. Great value for electronics hobbyists, students, and professional developers.
- SEAMLESS ARDUINO COMPATIBILITY: Fully compatible with Arduino Uno R3/R4 and Mega. The shield plugs directly onto your board with no extra wiring, making setup fast and hassle-free for both beginners and advanced users.
- CLEAR & BRIGHT 1602 LCD DISPLAY: Features a high-contrast LCD screen with two rows and sixteen characters, providing crisp and easy-to-read output for real-time data, menus, and system feedback in any lighting condition.
- FREE ONLINE TUTORIAL AVAILABLE: Get started quickly with our helpful online guide. Just search “DIYables LCD Keypad Shield” to access step-by-step instructions, example codes, and project ideas designed to support both new learners and experienced makers.
For a character LCD, a LiquidCrystal I2C library can provide higher-level display commands. Arduino Library Manager lists LiquidCrystal I2C by Frank de Brabander, version 1.1.2, dated 2020-07-07, and warns that it may not be compatible with existing sketches. That warning matters because libraries with similar names do not necessarily use the same constructor or method syntax. Check the library’s documentation and match its API to the sketch you intend to use. See the Arduino Library Manager listing.
There is no single address, geometry, or constructor that applies to every I2C LCD module. Find the I2C address and display dimensions in the module documentation or scan the I2C bus to identify its address. Use those actual values with the library you selected.
Quick Recap
Best Value

- 30+ Guided Electronics Projects: Start with LEDs and build toward LCD1602 displays, RFID access, motion detection, distance sensing, motor control and environmental monitoring for STEM learning, coding clubs, classrooms and hobby projects
- 200+ Components Across 63 Types: Includes an ELEGOO UNO R3 controller, LCD1602, RC522 RFID, RTC, HC-SR501 PIR sensor, ultrasonic sensor, DHT11, GY-521, MAX7219, keypad, joystick, relay, SG90 servo, stepper motor, breadboard and more
- Begin Without Soldering: Pre-soldered modules, a solderless breadboard, organized storage case and small-parts box reduce setup time and help beginners move from lesson to lesson while keeping LEDs, ICs, wires and sensors easy to find
- Learn, Modify and Create: Program the ELEGOO UNO R3 board with Arduino IDE using the included PDF tutorial and example code, then adjust sensor thresholds, timing, display text and motor behavior to turn guided lessons into original projects
- Flexible Power and Project Setup: Includes a 9 V, 1 A power supply, breadboard power module, 9 V battery and USB cable to support controller, breadboard and module experiments without sourcing basic setup accessories separately
Rank #4

- TURN CODE INTO REAL-WORLD RESULTS — Follow 22+ guided lessons to make LEDs blink, read temperature and distance, move servo and stepper motors, control an LCD and respond to joystick or IR input; ideal for a family weekend build, homeschool unit, coding club or STEM classroom
- MORE PROJECT VARIETY IN ONE ORGANIZED KIT — Includes the UNO R3 controller, LCD1602 with pre-soldered header, breadboard power module, ultrasonic and DHT11 sensors, joystick, IR receiver and remote, SG90 servo, stepper motor, relay, DC motor, fan blade, displays, LEDs, buttons, resistors and jumper wires
- START WITHOUT SOLDERING — Plug-in modules, a solderless breadboard and the pre-soldered LCD help beginners focus on wiring, code and testing; the illustrated component list makes it easier to find each part and move from one lesson to the next
- LEARN THE LOGIC, THEN CREATE YOUR OWN — Use Arduino IDE and the included example code to understand digital input and output, analog sensing, timing, motor control and display functions, then change thresholds, speeds and sequences for alarms, environmental monitors, reaction games and motion projects
- CLEAR SETUP SUPPORT FOR FIRST-TIME BUILDERS — Download the latest tutorial and code, select the UNO board and correct computer port, check component polarity and breadboard rows, and keep power-module input at 9V or below; younger learners should work with an experienced adult
Rank #3

- 2.8-Inch Touch Display: Add a compact graphical interface to electronics projects with a 320 × 240 TFT display and touch input for menus, sensor readings, controls and interactive project screens
- 320 × 240 TFT LCD: Display text, graphics, icons and project data on a 320 × 240 color screen; the shield format connects through UNO-style headers for compact prototyping
- Touch Input With Stylus: Use the included stylus for precise resistive-touch input when building buttons, menus, calibration screens and other interactive controls
- MicroSD Expansion and Parallel Interface: The onboard card slot can store compatible project assets, while the 8-bit parallel display interface supports responsive screen updates in compatible projects
- What's Included: Includes one 2.8-inch TFT touch screen shield, one touch stylus and one tutorial CD; UNO boards, USB cables and memory cards are not included
Rank #2

- VIBRANT DISPLAY QUALITY: High-resolution 320x480 color screen delivers sharp and vivid visuals for all types of Arduino projects
- RELIABLE ILI9486 DRIVER: Uses the ILI9486 driver IC for stable performance and seamless Arduino integration
- FAST 8-BIT INTERFACE: 8-bit parallel interface ensures quick data transfer and smooth screen refresh for dynamic applications
- BROAD ARDUINO COMPATIBILITY: Works with Arduino Uno R3, Uno R4 WiFi/Minima, Mega 2560, Due, Giga R1, and other Uno or Mega form-factor boards
- LIBRARY AND TUTORIALS PROVIDED: A dedicated library and step by step online tutorials are provided to help both beginners and advanced users set up and code the display easily
Upload and troubleshoot
- Check that SDA goes to A4/SDA and SCL to A5/SCL on the Uno R3.
- Verify VCC voltage against the module’s documentation, and confirm the ground connection.
- Identify the display’s I2C address and screen dimensions; do not copy assumed values from a sketch for a different module.
- Confirm the installed library matches the sketch’s constructor and display methods.
- If the display does not respond, recheck the wiring, power specification, address, and library compatibility before changing code.
Product prices and availability are accurate as of the date/time indicated and are subject to change. Any price and availability information displayed on Amazon at the time of purchase will apply.
Do these 3 things before closing this tab:
1Fix the driver behind crashes, sound loss and screen glitches2Repair Windows errors before they cause bigger problems3Scan for outdated or missing drivers - takes under a minute



