If the HDMI socket on your Xbox One physically moves, stop flexing the cable: the port is soldered to the motherboard, so fixing it usually means a model-specific board-level repair—not tightening a screw. First identify your console revision and rule out a bad cable or display input. If the socket or pins are damaged, arrange a repair with someone equipped for motherboard soldering unless you already have that experience and equipment.
Check whether the HDMI port is actually the problem
A blank screen alone does not prove the console’s HDMI socket has failed. Before considering repair, try a known-good HDMI cable and, if available, another display or HDMI input. Confirm that the display is set to the input connected to the console. These are basic checks, not a definitive Xbox diagnostic procedure.
As an Amazon Associate I earn from qualifying purchases.
With the console off, look at the socket without pushing or rocking the cable. If the connector visibly shifts, looks bent, or has damaged pins, stop inserting the cable. Repeated movement can worsen damage. A cable that fits loosely is a useful clue, but it does not by itself identify the exact internal fault.
Free tools Windows power users keep installed
One-click scans. No signup required.
Identify your Xbox One revision before ordering parts
“Xbox One” covers different hardware revisions, and the port listings are not interchangeable evidence of fit. iFixit says the original Xbox One model number is on the bottom of the device; check the label and confirm the model before buying anything.
#1 Best Overall

- Compatibility: The console accessories only for Xbox One S HDMI port replacement(2PCS, Not for other model).Please make sure your model before purchase.
- Application: When there has problem with the HDMI port for Xbox One S, it may encounter is display problems. This includes flickering, distorted screens, broken screens, distorted colors, or unclear images. In addition, the display may not recognize the signal source or intermittently lose the signal, causing the screen to go black. This includes audio loss or deterioration of sound quality, because the HDMI cable also transmits audio signals. Our interface connector for Xbox One S which could better to solve these problem.
- Quality Guarantee: The One S HDMI port was made by good quality and produce by accurate machine, can restore the quality and size with your original HDMI port. All for Xbox One S socket connector have passed strictly QC double tested and 100% in good condition before shipment.
- Professional Tools: Comes with 2pcs HDMI port and set tools for Xbox One S interface connector replacement, professional repair tools helps to disassemble and replace the One S HDMI port more convenient.
- Suggestion Tips:If you do not have any installation experience, we suggest find the professional. If you need the installation guide for Xbox One S HDMI Port socket interface replacement or have problem, please leave a message.
| Console revision | iFixit listing identified | What the listing establishes |
|---|---|---|
| Xbox One Original | Standalone HDMI port, IF294-076-1; fix kit, IF294-076-2 | The standalone port is listed for Xbox One Original and is soldered to the motherboard. The fix kit listing says soldering skills and equipment are required. |
| Xbox One S | Fix kit, IF373-016-2 | A separate listing specifically names Xbox One S compatibility. It does not establish fit for the original Xbox One or Xbox One X. |
| Xbox One X | No part listing established here | Do not assume either listed part fits; verify the exact model with a qualified repairer or a model-specific parts source. |
The linked iFixit product pages were accessed October 7, 2026; they do not display a publication date. Product availability can change, so confirm current stock and compatibility directly on the listing.
Why a physically loose port is not a simple tightening job
The original Xbox One HDMI port is soldered to the motherboard. Replacing it involves board-level soldering, not tightening an external fastener. iFixit’s original-model port and fix-kit listings both specify soldering skill or equipment requirements. A damaged socket may also involve damage beyond the connector, so a part listing alone cannot diagnose the console.
Rank #2
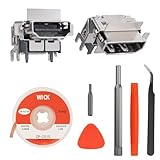
- Solder Wick Included: Make your repair smooth and hassle-free! Each pack includes a solder wick to effortlessly remove the old or damaged HDMI port on your for Xbox One S.
- Compatibility: Perfectly fits for Xbox One S consoles, ensuring seamless performance and reliability.
- OEM-Quality: Enjoy peace of mind with our brand-new, high-quality HDMI socket replacements sourced directly from the OEM factory, offering the same quality as the original HDMI port.
- Soldering Required: Ready for a rewarding DIY project? Installation requires soldering, and we highly recommend watching step-by-step video tutorials on YouTube for guidance (manual not included).
- Comprehensive Repair Kit: Includes 2 HDMI ports for Xbox One S, 4.92ft solder wick, 1 metal bit driver, 1 T8 bit, 1 metal tweezer, 1 triangular pry tool, and 1 prying bar. Restore your for Xbox One S and get back to gaming with confidence!
iFixit’s general Xbox One device page names examples of opening and soldering tools, including a spudger, TR9 and TR10 security screwdrivers, opening tools, solder, and soldering equipment. That is a general tool reference, not a verified complete bill of materials for an HDMI-port replacement. A basic console-opening toolkit is not enough to establish that you can complete the repair.
Quick wins for a faster PC:
Clear out junk files and repair common Windows errorsFree Scan →Fix the driver behind crashes, sound loss and screen glitchesFind Drivers →Repair Windows errors before they cause bigger problemsFix Now →Choose between professional repair and DIY
Use a repair service if you lack board-level experience
If you do not already have suitable soldering equipment and experience working on motherboard-mounted connectors, ask a qualified console repairer to inspect it. Give them the exact console revision and describe what you observed; ask them to confirm the fault and quote the repair before authorizing work. Compare that quote with the console’s overall condition and value. The cited listings do not establish typical repair prices or repair times.
Rank #3
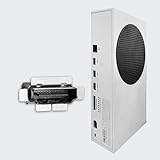
- Perfect fit with Xbox Series S console directly, NOT FOR Xbox One console. NOT FOR Xbox Series X console.
- Fix the worn/bent/broken/faulty HDMI module to recover the video output of your XSS console
- NOTE*Professional soldering and teardown skill required (Please search the tutorial video online in advance)
- Brand new original OEM part for the best quality
Attempt DIY only with a verified model-specific procedure
If you have board-level soldering experience, first confirm that the replacement part matches your revision and use a repair guide verified for that exact console. The listings establish part names and soldering requirements, but do not provide a complete replacement walkthrough. Do not improvise disassembly, soldering temperatures, or pad-repair steps from a parts listing.
Independent reader supportYour contribution helps us test, update, and keep practical guides available for everyone.Can a USB-to-HDMI adapter bypass the damaged port?
Do not count on a USB-to-HDMI converter as a workaround for the console’s damaged video output. In an iFixit community answer dated February 7, 2018, Nick responded “First off, no – an HDMI to USB won’t work” to a question about an Xbox One S. That is community guidance, not an official Microsoft statement, but it offers no basis for treating such an adapter as a supported substitute.
Quick Recap
Best Value

- Brand new original OEM part for the best quality - Radio Frequency Safe
- Perfect fit with Xbox Series X console directly, NOT for the Xbox One console - Radio Frequency Safe
- Fix the worn/bent/broken/faulty HDMI module to recover the video output of your XSX console - Radio Frequency Safe
- Ship with the sturdy package to make sure this tiny part is secure when you get it - Radio Frequency Safe
- Get everything you need (HDMI Port for Xbox Series X, Screwdrivers, Tweezer and Spudger) - Radio Frequency Safe
Rank #4

- Perfect fit with Xbox Series X console directly. NOT FOR Xbox One console and NOT FOR Xbox Series S console
- Fix the worn/bent/broken/faulty HDMI module to recover the video output of your XSX console
- Brand new original OEM part for the best quality
- NOTE*Professional soldering and teardown skill required (Please search the tutorial video online in advance)
What to do next
- Find the model information on the console and identify whether it is an Xbox One Original, Xbox One S, or Xbox One X.
- Check the display input and try a known-good cable or display/input if available.
- Inspect the socket visually without forcing or repeatedly flexing the cable; stop if the connector or pins appear damaged.
- For a physically loose or damaged socket, have the fault confirmed and arrange a model-specific board-level repair—or proceed only if you have the required soldering skills, equipment, and a verified procedure.
Product prices and availability are accurate as of the date/time indicated and are subject to change. Any price and availability information displayed on Amazon at the time of purchase will apply.




