To watch DISH on a smart TV, connect the DISH receiver to the TV, turn on the receiver, and select the TV input used by that connection. This is separate from connecting the television to home Wi-Fi: the receiver-to-TV connection carries the DISH picture, while internet access supports online features. The exact steps depend on whether the receiver is in the same room as the TV and on the equipment’s ports.
Before you connect anything
- If the TV is still showing its initial setup screen, finish the TV manufacturer’s setup first. If you cannot complete it, contact the TV manufacturer.
- Check the TV and receiver ports and any existing cables before buying anything. The cable type determines which input you select on the TV; not every setup needs a new cable.
- These steps cover a DISH receiver connected to a TV. They do not replace the TV’s own setup or Wi-Fi connection.
Connect a DISH receiver and TV in the same room
- Connect the receiver’s video cable to the TV and secure both ends. If the connection runs through an audio receiver or another device, turn that device on as well.
- Turn on the TV. Check the DISH receiver’s front panel: if its green light is off, press the receiver’s front-panel power button. If the light is absent or blinking afterward, troubleshoot receiver power.
- Press and release SAT on the DISH remote.
- Using the TV remote or its controls, press Input or Source. Pause briefly between presses until the DISH picture appears. Choose the input that matches the cable connection, such as HDMI 1 or HDMI 2.
- If the DISH remote does not operate the TV’s power or volume, pair it to the TV using the steps below.
DISH’s replacement-TV setup instructions describe this same-room connection sequence. HDMI is one option, but use the ports and wiring your receiver and TV support.
| # | Preview | Product | Price | |
|---|---|---|---|---|
| 1 |
|
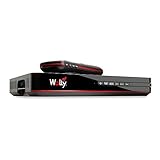
Pace International 1305908409 Dish Network Wally | $40.99 | Buy on Amazon |
| 2 |
|
Dish Wally HD Receiver with 54.0 Voice Remote | $85.00 | Buy on Amazon |
| 3 |

|
Dish Network Solo HD Receiver (Vip211k) (remanufactured) | $84.99 | Buy on Amazon |
| 4 |

|
Dish 211K Receiver HD Single Tuner 211 K Receiver | $84.99 | Buy on Amazon |
As an Amazon Associate I earn from qualifying purchases.
Pair the DISH remote with the TV
Remote menus and button sequences vary by remote and receiver generation. Depending on your model, press HOME twice or MENU once, then open Settings > Remote Control. Choose the TV under Devices and follow the Pairing Wizard. DISH provides model-specific guidance in its remote-control instructions.
Free tools Windows power users keep installed
One-click scans. No signup required.
When the TV and receiver are in different rooms
DISH describes a separate coax-and-TV2 setup for certain replacement-TV arrangements. Connect the coax cable securely from the wall to the TV, turn on the television and any relevant intermediate equipment, check receiver status, and tune the TV to channel 60. If there is no picture, try channel 73 or the channel used with the previous TV. These channel steps apply to the described TV2 arrangement; they are not universal instructions for every receiver or room configuration. See DISH’s replacement-TV instructions for the applicable setup.
#1 Best Overall
- Designed for wall mounting
- RF-remote capable without external antenna
- Works quickly and quietly
Do you need to connect the receiver to the internet?
Not to display the receiver’s picture on the TV: that depends on the receiver-to-TV connection and the correct TV input. Receiver internet access is for receiver features, and the available method depends on the receiver model.
Hopper receivers
DISH describes either a direct Ethernet connection or Wi-Fi setup for Hopper. For Wi-Fi, open Settings > Internet > Wireless Setup, select your network, enter its password, and save. Consult DISH’s Hopper internet instructions for model-specific details.
Rank #2
- SOME ITEMS ARE NEW FACTORY REMAN DISH NETWORK CERTIFIED*
ViP and other receiver families
Do not assume every DISH receiver has built-in Wi-Fi or works with a generic wireless adapter. DISH identifies the Netgear WNDA3100v2 as the supported adapter for compatible ViP receivers; requirements vary by model. Its receiver internet guidance also describes adapter needs for some older Hopper and Wally models. Check the instructions for your receiver before purchasing an adapter.
The Tool Desk
Outbyte Driver Updater FREEFix the driver behind crashes, sound loss and screen glitchesFind Drivers →Outbyte PC Repair FREEClear out junk files and repair common Windows errorsFree Scan →Connect a soundbar without changing the DISH picture setup
Keep the DISH receiver connected to the TV. DISH says most soundbars connect to the TV over HDMI or optical audio:
Rank #3
- Supports one independent HDTV with remote control
- Compatible with Tailgater
- On-screen Caller ID with history (optional)
- View over-the-air SD and HD broadcasts Receiver Off-air local broadcasts in High defintion for free (off-air TV antenna required)
- HDMI ARC: If the TV has an ARC-labeled HDMI port, connect the soundbar there. DISH says HDMI-CEC must be enabled on the TV for ARC.
- Optical: If ARC is unavailable or you are not using HDMI for soundbar audio, connect an optical cable from the soundbar to the TV.
To use the DISH remote for soundbar volume, open Settings > Remote Control > Auxiliary Device > Audio Accessory, run the pairing wizard, and choose the option to control auxiliary-device volume. See DISH’s soundbar setup instructions. Check your equipment’s ports before buying a cable.
Independent reader supportYour contribution helps us test, update, and keep practical guides available for everyone.Fix a missing picture or control problem
The TV shows a black screen
- Confirm that the TV, receiver, and any device between them are powered on.
- Check the receiver’s front-panel status and power it on if needed.
- Make sure the video cable is secure at both ends.
- Press SAT on the DISH remote, then cycle the TV’s Input or Source until you reach the input matching the cable.
The picture works, but DISH remote power or volume does not
Pair the DISH remote to the TV with its Pairing Wizard. The procedure depends on the remote generation.
A different-room TV2 setup has no picture
Check the coax connections and try channel 60, then channel 73. If the arrangement previously used another channel, try that as well.
Recommended Free Tools
The receiver will not join Wi-Fi
Check the receiver model and its network instructions. Hopper Wi-Fi menu steps do not establish that every DISH receiver has built-in Wi-Fi, and ViP adapter support is model-specific.
There is still no picture
For an unresolved TV setup problem, DISH directs customers to the TV manufacturer; contact DISH for additional receiver assistance. Start with DISH support.
Quick Recap
Product prices and availability are accurate as of the date/time indicated and are subject to change. Any price and availability information displayed on Amazon at the time of purchase will apply.




