The Tool Desk
Outbyte PC Repair FREEClear out junk files and repair common Windows errorsFree Scan →Outbyte Driver Updater FREEFix the driver behind crashes, sound loss and screen glitchesFind Drivers →To run a self-hosted app, first choose software that supports a deployment method you can maintain, then match its documented requirements to a home machine or rented server. Follow the app’s own installation guide, configure persistent storage and secure access, and test a backup and restore before relying on it. Docker Compose is a practical single-host option when the project supports it; it does not remove your responsibility for updates, security or recovery.
Choose the app before choosing the server
Start with the job you want the app to do, the people who need access, and the information it will hold. Self-hosting can give you direct control over the machine and its data, but it also makes you responsible for keeping the service configured, updated and available.
As an Amazon Associate I earn from qualifying purchases.
Before selecting hardware or hosting, check the project’s official deployment documentation for:
- Supported operating systems and processor architectures.
- Supported installation methods and required dependencies, including whether the app needs a separate database or other services.
- CPU, memory and storage requirements for the configuration you intend to run.
- Which directories or volumes contain persistent data, including uploaded files.
- How initial administrator access, authentication and secrets are configured.
- How to expose the service safely, update it, back it up and restore it.
Requirements can vary substantially between apps and configurations. For example, Supabase’s current self-hosting guide specifies a minimum of 4 GB RAM, 2 CPU cores and a 40 GB SSD for its full component set, while noting that optional services can be removed to reduce requirements. Those numbers apply to that documented Supabase configuration, not to self-hosted apps generally. Supabase’s self-hosting guide
#1 Best Overall

- Entry-level NAS Personal Storage:UGREEN NAS DH2300 is your first and best NAS made easy. It is designed for beginners who want a simple, private way to store videos, photos and personal files, which is intuitive for users moving from cloud storage or external drives and move away from scattered date across devices. This entry-level NAS 2-bay perfect for personal entertainment, photo storage, and easy data backup (doesn't support Docker or virtual machines).
- Set Your Devices Free, Expand Your Digital World: This unified storage hub supports massive capacity up to 64TB.*Storage drives not included. Stop Deleting, Start Storing. You can store 22 million 3MB images, or 2 million 30MB songs, or 43K 1.5GB movies or 67 million 1MB documents! UGREEN NAS is a better way to free up storage across all your devices such as phones, computers, tablets and also does automatic backups across devices regardless of the operating system—Window, iOS, Android or macOS.
- The Smarter Long-term Way to Store: Unlike cloud storage with recurring monthly fees, a UGREEN NAS enclosure requires only a one-time purchase for long-term use. For example, you only need to pay $459.98 for a NAS, while for cloud storage, you need to pay $719.88 per year, $2,159.64 for 3 years, $3,599.40 for 5 years. You will save $6,738.82 over 10 years with UGREEN NAS! *NAS cost based on DH2300 + 12TB HDD; cloud cost based on 12TB plan (e.g. $59.99/month).
- Blazing Speed, Minimal Power: Equipped with a high-performance processor, 1GbE port, and 4GB RAM on Board, this NAS handles multiple tasks with ease. File transfers reach up to 125MB/s—a 1GB file takes only 8 seconds. Don't let slow clouds hold you back; they often need over 100 seconds for the same task. The difference is clear.
- Let AI Better Organize Your Memories: UGREEN NAS uses AI to tag faces, locations, texts, and objects—so you can effortlessly find any photo by searching for who or what's in it in seconds. It also automatically finds and deletes similar or duplicate photo, backs up live photos and allows you to share them with your friends or family with just one tap. Everything stays effortlessly organized, powered by intelligent tagging and recognition.
Choose a deployment method you can operate
Use the project’s maintained installation path rather than assuming a generic tutorial or a single container will suit every app. For one host, Docker Compose is often a useful fit when the project provides a supported Compose configuration: its YAML file describes services, settings, networks and storage in a repeatable form.
| Method | When it fits | What to check |
|---|---|---|
| Docker Compose | A single host running an app with a supported Compose configuration. | Review image tags, environment variables, published ports, volumes, dependencies and the project’s update instructions. |
| Single Docker container | An app that is genuinely self-contained and has documented container instructions. | Confirm how persistent data and restart behavior work; a separate database or service may still be required. |
| Native binary or service | An operator who prefers installing the application directly on the host. | Follow the app’s instructions for running it as a service, configuring storage and managing upgrades. |
| Kubernetes | An existing cluster or a specific need for cluster orchestration. | Plan for persistent storage, routing and ingress; it adds operational complexity for a straightforward single-host setup. |
| Provider template or graphical panel | A reader who wants less manual setup or command-line work. | Verify what version is installed and how configuration, secrets, updates, backups and recovery are handled. Templates can lag behind upstream releases, and panels may constrain configuration. |
The official Memos deployment documentation illustrates why the app’s own guide matters: it documents Docker, Compose, binary and Kubernetes paths. It advises choosing one installation path, then configuring the external URL and proxy for that deployment. Do not infer that another app offers the same options.
Free tools Windows power users keep installed
One-click scans. No signup required.
Rank #2

- 【Advanced Home Data & Media Hub】For advanced home users who need phone backup, file storage, and centralized data management. Centralize family photos, 4K videos, movies, computer backups, and personal files in one place while running multiple apps for home entertainment and everyday data management. Suitable for households with growing digital libraries and multiple NAS use cases.
- 【Built for Creators, Media Servers & Advanced Apps】Powered by the Intel N100 Quad-Core CPU, 8GB DDR5 RAM, 2.5GbE networking, and dual M.2 NVMe slots, DXP2800 handles large files and heavier workloads with ease. Run Docker, virtual machines, and media server applications compatible with Plex—ideal for content creators, tech enthusiasts, and advanced home users managing 4K videos, RAW photos, personal media libraries, and multiple NAS apps.
- 【Up to 80TB for Growing Digital Libraries】 Supports up to 80TB of storage using two HDD bays and two M.2 NVMe SSD slots for family photos, movies, RAW photos, 4K videos, work files, and device backups. AI photo management supports recognition of people, objects, scenes, and locations, album organization, and duplicate photo detection. HDDs and SSDs are not included.
- 【AI-powered Home Surveillance】Turn DXP2800 into a centralized home surveillance hub by connecting compatible network cameras and storing recordings locally on your NAS. AI-powered features include Face Recognition, People Detection, and Pet Detection, helping advanced home users review important events more efficiently while managing home surveillance and personal data in one place.
- 【One data Center Across Your Devices】Keep files from desktops, laptops, phones, tablets, and other devices together instead of scattered across cloud accounts and external drives. Access, back up, organize, and share data across Windows, macOS, Android, iOS, web browsers, and compatible smart TVs—ideal for creators and advanced home users working across multiple devices.
Choose between a local server and a VPS
A local server uses hardware you supply, such as an existing Linux computer, NAS or Raspberry Pi. A virtual private server (VPS) is rented from a hosting provider. Both still require app administration; the difference is chiefly who supplies the physical machine and how the network connection is provided.
| Consideration | Local server | Rented VPS | Provider template or panel |
|---|---|---|---|
| Hardware | You supply and maintain the machine. | The provider supplies the virtualized host; you still manage the app. | Depends on the host and template. |
| Cost | Hardware and operating costs; the cost depends partly on what you already own. | A recurring hosting charge that varies by provider and resources. | May be included with hosting or charged separately. |
| Network access | Depends on your home router, internet provider, domain and TLS setup. | Public addressing and network access depend on the provider and configuration. | Provisioning may be simplified; verify what networking and TLS are actually configured. |
| Flexibility | High, with responsibility for the whole stack. | Often flexible when the plan provides the needed access; check plan limits. | Setup may be faster, but configuration can be limited or versions may lag. |
| Operational work | Hardware, operating system, app, power, connectivity, backups and updates. | Operating system, app, backups, updates and hosting account. | Some work may be automated; confirm who handles updates, backups and recovery. |
For scale only, TechRadar’s 2026 article estimates a small VPS at $5–$20 per month and one SaaS tool at $20–$60 per month. These are that article’s estimates, not a live quote or independently established market averages; actual prices change, and the comparison excludes operator time, backup storage and local electricity. TechRadar’s 2026 guide
Rank #3
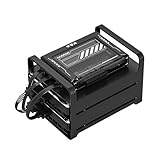
- 【Build Your Own NAS & Homelab — Not Just Storage】 More than a traditional NAS, ZimaBlade 7700 is a flexible x86 mini server for building your own homelab, personal cloud, or Docker host. Perfect for DIY NAS, self-hosting, container apps, and even retro systems — not limited like typical ARM-based NAS devices.
- 【x86 Platform — Broad Compatibility, Real Freedom】 Powered by an Intel quad-core x86 processor, it runs a wide range of operating systems and software with native compatibility. Ideal for Linux, Docker, CasaOS, and more — designed for flexibility and experimentation rather than locked-down appliance use.
- 【16GB RAM for Smooth Multi-Service Workloads】 Handle file sharing, media streaming, backups, and multiple lightweight services at once. Optimized for low-power, always-on operation — a great fit for home labs and personal servers running 24/7.
- 【Smooth 4K Media Streaming — Plex Direct Play Ready】 Stream your personal media library smoothly with Plex and similar media servers. Supports 4K playback on compatible devices via direct play, delivering a reliable home media experience without the need for heavy transcoding.
- 【Complete 2-Bay NAS Kit — Ready to Build】 Includes power supply, 16GB RAM, metal drive cage for 2 HDD/SSD, and dual SATA cables — everything you need to start building your own NAS right out of the box.
A home server also depends on the reliability of your power and internet connection, as well as the router configuration needed for remote access. A VPS avoids maintaining the physical machine at home, but it does not take care of application configuration, data protection or updates for you.
Set it up in a deliberate order
- Define the job and who can reach it. Decide what the app will do, who needs accounts, what data it will store, and whether it must be reachable from outside your home network.
- Read the official deployment and operations guides. Check supported methods, requirements, dependencies, persistence paths, initial setup, upgrade steps, and backup and restore procedures before installing.
- Choose hardware or hosting against those requirements. Account for available storage, memory, network access, power and maintenance effort. Do not assume a small device can run a particular app just because it can run Linux or Docker.
- Install the supported runtime and deployment files. Use the app’s maintained Compose file or official install procedure. Before starting, inspect image tags, exposed ports, environment variables, volumes and dependencies. Replace example passwords and secrets with strong unique values; never leave sample credentials on a public service.
- Configure the app’s external address and HTTPS if it will be public. Set DNS and the external URL as the app’s documentation specifies, then configure TLS at the app or a reverse proxy. Supabase says its default self-hosted setup uses HTTP and recommends HTTPS through a reverse proxy such as Caddy or Nginx for production. Memos likewise documents configuring an external URL and proxy. Ports and forwarded headers vary by app, so follow its specific instructions. Supabase self-hosting instructions · Memos deployment instructions
- Start the service and check its health. Use the project’s status checks and logs. If a component does not become healthy, inspect its logs and configuration rather than assuming the service is ready because the startup command completed.
- Test persistence and recovery. Restart the app and confirm that its database and attachments remain. Make a backup that includes all state the app needs, then test restoring it before treating the installation as dependable.
- Maintain the installation. Track upstream releases, retain configuration and secrets securely, and apply updates using the documented process. For example, Supabase’s update documentation says its Compose snapshots are released approximately monthly and warns that mismatched individual service tags may cause compatibility risks. That schedule and warning are specific to Supabase, not a general update cadence. Supabase Docker documentation
Secure access and protect the data
Limit what you expose
For an Internet-facing app, use HTTPS, strong unique credentials and the app’s authentication settings. Understand which ports are published, and avoid making internal databases or administration services public unless the project specifically requires it and you have secured them. Containerization helps organize deployment, but it is not a guarantee that services are isolated from every risk.
Rank #4
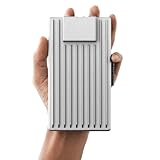
- Server-Class Home Server Built for 24/7 Workloads - Designed as a purpose-built home server rather than general-purpose SBCs, Mini PCs, entry NAS systems, or routing-only devices. As a compact, pocket-sized single board server platform, ZimaBoard 2 832 combines x86 architecture, quad-core performance up to 3.6GHz, 8GB DDR5 memory, and 32GB eMMC storage for reliable always-on home servers, homelabs, and self-hosted workloads.
- PCIe 3.0 x4 Expansion for Real Server Builds - Built as a server-class platform with native PCIe expansion, ZimaBoard 2 features a full PCIe 3.0 x4 slot for high-speed, low-latency upgrades beyond USB-based limitations. Supports 10GbE NICs, NVMe adapters, GPUs, and AI accelerators to build scalable home servers, homelabs, and advanced self-hosted systems—offering greater expansion flexibility than typical SBCs, Mini PCs, and entry-level NAS devices.
- Native Dual SATA & Dual 2.5GbE Networking - Built with server-class storage and networking I/O, ZimaBoard 2 integrates dual SATA ports for direct HDD/SSD connectivity and dual 2.5GbE Ethernet for high-throughput, low-latency networking. This architecture enables reliable DIY NAS, fast storage, routing, and multi-service home server deployments—while avoiding USB-based performance constraints common in ARM SBCs, Raspberry Pi–based setups, Mini PCs, and entry-level NAS devices.
- ZimaOS Preinstalled + Wide OS Compatibility - Comes preinstalled with ZimaOS for a clean, ad-free private cloud experience—centralized file dashboard, automatic backups, P2P downloads, private photo/video sharing, 500+ plug-ins, and secure on-device AI that keeps your data at home. Also supports TrueNAS, Proxmox, Debian, Ubuntu Server, pfSense, OpenWrt, and Linux containers, making it perfect for Plex media servers, Pi-hole, firewalls, backups, Docker labs, home-cloud services, and multi-service deployments.
- All-in-One NAS, Router, Docker & Homelab Server - Replace multiple devices with one low-power, fanless system. ZimaBoard 2 can serve as a NAS, router, Docker host, firewall, media server, or homelab node—delivering a flexible, open alternative to ARM SBCs, Mini PCs, and entry-level NAS systems.
Back up the complete state
A backup must include the data the app needs to recover. Depending on the design, that can mean both a database and uploaded files or separately stored objects. Keep at least one backup copy away from the machine that runs the service, so a failure affecting that machine does not also destroy every copy. Choose backup frequency and retention based on how much data loss you can accept; there is no universal schedule for every app.
Prove that recovery works
A successful first boot does not prove that a backup is complete. Test restoration using the app’s documented procedure and verify that important records and attachments are present. Keep the recovery steps and required configuration available to the person who will need them.
Quick Recap
Best Value

- Pro-Performance NAS Engineered for Demanding Workflows: This NAS is built for offices, businesses, and power users who need serious performance. Powered by a pro-performance Intel processor, it serves as a versatile private workstation that delivers smooth performance for running virtual machines and Docker containers. It functions as an IT hub for video editors, developers, virtualization tasks, and growing teams with advanced workflows
- Pro-Grade Core Hardware Performance: Features the Intel Core i3-1315U Processor (6 Cores, 8 Threads, up to 4.5GHz Turbo), offering a significant performance lead. It's paired with 8GB of high-speed DDR5 RAM (expandable to 96GB) and 13th Gen Intel UHD Graphics for smooth multitasking. Dual high-speed network ports (10GbE + 2.5GbE) enable blazing-fast transfers, reaching up to 1.25GB/s
- Ultimate Flexibility with Docker, VMs & Smart AI: It offers comprehensive support for Docker and Virtual Machines, unlocking endless possibilities to run personal websites, smart home hubs, or private development environments. The local AI-powered Photo Album automatically recognizes faces, scenes, and content. All AI processing happens on-device, ensuring your privacy while managing massive photo libraries effortlessly
- Massive Storage & Intuitive All-in-One System: It supports a colossal 144TB capacity (4x HDD + 2x M.2 SSD), enough for approximately 4.2 million 35MB RAW photos, 3.6K 40GB 4K movies, 5 million 30MB lossless music, or 150 million 1MB files. Dual M.2 PCIe 4.0 SSD slots can be used as a high-speed cache or storage pool to eliminate HDD bottlenecks. The intuitive UGOS Pro operating system integrates a media center, photo management, cloud sync, downloads, and more for a one-stop experience
- Enterprise-Grade Data Security & Privacy: Provides multiple RAID configuration options (0, 1, 5, 10) for flexibility between capacity, speed, and protection. Features granular user permission controls (supporting up to 2048 accounts). The Data Vault offers an extra layer of security by hiding and encrypting sensitive files. Certified for strong privacy and data protection by TV SD (ETSI EN 303 645) and TRUSTe
Product prices and availability are accurate as of the date/time indicated and are subject to change. Any price and availability information displayed on Amazon at the time of purchase will apply.




