Do these 3 things before closing this tab:
1Clear out junk files and repair common Windows errors2Scan for outdated or missing drivers - takes under a minute3Repair Windows errors before they cause bigger problemsSet the server’s scenarioId inside the game object of its JSON configuration. The value is the scenario’s .conf path, prefixed by the scenario GUID in braces, such as {ECC61978EDCC2B5A}Missions/23_Campaign.conf. A Workshop scenario also requires its mod entry in game.mods before the server can load it. Start the server with -config your-file.json; the -server parameter does not read that configuration file.
Godlike.Host offers hosted Arma Reforger servers with its own game panel, SFTP access and free DDoS protection, if you would rather not host it yourself.
What you are changing
Arma Reforger selects the mission scenario during server startup. The setting is not a separate mission-rotation menu: it is the scenarioId property in the game block of the server’s JSON configuration. The value must identify a scenario configuration file and include its GUID in braces.
As an Amazon Associate I earn from qualifying purchases.
PC Slower Than It Used to Be?
A free scan shows the junk files, broken settings and background clutter dragging Windows down - then fixes them in one click.Free scan · Windows 10 & 11Outdated Drivers Are Slowing You Down
One free scan finds every outdated or missing driver and matches the right update for your exact hardware.Free scan · exact hardware matchAn official example for Conflict on Everon is:
"scenarioId": "{ECC61978EDCC2B5A}Missions/23_Campaign.conf"The path is case-sensitive in practice. Do not substitute a map name, a display title, a Steam Workshop number, or a folder called Scenarios unless your own server’s scenario listing explicitly reports that value. Reforger’s current format uses a GUID-prefixed Missions/… .conf path.
Before you edit the file
- Have access to the dedicated server’s startup command or hosting-panel launch options.
- Know where the panel or installation stores the JSON file passed to
-config. Guides use names such asconfig.jsonandserverconfig.json, while a hosting panel may rename the file. The filename itself is not what selects the mission; the argument after-configdoes. - Back up the current JSON before changing it. A missing comma or brace prevents the server from parsing the file.
- For a Workshop scenario, identify the scenario mod’s 16-character hexadecimal
modIdand the exact scenario path shown by your server version.
Find the exact scenario path with -listScenarios
Do not guess the path. Reforger builds and Workshop content can change the available entries, and published wiki revisions do not show an identical list. One official copy lists 31 entries while another lists nine, so the authoritative list for your installation is the one printed by your own server.
#1 Best Overall

- System: Intel Core i5-13400F 2.5GHz 10 Cores | Intel B760 Chipset | 16GB DDR5 | 1TB PCIe 4.0 NVMe SSD | Windows 11 Home
- Graphics: NVIDIA GeForce RTX 5060 8GB Graphics | 1x HDMI | 2x DisplayPort
- Connectivity: 1 x USB-C 3.2 | 2 x USB-A 3.2 | 6 x USB-A 2.0 | 1 x LAN | WiFi 6 | Bluetooth 5.3 | 7.1 Channel Audio
- Tempered Side Case Panel | Custom RGB Lighting | Keyboard and Mouse
- 1 Year Parts & Labor Warranty, Free Lifetime Tech Support
- Temporarily launch the dedicated server with the
-listScenariosstartup parameter. - Open the server log produced by that launch. The parameter prints the scenarios available to that build and their complete paths.
- Copy the desired value exactly, including braces, capital letters, the slash, and the
.confextension. - Save the copied value somewhere safe before changing the normal startup command.
Workshop scenarios have an important exception: they appear in the -listScenarios output only when no scenario is being loaded through a configuration file. If an existing JSON already sets scenarioId, remove or temporarily rename that setting, run the listing, and then restore the configuration after you have copied the path.
Reading a listed entry
A listed value normally has this shape:
{SCENARIO-GUID}Missions/ScenarioName.confThe text in braces is the scenario GUID, not a human-readable title. The portion after the braces is the path inside the game or mod. Use the complete string as one value; do not add another pair of braces or prepend a filesystem directory.
Set a built-in scenario
Open the JSON file passed to the server’s -config argument and place scenarioId inside game. A minimal configuration fragment looks like this:
Rank #2

- Legend perfected: Modern design with a matte basalt black finish in an optimized chassis with customizable AlienFX lighting zones, including the striking stadium lighting.
- Game changing graphics: Step into the future of gaming and creation with the NVIDIA GeForce RTX 5070 graphics, powered by NVIDIA Blackwell architecture.
- Marathon gaming unlocked: This high-performance technology ensures clean energy is consistently available, unleashing the top-level power of Intel Core Ultra 7 265F processor as you game, livestream, and multi-task for hours on end.
- Total command: Alienware Command Center software allows you to create and edit AlienFX lighting across the ecosystem, choose and monitor your performance mode across distinct power states, and create custom gaming profiles for your whole library.
- Dell Services: 1 Year Onsite Service provides support when and where you need it. Dell will come to your home, office, or location of choice, if an issue covered by Limited Hardware Warranty cannot be resolved remotely.
{
  "game": {
    "scenarioId": "{ECC61978EDCC2B5A}Missions/23_Campaign.conf"
  }
}
If your existing file contains other game settings, add the property without deleting them. Put a comma after the preceding property when JSON requires one, and do not add a comma after the final property in an object. Keep the GUID-prefixed path on one line unless your editor is only wrapping it visually.
Check the JSON structure
scenarioIdis nested undergame, not at the top level.- The value is a JSON string in double quotation marks.
- The GUID is enclosed in literal curly braces.
- The path ends in
.conf. - There is only one
scenarioIdproperty. Duplicate keys can produce unpredictable results depending on the parser.
Add a Workshop scenario
A Workshop scenario is delivered as a mod. The server must know about that mod in game.mods and must be given the scenario’s own .conf path. Installing or subscribing to content on a client does not, by itself, make it available to a dedicated server.
1. Obtain the mod ID and scenario path
Use one of the following authoritative locations for the content you are deploying:
Rank #3
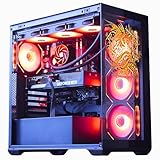
- System: Core i9 Unlocked OC CPU | Premium Chipset | 64GB Ram (Twice the high end average of 32GB in other systems) | 5TB Storage Total: 1TB M.2 NVMe up to 7000MB/s speeds SSD + 4TB 7200RPM HDD (Ultra Fast Storage), Extra M.2 NVME and HDD Port for additional Storage | Windows 11 PRO preinstalled for Advanced security and device control.
- Graphics: NVIDIA GeForce RTX 5070 OC 12GB | Factory overclocked for higher and more consistent frame rates | Real-time ray tracing for realistic lighting and reflections | DLSS 4.0 support for smoother performance at higher resolutions | Improved efficiency and lower power draw | Stronger support for multi-monitor setups with 1x HDMI and 3x DisplayPort | Better stability for long gaming sessions and GPU-accelerated tasks | VR and AI Deeplearning Ready
- Cooling & Design: 360mm Liquid Cooling | Intelligently controlled Fan Speeds for whisper quiet performance | ARGB Lighting (Software Control for thousands of options) | Dragon Front Panel | Total of 11 Fans (3 on GPU, 1 on Power supply, 8 on Overall temperature control)
- Connectivity: 1 x USB-C 3.2 | 8 x USB 3 |1 x LAN / Ethernet up to 2.5GB/s | WiFi up to 2.4GB/s | Bluetooth Enabled | Game and VR Ready | 850W 80+ GOLD Power Supply With x6 Extra SATA Connectors
- Build Quality & Support: Premium components chosen for long-term reliability | Thorough quality testing before shipment | 3-year parts warranty and 5-year labor warranty | Access to specialists with over 20 years of experience for hardware, software, and performance support | Quiet and dependable operation for everyday and extended use || As of August 17, 2026, all firmware and software components are fully updated before shipment. Fast, free 10 minute firmware update assistance is now available through our support team (Note: Firmware only needs to be updated once every 2-3 years)
- The scenario’s page in the Reforger Workshop, where the mod identifier is shown.
- Workbench project information.
- The mod’s
.gprojfile. - Your server’s
-listScenariosoutput after the mod is available to the server.
The modId is a 16-character hexadecimal GUID-style identifier, for example ECC61978EDCC2B5A. The mod ID and the GUID at the beginning of a scenario path are related identifiers but should not be assumed to be interchangeable. Copy each value from the source that supplies it.
2. Add the mod to game.mods
Each mod entry requires modId. The configuration also permits optional name, version, and required fields. A representative structure is:
{
  "game": {
    "scenarioId": "{SCENARIO-GUID}Missions/ScenarioName.conf",
    "mods": [
      {
        "modId": "0123456789ABCDEF",
        "name": "Scenario mod",
        "version": "1.0.0",
        "required": true
      }
    ]
  }
}
Replace the example identifiers and version with the values for the actual Workshop item. The name is descriptive; the ID is what identifies the mod. If the publisher does not specify a version, do not invent one—omit the optional version property or use the exact value exposed by your server’s mod information.
Rank #4

- Dress in style for duty on Everon. Built to answer the call of military service and survive arma for days at a time, so take a day off the battlefield duty and dress to impress your squad with our low weight but high cool reforger inspired army design.
- Compatible with all versions of arma so PC gamers and console players can spend dayz in reforger gaming in comfort and style on Everon. A great gamer gift for any military army simulator player.
- Lightweight, Classic fit, Double-needle sleeve and bottom hem
3. Decide whether the mod is required
Set required to true when every connecting server must obtain the scenario mod. If required is false and the mod cannot be downloaded from the Workshop, the server removes that addon from the list and writes a warning to the log. That setting can let a server start without an unavailable optional addon, but it does not make a scenario playable when the scenario itself depends on that addon.
Quick wins for a faster PC:
Repair Windows errors before they cause bigger problemsFix Now →Scan for outdated or missing drivers - takes under a minuteDriver Scan →Clear out junk files and repair common Windows errorsFree Scan →Start the server with the edited configuration
- Stop the running server cleanly so it does not overwrite or lock the file while you edit it.
- Save the JSON with the same filename and location referenced by the startup command.
- Launch the dedicated server with
-config <your-file>.json. For example, the argument is conceptually-config serverconfig.jsonwhen that is the file you selected. - Do not rely on
-serverto load the file. The documented behavior is that-serverignores the configuration file; include-configexplicitly. - Watch the startup log for JSON parsing errors, mod download messages, and the scenario-loading line before attempting to join.
Do not put a full operating-system path into scenarioId. That property identifies content inside Reforger, while -config identifies the JSON file on the host.
Verify that the scenario loaded
Verification has two parts: the server log and an actual connection.
Best Value

- System: Intel Core Ultra 5 225F 3.3GHz 10 Cores | Intel B860 Chipset | 16GB DDR5 | 1TB PCIe 4.0 NVMe SSD | Windows 11 Home
- Graphics: NVIDIA GeForce RTX 5050 8GB Graphics | 1x HDMI | 2x DisplayPort
- Connectivity: 5 x USB-A 3.2 | 2 x USB-A 2.0 | 1 x LAN | WiFi 6 | Bluetooth 5.3 | 7.1 Channel Audio
- Tempered Side Case Panel | Custom RGB Lighting | Keyboard and Mouse
- 1 Year Parts & Labor Warranty, Free Lifetime Tech Support
Check the startup log
- There should be no malformed-JSON or unknown-property error that causes the game block to be ignored.
- For Workshop content, confirm that the mod is discovered or downloaded before the scenario initialization message.
- Confirm that the loaded scenario path matches the exact GUID-prefixed value you entered, rather than only checking the display name.
Join as a client
- Connect to the server after startup has completed.
- Confirm that the expected terrain, rules, and objectives appear. A familiar map name alone is not proof that the intended scenario loaded, because several scenarios can use the same terrain.
- If the client is asked to download a required mod, allow that process to finish and reconnect if the game requests it.
Changing the scenario later
To change missions, stop the server, replace the existing scenarioId with the new complete path, adjust game.mods if the new scenario needs different Workshop content, and restart with the same -config argument. Leaving the old scenario mod in the list may cause an unnecessary download; removing a mod that the new scenario requires causes initialization or connection failures.
Only one scenario can be defined per server. As of the official documentation for version 0.9.8, mission rotation was not supported. Do not create multiple scenarioId entries or expect the server to cycle through an array of missions. Run separate server instances, or change the single value between restarts, when you need different scenarios at different times.
Recommended Free Tools
Configuration reference
| Setting or parameter | Where it is used | What to enter | Important qualification |
|---|---|---|---|
scenarioId |
Inside the game object |
GUID in braces followed by the exact Missions/Name.conf path |
Use the path printed by your own build’s -listScenarios output. |
mods |
Inside the game object |
An array of mod objects | Required for Workshop scenarios; each object uses a 16-character hexadecimal modId. |
required |
Inside a mod object | true or false |
When false, an undownloadable addon is removed and a warning is logged. |
-listScenarios |
Startup parameter | No JSON value; add it to the launch command | Workshop entries are listed only when no scenario is being loaded through a config. |
-config |
Startup parameter | The path or filename of your JSON file | This is what tells the server which configuration to load. |
-server |
Startup parameter | Do not use it as a substitute for -config |
The documented behavior is that it ignores the config file. |
Troubleshooting
The server starts, but the old scenario still loads
- Check the startup command and confirm that
-configpoints to the file you edited. - Look for a second JSON file maintained by the hosting panel. Panels can rename files or generate a configuration at launch.
- Search the active file for duplicate
scenarioIdproperties and remove all but the intended one. - Make sure you restarted the process after saving; changing a file while the server is running does not change the already-loaded mission.
The server reports a JSON or game-block error
- Validate commas, braces, quotation marks, and array brackets.
- Ensure
scenarioIdis insidegame. - Remove comments from the JSON. Standard JSON does not accept
//or/* … */comments. - Restore the backup and add one change at a time to identify the malformed section.
The scenario does not appear in -listScenarios
- Run the listing without an active
scenarioIdin the configuration; a configured scenario suppresses Workshop entries in the list. - Confirm that the server, not just a client, has access to the Workshop mod.
- Check the server log for a failed download or an invalid
modId. - Verify that the mod is a Reforger Workshop item. Numeric Steam Workshop IDs and paths copied from unrelated hosting guides do not match the official Reforger GUID-prefixed format.
The server cannot download the mod
- Recheck the 16-character hexadecimal
modIdfor missing or transposed characters. - Use the exact version exposed by the mod or omit the optional version rather than entering an invented value.
- Inspect whether
requiredis false. In that case the server may remove the addon and continue with a warning; the scenario can still fail if the addon is essential. - After correcting the entry, restart and watch for a successful download before joining.
Clients cannot join after the scenario loads
- Compare the client’s requested addon with the server’s
game.modslist. - Make sure every required Workshop mod is available at the server and that the scenario path belongs to the same content version.
- Read the client and server logs for a missing dependency rather than changing the GUID blindly.
A familiar third-party guide uses server.json, numeric IDs, or Scenarios/
Those instructions describe a different configuration convention and conflict with the official Reforger server configuration format. Treat the guide’s filename as a hosting-panel detail only if its launch command confirms it, and use your own -listScenarios output for the path. The reliable format for this procedure is a GUID-prefixed Missions/… .conf value in game.scenarioId, with Workshop mods declared in game.mods.
Version and documentation caveats
Scenario catalogs and Workshop identifiers change as the game and mods are updated. Two revisions of the official community wiki currently show different numbers of built-in scenario entries, and a universal 2026 scenario list is therefore not safe to copy. Always regenerate the list with the server binary you are actually running.
The official documentation reviewed for this procedure confirms the GUID-prefixed path, the game.mods structure, the -listScenarios and -config parameters, and the one-scenario limitation documented for version 0.9.8. It does not establish a universal default filename for every host. Your launch command and hosting panel determine that filename.
Quick Recap
Quick deployment checklist
- Back up the active JSON file.
- Run
-listScenarioswith no scenario selected through a config. - Copy the exact GUID-prefixed
.confpath. - For Workshop content, copy the mod’s 16-character hexadecimal
modId. - Place
scenarioIdundergame. - Add the Workshop mod object to
game.mods, includingrequiredonly when you have a deliberate choice. - Launch with
-configpointing to the edited file; do not substitute-server. - Read the startup log, then join and confirm the objectives and terrain.
- Remember that one server supports one scenario at a time; change the value and restart to switch.
Product prices and availability are accurate as of the date/time indicated and are subject to change. Any price and availability information displayed on Amazon at the time of purchase will apply.




