Quick wins for a faster PC:
Scan for outdated or missing drivers - takes under a minuteDriver Scan →Clear out junk files and repair common Windows errorsFree Scan →To activate a BM-800 condenser microphone on a computer, first identify which connector your bundle uses. The ZINGYOU BM800 manual describes a 3.5 mm plug going into the computer’s microphone input. After connecting, you select the microphone as the recording device in your operating system’s sound settings. If your bundle has an XLR output instead, the microphone needs a USB audio interface with an XLR microphone input, and that interface may need to supply phantom power.
The BM-800 name covers more than one bundle, and the model name alone does not tell you the cable, connector, or power arrangement. Check the box and manual that came with your unit before you plug anything in, and treat the steps below as a map of the possible routes rather than a single fixed procedure.
As an Amazon Associate I earn from qualifying purchases.
Identify your BM-800 connection before you connect
Look at the end of the cable that attaches to the microphone body, then at the end that goes to your computer. Those two ends decide which route applies. The table below sets out the three arrangements that matter for a computer setup.
| Microphone-end connector | Computer-end connector | What the sources establish | Route to use |
|---|---|---|---|
| 3.5 mm plug | Computer microphone input (or a combined headphone/mic jack) | The ZINGYOU BM800 manual describes plugging the 3.5 mm plug into the computer’s microphone input. A combined jack may need an adapter; the manual does not address this for every computer. | Route 1 |
| XLR | USB audio interface with an XLR microphone input, then USB to the computer | Shure’s general guidance for condenser microphones states that “All condenser microphones require phantom power to operate.” Power requirements for each BM-800 bundle are not stated in the sources reviewed. | Route 2 |
| Bundle with a USB connection on the microphone | Computer USB port | Not stated in the sources reviewed. Follow the manual that came with this bundle. | Use the bundle’s own manual |
If your microphone uses a 3.5 mm plug and your MacBook or laptop has a single combined headphone/mic jack, check the plug. A combined jack generally expects a four-conductor (TRRS) plug, while many microphone plugs have three conductors. In that case a compatible adapter or a USB audio adapter is the usual fix, and the manual’s own steps assume a dedicated microphone input.
#1 Best Overall

- 【Design& Protection】: The microphone features a metal double-layer spring net design that serves both to protect the device and enhance recording quality by dampening vibrations and external noise.
- 【Robust Interface】: Utilizing an XLR interface made from alloy materials, it ensures reliable and strong connections that are resistant to wear. This offers consistent sound signal transmission important for professional audio applications.
- 【Ease of Use】: The USB microphone is user-friendly, designed for simple plug-and-play operation when connected to a computer. This feature allows for immediate recognition by the PC without the need for additional software installation.
- 【Versatile】: Ideal for various uses such as gaming, live broadcasting, digital recording, and meetings, the USB microphone delivers clear and durable vocal performances, ensuring high-quality audio across different settings.
- 【Noise Reduction】: Equipped with a double-layer filter, the computer microphone effectively minimizes breath sounds and background noise. This enhancement allows for clearer and more focused audio capture, making it suitable for professional broadcasting and recording.
Route 1: connect a 3.5 mm microphone
- Plug the 3.5 mm connector into the computer’s microphone input. On a desktop or laptop with separate headphone and microphone sockets, use the microphone socket, which is usually marked with a microphone icon. On a combined jack, use a compatible adapter as described above.
- Open the recording-device settings. In Windows 11, go to Settings > System > Sound > Input and choose the connected microphone under the input device list. In Windows 10, use Settings > System > Sound and pick the input device there. On current macOS releases, go to System Settings > Sound > Input and select the microphone. The ZINGYOU manual uses older interface labels, so the exact wording on your system may differ.
- Speak and watch the input meter. Talk at your normal distance from the microphone. The level bar in the same settings panel should move. If it does not, go to the troubleshooting list below before changing anything else.
- Adjust the input level gradually. Raise the input volume slider in small steps until your voice sits comfortably on the meter without hitting the top.
Route 2: connect an XLR microphone through a USB audio interface
An XLR microphone has no built-in USB or 3.5 mm output, so it needs an interface that converts its signal for the computer. Use an interface with an XLR microphone input and USB connection to your computer. Check the interface’s documentation for its phantom power control and maximum gain before you start.
- Turn the interface’s gain fully down. Set the gain control to its lowest position before making any connection.
- Connect the XLR cable. Plug the microphone’s XLR cable into the interface’s XLR microphone input, not a line or instrument input.
- Connect the interface to the computer over USB. Once the computer recognises the interface, choose it as the input device using the same settings path as Route 1, for example System Settings > Sound > Input on macOS.
- Enable 48V phantom power only if your BM-800 bundle requires it. Shure’s guidance for condenser microphones treats phantom power as required for condenser operation, but whether your specific bundle needs it is a question for its manual. Turn on the interface’s 48V switch only after the microphone is connected.
- Raise the gain while speaking. Increase the gain in small steps until the input meter shows a clear, steady signal. Avoid pushing it so high that the meter reaches the top, since that can add noise or clip the sound.
Focusrite’s general guidance for its interfaces follows the same order: connect the microphone, turn the gain down, enable 48V when the microphone requires it, then raise the gain. When you finish, reverse the order. Turn the gain down and switch 48V off before you unplug the microphone. Focusrite’s support article says this avoids pops and bangs.
Rank #2

- Professional Sound Chip : This Condenser Microphone boasts a professional sound chipset for high-resolution sampling rates. With a smooth frequency response of 30Hz-16kHz, it is perfect for vocals, podcasts, and voiceovers.
- Plug And Play & Wide Compatibility:This USB microphone is easy to connect to your computer with its USB 2.0 data port, no extra driver needed. With a 192kHz/24bit sampling rate, it ensures high-quality sound reproduction for podcasts, live streams, and video calls.
- Sturdy Boom Arm Set:This condenser mic comes with a pop filter, foam windscreen, and shock mount for clear and stable recording. Suitable for video voiceovers, podcasts, Skype conferences, and more.
- Featuring a Cardioid Pickup Pattern:the microphone effectively captures pristine and accurate sound. The built-in soundproof cotton reduces unnecessary noise, providing a clear and high-quality audio experience for the user
- Complete USB microphone kit :comes with all premium accessories in one package, including a USB condenser microphone, extended boom arm, metal shock mount, desk clamp, pop filter, mic cover,USB cable, and manual.
Troubleshooting no sound or a weak signal
- The microphone is not selected. Check that the computer’s recording input is the BM-800 (or the interface) and not the built-in microphone or another device. The ZINGYOU manual recommends this check first.
- The cable or port is loose or faulty. Reseat the cable at both the microphone and the computer. Try another USB or microphone port. The ZINGYOU manual also suggests restarting the computer.
- The interface is set up incorrectly. On an XLR route, confirm the cable is in an XLR microphone input and that the interface is powered and recognised by the computer. Check phantom power against the microphone’s requirements.
- The gain is too low. Increase gain gradually, watching the meter. Do not treat boost as a universal fix; a faulty connection or wrong input selection will not be solved by more gain.
- The signal is noisy or distorted. Reduce gain. Excessive gain can bring up background noise or cause clipping.
- Nothing works after checks. Test the microphone and cable with equipment you know is compatible, or contact the seller or manufacturer for the bundle’s documented connection and power details.
What to compare when you need a different connection
If your bundle does not match your computer, or you need an added connection, compare candidate hardware on these points:
- Connector compatibility: whether the adapter or interface accepts your microphone’s plug or XLR output and your computer’s port.
- XLR microphone input: required for an XLR-output microphone.
- Power supply: whether the device supplies the power your exact microphone needs. The sources reviewed do not state this for every BM-800 bundle.
- Computer and OS support: whether the device is compatible with your Windows or macOS release.
- Gain and monitoring controls: whether you can set input level and listen to your own voice.
If your 3.5 mm or USB setup already works, you do not need an interface. Keep the existing connection and adjust settings.
Quick Recap
Best Value

- 🔥【Professional Podcast Equipment Bundle】- The Podcast Equipment Bundle is equipped with BM-800 microphone, V8S sound card, Shock mount, Pop filter, Mic adjustable suspension scissor arm stand, Anti-wind foam Cap, Power cable. This professional studio equipment was designed for podcasting, streaming and recording music and short video. What you get is a complete set of professional podcast equipment bundle. One set can meet all your needs and you don’t need to buy other equipment again.
- 🔥【Rich sound effects & 4 Voice-changing】-- The audio interface mixer has 4 sound variations(Female、Male、Child and Monster)and can produce 10 sound effects.These sound effects add more fun to your live streaming.In addition, the podcast mixer has 4 sound modes,13 functions.It contains almost all of the commonly used functions,which is designed for recording,podcasting,live streaming,ect.
- 🔥【Metal Condenser Microphone & Excellent Sound Quality】- The condenser microphone bundle has been designed with latest professional sound chipset, condenser microphone used the Metal material,Podcast Microphone is 24bit/192kHz bit sample rate, so your recordings will be crystal clear.The cardioid pickup pattern offers pristine and accurate capture, which is more suitable for recording podcasts, vocals and voice works.
- 🔥【Plug and Play & Easy To Use】- This V8S sound card with multiple sound effects can be used on any mobile phone, computer, and Any game platform. No need extra driver software. You can connect to different devices (computer/ mobile phone/ laptop) by using different connection methods. You can even connect with two mobile phones to livestream on both streaming platforms at the same time. The podcast equipment bundle will bring more fun to you and make your recording more creative.
- 🔥【High Compatibility】- The podcast equipment bundle is not only fully compatible with most mainstream operating systems such as Windows and Mac OS, but also compatible with smartphones (Android and IOS), even connect to two mobile phones to livestream on both streaming platforms at the same time. It meets the use of all scenarios: Gaming, Live Streaming, Podcasting, Voice Over, Recording Music, Live and Sing, take video on TikTok, YouTube, etc.
Rank #4
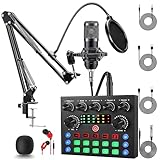
- Professional Podcast Equipment Bundle: The Podcast Equipment Bundle is Equiped with BM-800 Podcast Microphone, DJ Mixer, Microphone Boom Arms, Shock Holders, Pop Filters, Foam Covers, etc. Zero extra purchases needed. Ideal for voice over starter!
- Versatile Sound Effects: The audio interface mixer supports 10 rich sound effects, including reverb, treble, bass and noise reduction, as well as 4 unique voice changes (female, male, child and monster), adding variety and creativity to your broadcasts. With four voice modes and 13 practical functions, can easily master this kit and enjoy a professional-grade streaming experience
- Excellent Sound Quality(Cardioid pickup technology): Elevate your audio with our podcast equipment bundle, featuring advanced noise reduction and cardioid pickup technology. The dual-layer POP filter and windproof foam cap minimize background noise, the built-in Audio Interface Mixer's DSP chip delivers studio-quality sound
- Universal Gaming & Podcast Equipment Compatibility: The Audio Interface Mixer works flawlessly across devices-PCs, smartphones, Xbox and systems like Windows, Mac OS, iOS, and Android. Whether for gaming equipment or podcasting, this bundle adapts to any scenario for gaming streamers, musicians, and outdoor creators
- User-Friendly Podcast Equipment: Designed for beginners and pros alike, this podcast equipment bundle includes everything you need! For first-time use or after long storage, fully charge the device
Rank #3

- Great Podcast Equipment Bundle - The Podcast Equipment Bundle is equipped with black BM-800 microphone, Mic adjustable suspension scissor arm stand, Shock Mount, Pop filter, Anti-wind foam Cap, Power cable, V8 sound card. This recording studio package was designed for podcasting, streaming and recording music and short video. What you get is a complete set of podcast microphone bundle.
- Excellent Sound Quality - The condenser microphone bundle has been designed with 2021 professional sound chipset, ensuring your voice is captured in high detail. The cardioid pickup pattern is more suitable for recording podcasts, vocals and other voice works. The condenser microphone records the sound source in front of the microphone directly and provides a rich, mellow sound.
- High Compatibility Podcast Kit - The recording studio equipment can be used in most mainstream operating systems such as Windows and Mac OS, in addition, the voice changer is compatible with smartphones (Android and IOS). This audio interface can be used on any mobile phone, computer, tablet iPad, PS4, Xbox, Switch and any game platform.
- Functional Recording Studio Package - This voice changer has multiple sound effects. You can connect to different devices (computer/ mobile phone/ laptop) by using different connection methods. Change your voice anytime, anywhere, call with friends, chat on for WeChat, live and sing, take video on TikTok, Youtube, etc. The podcast equipment bundle will bring more fun to you and make your recording more creative.
- Please Pay Attentigon - After you get the studio microphone bundle, please charge it first. We are a company dedicated to the research and development of podcast kit, if you have any questions in the process of use, please contact us in time, we will solve any problems for you within 12 hours.
Product prices and availability are accurate as of the date/time indicated and are subject to change. Any price and availability information displayed on Amazon at the time of purchase will apply.




