Do these 3 things before closing this tab:
1Clear out junk files and repair common Windows errors2Scan for outdated or missing drivers - takes under a minute3Repair Windows errors before they cause bigger problemsIf your PC stopped booting after a RAM overclock, clear CMOS using the procedure for your exact motherboard model. Then enter BIOS, load its default settings, and save before trying memory settings again. Do not guess which pins to short: boards use different methods and layouts.
Find your motherboard’s exact CMOS reset procedure
Look up the motherboard’s full model name and open its manufacturer manual. Find the clear-CMOS instructions and the diagram showing the button, header pins, or battery location. ASUS specifically advises checking the manual to determine whether a board uses a CLRTC pin or a clear-CMOS button; the procedure is not universal. ASUS’s CMOS reset guidance describes the available methods, but your model’s manual should determine which one to use.
As an Amazon Associate I earn from qualifying purchases.
Clear CMOS using only the documented method
- Shut down the PC. Follow the manual’s power-off precautions. Before handling pins, turn the computer off and unplug its power cord if the manual instructs you to do so. GIGABYTE’s manual, for example, says to turn off the computer and unplug the cord before clearing CMOS.
- Use the method specified for your board. Depending on the model, this may be a clear-CMOS button, a header shorted with a jumper or an allowed tool, or battery removal. Do not short unidentified pins or substitute one method for another.
- Follow the board’s exact hold or wait instructions. The required action and duration vary. MSI’s battery-reset instructions specify waiting 3–5 minutes for that particular procedure; that timing is not a general rule for other boards.
- Restore power and start the PC. A CMOS reset can restore BIOS defaults after instability from memory overclock settings, but it does not guarantee that the computer will POST.
Load BIOS defaults before changing memory settings
When the system starts, enter BIOS using the prompt or the key specified by the motherboard maker. Load the BIOS’s optimized or default settings, then save and exit. ASUS also advises setting the date and time if needed. Memory overclock settings such as XMP or EXPO may need to be enabled again later; first confirm the PC starts reliably at defaults.
Quick wins for a faster PC:
Repair Windows errors before they cause bigger problemsFix Now →Scan for outdated or missing drivers - takes under a minuteDriver Scan →If the DRAM fault remains
Use diagnostics documented for your exact motherboard rather than repeating an uncertain reset procedure. MSI suggests testing one memory stick at a time in the recommended slot or slots and checking CPU socket pins. Flash BIOS is another possible step only if the board supports it and its manufacturer provides instructions for the model. A continuing DRAM fault may need diagnosis beyond clearing CMOS.
#1 Best Overall

- [COMPATIBILITY] This PC power switch cable is designed to replace your existing PC power switch and RESET restart switch cables, ensuring seamless compatibility with most ATX chassis setups. The 2Pin connector works flawlessly with standard motherboard power headers.
- [EASE OF USE] Enjoy plug-and-play functionality with no drivers required. The 50cm red and black wires provide ample length for tidy cable management within your PC case, making installation straightforward even for beginners.
- [DURABLE CONSTRUCTION] Built with high-quality ABS material and strict quality control standards, this jumper switch offers enhanced durability for long-term reliability. The robust design withstands frequent use as both a power and reset switch.
- [VERSATILE APPLICATION] Perfect for ATX chassis systems, this switch serves dual functions as both an instantaneous reset cable and restart switch cable. The compact design fits comfortably in most PC case configurations.
- [UPGRADE SOLUTION] Ideal for replacing worn-out or malfunctioning power switches on your desktop PC. The simple 2Pin connection works with most modern motherboards, providing a cost-effective solution for power switch issues.
There is no universal memory-training duration, restart count, or guaranteed boot outcome established for every motherboard after a reset. Follow model-specific guidance if startup does not proceed.
Quick Recap
Rank #4
- Essential Features: The 2-pin ATX computer chassis power button is designed as a contact type power switch cable, effectively replacing your PC's power switch and RESET reset switch cable. Built to strict quality control standards, ensures greater durability.
- User-friendly Design This jumper switch connects perfectly to a 2-pin motherboard power switch and does not require additional drivers. It is a plug-and-play solution for hassle-free installation, making it ideal for both beginners and experienced enthusiasts.
- Flexible cabling: With two 50cm cables in red and black, this power button cable allows for easy arrangement within any ATX chassis. You can effortlessly route cables to match your PC's specific configuration for optimized appearance and functionality.
- Wide Applications Designed specifically for ATX chassis, this instant reset switch cable and reset switch cable are versatile enough for a variety of applications, ensuring reliable operation for a wide of computer builds.
- Quality assurance: Rigorously tested for durability and performance, this product is your ideal choice for reliable PC power management. With strict quality controls, you can trust that this jumper switch will withstand daily use without fail.
Rank #3

- 2 pin jumper pc power pc start button Essential Features: The 2Pin ATX Computer Chassis Power Button is designed as a contact type power switch cable, effectively replacing your PC power switch and RESET restart switch cable. Built to stringent quality control standards, it guarantees enhanced durability.
- 2 pin jumper pc power pc start button Flexible Wiring: Featuring dual 50cm wires in red and black, this power button cable allows for easy layout within any ATX chassis. You can effortlessly route the cables to match your specific PC setup for an optimized look and functionality.
- 2 pin jumper pc power pc start button User-Friendly Design: This jumper switch perfectly connects to a 2Pin mainboard power switch, requiring no additional drivers. It’s a plug-and-play solution for hassle-free installation, making it ideal for both beginners and experienced enthusiasts.
- 2 pin jumper pc power pc start button Wide Applications: Designed specifically for ATX chassis, this instantaneous reset switch cable and restart switch cable are versatile enough for a variety of applications, ensuring reliable operation for a broad range of computer builds.
- 2 pin jumper pc power pc start button Quality Assurance: Rigorously tested for durability and performance, this product is your go-to choice for reliable PC power management. With stringent quality checks, you can trust that this jumper switch will withstand daily usage without failure.
Rank #2
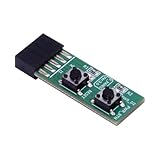
- 10Pin Motherboards Testing Board Switching Board With Builts In Reboots Functionality for Frequently Power Switching.
- Elevates your PC building and maintenance experience with our 10Pin Motherboards Switching Tester Board, featuring a convenient button for seamlessly testing.
- 2x5pin(Empty Pin10) standard design for desktop PC.
- Support XP,Win7, Win8, Win10, Win11 or so on.2x5Pin to Resets Button+Power Power Button Switching Board Adapter with HDD LED for Desktop PC for WIN7/10/11
- This adapter card is widely used for frequently power switching testing without chassis.
Product prices and availability are accurate as of the date/time indicated and are subject to change. Any price and availability information displayed on Amazon at the time of purchase will apply.
Independent reader supportYour contribution helps us test, update, and keep practical guides available for everyone.



