There is no single Halide preset that works best for every photo. For more editing latitude, enable RAW and plan to develop the DNG; for easier sharing, keep a rendered companion. Choose an exposure priority based on what you need to control, and treat focus peaking as a guide—not proof that the subject is in focus. The controls available depend on your Halide version and iPhone: Halide 3.2’s Aperture Priority, for example, is limited to iPhone 18 Pro.
Best Halide settings for RAW photos: start with the result you want
RAW is most useful when you expect to make development choices after capture, such as adjusting exposure, contrast, or color. Halide saves RAW as DNG, but a DNG is not a finished-looking image on its own: software has to render the sensor data for display. Halide describes its Photo Lab as a streamlined developer, with Quick Edit, Exposure, Film, and Balance panes—not a full-fledged general photo editor. See Lux’s Halide Mark III overview.
As an Amazon Associate I earn from qualifying purchases.
- Choose RAW when you intend to edit. It gives you source data to develop, including room to adjust exposure in Halide’s Photo Lab.
- Keep a rendered companion for convenience. A processed image is generally the safer choice for sharing and opening across apps. Lux warns that other apps may render RAW files differently from Halide in its Halide 3.1: Scarlet Edition notes.
- Use RAW-only only when your workflow calls for it. Halide 3.1 added optional RAW-only capture. It avoids a processed companion, so choose it when you already know how you will develop and use the DNG.
RAW capture and the image’s processing look are separate decisions. For challenging light and convenience, start with the standard iPhone processing look. If you prefer a more minimal rendering and are willing to make exposure decisions yourself, consider Process Zero. Its manual explains that it preserves raw sensor data for later exposure adjustment, but skips computational techniques that can help in difficult lighting. In a bright-window portrait, that can mean choosing between detail in the person and detail in the bright background. See the Process Zero Manual.
PC Slower Than It Used to Be?
A free scan shows the junk files, broken settings and background clutter dragging Windows down - then fixes them in one click.Free scan · Windows 10 & 11Crashes, No Sound, or Screen Glitches?
Random freezes, missing sound and display glitches usually trace back to one bad driver. Find and replace yours safely.Free scan · under a minuteHow do I control exposure in Halide?
First decide which photographic constraint matters most: motion, noise and brightness, or—on a supported phone—aperture. These priorities are ways to direct the camera, not universal numeric recipes; the right shutter speed, ISO, or f-number depends on the scene and the result you want.
#1 Best Overall

- ✔ COMPATIBLE WITH ALL SMARTPHONES, TABLETS, and LAPTOPS including ALL iPhone models, Samsung Galaxy and Note, Google Pixel, Huawei and more. CONTENTS INCLUDE: TruView 0.45x Wide Angle Lens, Clarus 15x Macro Lens, TruGrip Lens Clip, GlowClip Mini Rechargeable LED Light + Charging Cable, Quick-Release Lanyard, DuraCase, EasyClip, and Cleaning Cloth.
- ✔ TRUVIEW 0.45x WIDE ANGLE LENS - CAPTURE 45% MORE PICTURE WITH EVERY SNAP: Shoot stunning photos of people, pets, travel scenery, landscapes, architecture, selfies and more. NO DARK CORNERS (vignetting) like cheaper lenses. Crafted from aircraft-grade aluminum and premium optical glass for durability and clarity. Multi-element, coated glass lenses minimize ghosting, reflections, lens flare, and other artifacts. Xenvo cell phone lens attachment is ideal for hobbyists and photography pros alike.
- ✔ CLARUS 15x MACRO LENS - MARVEL YOUR SENSES. MAGNIFY NEARBY SUBJECTS FOR BREATHTAKING, SUPER CLOSE-UP PHOTOS: Capture all the intricacies and details with precision-focus for razor crisp macro photos every time. (For best results, position macro lens approximately 1/2 inch from subject. Not designed for zooming in on distant subjects.) THE TRUGRIP LENS CLIP offers SUPERIOR GRIPPING POWER to fasten your lenses to your cell phone when you're in action mode, framing your next perfect shot.
- ✔ GLOWCLIP RECHARGEABLE LED FILL LIGHT - The GlowClip LED light clips ANYWHERE on your phone to instantly illuminate your subject and surroundings with warm continuous light. The warm and natural LED light is superior to your smartphone's built in flash—which can be blinding and unnatural—especially in darker settings and venues. FEATURES 3 BRIGHTNESS SETTINGS: Low, Medium and High. Say goodbye to frustrating photo "retakes" and hello to brilliant photos the first time.
- ✔ QUICK-RELEASE LANYARD AND TRAVEL CASE - TRANSPORT AND PROTECT YOUR LENS KIT: Perfect for taking your Xenvo lenses with you on the fly. The travel case stores and protects all lens kit components snugly and safely while the quick-release lanyard is the perfect way to carry your lenses on your next outing. Just drape the lanyard and lens around your neck. The quick-release lanyard head makes it a cinch to access your Xenvo lenses in a flash so you never miss another photo moment.
| Control | When it helps | Version and device context |
|---|---|---|
| Auto exposure | Use when you want Halide to choose exposure rather than prioritize one variable. | Documented on the Halide Mark III product page; availability can depend on the installed app and device. |
| Shutter Priority | Use when shutter time is the key constraint—for example, how motion is rendered or the risk of camera shake. | Documented on the Halide Mark III product page. |
| ISO Priority | Use when you want to prioritize ISO as part of the noise and brightness tradeoff. | Documented on the Halide Mark III product page. |
| Aperture Priority | Use when choosing the f-number is important and you want Halide to choose shutter speed and ISO. | Halide 3.2, released September 30, 2026, supports this on iPhone 18 Pro. Lux specifies variable apertures from f/1.48 to f/4.0 on that device. |
In Mark III manual exposure, Halide displays an exposure meter. Use it as an aid, then review the captured photo: a meter cannot decide which part of a high-contrast scene should retain the most detail. The Mark III product page documents auto exposure, manual exposure, Shutter Priority, and ISO Priority; the Halide 3.2 aperture update documents the newer, device-specific Aperture Priority feature.
Halide 3.1 also changed viewfinder-tap behavior: when manual focus is active, tapping the viewfinder no longer updates focus; when manual exposure is active, it no longer updates exposure. If a tap does not change the setting you expect, check whether you are in manual mode and adjust the relevant control directly. This behavior is described in the 3.1 release notes.
Rank #2

- 【Shoot Like DSLR】This clip-on CPL filter kit from K&F CONCEPT includes a K&F CONCEPT Nano-K series CPL filter and a clip for phone, it is fit for travel shots, street photography, outdoor landscape, and time-lapse photography, Instagram, weddings, vacations, and other fun shooting, etc. For reflection reduction, keep the lens at 30–40° to the surface. For sky enhancement, shoot sideways (90°) to the sun. Adjust as needed. NOTE:Not compatible with iPhone 18 Pro & 18 Pro Max.
- 【K&F CONCEPT 52mm Nano-K Series CPL Filter 】Made by Japanese imported AGC glass, no effect on the image color, and restores the natural color. Adopt 18-layer MRC coating, which reduces reflection, and glare and improves color saturation and contrast. It only reduces glare, making reflections look clearer or darker, but not disappear. To fully remove them, change your angle or physically remove the reflective object.
- 【Enhance Color & Contrast】CPL filter can enhance the color and contrast, and remove non-metallic reflections such as water, and glass to show the true color, especially used in white cloud and blue sky photography. It only reduces reflections from non-metallic surfaces like glass or water. It has little effect on metal or mirrors. Please set realistic expectations.
- 【Widely Compatibility】The clip can be clamped on most smartphones to take pictures like a professional SLR camera. The 52mm CPL filter can also work with the DSLR cameras with ø 52mm lens thread. Please check the product images for compatible phone models.
- 【Quick Install & Easy Operation】Simply screw the filter on the phone clip, then clamp it on your phone, during a photo shoot, easily rotate the filter and adjust shoot angle to get the best polarizing effect. Please check whether it is compatible with your mobile phone.
How do I turn on focus peaking in Halide?
Focus peaking overlays an outline on areas the app identifies as sharp. It can help you judge manual focus, especially for close-up work, but it is a visual aid rather than a guarantee that the important detail is in focus. Lux’s documented Macro Mode instructions describe switching from autofocus to manual focus and using peaking, including an option for it to activate while adjusting focus. Those directions are from earlier Halide material, not a verified current Mark III menu path. See Lux’s iPhone Macro guide.
Free tools Windows power users keep installed
One-click scans. No signup required.
- Check your installed Halide version and its current focus controls. The exact Mark III focus-peaking path is not established by the current Mark III documentation.
- If your version offers manual focus and focus peaking, switch from autofocus to manual focus and enable peaking using the control shown in that version.
- Adjust focus until the outline falls over the detail you want sharp. For macro subjects, make small focus adjustments and inspect the result rather than relying on the outline alone.
Lux’s Mark III preview said focus peaking was still planned at the time of that preview. That historical note does not establish whether a later Mark III release added the feature or where it appears; consult the current app interface rather than assuming Mark II directions apply. See Inside Looks: A Mark III Preview. Mark II remains selectable from Mark III’s ellipsis menu, according to Lux, but Mark II will not receive new features; its controls should not be presented as Mark III controls.
Rank #3

- Upgraded 28x Telephoto Lens – Wider View & Easier Framing: Designed for everyday users, this 28x telephoto lens delivers a wider field of view than most 28x lenses, making it easier to find and frame distant subjects. Whether you're at a concert, a sports game, or just exploring nature, you'll get crisp, high-resolution close-ups without the hassle of perfect alignment.
- Advanced Optical Performance with Reduced Edge Darkening: Features a breakthrough light path design for an ultra-wide view and excellent light intake. The field-of-view ring helps reduce edge darkening, so you get a cleaner image with fewer dark corners (results may vary by phone model). High resolution and true color reproduction significantly enhance your mobile photography.
- Stable Long-Distance Capture & Monocular Function: With 28x magnification, capture clear and steady shots of distant subjects. The lens can also be used as a monocular telescope for extended observation—perfect for birdwatching, wildlife, or scenic views.
- Wide Compatibility & Versatile Use: Perfect for sports events, concerts, bird watching, wildlife observation, and travel. Compatible with iPhone, Samsung, Huawei, Xiaomi, OPPO, Vivo, and most other smartphones.
- Portable & User-Friendly: Crafted with high-quality glass and a durable yet lightweight body. The universal clip attaches securely to your phone, and the compact design fits easily in a pocket or bag—ideal for travel and outdoor adventures.
Use exposure aids, then review the image
Halide’s Mark III materials describe an exposure meter and a Photo Lab histogram. Read these as evidence about exposure, not as automatic judgments of what the final image should look like: the histogram helps you see the distribution of tones, while your subject and intended rendering determine which highlights or shadows matter most.
Halide’s older Mark II materials discuss waveform, histogram, and zebra-stripe aids, including visualization of real RAW sensor data when RAW streaming is active during interactive exposure adjustment. These are Mark II-era details, not a guarantee that the same aids or workflow exist in Mark III. The 2020 Mark II announcement described that feature; it should not be read as a current Mark III control guide.
Quick Recap
Best Value

- 【10X Telephoto & Macro 2-in-1 Lens】Experience the power of two professional lenses in one. This dual lens combines a 10X telephoto lens for Phone to bring distant stage moments at concerts clearly closer, and the 10X macro lens focuses at 8 inches – far enough to capture flowers, leaves, and insects in the wild without casting shadows or scaring them away
- 【Superior Optical Clarity & Sharpness】Featuring a complex 12-element optical structure with full-surface multi-layer coating, this Phone telephoto lens is engineered to significantly reduce glare and distortions. This advanced design helps deliver sharper, clearer images with more vibrant colors and improved light transmission for higher-quality photos
- 【Lightweight & On-the-Go Ready】Weighing only 5.12 oz, this clip-on telephoto lens for Phone is incredibly lightweight and portable. Its minimalist design slips effortlessly into your pocket, making it the perfect, hassle-free companion for travel adventures, hiking trips, or spontaneous concerts without adding any bulk to your gear
- 【Universal Clip-On Compatibility】Designed as a universal phone camera lens, it is compatible with a wide range of smartphones, including most Phone and Samsung Galaxy models. Simply clip it onto your phone's camera in seconds—no tools or complicated setup required—to instantly upgrade your mobile photography
- 【Unleash Your Creative Potential】Go beyond your phone's standard camera limits. This Phone macro lens and telephoto combo empowers you to explore new perspectives, from vast landscapes to intricate close-ups. It’s an ideal tool for content creators, photography enthusiasts, and fans who want to capture professional-level shots
Rank #4
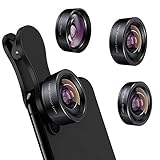
- 3 in 1 Phone Camera Lens Set: Every lens can be used separately. The 20X Macro lens has a best focusing distance of 1.18-3.54 inch, help you to explore the microworld. 120° Wide lens can expand the shooting area of 10%, make a bigger view to the world. 198° Fisheye lens can produce a strong visual effect to make thing cuter
- High Quality: Professional HD Lens with advanced lanthanide optical glass can reduce the reflection and ghosting, bringing you amazing vision with details and clarify. High quality grade aluminum shell can protect the glass offering a long durability
- Clip-on Phone Lens: Easy Use Design. Just attach the lens to the clip and clip it on the phone camera, then you can enjoy the amazing effect of the lens. The clip has soft rubber to avoid scratch on your phone. Strong spring can hold on tightly
- Compatible with Most Smartphones: Universal design of 3.6 cm clip make the lenses compatible with most iPhone, Samsung google phone etc. Note: For different model you might have to use different way to clip the clamp.
- Package Content: 1x 120° Wide Angle Lens, 1x198° Fisheye Lens, 1x 20X Macro Lens, 1x Universal Clip, 1x Storage Bag, 1x User’s Manual
A dependable capture-to-share workflow
- Choose the look. Use standard iPhone processing when convenience in difficult light is the priority. Consider Process Zero when you want minimal processing and expect to make exposure decisions yourself.
- Decide whether you will develop the file. Enable RAW when you want to adjust the DNG later. Keep a rendered companion unless you have a known RAW-only workflow and an editor that handles the file as intended.
- Set the exposure priority to match the constraint. Use Shutter Priority for shutter-time control, ISO Priority when ISO is the variable you want to prioritize, or Aperture Priority only on a compatible iPhone 18 Pro running Halide 3.2.
- Focus and verify. Use manual focus and peaking if they are available in your installed version. Inspect the captured image at the detail that matters; an overlay is not a substitute for review.
- Develop and export deliberately. Review the RAW in Photo Lab and compare your adjustments before sharing. If the destination app renders the DNG differently, use the processed companion or export a rendered version from a compatible editor.
Product prices and availability are accurate as of the date/time indicated and are subject to change. Any price and availability information displayed on Amazon at the time of purchase will apply.
Recommended Free Tools




