Free tools Windows power users keep installed
One-click scans. No signup required.
Choose the Raspberry Pi Zero 2 W when the toy must be compact and you are comfortable adding an audio board, USB audio device, Bluetooth speaker, or another external output. Choose the Raspberry Pi 4 Model B when you want the least complicated wired audio setup, several USB peripherals, or more memory headroom. “Raspberry Pi Zero” is not one specification: the original Zero, Zero W, and Zero 2 W differ substantially, so name the exact board in your design.
What changes between a Raspberry Pi Zero and a Raspberry Pi 4?
The decisive difference for a music toy is audio hardware. Raspberry Pi 4 Model B includes a four-pole 3.5 mm jack that carries stereo analog audio (and composite video). Zero-family boards do not include that jack. A Zero can still make sound through HDMI, USB audio, Bluetooth on wireless models, or a GPIO audio board, but each route adds a device, cable, software setup, or enclosure decision.
As an Amazon Associate I earn from qualifying purchases.
Pi 4 also has a faster processor, more memory choices, and four USB ports. Zero 2 W is much smaller and can run a sound program comfortably, but its single USB 2.0 OTG connection and unpopulated GPIO header footprint require more planning. Neither board is automatically “better” for every toy: the right choice follows the speaker path, controls, enclosure, and power budget.
First identify which “Zero” you mean
Recommendations that simply say “Pi Zero” hide important differences. The original Zero is single-core with 512 MB of memory. Zero W adds wireless networking to the Zero family. Zero 2 W uses a quad-core 1 GHz processor, 512 MB of memory, 2.4 GHz Wi-Fi, and Bluetooth 4.2. If a build guide names only “Zero,” verify the board before buying a case, header, or software image.
#1 Best Overall

- Powerful Performance: Equipped with a quad-core 64-bit ARM Cortex-A53 processor, the Raspberry Pi Zero 2 W delivers a significant performance boost compared to its predecessor. And built-in Wi-Fi and Bluetooth support enable easy wireless communication and Internet access for your projects, five Times Faster.
- SANOOV Basic Starter Kit for Pi Zero 2 W Include: 1. Raspberry Pi Zero 2 W Board 2.Mini HDMI to Standard HDMI adapter 3.Micro-USB to Standard USB OTG Adapter 4.Aluminum Heatsink 5.40 Pin Header.NOTICE: The kit does NOT include , supply power, case, SD card, keyboard, mouse or monitor.
- SANOOV for Raspberry Pi Zero 2 W features: 1GHz quad-core, 64-bit ARM Cortex-A53 CPU VideoCore IV GPU 512MB LPDDR2 DRAM 802.11b/g/n wireless LAN Bluetooth 4.2 / Bluetooth Low Energy (BLE) MicroSD card slot Mini HDMI and USB 2.0 OTG ports Micro USB power HAT-compatible 40-pin header Composite video and reset pins via solder test points CSI camera connector.
- Video Output & Efficient Cooling: Supports 1080p30 video output via the mini HDMI port, making it ideal for multimedia applications and streaming.The aluminum heatsink helps dissipate heat, ensuring stable performance even under heavy workloads.
- Compact Size: The tiny size of the Raspberry Pi Zero 2 W makes it perfect for space-constrained projects and embedded applications.Ideal for a variety of uses, including IoT projects, home automation, media centers, educational tools, and more.
| Board | Processor and memory | Wireless capability | Audio jack |
|---|---|---|---|
| Raspberry Pi Zero | Single-core processor; 512 MB | Wireless capability depends on the exact model | No built-in 3.5 mm jack |
| Raspberry Pi Zero W | Zero-family processor; memory specification should be checked for the exact board | Wireless Zero variant | No built-in 3.5 mm jack |
| Raspberry Pi Zero 2 W | Quad-core 1 GHz; 512 MB | 2.4 GHz Wi-Fi; Bluetooth 4.2 | No built-in 3.5 mm jack |
| Raspberry Pi 4 Model B | Quad-core Cortex-A72 at 1.8 GHz; 1, 2, 3, 4, or 8 GB variants | Dual-band 2.4/5 GHz Wi-Fi; Bluetooth 5.0 | Four-pole stereo audio/composite jack |
For a new compact toy, Zero 2 W is the meaningful comparison with Pi 4. The original Zero can run simple sound software, but its single-core processor gives less margin for a graphical interface, multiple effects, or other concurrent tasks. Raspberry Pi co-founder Eben Upton said in the 28 October 2021 Zero 2 W launch announcement that multi-threaded Sysbench was “almost exactly five times faster” than the original Zero. That is a result for that benchmark and workload, not a universal five-times playback guarantee.
Hardware comparison for a toy music build
| Decision axis | Raspberry Pi Zero 2 W | Raspberry Pi 4 Model B | What it means in a toy |
|---|---|---|---|
| Analog audio | No onboard 3.5 mm jack | Four-pole stereo audio/composite jack | Pi 4 can feed compatible wired headphones or an amplifier directly; Zero needs another audio route. |
| CPU and memory | Quad-core 1 GHz; 512 MB | Quad-core Cortex-A72 at 1.8 GHz; 1–8 GB options | Pi 4 offers more headroom, but the available material does not establish that basic tone or file playback needs it. |
| GPIO | 40-pin footprint; standard board header is unpopulated | Standard 40-pin GPIO header | Zero may need a header-fitted variant or soldering before a HAT can be attached. |
| USB | One USB 2.0 OTG interface | Two USB 3.0 and two USB 2.0 ports | Pi 4 is easier with multiple controllers, storage devices, or USB audio hardware. |
| Wireless | 2.4 GHz Wi-Fi; Bluetooth 4.2 | Dual-band 2.4/5 GHz Wi-Fi; Bluetooth 5.0 | Both can support wireless operation when the exact model and software support the required profile. |
| Power connector | Micro-USB | USB-C | Choose a supply and cable that match the board and every attached device. |
| Board footprint | Smaller Zero-family format | Larger Model B board | Zero gives more enclosure flexibility; Pi 4 needs more physical space and airflow planning. |
Can a Raspberry Pi Zero play music?
Yes. The absence of a 3.5 mm socket is not an absence of audio capability. A Zero can output sound over HDMI, USB, Bluetooth on supported wireless variants, or a GPIO audio board. The practical choice depends on whether the toy has a display, how much space is available, whether a USB port is needed for controls, and whether the speaker needs an amplifier.
HDMI audio
Raspberry Pi models with HDMI, including Zero boards with their appropriate mini- or micro-HDMI connection, can send audio over HDMI. In a desk prototype, a monitor or an HDMI audio extractor can provide the final output. In a self-contained toy, this route usually means adding an extractor or another HDMI-compatible audio device, which can be awkward inside a small case.
USB audio
Raspberry Pi supports USB audio. A USB sound device or adapter can supply an analog output or an amplified speaker, subject to the device’s own requirements. On Zero 2 W, the single USB 2.0 OTG connection is a real allocation decision: a hub may be needed if the toy also uses a USB controller, keyboard, or storage device. Pi 4’s four ports make this arrangement less constrained.
Bluetooth audio
Bluetooth-equipped models can send audio to a compatible speaker or headset. Pairing behavior, reconnect behavior after boot, latency, and speaker volume should be checked in the intended enclosure and software. Bluetooth is convenient for a prototype, but a wireless speaker adds its own battery, controls, and charging requirements to a toy that was supposed to be self-contained.
GPIO audio boards and HATs
An audio board that mounts on the 40-pin GPIO header is the most natural expansion for a Zero-based sound toy. Raspberry Pi accessory documentation uses a toy chatterbox as an example of this approach. Verify that the board fits the exact Zero variant, that the GPIO header is present, and that the board’s output stage matches the speaker you plan to install. One documented board example specifies 5 W at 4 Ω; that rating belongs to that referenced board and must not be generalized to every audio HAT.
Rank #2

- Includes Raspberry Pi 4 4GB Model B with 1.5GHz 64-bit quad-core CPU (4GB RAM)
- Includes Pre-Loaded 32GB EVO+ Micro SD Card (Class 10), USB MicroSD Card Reader
- CanaKit Premium High-Gloss Raspberry Pi 4 Case with Integrated Fan Mount, CanaKit Low Noise Bearing System Fan
- CanaKit 3.5A USB-C Raspberry Pi 4 Power Supply (US Plug) with Noise Filter, Set of Heat Sinks, Display Cable - 6 foot (Supports up to 4K60p)
- CanaKit USB-C PiSwitch (On/Off Power Switch for Raspberry Pi 4)
Active buzzer for simple tones
For beeps, alerts, or game-like effects, an active buzzer connected to GPIO can be enough. Raspberry Pi’s official sound tutorial demonstrates this pattern. A buzzer is not equivalent to a full-range speaker: it is appropriate for simple tones and signaling, not a claim of high-fidelity music playback.
When the Zero 2 W is the better starting point
Compact enclosure
The Zero family’s smaller board is easier to hide behind buttons, in a plush enclosure, or in a handheld prop. That advantage is physical, not a measured battery-life result. The available specifications do not establish comparative runtime for a Zero 2 W and Pi 4, so size should not be treated as proof of longer operation.
One-purpose sound playback
If the toy plays short samples, tones, or a modest collection of files and has only a few controls, Zero 2 W’s quad-core 1 GHz processor and 512 MB memory provide a sensible platform. The sources do not report a performance test of a complete toy, so leave margin for the chosen audio software, input handling, and boot process rather than assuming a benchmark translates directly to your project.
External audio is acceptable
Zero 2 W makes sense when the design already includes an audio HAT, USB audio device, Bluetooth speaker, or HDMI-based prototype. The board itself is not the complete audio system; budget space, mounting, cables, and power for the add-on.
When Pi 4 is the better choice
Direct wired analog output
Pi 4’s four-pole jack is the simplest route to wired stereo audio. Raspberry Pi’s Pi 4 data sheet says the analog output can drive 32-ohm headphones directly. That statement does not guarantee enough volume for every loudspeaker: a passive speaker may still need a suitable amplifier, and the final level depends on the speaker and enclosure.
What’s actually slowing this PC down?
Pick the symptom - the matching free tool is one click away.
Several USB devices
Pi 4 provides two USB 3.0 and two USB 2.0 ports. That is useful when a toy combines USB audio, removable storage, a controller, and a keyboard during development. Zero 2 W has one USB 2.0 OTG interface, so the same combination may require a hub and careful cable placement.
Rank #3

- Orange Pi Zero 2W 1GB is powered by Allwinner H618 high-performance quad-core Cortex-A53 processor with up to 1.5GHz, integrated Mali G31 MP2 graphics processor, supporting OpenGL ES 1.0/2.0/3.2, OpenCL 2.0, Vulkan 1.1. It has 1GB LPDDR4 memory specification options, supports 16MB SPI Flash. Outperform the Raspberry Pi Zero 2W.
- Orange Pi Zero 2W 1G mini pc can be extended with USB2.0, 100M Ethernet, IR receiver, audio output, TV-out, power button, etc. via 24Pin connector with adapter board. In addition, the 40Pin expansion port on the board further enriches the motherboard's functional interfaces and enhances the development potential.
- Orange Pi Zero 2W 1gb adheres to the compact and exquisite design concept of the Zero series, with a PCB size of 30mm X 65mm X 1.2mm, and can be widely used in TV boxes, smart screen casting devices, smart home, smart gateway, IoT and other fields.
- Wi-Fi5+BT 5.0, with BLE support: 2.4G/5G dual-band Wi-Fi5 and Bluetooth 5.0 with BLE support, enjoy the wonderful network anytime, anywhere.
- Orange Pi Single Board Computers is open source.
More demanding software or a richer interface
Pi 4’s 1.8 GHz Cortex-A72 processor and memory options from 1 GB through 8 GB leave more room for a display, a larger interface, multiple services, or effects processing. More capacity does not automatically improve speaker sound, and no source establishes a minimum Pi 4 memory size for a basic music toy.
How to plan the audio path before buying parts
- Define the sound. Decide whether the toy needs beeps, one-shot samples, speech, or continuous music. This determines whether an active buzzer is sufficient or a speaker-and-amplifier path is required.
- Choose the exact board. Write “Zero 2 W,” “Zero W,” “Zero,” or “Pi 4 Model B” on the parts list. Do not order a generic “Zero” and assume every accessory will fit.
- Select the output route. On Pi 4, start with the four-pole analog jack for wired audio. On Zero, choose HDMI, USB audio, Bluetooth, or a GPIO audio board before designing the case.
- Reserve connectors and controls. Count the USB ports, GPIO connections, buttons, LEDs, storage, and any hub. Zero 2 W’s single OTG port can become the limiting resource.
- Check header fit. The standard Zero 2 W has an unpopulated 40-pin header footprint. Select a header-fitted version or plan soldering before ordering a GPIO HAT.
- Match the speaker and amplifier. Confirm impedance, power handling, connector type, and whether the audio board can drive the load. A documented 5 W at 4 Ω example applies only to that referenced board.
- Design power around the complete assembly. Include the board, audio hardware, USB devices, wireless speaker charging if applicable, and startup surges. Use the board-specific guidance below as a minimum starting point, not as a guarantee for an accessory-heavy build.
- Prototype outside the enclosure. Confirm boot, pairing, audio routing, button response, and volume before committing to permanent mounting.
Adding a speaker to a Raspberry Pi Zero: practical routes
Route 1: a GPIO audio board
- Confirm that the board is designed for the 40-pin Raspberry Pi GPIO layout and that it physically fits your Zero variant.
- Install or solder the GPIO header if your Zero board does not already have one.
- Mount the audio board and connect the speaker according to that board’s own wiring and impedance requirements.
- Install the board’s required software or audio configuration, then select it as the playback device.
- Test at low volume first and check that the enclosure does not block the speaker or create rattles.
This route keeps the toy self-contained and avoids consuming the Zero’s only USB OTG port, but it adds a board, header work, and a second set of electrical and mechanical specifications.
Route 2: USB audio
- Choose a USB audio device that exposes the connector and output type your speaker or amplifier needs.
- Plan a micro-USB OTG adapter or hub for Zero 2 W, and reserve physical space for it.
- Connect the audio device, verify that the operating system detects it, and select it in the playback software.
- Add a powered hub or separate amplifier supply only if the chosen hardware requires it; do not assume the Pi can power every accessory.
Route 3: Bluetooth speaker
- Use a Zero model with Bluetooth support, such as Zero 2 W or Zero W.
- Pair the speaker and confirm it reconnects after a cold boot, not only after manual setup.
- Measure perceived delay with the toy’s buttons and effects; latency that is acceptable for background music may feel wrong for an immediate button sound.
- Account for the speaker’s charging, volume controls, and wireless range in the finished design.
Route 4: HDMI during development
Use HDMI audio when a display or extractor is already on the workbench. It is a useful way to validate software before selecting the final speaker path, but a standalone toy will need a practical HDMI audio endpoint inside or outside the enclosure.
Recommended Free Tools
Power requirements and connector details
Raspberry Pi documentation specifies a minimum 5 V/3 A USB-C supply for Pi 4. Zero documentation gives lower current guidance: the Zero 2 W specification lists 5 V/2 A through micro-USB, while the general getting-started guidance for Zero models recommends a 5 V/2.5 A micro-USB supply. Treat the exact board documentation and the connected peripherals as the authority for the final supply. A speaker amplifier, USB hub, bright LEDs, or storage device can change the practical requirement.
| Board | Connector | Documented supply guidance | Design implication |
|---|---|---|---|
| Raspberry Pi Zero 2 W | Micro-USB | 5 V/2 A in the Zero 2 W specification; the general Zero getting-started guide recommends 5 V/2.5 A | Check the exact variant and include accessory demand. |
| Raspberry Pi 4 Model B | USB-C | Minimum 5 V/3 A | Use a supply and cable suitable for the Pi 4 and attached peripherals. |
These figures are supply requirements, not battery-runtime measurements. No comparative battery-life result or complete-build power test establishes how long either board will run in a particular toy.
Physical integration and GPIO considerations
Both boards expose the familiar 40-pin GPIO arrangement, but the mechanical starting point differs. Pi 4 ships with a standard 40-pin header. A standard Zero 2 W has the footprint without the populated header. A HAT that simply plugs into Pi 4 may therefore require soldering, a header-fitted Zero variant, or a different mounting strategy on Zero 2 W.
Rank #4

- 🍊[Incredibly Powerful]: Orange Pi Zero 2W is a powered by Allwinner H618 quad-core Arm Cortex-A53 SBC with 1GB/1.5GB/2GB/4GB LPDDR4 RAM memory, embedding a larger 16MB SPI flash. And features Wi-Fi 5 and Bluetooth 5.0 connectivity.
- 🍊[Practical Design]: Despite Orange Pi Zero 2W has only a small size of 30mmX65mmX1.2mm, but it is equipped with 2*USB 2.0, 1Micro HDMI, 1*MicroSD card slot, 1*24 pin functional interface, 1*40 pin headers.
- 🍊[Support Expansion Board]: Orange Pi Zero 2W can be extended with USB2.0, 100M Ethernet, IR receiver, audio output, TV-out, power button via 24 pin functional interface with adapter board. In addition, the 40 pin expansion port on the board further enriches the motherboard's functional interfaces and enhances the development potential.
- 🍊[Small But Powerful]:Orange Pi Zero 2W adheres to the compact and exquisite design concept of the Zero series, and can be widely used in TV boxes, smart screen casting devices, smart home, smart gateway, IoT and other fields. Orange Pi Zero 2W supports Android 12 TV, Debian11, Debian12, Ubuntu22.04, Ubuntu20.04 ,Orange Pi OS(Arch)and other operating systems.
Keep the speaker magnet, amplifier board, buttons, and cable strain away from the board’s ventilation and connectors. Decide whether the microSD card must remain accessible for updates. In a child-facing enclosure, secure every board and cable, cover sharp header pins, and prevent access to small detachable parts.
Windows Errors? Fix Them Before They Spread
Repair common Windows errors and clear accumulated junk for a smoother, more stable PC - no reinstall needed.Free scan · no reinstallCrashes, No Sound, or Screen Glitches?
Random freezes, missing sound and display glitches usually trace back to one bad driver. Find and replace yours safely.Free scan · under a minuteSoftware and playback decisions
Hardware output is only half the design. The playback program must select the correct audio device, react quickly to button presses, and recover sensibly if a Bluetooth speaker disconnects or a USB device is absent. Prototype the complete startup sequence: power on, boot, establish the audio route, and play the first sound without a keyboard or monitor attached.
For a buzzer, the control program can generate simple GPIO-driven tones. For recorded music, use an audio output device and test the actual files, sample rates, volume range, and simultaneous effects you intend to ship. Avoid choosing the board solely from the “five times faster” Sysbench statement: that result compares a particular benchmark, while playback responsiveness depends on software, storage, audio hardware, and scheduling.
Cost, availability, and claims you should not assume
The Zero 2 W launch announcement on 28 October 2021 listed a $15 price. That is a historical launch price, not a current retail quote, and it does not include a power supply, microSD card, speaker, amplifier, buttons, enclosure, or audio HAT. The material available here does not establish a current Pi 4 price, a complete project cost, retail stock, or affiliate availability.
Likewise, board specifications do not provide a measured comparison of finished-toy sound quality, battery runtime, or total build performance. Those outcomes depend on the selected speaker, amplifier, enclosure, software, and power source. Present any such result only after testing that specific assembly.
Quick wins for a faster PC:
Repair Windows errors before they cause bigger problemsFix Now →Fix the driver behind crashes, sound loss and screen glitchesFind Drivers →Common failure modes and fixes
No sound from a Zero
Check that the board is not being treated as if it had a 3.5 mm jack. Verify the selected HDMI, USB, Bluetooth, or GPIO audio route, then confirm that the operating system and playback program are using that device.
Best Value
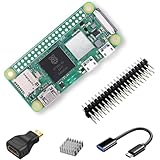
- RasTech Pi Zero 2W Kit: The Pi Zero 2W pack includes Raspberry Pi Zero 2 W Board x1, Mini HDMI to Standard HDMI Adapter x1, Micro USB OTG Cable x1, Aluminum Heatsink x1, 40-Pin Header x1.
- Powerful Performance: Equipped with a quad-core 64-bit ARM Cortex-A53 processor, the Raspberry Pi Zero 2 W delivers a significant performance boost compared to its predecessor.
- Compact Size: The tiny size of the Raspberry Pi Zero 2W makes it perfect for space-constrained projects and embedded applications.
- Efficient Heat Dissipation: The Aluminum heatsink helps dissipate heat, ensuring stable performance even under heavy workloads.
- Versatile Connectivity: The Raspberry Pi Zero 2 W basic kit is an ideal equipment for beginners to learn programming, electronics, and DIY projects. And the included HDMI adapter and USB OTG cable provide essential interfaces to connect a display, keyboard, mouse and other peripherals.
A HAT will not plug in
Inspect the Zero’s GPIO footprint. A standard Zero 2 W may need a soldered header or a header-fitted variant, and the HAT must match the 40-pin layout and mechanical clearance.
The speaker is too quiet
Do not infer loudspeaker performance from the Pi 4 headphone specification. Check whether the speaker needs an amplifier, whether the audio board can drive its impedance, and whether the enclosure opening is obstructed.
USB accessories conflict on Zero 2 W
There is one USB 2.0 OTG interface. Recount every USB device and add a suitable hub only after checking its power and physical fit. A GPIO audio board or Bluetooth speaker can leave that port available for controls.
Do these 3 things before closing this tab:
1Scan for outdated or missing drivers - takes under a minute2Clear out junk files and repair common Windows errors3Fix the driver behind crashes, sound loss and screen glitchesAudio works only after manual setup
Test a cold boot and an unplugged-and-reconnected accessory. Configure the intended default output and make the toy’s software handle a missing or delayed audio device instead of assuming a development monitor or keyboard is present.
A decision checklist
- Pick Zero 2 W if compact size is central, the toy has modest playback needs, and an external audio path is acceptable.
- Pick Pi 4 Model B if a wired analog jack, several USB ports, or 1–8 GB memory options simplify the build.
- Pick an active buzzer for beeps and simple tones, not for full music.
- Pick a GPIO audio board when a self-contained Zero build needs a real speaker and you can provide the header and mounting.
- Pick USB audio when an adapter is convenient and the available USB budget permits it.
- Pick Bluetooth when wireless convenience outweighs pairing, latency, and separate-speaker complications.
- Use HDMI audio as a practical prototype route or when an HDMI audio endpoint genuinely fits the installation.
For most compact, button-triggered toys, the balanced starting point is a specifically identified Raspberry Pi Zero 2 W paired with an audio board or other deliberate output device. For the simplest wired stereo prototype, Pi 4 Model B’s built-in jack and four USB ports remove more integration work than the larger board adds.
Quick Recap
Product prices and availability are accurate as of the date/time indicated and are subject to change. Any price and availability information displayed on Amazon at the time of purchase will apply.




