What’s actually slowing this PC down?
Pick the symptom - the matching free tool is one click away.
Build an iconic Minecraft landmark by giving it a clear server role, reducing the idea to a readable silhouette, reserving a measured site, and constructing from large forms to small detail. A spawn beacon should guide newcomers, a civic monument should organize a public district, and a transport hub should make routes easier to understand. The landmark succeeds when players can identify it from several approaches and have a reason to visit it.
Playing with friends? Godlike.Host runs hosted Minecraft Java servers from 10 data-center locations, with free DDoS protection.
This workflow keeps a large project manageable: define the job, sketch the geometry, test a temporary outline, raise the primary masses, connect the site to roads and public spaces, then add materials, lighting, signs, and reusable modules.
As an Amazon Associate I earn from qualifying purchases.
Do these 3 things before closing this tab:
1Fix the driver behind crashes, sound loss and screen glitches2Clear out junk files and repair common Windows errors3Scan for outdated or missing drivers - takes under a minuteDefine what the landmark does before choosing what it looks like
A memorable shape is useful, but a landmark becomes valuable when it performs a job for the server. Decide that job first; it determines location, scale, entrances, surrounding buildings, and the views that must remain unobstructed.
| Landmark role | Best location | Features to reserve | Recognition test |
|---|---|---|---|
| Spawn beacon | At or just beyond the arrival area | Open forecourt, welcome signs, routes to major districts | A new player can point toward it and understand where the town center is |
| Civic center | At the intersection of principal roads | Plaza, meeting hall, notice boards, market frontage | Several neighborhoods naturally lead toward its public space |
| Memorial or monument | A quiet edge, cemetery, battlefield, or historic site | Interpretive signs, viewing space, accessible path | The silhouette and story remain legible without an explanation from the builder |
| Gateway | At a city boundary, bridge, or district threshold | Wide passage, walls or towers, route lighting | Players know they have entered a new area before seeing a sign |
| Tower or statue | High ground or a central axis | Viewing deck, stairs or lift route, lighting | It remains distinct against the sky from roads and map views |
| Transport hub | Where roads, rail, water, or portals meet | Platforms, departure signs, waiting area, safe circulation | Players can use the form and its signage to choose a route |
Write one sentence that states the role and audience, such as: “This tower is the public meeting point visible from spawn, with a viewing deck and roads to three districts.” That sentence prevents a beautiful structure from becoming an isolated sculpture.
#1 Best Overall

- LEGO MINECRAFT TOY WITH ANIMALS – The Baby Pig House is packed with pretend play fun for girls and boys ages 7 years old and up who have a passion for Minecraft, home-building, animals and farms
- MINECRAFT FIGURES – This set includes a hero character in a wolf skin, a baby pig, bee, an adult pig and a zombified piglin
- BUILDABLE PLAYSET – Kids build a pig-shaped house that comes with a farm plot where potatoes and beets grow, plus a field with a gate to guide the baby pig through and more
- AUTHENTIC DETAILS – Inside the house, there’s a Minecraft crafting table, a bed and a bookcase to inspire imaginative play
- MINECRAFT EASTER GIFT FOR KIDS – This build-and-play toy is a fun birthday, holiday or any-day gift idea for girls and boys
Choose a concept with a practical scoring method
Compare two or three ideas before collecting materials. Score each from 1 (weak) to 5 (strong) on the six questions below. The total is not a measure of artistic quality; it exposes projects that look impressive but do not fit the server.
| Question | What to check |
|---|---|
| Recognition distance | Can a player identify the form from spawn, a main road, and a map view? |
| Server role | Does it guide navigation, host activity, commemorate history, or provide a service? |
| Scale and labor | Can your team build and detail the footprint and height without abandoning it? |
| Theme fit | Do its materials, rooflines, and architectural language belong beside nearby districts? |
| Gameplay utility | Can it include a market, portal, transit stop, storage, meeting area, or viewing deck? |
| Maintenance and expansion | Can damaged modules be repaired, copied, or extended with structure tools? |
Keep the winning concept and the strongest rejected concept in your planning notes. The second idea often supplies a useful secondary feature, such as a gateway arch added to a civic plaza.
The Tool Desk
Outbyte Driver Updater FREEFix the driver behind crashes, sound loss and screen glitchesFind Drivers →Outbyte PC Repair FREERepair Windows errors before they cause bigger problemsFix Now →Turn the winning idea into a measurable brief
Before placing permanent blocks, write down four constraints: footprint, height target, palette, and approach routes. Add the intended entrances, public uses, and any view that must remain open. A brief turns “build a huge tower” into a sequence that can be checked.
Footprint
Mark the outermost block of the building, stairs, retaining walls, plaza, and service paths. Do not measure only the central structure. If players must walk around it, the circulation space is part of the landmark’s footprint.
Height target
Choose a target relative to nearby roofs, hills, and tree lines. A tower that is tall in isolation may disappear behind a ridge; a shorter monument on a clear axis may be easier to recognize. Record the top elevation so the outline can be tested before details consume resources.
Palette
Choose a primary structural block, a darker or lighter trim, a limited accent, and a lighting material. The palette should contrast with the terrain and nearby buildings while still belonging to the server’s theme. Reserve rare blocks for focal edges rather than covering every surface.
Rank #2
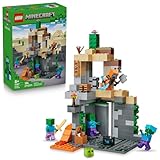
- MINECRAFT TOY FOR KIDS – LEGO Minecraft Zombie Dungeon (21587) building toy for boys and girls ages 8 years old and up
- 5 LEGO FIGURES – Builders can cast a Wastelands Wanderer minifigure, a slime and 3 zombies (including one with enchanted leggings and gold sword and one with diamond helmet) in their pretend play adventure stories
- GAMING-INSPIRED FUNCTIONS – Set in the Minecraft desert biome, this zombie dungeon features a rotating, zombie-spawning chamber and a sliding piece that triggers a rockfall
- INSPIRE CREATIVE STORYTELLING – The Wastelands Wanderer, equipped with a diamond pickaxe, mace and netherite armor, takes on a slime and 3 zombies in the desert biome dungeon
- ACCESSORIES FOR PRETEND PLAY – Features netherite armor, a mace, diamond pickaxe, gold sword, diamond helmet, crafting table, torch and a chest containing bread, bone and rotten flesh
Approach routes
List at least three viewpoints: the arrival route, the busiest road, and a distant or elevated view. Mark where signs, rooflines, or lighting will be visible. If the landmark is meant to guide navigation, one of those views should be available before a player reaches the district.
Reserve the site and prepare the terrain
Choose terrain deliberately instead of forcing the concept into the first empty field. Flat ground simplifies a plaza and a civic center; a ridge or river bend can make a tower or gateway more dramatic. Check that the site leaves room for roads, drainage, farms, redstone systems, future districts, and an unobstructed view.
Microsoft’s Bedrock Editor tutorial for an Arc de Triomphe example clears an area of at least 99 × 99 blocks. That is a source-specific planning envelope for that monument, not a universal requirement. Use it as a reminder to include approaches and public space, then resize the envelope for your own footprint, edition, terrain, and team.
- Mark the center point with temporary blocks and record its coordinates.
- Place corner markers for the full envelope, including plaza and circulation space.
- Walk the approach routes and note hills, trees, water, caves, and existing buildings that will hide the silhouette.
- Decide what to preserve. A river, cliff, or old road can become part of the story instead of being removed.
- Level only the areas that need a stable foundation; use terraces and retaining walls where a stepped site improves the design.
- Set a protected storage and staging area outside the main view so construction clutter does not interfere with the finished space.
Reduce the concept to a silhouette
Start with a sketch viewed from the front, side, and a three-quarter angle. Then translate the sketch into a block outline using cheap temporary materials. The official Minecraft construction guidance emphasizes getting the structure right so the rest of the build follows the plan; that principle matters more as the project grows.
Use simple geometric primitives
Break the design into squares, rectangles, triangles, circles, pyramids, arches, and spheres. A gateway may be two vertical masses plus an arch; a statue may be a stepped base, torso, head, and one unmistakable prop; a civic hall may be a rectangular body with a triangular roof and a central tower. If you cannot describe the form with a few primitives, the silhouette is probably not settled.
Lay out circles and arches with measured layers
Do not freehand a large circle one block at a time. Choose a diameter, mark the center lines, and record the width of each horizontal layer. Build one half, check symmetry, and mirror it. For a sphere, the official guide demonstrates five circles that increase in size, followed by a mirrored sequence of decreasing circles. The exact diameters depend on your chosen radius; the important practice is to measure the layers and mirror the sequence rather than guessing.
Rank #3

- ADVENTURE AWAITS – The Warden Encounter for boys and girls takes kids on an exciting cave exploration where they'll come face-to face with a dreaded Warden
- BUILD THE GAME – This Minecraft building toy includes a Silent Ranger minifigure, a Minecraft chicken and a buildable and poseable Minecraft Warden
- INTERACTIVE FEATURES & ACCESSORIES – Kids use the exploding TNT and falling rock functions, mine diamonds in the cave, restore health with potions and carrots, and pose the warden's head, arms, and legs
- PRETEND PLAY POSSIBILITIES – Packed with familiar details from the Minecraft game, this LEGO set sparks imagination by placing young gamers right in the center of the action
- MINECRAFT GIFT FOR KIDS – This LEGO video game toy makes a great birthday, holiday or any-day gift for boys and girls ages 7 and up
Test the outline from real routes
Walk the intended approaches while the outline is still temporary. Ask another player to stand at spawn, on a road bend, and on a hill, then inspect the shape from those positions. If the form reads only from the front, add a stronger roofline, tower, color break, or repeated vertical element before starting the façade.
Build in passes, from mass to detail
Separate construction into passes so a late proportion change does not destroy hours of decoration.
Free tools Windows power users keep installed
One-click scans. No signup required.
- Reference grid: Place center lines, corner stakes, height markers, and level markers. Keep a written coordinate plan for major axes.
- Temporary outline: Trace the footprint and top profile with inexpensive blocks. Include stairs, ramps, walls, and the outer edge of the plaza.
- Foundation: Build the base, retaining walls, and structural supports. Confirm that entrances are at the planned elevations.
- Primary masses: Raise the main towers, body, roof, arch, or statue sections. Use a small set of structural blocks and leave interiors hollow where practical.
- Silhouette review: Inspect from every approach, at night, and from above. Move or resize large forms now, while replacement is cheap.
- Secondary forms: Add buttresses, balconies, windows, stairs, wings, roof tiers, and repeated bays that reinforce the main shape.
- Functional spaces: Install the market, transit stop, storage, meeting room, viewing deck, or memorial path promised by the brief.
- Surface treatment: Apply trim, controlled variation, banners, landscaping, and texture after the proportions are stable.
- Lighting and wayfinding: Light entrances and routes without flattening the silhouette. Add signs, map displays, and distinctive roof or beacon elements.
- Public opening: Remove temporary markers, finish paths, test circulation with players, and record a repair plan for repeating modules.
Make materials reinforce the shape
Material choice should clarify depth and hierarchy. Use the darkest value in recesses, the primary structural material on large masses, and a lighter or contrasting trim on edges that must read at a distance. Lighting can outline an arch or tower, but excessive lights can erase shadows and make the form look flat.
Stone and cobblestone are documented options for statues, but no single palette is mandatory. A modern server might use concrete and glass; a medieval district might use stone, timber, and tile. Test a small façade panel in daylight and at night before committing to thousands of blocks.
The Minecraft Wiki construction tutorial suggests a 10 × 10 block statue base as a starting point. It is a tutorial example, not a universal standard or a guarantee that a statue will look proportionate. Scale the base to the intended viewing distance, pose, and surrounding architecture.
Give the landmark a district, not an empty pedestal
A metropolis-building tutorial recommends deciding the theme, limitations, goals, and tools before expanding. Apply those decisions to the area around the landmark. Keep block choices, building sizes, rooflines, and decorative language consistent enough that the landmark feels like the center of a place rather than a prop imported from another world.
Rank #4

- BUILD THE DREADED CREEPER – Young explorers, ages 10 and up, build a large poseable version of the iconic Minecraft mob
- MINECRAFT ACTION FIGURE – Kids construct every detail of the Creeper, from its 4 poseable legs to its detachable head
- HIDDEN SURPRISE INSIDE – Builders can remove the Creeper's head to reveal a compartment that hides a first-version Creeper minifigure and TNT element
- POSEABLE ROOM DECOR – After building, kids can put their creation on display in the bedroom or playroom
- GIFT IDEA FOR KIDS – Makes a wonderful birthday or any-time gift idea for boys and girls
Use a central public space
Place a plaza, green, market, or waterfront walk where players can pause and see the landmark. Keep the main sightline open, but allow smaller buildings to frame it. A plaza also gives builders a clear boundary: the landmark can remain monumental without swallowing the entire district.
Connect branching streets and community buildings
Settlement guidance commonly uses a center, branching streets, community buildings, and a landmark such as a church tower, monument, or river. Build that logic into your plan. Route at least one major street to the entrance, then branch toward homes, shops, farms, transport, and public services. Players should pass the landmark while doing ordinary tasks.
Match scale and language
Choose a consistent street width, façade height, window rhythm, and sign style. If the landmark is intentionally larger than everything else, use a gradual transition of plazas, walls, trees, or civic buildings so the scale change looks deliberate.
Design navigation cues players can actually use
Landmarks work as navigation tools when they remain visible and are paired with routes. Put signs at decision points rather than only at the destination. Use a distinct roofline, colored trim, banners, a lit crown, or a water feature that can be recognized from multiple directions.
Maps are useful for checking whether the landmark anchors the settlement. Mapping guidance recommends keeping map panels aligned with consistent coordinate intervals; follow the intervals appropriate to your map scale and layout rather than shifting each panel arbitrarily. Surface lava pools can appear as red dots on zoomed-out maps, so do not mistake those marks for the landmark when planning a map wall. Add a framed map, a “you are here” marker, and named routes if the area is large.
Save repeated sections instead of rebuilding them
Repeated arches, towers, windows, façade bays, roof modules, and detail kits are ideal candidates for templates. Bedrock structure blocks can save and load blocks and entities, and Microsoft’s Editor tutorial demonstrates duplicating an Arc de Triomphe at massive scale. Save a clean module before adding damage, banners, or one-off decoration.
- Build and check one complete module, including its connection points.
- Remove temporary scaffolding and verify that the saved area contains only the intended blocks and entities.
- Save the module with a name that records its orientation and version, such as
gateway_arch_north_v1. - Load or duplicate it at the next location, then inspect alignment, spacing, and terrain intersections.
- Keep a master copy untouched so later repairs use the same proportions.
Use templates for structure, not for every visible detail. Small variations in banners, windows, vegetation, and wear keep a repeated district from looking mechanical while preserving labor savings.
Plan team work so progress remains visible
Riley “Raeyzeus” Garland warns that many builders underestimate planning and recommends drawing the idea and making a small model first. He also describes the work as partly patience and partly having friends who can help. Turn that advice into explicit assignments.
- Planner: Maintains the brief, coordinate grid, elevation targets, and change log.
- Terrain crew: Clears, terraces, preserves or reroutes natural features, and prepares roads.
- Structure crew: Builds the foundation and primary masses from the approved outline.
- Module crew: Produces arches, windows, towers, roof sections, and saved templates.
- Interior and utility crew: Installs storage, transit, meeting, market, or viewing functions.
- Landscape and wayfinding crew: Finishes plazas, lighting, signs, maps, and routes.
Set review points after the outline, primary masses, and functional installation. A short review at each point is cheaper than discovering that every façade bay is attached to the wrong footprint.
Best Value

- MINECRAFT TOY FOR KIDS – The Nether Lava Battle is a small LEGO Minecraft set that provides big build-and-play fun for boys and girls 6 years old and older who play the popular video game
- PRETEND PLAY – This playset includes a buildable section of the Nether fortress bridge, and minifigures including Alex, a wither skeleton, plus blaze and strider LEGO Minecraft figures with weapons and accessories
- LEGO MINECRAFT FORTRESS ACTION – Players will need their skills to collect ancient debris, escape a lava fall, battle mobs and ride a Minecraft figure to safety
- MINECRAFT FIGURES – The skeleton wields a stone sword, the whirling blaze spins its rods, the strider features posable legs and a saddle, and Alex carries the game’s familiar diamond sword
- FUN GIFT IDEAS – This hands-on video game set is a great birthday, holiday, or any-day treat for boys and girls who love small build-and-play toys packed with activity
Estimate resources without pretending there is a universal budget
There is no reliable universal statistic for landmark cost, build time, block count, or server performance. The result depends on edition, design, terrain, automation, team size, and whether materials are gathered or supplied. Make your own estimate from the measurable brief.
- Count the footprint area and approximate wall, roof, and floor surfaces.
- Multiply one tested module by the number of repetitions, then add foundations, paths, lighting, and landscaping.
- Separate structural blocks from trim, glass, lighting, signs, and temporary scaffolding.
- Add a reserve for revisions and repairs rather than treating the first count as exact.
- Build one representative bay or statue section and use its actual material consumption to refine the estimate.
This approach produces a server-specific bill of materials without claiming that a 99 × 99 site or a 10 × 10 statue base applies to every project.
Recommended Free Tools
Troubleshoot the problems that make landmarks fail
The build is large but not recognizable
Return to the outline and remove texture. View the structure from the busiest route and the intended distant point. Strengthen one dominant feature—an arch, crown, roof, prop, or vertical axis—and reduce competing details. A clear two-tone silhouette usually helps more than additional ornament.
The landmark looks correct from only one side
Inspect the side and rear elevations as part of the silhouette pass. Repeat the main vertical rhythm, add a secondary roofline, or shape the base so the structure has a deliberate profile from every public route.
The site feels disconnected
Extend a road, plaza, waterfront walk, or transit route to the entrance. Add a practical destination inside the landmark and place community buildings along the approach. If players have no reason to pass the site, visual prominence alone will not make it part of the server.
The scale overwhelms nearby buildings
Introduce transition elements: terraces, walls, trees, colonnades, smaller civic structures, or a widening plaza. Keep the landmark’s height, but create intermediate scales that explain why it is monumental.
PC Slower Than It Used to Be?
A free scan shows the junk files, broken settings and background clutter dragging Windows down - then fixes them in one click.Free scan · Windows 10 & 11Crashes, No Sound, or Screen Glitches?
Random freezes, missing sound and display glitches usually trace back to one bad driver. Find and replace yours safely.Free scan · under a minuteRepeated modules drift out of alignment
Check the saved module’s origin, orientation, and connection points. Reload the untouched master, mark a coordinate grid, and place one test copy before duplicating the full row. Correct the source rather than manually repairing every copy.
Players cannot find the entrance
Make the main approach wider or brighter, align it with a road or plaza, and place signs at the preceding junction. A visible roofline or tower should point toward the entrance, not merely decorate it.
A practical launch checklist
- The landmark has one written server role and a useful public function.
- The concept scored well for recognition, role, labor, theme, utility, and maintenance.
- The footprint includes the structure, circulation, plaza, roads, and service space.
- A height target, palette, and three approach routes are recorded.
- The temporary outline reads correctly from ground level, a distant route, and above.
- Primary masses and silhouette are complete before detailed texture begins.
- Entrances, roads, plazas, and community uses connect the landmark to daily activity.
- Signs, lighting, maps, or roofline cues make the site easy to locate.
- Repeated sections have clean saved templates and a documented orientation.
- The team has a repair plan and a master copy of each reusable module.
- Material estimates come from a tested section and include a revision reserve.
- Players have walked the finished routes and can explain what the landmark is for.
What makes an iconic landmark last
Iconic construction is less about maximum size than about dependable recognition and repeated use. A disciplined silhouette gives the server a visual anchor; a connected plaza and road network turn that anchor into a destination; a useful interior gives players a reason to return. Plan on paper, test with temporary blocks, build the largest forms first, and reserve detail for the point at which the proportions already work.
Quick Recap
Product prices and availability are accurate as of the date/time indicated and are subject to change. Any price and availability information displayed on Amazon at the time of purchase will apply.
Quick wins for a faster PC:
Fix the driver behind crashes, sound loss and screen glitchesFind Drivers →Clear out junk files and repair common Windows errorsFree Scan →Scan for outdated or missing drivers - takes under a minuteDriver Scan →



