The Tool Desk
Outbyte PC Repair FREERepair Windows errors before they cause bigger problemsFix Now →Outbyte Driver Updater FREEScan for outdated or missing drivers - takes under a minuteDriver Scan →The Samsung Galaxy S23 Ultra is built for flexible shooting, from everyday photos to heavily controlled Pro Mode, with strong low-light performance and a zoom system that can go far without immediately falling apart. This guide focuses on practical camera mastery—what to change, what to leave alone, and how to get consistent results.
Because your results depend on more than just “which button you tap,” you’ll learn how to configure photo and video settings, use each mode correctly, and troubleshoot the most common failures like blur, exposure swings, and color casts. If you follow the setup and workflows below, you’ll spend less time guessing and more time capturing clean shots.
As an Amazon Associate I earn from qualifying purchases.
What Makes the Galaxy S23 Ultra Camera Different
The S23 Ultra’s camera system combines multiple lenses, strong image processing, and helpful automation. It’s designed to switch between sensors intelligently so you don’t have to micromanage every scene.
What’s actually slowing this PC down?
Pick the symptom - the matching free tool is one click away.
The headline feature most people care about is zoom: the Ultra’s multi-lens setup supports both optical and digital zoom behaviors depending on focal length and distance. The practical goal is to keep details sharp and avoid “zoom mush,” especially indoors and at night.
#1 Best Overall
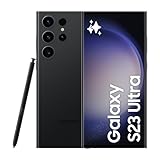
- 6.8" Dynamic AMOLED 2X QHD+ display with 1–120 Hz adaptive refresh rate, up to ~1750 nits brightness, HDR10+ support, and ultra-smooth responsiveness for gaming and scrolling.
Prerequisites and Camera Basics
Before you change settings, confirm a few basics. Small habits can beat most “best settings” lists.
Start with the right stance
Use stable footing, keep the phone as level as possible, and avoid waving during exposure. If you’re using 10x+ zoom, brace your elbows or rest your wrists on a surface.
Clean the lenses
Wipe the lens glass and the camera bump regularly. Fingerprints and dust look like smudges, but they also lower contrast and increase flare.
Know what the shutter is doing
Samsung’s autofocus and HDR pipeline can take a moment depending on lighting. If your camera “hesitates,” it’s often processing multiple frames for HDR or night scenes—moving subjects may blur.
Quick Setup: Best Starting Settings
These settings aim for consistency for both photos and video. They won’t guarantee perfect results in every scene, but they’re a strong baseline.
Open the camera settings
Launch Camera, then tap the Settings icon (usually a gear). Use the options below as your starting point.
- Aspect ratio: 3:4 (good default for most photos)
- Picture size (rear): Prefer the highest available (commonly “12MP” default selections vary by mode)
- Location tags: On (adds GPS metadata for easier searching)
- Contact-based sharing: Off unless you frequently use it
- Grid lines: On (helps horizon and framing)
- Auto HDR: On (keeps highlights in check)
- Scene optimizer: On (lets Samsung adjust color/contrast automatically)
- Stabilization for video: Auto (or High if available)
If you shoot lots of content online, also consider saving in formats that match your workflow (see the file considerations section later).
Quick wins for a faster PC:
Repair Windows errors before they cause bigger problemsFix Now →Scan for outdated or missing drivers - takes under a minuteDriver Scan →Photo Modes You’ll Actually Use
Galaxy S23 Ultra ships with a mode selector that’s easy to underestimate. Using the right mode matters because each mode changes processing, frame stacking, and autofocus behavior.
Single take vs. standard photo
Single take (often called Single Take on Samsung) captures a burst and produces multiple outputs. It’s great for fast moments, but it won’t replace Pro Mode when you want controlled exposure.
For consistent results, use standard Photo mode most of the time and switch modes based on conditions.
Rank #2

- 6.8" Dynamic AMOLED 2X QHD+ display with 1–120 Hz adaptive refresh rate, up to ~1750 nits brightness, HDR10+ support, and ultra-smooth responsiveness for gaming and scrolling.
Expert RAW (if available)
Expert RAW (from Samsung’s app/feature set) is useful when you want more control and higher-quality edits. It often pairs with Pro-like workflows for scenes with challenging dynamic range.
Portrait
Portrait is best with clear subject separation. For older children and adults, keep enough distance to avoid edge halos around hair and glasses.
Night
Night mode stacks frames to reduce noise and recover shadow detail. Use it when scenes are too dim for reliable handheld autofocus and when you want a brighter, more detailed look.
Food
Food uses scene detection and tone changes. If you’re serious about food styling, test angles and lighting first—filters can’t fix harsh overhead light.
Pro (for photos)
Use Pro when you want manual control over shutter speed, ISO, and focus, especially for sunsets, stage lighting, and interior shots.
Crashes, No Sound, or Screen Glitches?
Random freezes, missing sound and display glitches usually trace back to one bad driver. Find and replace yours safely.Free scan · under a minutePC Slower Than It Used to Be?
A free scan shows the junk files, broken settings and background clutter dragging Windows down - then fixes them in one click.Free scan · Windows 10 & 11Pro Mode (Expert Controls) for Photos
Pro Mode is where you can stop the camera from “guessing” and start shooting with intent. It’s the right tool for consistent exposure across a series of shots.
Open Pro Mode
- Launch Camera
- Swipe to More or locate Pro
- Select Pro
Understand the three most important controls
- ISO: Lower ISO reduces noise but needs more light
- Shutter speed: Slower shutter gathers light but increases blur risk
- Focus: Use manual or touch-to-focus depending on motion
Practical Pro Mode recipes
Use these as starting points, then fine-tune based on results.
- Sunset / golden hour: ISO 50–100, shutter 1/250 to 1/1000, Auto White Balance (or set a fixed Kelvin)
- Indoor without flash: ISO 400–1600, shutter 1/60 to 1/250 (brace the phone), use a lower aperture equivalent if available
- Moving subjects: Faster shutter (1/250+) first, then raise ISO rather than slowing down
- Night city scenes: ISO 100–400, shutter 1/2 to 1/30 with stabilization, tripod recommended
If you see noisy shadows, don’t immediately “fix it in editing.” Adjust ISO and shutter to capture cleaner exposure in the first place.
Nightography and Low-Light Shooting
Low-light success on the S23 Ultra is about balance: you want enough light captured per frame, but you also need stability and correct subject exposure.
Recommended Free Tools
Use Night mode correctly
- Open Camera
- Swipe to Night
- Tap to focus on the subject
- Hold steady while the progress bar completes
If your subject is moving, you’ll often get better results by reducing exposure time (using a faster mode like standard Photo with a stable shot), rather than forcing long stacking.
Rank #3

- 6.8" Dynamic AMOLED 2X QHD+ display with 1–120 Hz adaptive refresh rate, up to ~1750 nits brightness, HDR10+ support, and ultra-smooth responsiveness for gaming and scrolling.
Stabilize for best results
- Use a tripod or rest the phone on something solid
- Turn on Timer if you’re getting micro-blur
- Avoid digital zoom at night unless you can keep the phone extremely steady
Watch for blown highlights
Streetlights and neon signs can clip. If you see white “halos,” try shooting from a slightly different angle or use Pro Mode with lower ISO and faster shutter to preserve highlights.
Video Mastery: Resolution, Frame Rate, and Stabilization
Video is where the Ultra can shine, but it’s also where wrong settings show up fast—especially in motion, low light, and fast pans.
Set resolution and frame rate
- Open Camera
- Switch to Video
- Tap the resolution / frame rate label
- Choose based on your target platform
Common practical choices: 4K at 30 fps for general use, 4K at 60 fps for smoother motion, and 1080p at 60 fps for editing flexibility. In low light, higher frame rates can cost sensitivity, so favor 30 fps when possible.
Do these 3 things before closing this tab:
1Clear out junk files and repair common Windows errors2Fix the driver behind crashes, sound loss and screen glitches3Repair Windows errors before they cause bigger problemsStabilization settings
In video settings, select Super steady (if available) for walking shots. For cinematic smoothness on a tripod or gimbal, standard stabilization is often cleaner than “super steady,” which can crop the frame.
Use the right zoom behavior
For smooth zooms, consider moving your body instead of relying on digital zoom. If you must zoom, do it slowly and maintain a steady horizon.
Audio matters
Check audio quality by recording a 5–10 second clip and reviewing playback. If you’re in wind, use wind noise considerations (use a wind muff if you use accessories).
Zoom, Lenses, and How to Avoid Bad Results
Zoom is powerful, but it’s also the fastest way to reveal shake, focus misses, and atmospheric haze. The goal isn’t always maximum zoom—it’s usable detail.
Practical zoom rules
- Short distances: Use optical range when possible and keep the phone steady
- Long distances: Atmospheric haze limits detail; try different angles to reduce haze
- Night zoom: Expect noise and loss of contrast; use standard Night mode and avoid extreme zoom
Focus checks
When zoomed, your autofocus target area is smaller. Tap on the subject carefully and wait a beat for focus to lock.
Use a stabilizer mindset
If you’re shooting at 10x or higher, treat it like a “telephoto lens.” Brace, reduce movements, and use timer or burst when needed.
Advanced Features: HDR, Object Eraser, and Smart Options
Samsung’s processing tools can dramatically improve results when used with restraint.
Rank #4

- 6.8" Dynamic AMOLED 2X QHD+ display with 1–120 Hz adaptive refresh rate, up to ~1750 nits brightness, HDR10+ support, and ultra-smooth responsiveness for gaming and scrolling.
Auto HDR and highlight recovery
Auto HDR helps with scenes that have both bright highlights and deep shadows—like sunsets with buildings. If you notice oversaturated skies, toggle Scene optimizer or adjust your editing later.
Scene optimizer
Scene optimizer adjusts color and contrast based on detected scenes. It can be a win for casual shooting, but for consistent “look,” you may prefer turning it off and editing intentionally.
Object Eraser
If your device includes Object eraser (often found in the gallery editor), it can remove people, wires, and small distractions. Best results happen when the background is simple and you have enough resolution.
When erasing fails, avoid heavy brush strokes at once. Use multiple passes and zoom in to refine edges.
Editing and Post-Processing on the Phone
The camera captures the scene; editing determines how it feels. On the S23 Ultra, you can get strong results directly in the Gallery without needing a full workflow.
Gallery editing basics
- Open Gallery
- Select a photo
- Tap Edit
- Adjust: Brightness, Contrast, Saturation, Highlights, Shadows
Recommended editing order
- 1) Exposure: Fix brightness and shadows first
- 2) Tone: Adjust contrast and highlights
- 3) Color: Tweak saturation and white balance
- 4) Sharpening: Use lightly to avoid crunchy edges
- 5) Cleanup: Object removal only after tone is stable
Common edit mistakes
Avoid pushing saturation too far—especially in night shots—because noise and color banding become more obvious. If a photo looks “muddy,” correct exposure before contrast.
Independent reader supportYour contribution helps us test, update, and keep practical guides available for everyone.Sharing Workflows and File Considerations
What you shoot affects what you share. Compression and platform resizing can reduce detail, especially from high-resolution images and 4K video.
Choose output formats intentionally
If you’re working with Expert RAW or Pro Mode outputs, you may have more control. For social sharing, standard JPEG captures are often enough, but consider whether your platform supports HDR video or high-resolution uploads.
Video and HDR
When you share to platforms, HDR support varies. Before assuming HDR, upload a short test clip and inspect how highlights and skin tones render on the receiving device.
Free tools Windows power users keep installed
One-click scans. No signup required.
Managing storage
Higher-quality modes produce larger files. If storage is tight, set a routine: clear older videos, move files to a computer, or use cloud storage you trust.
Best Value
- 6.8" Dynamic AMOLED 2X Infinity-O QHD+, Edge Screen, 120Hz Refresh Rate, 500ppi, 1750nit (Outdoor Peak), 1440 x 3088 pixels, 5000mAh Battery
- 512GB, 12GB RAM, No SD Card Slot, Qualcomm SM8550-AC Snapdragon 8 Gen 2 (4nm), Octa-Core, Adreno 740
- Rear Camera: 200MP, f/1.7 + 10MP, f/4.9 + 10MP, f/2.4 + 12MP, f/2.2, Front Camera: 12MP, f/2.2, Android 13, One UI 5.1
- 2G: GSM 850/900/1800/1900, CDMA 800/1900, 3G: HSDPA 850/900/1700(AWS)/1900/2100, CDMA2000 1xEV-DO, 4G LTE: 1/2/3/4/5/7/8/12/13/14/18/19/20/25/26/28/29/30/38/39/40/41/46/48/66/71, 5G: 1/7/28/41/66/71/78/258/260/261 SA/NSA/Sub6/mmWave - Single SIM
- No Warranty. Compatible with Most GSM and CDMA Carriers like T-Mobile, AT&T, MetroPCS, etc. Will Also work with CDMA Carriers Such as Verizon, Sprint.
Troubleshooting: Fix Blurry, Grainy, or Wrong-Color Photos
When the camera doesn’t perform, it’s usually predictable. Use these troubleshooting paths to isolate what went wrong.
Problem: Photos are blurry
- Check shutter speed: In Pro Mode, speed up shutter or lower ISO
- Reduce motion: Use a timer (3s/10s) to avoid hand shake
- Improve focus: Tap the subject and wait for lock
- Stabilize zoom: Higher zoom amplifies shake; use bracing or a tripod
Problem: Night shots look grainy
- Stability: Hold still until the capture completes
- Avoid extreme zoom: Use lower zoom and crop later
- Control highlights: Reduce overexposure; blown highlights increase perceived noise
- Use Pro Mode: Start with lower ISO (e.g., 100–400) and slower shutter if you can stabilize
Problem: Wrong colors or skin tones
- Turn off Scene optimizer for consistency, then edit manually
- White balance: In Pro Mode, set Kelvin if Auto WB is misreading the scene
- Check lighting: Mixed lighting (LED + tungsten) can confuse Auto WB—try a different angle or use Pro WB
Problem: HDR looks unnatural
- Reduce HDR intensity by disabling Auto HDR in settings (if available for your mode)
- Edit highlights downward in Gallery instead of maxing contrast
- Avoid backlit moving subjects: HDR pipelines can struggle with motion
Problem: Auto-focus hunts or won’t lock
- Wipe the lens and remove case obstructions
- Use touch focus on a high-contrast edge
- Step back or change distance: Extreme close focus can be harder on phones
Common Mistakes to Avoid
- Relying on maximum zoom instead of stability and focus
- Holding the phone while Night stacks without stabilization
- Over-editing saturation to compensate for dull lighting
- Changing settings mid-series: consistency matters if you’re shooting multiple related photos
- Ignoring horizon lines: grid lines make a huge difference
Comparisons and Alternatives
The S23 Ultra can cover most needs, but it’s useful to understand when another approach gives a better result.
Using Pro Mode vs. Expert RAW
Pro Mode is fast and great for controlled exposure in real time. Expert RAW is better when you want more editing latitude from the start, especially in high dynamic range scenes.
Using a dedicated camera app flow
If you want consistent results for a specific look (street, portraits, or landscapes), create a repeatable capture plan: same frame size, consistent lens/zoom, fixed exposure strategy (Auto vs Pro), then edit with a consistent recipe.
FAQs
What’s the best default photo mode for most people?
Use Photo with Auto HDR and Scene optimizer enabled, plus grid lines for framing. Switch to Pro Mode when lighting is tricky or you want consistent exposure across a set.
Should I use Pro Mode for every low-light situation?
No. Use Night when the subject is mostly still and you want cleaner shadows. Use Pro when you can stabilize the phone (tripod) or when you need control over highlights and exposure.
Why do my night photos sometimes look over-processed?
It’s usually a combination of moving subjects, extreme zoom, and HDR/night processing blending. Try lower zoom, stabilize more, and keep the subject in the focus area.
How do I get sharper portraits?
Keep enough distance, ensure good lighting, tap to focus on the eyes/face, and avoid extreme zoom. Then use gentle sharpening in editing rather than heavy contrast boosts.
Does video stabilization reduce image quality?
Stabilization features can crop or change the processing pipeline. For the cleanest look, prefer standard stabilization for static shots and use “super steady” only when you need it for walking or moving capture.
Bottom Line
Mastering the Galaxy S23 Ultra camera is less about chasing one perfect “setting” and more about matching the mode to the scene: Photo for everyday consistency, Night for low-light stacking, Pro Mode for controlled exposure, and video settings tuned for frame rate and stabilization.
Once you adopt the quick setup baseline and use the troubleshooting paths when something goes wrong, your results will stabilize quickly—and you’ll spend far less time fighting blur, noise, and inconsistent colors.
Free tools Windows power users keep installed
One-click scans. No signup required.
Quick Recap
Product prices and availability are accurate as of the date/time indicated and are subject to change. Any price and availability information displayed on Amazon at the time of purchase will apply.




