What’s actually slowing this PC down?
Pick the symptom - the matching free tool is one click away.
To install Nginx UI with Docker, run the official uozi/nginx-ui:latest image, persist /etc/nginx-ui, and publish a host port to the container’s port 80. Complete first-run setup in a browser with the temporary .install_secret. Before deploying, decide whether the UI will control its bundled Nginx, a separate Nginx container, or host-installed Nginx: each option has different mounts and privileges.
Choose what Nginx UI will manage
The standard Docker image includes Nginx. The official [Getting Started guide] presents it as an option for replacing the host-facing Nginx service by publishing ports 80 and 443. If you instead want the UI to control Nginx in another container or installed on the host, configure that mode deliberately; the standard image is not the documented route for managing host-installed Nginx.
As an Amazon Associate I earn from qualifying purchases.
| Control mode | Where Nginx runs | Access and file requirements | Key operational consideration |
|---|---|---|---|
| Bundled Nginx | Inside the Nginx UI image | Publish the desired host ports to container ports 80 and 443; persist Nginx UI data at /etc/nginx-ui. |
Ensure the /etc/nginx volume is empty on the container’s first run, as the guide directs. |
| Another Nginx container | In a separate container | The documented setup requires the Docker socket and the same Nginx config and log paths mounted into both containers. UI-side config access must be writable; the Nginx container’s mount can be read-only. | Configure the target container name. The socket and name route status and control commands; the UI reads and writes configuration files through its own filesystem. See the [Nginx configuration guide]. |
| Host-installed Nginx | Directly on the host | The documented Docker-based host-control approach uses SSH and is same-host only. Linux requires systemd and a narrowly permitted passwordless sudo -n command set; macOS requires a Homebrew user service and its owning login user. |
Set up a dedicated SSH account, trusted host-key allow-list, persistent UI data, and narrowly scoped permissions. See the [host SSH guide]. |
Install the Docker image and complete first-run setup
1. Prepare persistent data and ports
The official image is uozi/nginx-ui:latest. According to the [official Getting Started guide], it listens on container ports 80 and 443. Port 80 is reverse-proxied internally to the UI backend at 127.0.0.1:9000, so publish container port 80 for browser access to the setup page. The guide’s example maps host port 8080 to container port 80, and host port 8443 to container port 443; in that example, open the host address on port 8080.
Free tools Windows power users keep installed
One-click scans. No signup required.
Mount persistent storage at /etc/nginx-ui before starting the container. The same directory holds application data and, when using host SSH control, the host-key allow-list. A bind mount or Docker volume helps retain this state across container replacement. Mount /var/www only if your deployment needs it. Treat the guide’s example mounts—including its Docker socket mount—as examples, not a least-privilege default for every installation.
#1 Best Overall
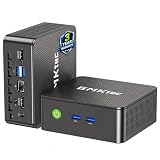
- WHY CHOOSE G3 ULTRA MINI PC PENTIUM GOLD 7505 - Choose the Intel Pentium Gold 7505 for snappier everyday responsiveness: It delivers up to 30% faster single-core performance than the Ryzen 5 3500U, making office apps and web browsing feel noticeably quicker, while its Intel UHD Graphics (48 EUs) provides 2.4x the GPU performance of the N100 & N150's 24-EU graphics, ensuring smoother 4K streaming and light photo editing.
- 16GB RAM MEMORY & 512GB STORAGE - GMKtec Nucbox G3 Ultra mini computer is prebuilt with 16GB LPDDR4 RAM at 3200 MT/s, you will enjoy a speedier experience with Built-in 512GB M.2 SATA Hard Drive. Our mini desktop pc boots up in seconds, work on multiple browser tabs, software applications and quickly transfers files. There is a primary slot and secondary expansion storage. Primary slot is M.2 2280 PCIE and secondary slot is M.2 2280 SATA.
- RICH INTERFACE - Nucbox pentium mini computer is equipped with 3* USB 3.2 Gen2 ports, up to 10Gbps/S, 1*USB 2.0, HDMI(4K@60Hz)*2, 3.5mm Audio Jack. Supports WiFi 6, and Gigabit Ethernet RJ45 2.5GbE network connectivity, Bluetooth 5.2. This Mini PC supports multiple device connection and can be used with servers, monitoring equipment, office equipment, displays, projectors, televisions, etc.
- 4K DUAL SCREEN DISPLAY - Mini desktop computer is equipped with upgraded Intel Graphics(max 1000MHz), supports 4K video playback and AV1 decoding, connect the pc with a projector as a home theatre, enjoy a variety of entertainments. Two HDMI 2.0 ports allows you to multi-task efficiently on two 4K@60Hz displays.
- UPGRADED COOLING FAN - The G3 Ultra has upgraded the cooling fan to reduce fan noise and thermals. We are using an upgraded thermal paste as well to help reduce heat on the CPU.
2. Start the container
Use the official guide’s Docker run or Compose example as a starting point, adapting host paths and port mappings to your chosen control mode. For a basic bundled-Nginx deployment, do not add the Docker socket unless you have chosen a documented feature that requires it. Make sure the /etc/nginx volume is empty on first run, as specified by the guide; do not place existing Nginx configuration there before initial startup.
3. Retrieve the temporary setup secret
On first startup, Nginx UI creates .install_secret alongside app.ini in /etc/nginx-ui. With a host directory mounted there, read the secret from that directory. If no mount exists, the guide gives this fallback:
Rank #2

- 12th Intel Alder Lake N95 Processor – The GMKtec G3 S Mini PC is powered by the 12th Gen Intel N95 processor with 4 cores, 4 threads, 6MB cache and a burst frequency up to 3.4GHz. Compared with N100/N5105/N5100/N5095, the N95 delivers up to 36% overall performance improvement. Perfect for routine tasks, office work, and home entertainment, this compact mini desktop is more convenient than traditional bulky PCs.
- 8GB RAM & 256GB SSD Storage – Pre-installed with 8GB DDR4 memory and a fast 256GB M.2 2242 SSD, the G3 S mini desktop offers quicker startup, smoother multitasking, and faster file transfers. Enjoy seamless performance whether you’re working on multiple applications, browsing, or streaming content.
- Rich Interfaces & Connectivity – The G3 S mini computer comes equipped with USB 3.2 (up to 10Gbps), dual HDMI 2.0 (4K@60Hz), and a 3.5mm audio jack. With support for WiFi 5, Bluetooth 5.0, and Gigabit Ethernet (RJ45 1000MbE), it connects easily with monitors, projectors, printers, office equipment, and other peripherals, making it versatile for both home and business use.
- Dual 4K Display Support – Featuring upgraded Intel UHD Graphics (up to 1000MHz), the G3 S supports 4K video playback and AV1 decoding for a smooth viewing experience. With dual HDMI outputs, you can connect two 4K@60Hz displays simultaneously, enabling efficient multitasking for work and entertainment.
- GMKTEC WARRANTY - GMKtec offers a 3-year limited warranty (1 year replacement + 2 years parts replacement) for each mini PC, starting from the date of the purchase effective on all sales starting Oct. 2026. All defects due to design and workmanship are covered. With a professional after sales team always ready to attend to your needs, you can simply relax and enjoy your mini PC
docker exec <container_name> cat /etc/nginx-ui/.install_secretOpen the host address on the port mapped to container port 80 and enter the secret in the initial setup flow. It is valid only during the first-run setup window and is removed after setup completes or the window expires. If it is missing, check that the container has started and look in the mounted data directory; an expired secret requires resolving the setup state rather than treating an old secret as reusable.
Secure host-installed Nginx access over SSH
Use the documented SSH mode when Nginx UI runs in Docker but must control Nginx installed on the same host. Its setup wizard performs connectivity and configuration checks, but host access still depends on careful account, key, and privilege configuration. The [host SSH guide] recommends enabling administrator two-factor authentication before opening the host SSH setup wizard.
Rank #3

- ➊ [ Trusted Quality for Everyday Agentic AI ] GEEKOM equips its SSDs with reliable original-grade flash and conducts rigorous stability testing to support dependable everyday operation. This commitment to quality is backed by a 3-year warranty. Simply connect the Air12 to cloud AI services for research, writing, study support and daily productivity—no NPU or complex local setup required. Designed for students, home users, light office work and first-time buyers, the Air12 is a high-value Cloud Agentic PC for everyday tasks
- ➋ [ Intel 7505 processor ] Powered by the Intel 7505 processor (2 cores, 4 threads, up to 3.5GHz), the GEEKOM Mini PC Air12 delivers smooth performance for everyday computing, office tasks, and home entertainment. With enhanced single-core processing, it handles daily workloads efficiently and responsively. Compact, quiet, and energy-efficient — a solid alternative to bulky desktops.
- ➌ [440lbs(200kg) Pressure Rated Metal Frame for Demanding Environments] Unlike the Plastic Shells You’ll Find on Most Mini PCs, geekom Mini Air12 features a triple-reinforced ABS+PC shell, precision-crafted metal frame and baseplate—engineered to withstand up to 440 lbs of pressure for the perfect balance of strength and thermal efficiency. Tool-free upgrades, shock-absorbing feet, and a 3D antenna deliver true durability
- ➍ [Dual-Channel RAM & NVMe SSD Expandability] Ships with 8GB DDR4 RAM and a 256GB NVMe SSD for smooth everyday performance. Dual memory slots and dual storage slots give you the flexibility to upgrade to 64GB RAM and 2TB SSD, so your system can adapt as your workload grows. Enjoy faster load times, smoother multitasking, and long-term reliability.
- ➎ [Triple 4K Displays for Maximum Productivity] Connect up to three 4K monitors via HDMI 2.0, Mini DisplayPort 1.4, and USB-C — ideal for stock trading dashboards, multi-tab research, office document editing, and light spreadsheet work. WiFi 6 and Bluetooth with high-gain antenna ensure stable wireless connections throughout your workspace. 5x USB ports and a full-size SD card reader provide quick access to peripherals and camera files — no adapters required.
Use a dedicated account and a scoped key
- On Linux, use a dedicated unprivileged
nginxuiaccount. The guide’s sample adds the account toadmfor log access; grant only the access this deployment needs. - Generate a key in the wizard or provide one. A generated Ed25519 key is stored at
/etc/nginx-ui/host_key; a pasted or uploaded key is stored with mode0600. This setup does not support encrypted private keys. - Verify the SSH host fingerprint through a trusted channel before accepting it. Host SSH mode requires a
known_hostsallow-list. Treat a changed host key for the same algorithm as security-sensitive, not as a routine prompt to accept. - On Linux, install the generated sudoers entry using
visudo. Keep customTestConfigCmd,ReloadCmd, andRestartCmdvalues empty unless the sudoers entry explicitly covers those commands.
Choose how the UI accesses host files
The guide offers SFTP or mounted-file access. SFTP avoids host-directory bind mounts, but rescans changes on a 30-second interval and has a documented limitation: it cannot discover certificates that exist only on the host. Mounted-file access requires bind mounts and container recreation when those mounts change.
Persist /etc/nginx-ui in a volume or bind mount so /etc/nginx-ui/known_hosts and related UI data survive upgrades and container rebuilds. Before saving the SSH setup, run the wizard’s applicable checks for SSH connectivity, Nginx configuration, platform and service status, file permissions, and sudo coverage.
Rank #4

- 【AMD Ryzen 4300U True 4-Core CPU: Outperforms N95 & i3-10110U】KAMRUI P2 Mini PC is equipped with true 4-core AMD Ryzen 4300U processor built on advanced 7nm Zen2 architecture,This means you get consistent, unthrottled performance for hours on end, whether you’re running multiple browser tabs, streaming 4K content, or managing virtual machines. Compare that to Intel N95 (4 efficiency cores that throttle under load) or Intel i3-10110U (only 2 cores total), and the difference is night and day: The KAMRUI P2 AMD Ryzen 4300U (28W) is 40% faster than the Intel i3-10110U and 25% faster than the Intel N95 in multi-core tasks, ensuring smooth, lag-free performance even during heavy workloads.
- 【Integrated AMD Radeon Graphics: 2.5X Stronger for Tri 4K】The KAMRUI P2 AMD 4300U Mini PC have unlocked the full potential of the built-in AMD Radeon Vega 5 graphics with 28W power delivery, making it 2.5 times stronger than the Intel UHD graphics found in the N95 and i3-10110U. This means you can enjoy Tri 4K@60Hz displays without a single stutter, perfect for productivity setups, home theaters, or even light photo/video editing and casual gaming. While the Intel N95/i3-10110U struggle to run a single 4K display without lag, The KAMRUI AMD 4300U Mini PC handles Tri 4K effortlessly, turning your workspace into a high-efficiency hub or your living room into a premium entertainment center.
- 【Large Storage Capacity, Easy Expansion】KAMRUI Pinova P2 mini computers is equipped with 16GB LPDDR4 for faster multitasking and smooth application switching. 512GB M.2 SSD ensures fast startup, fast file transfers and plenty of storage space,eliminating slow loading times and ensuring fast responsiveness. the two storage slots (1x M.2 2280 SATA/NVMe PCIe3.0 slot, 1x M.2 2280 SATA slot) can be combined to provide up to 4TB of total storage(Not included). This gives you enough space for all your projects, media and data.
- 【4K Triple Display】KAMRUI Pinova P2 4300U mini desktop computers is equipped with HDMI2.0 ×1 +DP1.4 ×1+USB3.2 Gen2 Type-C ×1 interfaces for faster transmission, Triple 4K@60Hz Display, KAMRUI P2 mini computer is ideal for visual home entertainment, home office, conference rooms, etc. USB3.2 Gen2 Type-A port ×2 with a transfer speed of up to 10 Gbps (21 times faster than USB 2.0) for efficient data transfer. Ideal for seamless multitasking between spreadsheets, browsers and presentations, or for an immersive entertainment experience.
- 【USB3.2 Gen2 Type-C 10Gbps, Versatile connectivity】KAMRUI P2 mini desktop pc fast and versatile connectivity! The USB3.2 Gen2 Type-C port offers a data transfer rate of 10Gbps and simultaneously supports DisplayPort 1.4 video output. The P2 AMD Ryzen 4300U Mini PC is complemented by Gigabit LAN, WiFi and Bluetooth, so nothing stands in the way of a productive working environment.
Limit Docker-socket access when managing another container
For the documented separate-container mode, Nginx UI needs the host Docker socket and the target container name to route status and control commands. It also needs matching Nginx configuration and log paths mounted into its own filesystem; its configuration mount must be writable. The Nginx container’s corresponding mount may be read-only.
PC Slower Than It Used to Be?
A free scan shows the junk files, broken settings and background clutter dragging Windows down - then fixes them in one click.Free scan · Windows 10 & 11Outdated Drivers Are Slowing You Down
One free scan finds every outdated or missing driver and matches the right update for your exact hardware.Free scan · exact hardware matchAccess to the Docker socket is a powerful host-control capability. Because the documented mode requires it, protect the management interface and the Docker host accordingly, and avoid granting socket access to deployments that do not need this control path. Do not confuse the socket’s role in issuing container commands with file access: Nginx UI reads and writes the configuration through its own mounted paths.
Put Nginx UI behind a reverse proxy carefully
Nginx UI documents ticket-based WebSocket authentication: a short-lived explicit token is obtained through a CSRF-protected API endpoint. If a reverse proxy exposes the UI under a different public origin, serves multiple management domains, or supports local development, WebSocketTrustedOrigins is an optional additional defense. Same-origin connections do not need to be added. Keep the trusted-origin list as small as the deployment requires; see the [HTTP configuration guide].
Quick Recap
Check the deployment before relying on it
- Confirm the browser reaches the host port mapped to container port 80; do not browse to the internal backend port 9000.
- Confirm
/etc/nginx-uiis persistent and contains the expected application data. - For separate-container control, verify the target container name, Docker-socket access, and matching config/log mounts; keep only the UI-side configuration mount writable.
- For SSH host control, verify the trusted host fingerprint,
known_hostspersistence, account permissions, and the applicable wizard checks before saving. - Recheck the official documentation and the release-specific image you deploy when upgrading: the repository README follows a development branch, and image tags and workflows may change.
Product prices and availability are accurate as of the date/time indicated and are subject to change. Any price and availability information displayed on Amazon at the time of purchase will apply.




