Free tools Windows power users keep installed
One-click scans. No signup required.
Starlink delivers two-way internet through a user terminal that communicates with low-Earth-orbit satellites moving overhead. The terminal can switch between satellites as they pass, but that does not guarantee an uninterrupted connection: your address must be eligible for service, and the terminal needs a sufficiently clear view of the sky. Check availability for the service address and use the Starlink app’s obstruction preview at the intended installation location before ordering.
How Starlink sends an internet connection to your home
Starlink is a satellite internet service. Its basic kit includes a user terminal, Wi-Fi router, power supply, and mount. The terminal communicates with satellites overhead; the router provides the local Wi-Fi connection for devices in your home. In other words, the terminal is the part that links the site to Starlink’s satellite network, while the router distributes the connection nearby. Starlink describes the service as two-way satellite-based internet, rather than a one-way broadcast service.
As an Amazon Associate I earn from qualifying purchases.
The satellites move across the sky relative to a terminal on the ground. As one satellite moves out of a useful position, the terminal can connect to another. Starlink says fixed installations can switch proactively as conditions change; mobile terminals and unexpected conditions may instead trigger reactive switching. That handoff is intended to maintain a useful link as the network moves overhead. It cannot overcome every obstruction: if all available paths are blocked, a handoff may not prevent a service interruption.
In a July 30, 2025 update, Starlink described a US user terminal as having “10s of satellites in view.” That is Starlink’s description of its US network at that time, not a guaranteed count for each terminal, location, or later date. More satellites potentially give the system more possible connections to work with, but the number alone does not establish what service will be available at a particular property. Starlink’s updates also reported on October 6, 2026, that more than 11,000 Starlink satellites were in low Earth orbit and that the first 26 V3 satellites had been deployed at the end of September 2026. Both figures are company-reported, time-sensitive snapshots, not fixed totals.
#1 Best Overall

- 【Compatible with Starlink Standard V3 / Gen3 / 4 / 4 X】Not compatible with Starlink Mini/Performance Gen 2/Performance Gen 3/Standard Actuated. Please verify your dish model before purchase.
- 【Aluminum Alloy Adapter Compatible with Starlink Standard 4 / 4 X / Gen3】 Unlike many plastic adapters, this aluminum alloy adapter offers greater durability, stronger support, and is less likely to crack or break over time.
- 【Adjustable Design】 For longer eaves, flip the pole for a better fit. The mount installs from either end, and the pole connected to the pipe adapter can rotate for angle adjustment. Tighten the screws to lock the position and optimize dish alignment.
- 【18-Inch Wall Mount for Starlink】 Works as a roof mount or pole mount. Includes two screw sets: expansion anchors for concrete/masonry and lag screws for wooden roofs.
- 【Accessories included】Aluminium Pipe Adapter x1,extension screws x6, self-tapping screw x4, short stainless steel screws x2, long stainless steel screws x1, support steel tubes x1, support base x1, wrench x1, drill bit x1, instruction manual x1
What “coverage” means—and what a map cannot tell you
Coverage has two separate practical tests. First, can service be activated for the intended address under the plans Starlink currently offers there? Second, can the installed terminal maintain a connection from its actual position, given the surrounding sky and any local obstructions? Passing one test does not guarantee passing the other.
A country or region shown on a coverage map does not prove that every address there can activate every plan. Starlink says eligible plan offerings depend on network capacity, regulatory approval, and local demand. The options shown can also be filtered by the service address, account, and hardware. Use the current Starlink Service Plans page and the address-specific availability flow to check what is offered where you plan to use the service. Starlink’s help article explains that eligibility is determined for the relevant account and location: Which service plans am I eligible for?
Eligibility answers whether a plan is offered for the address; it does not assess the view of the sky from a roof, yard, or mounting pole. Nor does an eligible plan by itself promise a particular speed or uninterrupted service. Treat the address check and the physical-site check as separate steps.
Rank #2

- [Easy Installation]- The mount includes all necessary installation components: a Starlink Gen 3、Gen 4 & 4X dish mount adapter, an angle-adjustable base, a 15.7" pivot pole, six screws and six anchors for base installation, six screws for the mount adapter, two screws for the pole and base, one lever, one wrench, and a comprehensive instruction manual, enabling immediate out-of-the-box installation
- [Robust Aluminum Alloy Adapter]- Features a durable, thickened aluminum alloy adapter, engineered for a secure connection to the Starlink V3 dish, ensuring optimal stability and signal integrity
- [Heavy-Duty Steel Pivot Pole]- Constructed with a resilient, 0.1-inch extra-thickened steel pipe, measuring 15.7 inches in length and 1.5 inches in diameter, the pivot pole provides exceptional strength and resistance to environmental factors, guaranteeing long-lasting durability and reliable performance, even in challenging weather conditions
- [Adjustable Base Mount]- An extra-thickened, heavy-duty adjustable base mount facilitates precise angle adjustments to optimize the Starlink V3 dish's alignment for superior signal reception
- [Seamless Compatibility]- Specifically designed for compatibility with the Starlink V3/V4 Standard Dish, ensuring a seamless and secure installation process
Why the view of the sky matters
The terminal needs to communicate with satellites as they move overhead. Trees, buildings, poles, roof edges, and other objects can obstruct that communication. A location may look open from ground level while part of the terminal’s usable sky view is still blocked by nearby structures or vegetation. Starlink’s setup guidance states: “Your Starlink needs a clear view of the sky so it can stay connected with satellites as they move overhead.” This is Starlink’s installation instruction, not an independent performance test.
Starlink’s obstruction map is based on obstructions the terminal detects while communicating. The map can help explain interruptions, but it is not a promise that a location will never lose service. Starlink says brief interruptions may occur when all available satellites are obstructed. Its obstruction-map help page explains how to interpret that view.
Check the proposed position before mounting
- Check address eligibility. Use Starlink’s current availability and plan tools for the service address. Confirm the plan options for that location rather than assuming a map’s regional shading means activation is available.
- Open the Starlink app at the intended installation spot. Use its “Check for Obstructions” tool to preview whether objects block the terminal’s view. Check the actual proposed location, not only a nearby open area.
- Try a different position if the preview shows obstructions. Compare possible locations on the property. If a clear view cannot be found at ground level, Starlink’s setup guide suggests considering an elevated roof, pole, or wall position.
- Use a suitable mount for the location and terminal. Starlink offers additional mounts and accessories. Verify compatibility with the terminal generation and the mounting surface before buying; a different mount cannot make an inherently blocked site clear.
- After installation, review the obstruction map if service is interrupted. Compare detected obstructions with the physical surroundings. If the site or its surroundings have changed, reassess the position rather than assuming satellite switching can compensate for a blocked view.
The official Standard (Circular) Starlink Kit setup guide describes the setup guidance for that kit. The guidance about elevated placement is useful when a ground-level position is blocked, but mounting height is not a substitute for finding a position with a suitable view.
Rank #3

- TIP: Compatible with Starlink Standard 4/4X/Gen 3. This package does not include bricks. NOTE: If facing strong winds, additional BRICKS should be added for reinforcement (extra weight, load-bearing capacity) to prevent movement!!
- [Starlink Roof Mount]The package includes a Starlink pipe adapter, which has been rigorously tested, ensuring high precision and reliable compatibility. The starlink pivot mount helps achieve optimal positioning. The starlink ridge mount allows for better alignment of the satellite dish, ensuring a clearer line of sight to the satellites for improved performance and faster internet speeds.
- [Versatile Angle]This upgraded starlink mounting kit is equipped with a swivel mechanism and adjustable angle feature, enabling it to accommodate different roof slopes while providing stability, making it ideal for structures with sloped roofs.
- [Robust Metal Construction]Easy setup! No drilling is needed on the roof, ensuring the Starlink Gen 3 mount can be set up effortlessly without compromising the roof's integrity or leaving any unsightly marks. Plus, the Starlink roof ridge mount Gen 3 is reusable, making it easy to reposition your satellite dish when needed.
- [Keep Water from Pooling]This design allows water to drain away, no worry about any pooling. The Starlink Gen 3 roof mount is perfect for sloped roofs but works just as well on flat ones, making sure the antenna has a clear view. Overall, the Starlink pivot roof mount boosts both the performance and looks of your satellite setup!
Other factors that affect service quality
Network capacity, demand, and plan eligibility
Capacity and local demand can influence which plans Starlink offers at an address. Eligibility is therefore location-specific and can change as network conditions or approvals change. Do not infer that a plan or price shown for one address, country, or account will be available to another. Check the current plan and availability tools for the actual service location.
Recommended Free Tools
Time of day and plan priority
Starlink cautions that performance varies with location, time of day, and service-plan priority. Speeds may be lower during periods of high usage, and the company does not guarantee uninterrupted service. A speed figure on a specifications page is consequently not a forecast for a particular household at a particular hour. The plan’s current terms and priority matter alongside the physical installation.
Movement and changing obstructions
Fixed installations can switch connections proactively, according to Starlink, while mobile terminals or unexpected conditions may prompt reactive switching. That flexibility does not mean every plan and hardware combination can be used while moving. If the intended use involves movement, check the current plan and hardware rules for the relevant location rather than assuming a residential or fixed-use offering applies. Trees grow, construction changes sightlines, and temporary objects can also affect a fixed installation; the terminal’s obstruction map can help identify detected blockage.
Rank #4
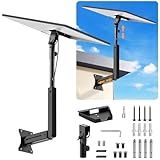
- ADJUSTABLE: Our starlink standard 4 mount features a retractable design with a support arm that telescopes up and down, back and forth, providing more versatility than a fixed length mount. Seamlessly compatible with your current Starlink Gen 3 mount, you'll enjoy an unobstructed view no matter where you place it
- HIGH QUALITY: Our Starlink Wall Mounts for Dishes is made of top-grade metal to ensure a long life and can withstand over 60 pounds of weight. And the starlink pole mount gen 3 comes with hidden cable holes to prevent damage to your cables, this thoughtful design not only enhances aesthetics but also protects the Starlink Gen 3 V4 from environmental wear and tear
- ANGLE ADJUSTMENT: Starlink 4x mount can be adjusted from 90-180° to ensure optimal reception of the signal. With its rustproof, windproof, and weatherproof properties, this starlink mount gen 3 ensures optimal performance in all conditions
- VERSATILITY: Our starlink v4 mount comes with two types of screws: expansion screws for concrete walls and lag screws for wood roofs. Suitable for a variety of walls such as wood, brick or concrete
- EASY INSTALLATION: This starlink wall mount standard 4 is simple to install. Simply drill the holes, secure the brackets, and plug directly into the Starlink Gen 3. This flexibility makes it an essential component for starlink mounts. The length of the mounting plate is 5.9 in/15cm, and the width is 5.11 in/13cm
Weather
Starlink markets its equipment as weather resilient. That design claim does not establish how often a specific site will lose service in rain, snow, or severe weather. The available specifications do not provide an independent site-specific outage rate or a quantitative estimate of weather-related signal loss. Do not interpret “weather resilient” as a guarantee of uninterrupted service in severe conditions.
Independent reader supportYour contribution helps us test, update, and keep practical guides available for everyone.Published speed and latency figures—and their limits
Starlink’s specifications page lists the following typical figures for land service. These are company-published specifications, not promised results for an individual address, terminal, plan, or time of day.
Quick wins for a faster PC:
Fix the driver behind crashes, sound loss and screen glitchesFind Drivers →Repair Windows errors before they cause bigger problemsFix Now →| Measure | Starlink-published typical figure for land | Important qualification |
|---|---|---|
| Download speed | 25–220 Mbps | Actual speeds may be lower during high usage and vary by location, time of day, and plan priority. |
| Upload speed | 5–20 Mbps | Actual performance depends on location, time of day, usage, and plan priority. |
| Latency | 25–60 ms | Starlink notes that latency can exceed 100 ms in some remote locations. |
These values are listed on Starlink Specifications. Starlink says service can vary with location, time, and plan priority, so the ranges should be read as typical published figures rather than a minimum-speed commitment. Plan details and specifications can change; consult the live page and local plan terms when making a current decision.
Best Value

- [📶Adjustable Tilt 160 Degree and Horizontally Rotatable 360 Degree for Better Signal]: The adjustable tilt, offering up to 160 degrees, allows precise alignment to maximize signal strength by fine-tuning the antenna's position relative to the satellite. Additionally, the mount rotates horizontally a full 360 degrees, enabling effortless direction adjustment for consistent connectivity in various environmental conditions. This dual-functionality not only enhances ease of installation but also ensures reliable, high-quality signal reception, making it an ideal choice for improving satellite communication efficiency and effectiveness across different applications and settings.
- [⛏️High-Quality Material Starlink Gen 3 Pipe Adapter Mount]: The starlink mounting kit is made of high-quality metal material, which not only possesses excellent strength and rigidity to withstand challenging environments but also has outstanding durability to maintain stability and reliability over time. The lightweight design makes the starlink Gen 3 roof mount easy to carry, while its premium appearance adds a sense of luxury and aesthetics, enhancing the user experience and product value.
- [🔩Easy Adjustment with Thumbscrews]:The thumbscrews, featuring an innovative design, allows for effortless adjustment of length to accommodate various installation needs. Typically comprised of a threaded portion and a handle, it enables quick adjustment of the threaded part's length by rotating the handle, thereby achieving precise control over the installation position. This design simplifies the installation process, eliminating the need for additional tools or complex steps. Users can easily adjust the bolt's length according to specific requirements, ensuring secure and reliable installation while saving time and effort.
- [🔧Easy to Install for Everyone]: The starlink Gen 3 mount includes all necessary hardware and detailed instructions, enabling users to effortlessly install this Starlink mount. From assembling the components to adjusting the positioning, each step is clear and understandable, requiring no specialized skills. This simplifies the installation process, allowing users to quickly and smoothly complete the setup and enjoy high-speed internet connectivity provided by the Starlink system.
- [💦Black Waterproof Spray Paint Starlink Gen 3 Mount]: The exterior is coated with waterproof spray paint, providing an additional protective layer to enhance durability and weather resistance, allowing it to be used in various harsh environments such as outdoor locations or damp conditions. This waterproof spray paint coating also effectively reduces water ingress, prolonging the lifespan of the starlink Gen 3 heavy duty pivot roof mount while enhancing its appearance.
For practical planning, the published range is a starting point for understanding the service, not a guarantee that a household will see a particular result. The site’s sky view, local network conditions, time of use, and plan priority all matter. No single satellite-count or speed figure can replace the address and installation checks.
A practical way to decide whether Starlink fits a location
Assess the decision in this order so that a promising map or advertised speed does not obscure a basic eligibility or installation problem:
Quick Recap
- Verify the exact address. Check what service plans are available for the place where the terminal will be used. If the intended location changes—for example, from one property to another—check again for the new address.
- Evaluate the physical site. Run “Check for Obstructions” in the Starlink app at the proposed terminal position. If obstructions are detected, look for another position or consider a suitable elevated mount.
- Match the use to the plan and hardware rules. Fixed home use and use while moving are not automatically interchangeable. Confirm that the current terms cover the way and location you intend to use the system.
- Set expectations from qualified performance figures. Use the published speed and latency ranges as context, not a guaranteed result. Account for time-of-day variation, local usage, location, and plan priority.
- Recheck changing details before committing. Availability, plan terms, and specifications are dynamic. Rely on the current address-specific options rather than a stale map, old plan description, or a figure reported for another location.
Common assumptions to avoid
- “The map shows my country, so my address can order it.” Geographic presence does not establish address-level plan eligibility; local capacity, regulation, and demand affect offerings.
- “More satellites mean obstructions no longer matter.” Satellite switching provides alternate connections when possible, but Starlink says brief interruptions can occur if all available satellites are obstructed.
- “The app preview guarantees a perfect connection.” The tool helps evaluate detected obstructions at a proposed spot. It is an installation aid, not a promise of a particular speed or uninterrupted service.
- “A higher mount always fixes coverage.” Elevation can be worth considering when ground-level locations are blocked, but the position still needs a sufficiently clear sky view, and the mount must suit the terminal and surface.
- “The published speed range is what every user receives.” The listed figures are typical company specifications, with explicit variation by location, time, usage, and plan priority.
- “Weather-resilient means weather-proof.” Starlink’s design description does not quantify site-specific outages or guarantee service during severe weather.
Product prices and availability are accurate as of the date/time indicated and are subject to change. Any price and availability information displayed on Amazon at the time of purchase will apply.




