A distorted condenser mic recording is usually caused by overload somewhere in the signal chain—not necessarily a broken microphone. The key is to find where the signal clips: inside the mic capsule, at the interface or mixer input, or later in your recording setup. Watch the input meter while you test, then match the fix to the stage causing the distortion.
Why can a condenser microphone sound distorted?
Distortion happens when some stage cannot handle the signal level cleanly. With a loud source, that stage may be the microphone capsule itself or the interface or mixer preamp. Processing or level changes later in the chain can also contribute, so begin by checking the recording path rather than assuming the mic is damaged.
As an Amazon Associate I earn from qualifying purchases.
The capsule may be overloaded
Every microphone has a model-specific maximum sound pressure level (SPL). If sound at the capsule exceeds that limit, the mic can distort before its output reaches the interface. Reducing interface gain afterward may make the recording quieter, but it cannot undo distortion already created inside the microphone. RØDE Support notes that distortion can persist even when sensitivity or gain is at its lowest if the source exceeds the mic’s maximum SPL: RØDE Support.
The interface or mixer input may be clipping
A preamp input can overload even if the microphone itself is within its clean-handling range. Use the interface or mixer’s input meter or clipping indicator while reproducing the problem. On the Focusrite Scarlett 2i2 guide cited here, green indicates signal at or above -24 dBFS, amber at -6 dBFS, and red at 0 dBFS, which indicates digital clipping. Those values describe that guide’s model context; meter colors and thresholds vary across equipment. Focusrite Scarlett 2i2 guide.
#1 Best Overall
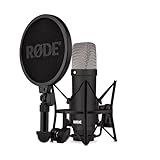
- COMPLETE VOCAL SETUP: shock mount, pop filter and XLR cable included, add an interface and record
- THE SOUND OF HIT RECORDS: the legendary NT1 large-diaphragm condenser voicing trusted in studios for two decades
- WHISPER-QUIET: among the lowest self-noise microphones ever made, nothing between you and the take
- BUILT FOR VOCALS AND STREAMS: tight cardioid pattern focuses on the voice, rejects the room
- IN THE BOX: NT1 Signature (Black), SM6 shock mount with pop filter, XLR cable and dust cover
How to locate the stage causing distortion
- Reproduce the problem and watch the input meter. Speak or play the same loud passage that causes distortion. Check the interface or mixer’s own input meter, not just a DAW track meter.
- Reduce input gain and disable level-boosting processing. Temporarily bypass plug-ins or other processing that could raise the signal. If lowering the preamp gain stops the meter clipping and the recording becomes clean, the interface or a later stage was likely overloaded.
- Test with the source quieter or farther away. If the recording remains distorted despite low interface gain—particularly with shouting, drums, or a loud amplifier—move the mic farther from the source or reduce the source volume. Shure advises checking for mixer-input overload first; if that is not the cause, use the mic’s attenuator if equipped, increase the distance, or choose a microphone that handles a higher level. Shure microphone techniques.
- Check the mic’s pad or attenuation switch. If the mic has one, consult its manual for what the setting does. It may reduce the level sent downstream, but it cannot reverse distortion that has already occurred in an overloaded capsule.
- Verify the connection and power requirements. Follow the microphone and interface manuals for the correct input and connection. The cited Focusrite guide warns that routing a line-level source through an XLR mic input can overload its preamp. If your condenser mic requires phantom power, turn gain down before enabling 48V, and turn phantom power off before unplugging, as Focusrite’s procedure advises. Check your own microphone’s documentation because power requirements vary. Focusrite phantom-power guidance.
- Isolate intermittent faults. If distortion comes and goes or changes when the cable moves, test with a known-good XLR cable. If possible, then try another interface or mixer input. These are diagnostic swaps; a changed result helps isolate a component but does not by itself prove the microphone is defective. RØDE support.
When does a pad help—and when does it not?
A pad reduces signal level at the point where it is placed in the signal chain. If a mic’s output is overloading the interface preamp, a suitable pad before that input may help by lowering the level the preamp receives. An interface’s own input pad, if available, may serve a similar role; check the device manual for the control’s position and operation.
A pad cannot fix capsule overload if the capsule has already distorted. In that case, first reduce sound pressure at the mic by moving it farther away or lowering the source level. Neither the cited guidance nor the manuals establish a universal attenuation value or a specific compatible pad, so use your equipment’s documentation rather than choosing by an assumed number.
Rank #2
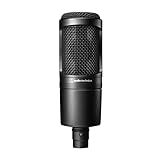
- The price/performance standard in side address studio condenser microphone technology
- Ideal for project/home studio applications
- High SPL handling and wide dynamic range provide unmatched versatility
- Custom engineered low mass diaphragm provides extended frequency response and superior transient response
- Cardioid polar pattern reduces pickup of sounds from the sides and rear, improving isolation of desired sound source.
How to tell whether the microphone is faulty
Distortion that appears only on loud sources, and changes when you move the mic or lower the source volume, points toward an SPL or input-level problem. Distortion that persists with a quiet source and low input gain warrants checking the connection, cable, input, and microphone against known-good alternatives. Change one component at a time so the result is useful for diagnosis.
Do not conclude that a mic is broken solely because reducing interface gain did not help: overload may have happened earlier, inside the capsule. For a model-specific judgment, check that microphone’s maximum SPL specification and operating guidance, along with the interface’s input limits. Maximum SPL is not one universal value for condenser microphones; it varies by model and may depend on stated test conditions. Shure notes that excessive sound level will not damage a microphone, but that guidance should not be read as a guarantee against every electrical fault or form of mishandling. Shure microphone techniques.
Quick Recap
Best Value

- [USB Output] Enables simple setup. USB studio recording microphone kit provides a direct convenient plug-and-play connection to pc and laptop without any additional hardware or drivers for recording vocals, podcasts and Skype. Studio microphone for recording vocals is never been easier to get high-quality sound for your voice and computer-based audio recordings. (Incompatible with Xbox)
- [Excellent Sound Quality] With rugged construction for durable performance, the vocal recording microphone, USB condenser mic for PC,offers a wide frequency response and handles high SPLs with ease. Ideal for project/home-studio applications. The cardioid condenser capsule captures crystal-clear audio from the front and avoid ambient noise when communicating/creating/recording. Comes ready to go with a desktop mic boom arm stand and 8.2ft USB cable, you're guaranteed to get great-sounding results.
- [Durable Arm Set] The podcast microphone bundle with versatile and sturdy broadcast suspension boom scissor arm with 180° up and down rotation, 135° forward and backward extension for optimal adjustment, for capturing your voice in podcast or voiceover. The double pop filter attached on the music recording microphone provides two layers of dissipation, removes the rush of air, minimize the popping sounds or cancel noise that can compromise your recording, great for studio as well as home use.
- [Easy to Attach] The streaming microphone for PC includes adjustable boom studio scissor arm stand that features a heavy-duty combo mount consisting of a sturdy C-clamp and a detachable desktop mount. With 13" fixed horizontal arm and offers a 30" reach, the low-profile, table-hugging design of audio recording microphone allows on-air talent to perform without facial obstruction to record in podcasting or make dubbing sounds for videos, use voice chat in Discord or online conference on Zoom or Skype.
- [The Accessory Package Includes] The studio microphone music recording comes with practical accessories for you to use in most of recording. The scissor arm stand is made out of all steel construction, sturdy and durable, a studio-grade shock mount, a double pop filter, premium 8.2' USB-B to USB-A/C cable, a podcast PC gaming microphone, a user manual and friendly Technical Support.
Rank #4

- 48V Phantom Power Required – The Maono PM320S professional XLR condenser microphone requires a stable 48V phantom power supply. Simply connect it to your audio interface, mixer, or preamp via the included XLR cable for plug‑and‑play operation, and it delivers pristine studio‑grade sound instantly. Whether you’re using it as a microphone for PC, a vocal microphone for singing, or a recording microphone for music production, the external power ensures consistent, reliable performance every time.
- Studio‑Grade Audio: Built with a large 16mm condenser capsule, this XLR condenser microphone captures extended frequency response and superior transient detail—ideal for studio recording, music production, and vocal tracking. It handles high SPL with ease, making it a versatile recording microphone for podcasting, streaming, vlogging, home studio, and content creation. Whether you're a singer, podcaster, or streamer, this condenser mic delivers broadcast‑quality sound for any application
- Low‑Noise Design for Crystal‑Clear Capture: The cardioid polar pattern effectively rejects off‑axis ambient noise, making it an excellent podcast microphone XLR for untreated rooms, while the integrated shock mount reduces vibration rumble from stands or desks. A pop filter and foam windscreen further tame plosives and saliva noise—perfect for vocal microphone for singing, streaming mic, or recording mic for voice‑over work—so your audio stays clean, immersive, and professionally polished.
- All‑In‑One Studio Kit: Engineered with rugged all‑metal housing, this condenser XLR microphone withstands daily studio use and accidental drops. The adjustable metal boom arm bracket offers stable positioning and folds neatly for easy portability. From podcast setups to music recording, it's the ideal studio microphone for producers, streamers, and vocalists—all at an incredible value, making it the go‑to podcast mic and recording mic for music, vocals, and online content creation
- Packing List: package includes microphone*1, boom arm*1, metal shock mount*1, pop filter*1, windscreen*1, XLR to XLR cable*1 and User manual*1
Rank #3

- Custom three-capsule array: This professional USB mic produces clear, powerful, broadcast-quality sound for YouTube videos, Twitch game streaming, podcasting, Zoom meetings, music recording and more
- Blue VO!CE software: Elevate your streamings and recordings with clear broadcast vocal sound and entertain your audience with enhanced effects, advanced modulation and HD audio samples
- Four pickup patterns: Flexible cardioid, omni, bidirectional, and stereo pickup patterns allow you to record in ways that would normally require multiple mics, for vocals, instruments and podcasts
- Onboard audio controls: Headphone volume, pattern selection, instant mute, and mic gain put you in charge of every level of the audio recording and streaming process
- Positionable design: Pivot the mic in relation to the sound source to optimize your sound quality thanks to the adjustable desktop stand and track your voice in real time with no-latency monitoring
Product prices and availability are accurate as of the date/time indicated and are subject to change. Any price and availability information displayed on Amazon at the time of purchase will apply.




