To configure a gamepad for an open-world game on Steam, first confirm the game’s controller-support level, connect a supported pad, choose a layout that matches the game’s native input, and test it through the Steam Overlay. If controls fail, verify overlay operation and input-style compatibility before changing bindings or trying a community configuration. This guide covers Steam games, non-Steam launches, Valve’s Steam Controller connection modes, and a methodical troubleshooting process without assuming one universal sensitivity or button layout.
What Steam controller settings actually control
Steam’s controller layer sits between your physical gamepad and the game. A layout can send native gamepad commands, emulate keyboard and mouse input, or combine those approaches through flexible bindings. The game still has to accept the command you send. A face-button binding is reliable only when the title supports gamepad input for that action; assigning a gamepad command to a game that accepts only keyboard input will not create native controller support.
As an Amazon Associate I earn from qualifying purchases.
Open-world games make this distinction important. You may use the same controller for movement, camera control, driving, menus, map navigation, inventory, photo modes, and launcher screens. A layout that works for walking can still fail in a map or crafting menu if that screen expects a mouse pointer. Treat the layout as a compatibility configuration rather than a set of universally correct numbers.
Recommended Free Tools
Check support before changing a binding
On the game’s Steam store page, look for the controller-support designation. It describes how much of the experience can be completed with a controller, not how well every individual action is mapped.
#1 Best Overall

- MODERNIZED DESIGN — Experience the modernized design of the XBOX Wireless Controller with sculpted surfaces and updated geometry that enhances comfort and control during long gaming sessions.
- PRECISION PERFORMANCE — Stay on target with a hybrid D-pad and textured grips on triggers, bumpers, and back case for improved accuracy and handling.
- SHARE BUTTON: Seamlessly capture and share content such as screenshots, recordings, and more with the new Share button.
- VERSATILE CONNECTIVITY — Connect via USB-C for plug-and-play on console and PC, or quickly pair and switch between supported devices with XBOX Wireless and Bluetooth support.
- BUILT-IN AUDIO SUPPORT — Plug in compatible headsets using the 3.5mm audio jack for direct voice chat and immersive in-game sound.
| Steam label | What it means for an open-world game | What you may still need |
|---|---|---|
| Full Controller Support | The game can be downloaded, launched, and played with a controller alone. | A keyboard or mouse may still be convenient, but the listed Steam definition does not require one for the basic flow. |
| Partial Controller Support | A controller works for some or most play, but the complete experience is not guaranteed to be controller-only. | A keyboard or mouse may be needed for installation, setup, a launcher, or parts of the interface. |
Steam’s Big Picture documentation lists official Xbox controllers, DualShock 4, DualSense, and Nintendo Switch Pro controllers as supported categories. Third-party controllers often work, but Valve does not classify them as officially supported in that guidance. A third-party pad can therefore be usable without being a dependable reference point when troubleshooting.
- Confirm the support label before spending time on a complex layout.
- Note whether the game opens an external launcher or asks for a separate account sign-in.
- If the store page indicates partial support, expect at least one keyboard-and-mouse task somewhere in the process.
Connect the controller and open its layout
Connect the gamepad before launching the title. Steam should show it in the controller settings area; from the game’s Steam page or the in-game Overlay, open the game’s Controller Layout screen. Steam’s wording and menu placement can change, so use the current label that leads to the layout editor rather than relying on an older screenshot.
- Connect the controller by its supported wireless receiver, Bluetooth, or USB cable.
- Open Steam’s controller settings and confirm that the device appears and responds to button presses.
- Open the game’s Controller Layout editor from the library page or Steam Overlay.
- Start with a gamepad-oriented template or the game’s default configuration when native gamepad support is present.
- Save the layout with a descriptive name before experimenting, so you can return to a known working version.
Do not begin by translating every keyboard key onto the pad. First establish whether the game already exposes native controls. Native input generally preserves the game’s prompts, analog behavior, and context-sensitive actions more accurately than emulation.
What’s actually slowing this PC down?
Pick the symptom - the matching free tool is one click away.
Build a practical open-world layout
There is no Valve-prescribed universal arrangement, sensitivity value, or dead-zone number for open-world games. Use the game’s own control menu and on-screen prompts as the authority, then make one change at a time so you can identify its effect.
Movement and camera
For a conventional gamepad scheme, leave the left stick assigned to movement and the right stick assigned to camera control when those are the game’s native functions. Preserve analog axes rather than replacing them with digital button presses; gradual stick movement is important for walking, driving, aiming, and stealth.
Rank #2

- MODERNIZED DESIGN — Experience the modernized design of the XBOX Wireless Controller with sculpted surfaces and updated geometry that enhances comfort and control during long gaming sessions.
- PRECISION PERFORMANCE — Stay on target with a hybrid D-pad and textured grips on triggers, bumpers, and back case for improved accuracy and handling.
- SHARE BUTTON: Seamlessly capture and share content such as screenshots, recordings, and more with the new Share button.
- VERSATILE CONNECTIVITY — Connect via USB-C for plug-and-play on console and PC, or quickly pair and switch between supported devices with XBOX Wireless and Bluetooth support.
- BUILT-IN AUDIO SUPPORT — Plug in compatible headsets using the 3.5mm audio jack for direct voice chat and immersive in-game sound.
Check the game’s options for camera inversion, vibration, acceleration, and sensitivity. These are title-specific settings. The available evidence does not establish a single sensitivity or dead-zone setting that is correct for every open-world game, so avoid copying a numerical value as a universal recommendation.
Face buttons and context actions
Map jump, interact, reload, crouch, and other face-button actions only to commands the game recognizes as gamepad inputs. If a menu prompt changes between keyboard and controller icons while you play, the title may be switching input modes; mixing emulated keyboard commands with native gamepad commands can produce inconsistent prompts or delayed responses.
Triggers, bumpers, and stick clicks
Keep analog triggers analog when the game uses them for acceleration, braking, aiming, or variable pressure. Use bumpers for frequent cycling actions such as changing equipment or targets when that matches the game’s default scheme. Stick-click actions can be useful for sprint, crouch, or melee, but verify that clicking while moving does not make accidental inputs likely.
D-pad and menu navigation
Use the D-pad for the game’s radial-menu shortcuts, equipment slots, or quick consumables when those actions are exposed as controller commands. If a map or inventory screen requires a pointer, assign a mouse-style control only if the game accepts it and provide a clear way to return to movement controls.
Optional paddles, back buttons, and layers
Extra buttons can hold sprint, push-to-talk, or a frequently used item, but they are not required for a functional layout. Layers or action sets can switch bindings for driving, on-foot exploration, menus, or a photo mode. Add these only after the basic layer works; a hidden layer or mode-shift button can make a layout appear broken when the real issue is that the controller is in a different action set.
Rank #3

- MODERNIZED DESIGN — Experience the modernized design of the XBOX Wireless Controller with sculpted surfaces and updated geometry that enhances comfort and control during long gaming sessions.
- PRECISION PERFORMANCE — Stay on target with a hybrid D-pad and textured grips on triggers, bumpers, and back case for improved accuracy and handling.
- SHARE BUTTON: Seamlessly capture and share content such as screenshots, recordings, and more with the new Share button.
- VERSATILE CONNECTIVITY — Connect via USB-C for plug-and-play on console and PC, or quickly pair and switch between supported devices with XBOX Wireless and Bluetooth support.
- BUILT-IN AUDIO SUPPORT — Plug in compatible headsets using the 3.5mm audio jack for direct voice chat and immersive in-game sound.
Native gamepad commands versus keyboard and mouse emulation
Steam’s configuration system supports flexible input styles, but flexibility does not override the game’s capabilities. Valve’s configuration guidance specifically limits gamepad-specific commands to games that support gamepad input. In a keyboard-only title, assigning a keyboard key to a button may be necessary; in a native gamepad title, the same emulation can interfere with prompts or cause the game to alternate between control schemes.
Do these 3 things before closing this tab:
1Repair Windows errors before they cause bigger problems2Scan for outdated or missing drivers - takes under a minute3Clear out junk files and repair common Windows errors| Input approach | Use it when | Risk to watch for |
|---|---|---|
| Native gamepad commands | The game advertises controller support and exposes the required action. | A command may do nothing if that particular action is not implemented for controllers. |
| Keyboard or mouse emulation | A game, launcher, or interface accepts only keyboard and mouse input. | Prompts may show the wrong device, analog behavior may be lost, and simultaneous input styles can confuse the game. |
| Flexible or mixed bindings | You need controller play plus a specific keyboard-only screen or shortcut. | Changing the active style can trigger mode switching, duplicate actions, or menus that stop responding. |
When testing a mixed layout, change one binding, enter the relevant in-game screen, and confirm both the action and the on-screen prompt. If a native command and an emulated key perform the same function, remove one of them before diagnosing further.
Use the Steam Overlay as a test point
The Steam Overlay is important to Steam Controller functionality because it is where many layouts are applied and edited during play. Press the configured Overlay shortcut while the game is running. If it does not appear, check Steam’s settings to ensure the Overlay is enabled for the game and that no full-screen or launcher setting is suppressing it.
- If the Overlay opens and the layout editor responds, the controller is reaching Steam; investigate the game’s accepted input style next.
- If the Overlay does not open, fix that path before rewriting every binding.
- If the Overlay works in one Steam game but not another, compare the affected game’s launch options, launcher, and support level.
External overlays and security software can also intercept input. Disable or close one conflicting overlay at a time, then retest, rather than changing several system settings simultaneously.
Configure a non-Steam open-world game
For a retail or otherwise non-Steam title, add the game’s executable to your Steam library and launch it through Steam. This can provide access to Steam’s layout tools, but it does not turn an unsupported game into a fully compatible one. Support varies by executable, launcher, anti-cheat system, and Overlay behavior.
Free tools Windows power users keep installed
One-click scans. No signup required.
Rank #4
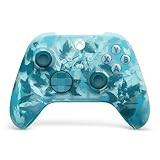
- BREAKER SERIES — Hold nothing back. Ice Breaker keeps it forever fresh with a mix of iced and frosted blues. Part of the collective debut of the Breaker special edition series.
- BOLD STYLE, BUILT TO PERFORM — Define your swagger with a wild, head-turning design. Stay elegantly on target with textured triggers built for every moment.
- RUBBERIZED GRIPS — Hold on to the action with rubberized grips on the back cases, designed for comfort and control during long gaming sessions.
- UP TO 40 HOURS OF BATTERY LIFE — Get up to 40 hours of battery life so you can keep playing without stopping to recharge.
- PLAY ACROSS EVERY SCREEN — Quickly pair with, play on, and switch between devices including console and PC. Stream games across mobile, gaming handhelds, Smart TVs, and supported VR headsets with XBOX Cloud Gaming.
- Use Steam’s option to add a non-Steam game and select the game’s executable.
- Launch that entry from the Steam library instead of starting the executable directly.
- Open the Steam Overlay and check whether the controller layout is available.
- Test the game’s title screen, an active save, menus, and any external launcher before investing in custom bindings.
Valve identifies several non-Steam failure cases:
- Anti-cheat software may block emulated input.
- A launcher that requires administrator privileges can prevent Steam’s Overlay or controller layer from attaching correctly.
- The game may not support the Steam Overlay.
- The executable may not be addable to the Steam library in a way that permits configuration.
These are compatibility limits, not signs that a particular button map is wrong. If a game reaches its launcher but loses input after the actual game starts, test both processes separately and check whether the game runs with elevated privileges.
Steam Controller (2026): choose a connection mode
If you are using Valve’s Steam Controller (2026), the documented connection choices are the included Puck wireless receiver, Bluetooth, and wired USB-C. Valve recommends Puck mode for the fastest and most reliable connection in that specific setup. That recommendation is scoped to this controller and its receiver; it should not be generalized to every gamepad.
| Connection | When it is useful | What to verify |
|---|---|---|
| Puck wireless receiver | Valve’s preferred mode for the Steam Controller (2026) when the receiver is available. | Connect the Puck, then confirm the controller and receiver status in Steam’s controller settings. |
| Bluetooth | Wireless play when you do not use the Puck. | Pair the controller with the computer and confirm Steam identifies it before launching the game. |
| USB-C | A wired connection for setup, updates, or isolating wireless problems. | Use a data-capable cable and check that Steam reports the controller as connected. |
Before troubleshooting a new Steam Controller, install available Steam, operating-system, and controller-firmware updates. Steam’s controller settings show update status for the controller and Puck. A firmware update can change behavior or resolve a connection problem, so record the current status before replacing a working layout.
Independent reader supportYour contribution helps us test, update, and keep practical guides available for everyone.Diagnose a layout that is not working
When a configuration fails, identify the layer at which input stops: physical controller, Steam detection, Overlay, layout application, or the game itself. The following order avoids unnecessary reconfiguration.
1. Confirm physical input
Disconnect and reconnect the controller, then watch Steam’s controller settings while pressing each button and moving both sticks. If Steam does not register input, the problem is connection, pairing, cable, receiver, firmware, or hardware rather than the game’s layout.
Best Value

- Tri-mode Connectivity: Wired for Xbox, 2.4G & Wired for PC, and Bluetooth for Android. The G7 Pro supports seamless connectivity across Xbox, PC, and Android. Effortlessly switch between modes using the convenient physical mode switch.
- TMR Sticks: The G7 Pro features GameSir's Mag-Res TMR sticks, combining Hall Effect durability with traditional potentiometer performance. This advanced technology delivers stable polling rates for smooth, drift-free gaming with low power consumption.
- Hall Effect Analog Triggers: The GameSir precision-tuned Hall Effect analog triggers provide unmatched smoothness and linear input for precise control. Featuring clicky Micro Switch trigger stops, gamers can easily switch based on their preferences.
- 1000Hz Polling Rate on PC: Experience ultra-responsive gaming with a 1000Hz polling rate on PC, available through both wired and 2.4G wireless connections. This ensures instantaneous input registration, reducing lag and optimizing your performance for the most competitive gameplay.
- GameSir Nexus App: The G7 Pro is compatible with the upgraded GameSir Nexus app, which brings a significant upgrade over the original. It introduces powerful new features such as gyro settings, stick curve adjustments, and button-to-mouse mapping, giving you deeper customization and more control than ever before.
2. Run Steam’s input test or calibration tools
Valve’s legacy troubleshooting path places controller diagnostics in Big Picture under Settings > Controller > Controller settings. Use the available input-test or calibration controls to check buttons, stick axes, and triggers. Steam’s labels may differ in a current client, so follow the equivalent controller-testing screen if that path has moved.
- A stick that moves without being touched indicates an axis or hardware problem before any sensitivity adjustment.
- A button missing from the test cannot be repaired by assigning it to a different in-game action.
- If the test is clean but the game fails, continue to Overlay and input-style checks.
3. Verify the Overlay
Launch the game through Steam and invoke the Overlay. If it is absent, enable it for the game and retest. For non-Steam games, confirm that the selected executable is the one actually running and that an external launcher has not taken over the session.
4. Check the layout’s input style
Open the failing action and identify whether it sends a native gamepad command, keyboard key, mouse movement, or a mode-shift instruction. Match that choice to what the game accepts. A gamepad command cannot substitute for a keyboard-only function, while keyboard emulation can cause trouble in a game that expects native controller input.
Quick wins for a faster PC:
Fix the driver behind crashes, sound loss and screen glitchesFind Drivers →Repair Windows errors before they cause bigger problemsFix Now →5. Test a community configuration
Valve suggests trying a community configuration when a custom layout does not work. Use it as a diagnostic comparison, not as proof that one layout is best for every open-world game. If the community layout works, compare its input styles and action sets with yours instead of importing every binding blindly.
6. Rebuild from a known baseline
Save the current layout, restore the game’s default or a basic gamepad template, and test movement, camera, one action button, and a menu. Add changes individually. This isolates a faulty mode shift, duplicate command, unsupported action, or accidental layer switch.
A decision framework for choosing the right setup
| Your situation | Best starting point | Reason |
|---|---|---|
| Steam game with Full Controller Support | Native gamepad template and the game’s own options. | The complete basic experience is designed to work without a keyboard or mouse. |
| Steam game with Partial Controller Support | Native gamepad controls plus a keyboard or mouse kept nearby. | Setup or interface tasks may remain outside controller support. |
| Keyboard-only or older game | Keyboard/mouse emulation, tested screen by screen. | The game may not recognize native gamepad commands. |
| Non-Steam game | Add the executable to Steam, launch through Steam, then test Overlay operation. | Configuration depends on the executable, launcher, anti-cheat, and Overlay compatibility. |
| Steam Controller (2026) | Puck receiver first; Bluetooth or USB-C when appropriate. | Valve specifically recommends Puck mode for speed and reliability on this controller. |
| Unresponsive or erratic controls | Run Steam’s controller test/calibration before editing the layout. | It separates hardware and connection faults from binding faults. |
Pre-launch checklist for an open-world session
- The game’s Steam page shows Full or Partial Controller Support, and you know what the label permits.
- Steam detects every stick, trigger, and button in its controller test.
- The selected layout uses native gamepad commands where the game supports them.
- Movement, camera, one context action, a menu, and a map have each been tested.
- No duplicate keyboard and gamepad bindings are producing unwanted mode switching.
- The Steam Overlay opens in the running game.
- A non-Steam title is launched through the correct executable, with launcher and anti-cheat limitations understood.
- The Steam Controller (2026), if used, has current Steam, operating-system, firmware, and Puck updates.
- You saved a working baseline before adding layers, paddles, or specialized vehicle bindings.
What to expect from controller support
A well-configured gamepad should let you explore, move the camera, perform core actions, and navigate the game’s supported menus without constant remapping. It cannot add controller commands that the game does not implement, bypass anti-cheat restrictions, or guarantee Overlay access for every launcher. Use the support label, the game’s own prompts, Steam’s input test, and a staged layout process to determine whether a problem is a setting, a connection, or a compatibility boundary.
Quick Recap
Product prices and availability are accurate as of the date/time indicated and are subject to change. Any price and availability information displayed on Amazon at the time of purchase will apply.
The Tool Desk
Outbyte Driver Updater FREEFix the driver behind crashes, sound loss and screen glitchesFind Drivers →Outbyte PC Repair FREEClear out junk files and repair common Windows errorsFree Scan →
