Free tools Windows power users keep installed
One-click scans. No signup required.
The most reliable Starlink setup starts outside: scan every possible dish location with the Starlink app, choose the clearest view of the sky, and raise the dish if trees, roofs or other objects intrude. Inside, place the router upright, elevated and in the open near the center of the service area. Keep it away from metal, masonry, appliances and other radios; where practical, Starlink suggests about 20 feet of separation from common interference sources. Use 5 GHz for nearby high-bandwidth devices, 2.4 GHz for longer-range or older devices, and add mesh nodes or wired links for rooms that remain weak.
Start with an unobstructed dish location
Starlink’s installation guidance is explicit: “Your Starlink needs a clear view of the sky so it can stay connected to satellites as they move overhead.” A location that looks open from the ground can still be blocked at the dish’s actual height by a roof edge, chimney, pole, branch or nearby tree canopy. Even temporary conditions such as wet leaves, seasonal growth and snow buildup can create interruptions.
As an Amazon Associate I earn from qualifying purchases.
Scan every candidate site in the app
- Stand at the proposed dish location and open the Starlink app.
- Run Check for Obstructions.
- Hold the phone close to the height and viewpoint the dish will have, rather than scanning from inside the house or at waist level.
- Repeat the scan from every realistic location, including different roof, pole or ground positions.
- Choose the site with the clearest scan, while also checking that it is safe to access and allows a practical cable route.
The scan is a view test, not a guarantee of uninterrupted service. A branch can move into the signal path later, and a roofline can become a problem when the dish is mounted lower than expected. Recheck the app after installation if outage alerts begin.
Recommended Free Tools
Raise the dish when the ground-level view is blocked
If every low position shows obstructions, elevation is usually more effective than repeatedly moving the router indoors. Starlink says that mounting higher can prevent obstructions and improve network performance. A safe roof mount, pole or tower can lift the dish above tree lines and roof edges. For a fixed installation on an existing pipe, Starlink names its Pipe Adapter Mount as an option.
#1 Best Overall

- 【Compatible with Starlink Standard V3 / Gen3 / 4 / 4 X】Not compatible with Starlink Mini/Performance Gen 2/Performance Gen 3/Standard Actuated. Please verify your dish model before purchase.
- 【Aluminum Alloy Adapter Compatible with Starlink Standard 4 / 4 X / Gen3】 Unlike many plastic adapters, this aluminum alloy adapter offers greater durability, stronger support, and is less likely to crack or break over time.
- 【Adjustable Design】 For longer eaves, flip the pole for a better fit. The mount installs from either end, and the pole connected to the pipe adapter can rotate for angle adjustment. Tighten the screws to lock the position and optimize dish alignment.
- 【18-Inch Wall Mount for Starlink】 Works as a roof mount or pole mount. Includes two screw sets: expansion anchors for concrete/masonry and lag screws for wooden roofs.
- 【Accessories included】Aluminium Pipe Adapter x1,extension screws x6, self-tapping screw x4, short stainless steel screws x2, long stainless steel screws x1, support steel tubes x1, support base x1, wrench x1, drill bit x1, instruction manual x1
Follow the installation guide for the required orientation and attachment method; do not improvise a mount that can flex in wind or allow water into the cable connection. A higher location is useful only if it is structurally secure, reachable for inspection and routed with a protected cable. Keep the cable away from sharp bends, hot exhausts and places where people or vehicles can catch it.
Check the dish when interruptions appear
After installation, review obstruction and outage alerts in the Starlink app. If a new alert appears, inspect the dish for seasonal leaves, a fallen branch, dirt or snow before relocating hardware. Weather and service congestion can also affect the connection, so an obstruction alert should be treated as a specific clue rather than proof that every slowdown has the same cause.
Place the Starlink router to limit indoor interference
The router should cover the area that actually uses Wi‑Fi, not simply sit beside the dish’s cable entry point. Put it as close as practical to the center of the living space, upright on an elevated hard surface such as a shelf, and leave the housing uncovered. Open placement lets the radio signal spread; a cabinet, media console or closet can absorb or reflect it and trap heat.
Rank #2
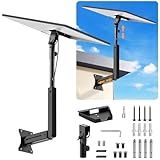
- ADJUSTABLE: Our starlink standard 4 mount features a retractable design with a support arm that telescopes up and down, back and forth, providing more versatility than a fixed length mount. Seamlessly compatible with your current Starlink Gen 3 mount, you'll enjoy an unobstructed view no matter where you place it
- HIGH QUALITY: Our Starlink Wall Mounts for Dishes is made of top-grade metal to ensure a long life and can withstand over 60 pounds of weight. And the starlink pole mount gen 3 comes with hidden cable holes to prevent damage to your cables, this thoughtful design not only enhances aesthetics but also protects the Starlink Gen 3 V4 from environmental wear and tear
- ANGLE ADJUSTMENT: Starlink 4x mount can be adjusted from 90-180° to ensure optimal reception of the signal. With its rustproof, windproof, and weatherproof properties, this starlink mount gen 3 ensures optimal performance in all conditions
- VERSATILITY: Our starlink v4 mount comes with two types of screws: expansion screws for concrete walls and lag screws for wood roofs. Suitable for a variety of walls such as wood, brick or concrete
- EASY INSTALLATION: This starlink wall mount standard 4 is simple to install. Simply drill the holes, secure the brackets, and plug directly into the Starlink Gen 3. This flexibility makes it an essential component for starlink mounts. The length of the mounting plate is 5.9 in/15cm, and the width is 5.11 in/13cm
Keep distance from common blockers and interferers
Starlink’s support guidance advises avoiding walls, metal, concrete, brick, major appliances, fluorescent lights, other Wi‑Fi networks and poor electrical connections. Where possible, it suggests 20 feet of separation from common in-home interference sources. The figure is a practical target from the Starlink Help Center (publication year not stated; accessed 2026), not a guaranteed threshold or a requirement that every home can meet.
| Router location or nearby object | Why it can cause trouble | Better practice |
|---|---|---|
| Inside a cabinet, closet or media console | Enclosure and nearby electronics attenuate signal and restrict airflow. | Use an open shelf with clearance around the router. |
| Against concrete, brick or a thick interior wall | Dense masonry reduces Wi‑Fi penetration into the next room. | Move the router toward the center of the served area or use a node. |
| Beside a refrigerator, microwave or other large appliance | Metal surfaces and electrical noise can reduce usable range; an active microwave can disrupt nearby 2.4 GHz devices. | Increase separation; aim for the 20-foot guidance when the floor plan allows. |
| Next to another access point | Overlapping networks compete for airtime and may select congested channels. | Space access points apart and use a planned mesh or wired layout. |
| On the floor or behind furniture | Furniture and low placement block the horizontal path to phones and laptops. | Elevate the router and keep it upright and visible. |
| On an unreliable outlet or poor power connection | Power interruptions can look like a network fault. | Use a sound electrical connection and check power before changing Wi‑Fi settings. |
Choose 5 GHz or 2.4 GHz deliberately
Starlink’s guidance describes the trade-off plainly: “The 2.4GHz band provides a longer range but may experience more interference than the 5GHz band.” The 5 GHz band is generally faster and less crowded at short range, but its signal loses strength more quickly through distance and walls.
| Band | Best use | Limit to expect |
|---|---|---|
| 5 GHz | Nearby televisions, game consoles, computers, phones and other devices that move substantial data. | Shorter range and weaker penetration through multiple walls. |
| 2.4 GHz | Farther rooms, smart-home equipment and older devices that cannot use 5 GHz. | Lower typical throughput and greater exposure to interference from neighboring networks and household electronics. |
Split the bands when you need predictable behavior
Automatic band steering is convenient, but a device can remain unstable if it repeatedly chooses a weak band or if you need to control which radio it uses. In the Starlink app, enable Split 2.4 / 5 GHz networks, then give each band a clearly distinguishable name. For example, use the same base name with “-5G” and “-2G” suffixes. Reconnect each device to the intended network after saving the change.
Rank #3

- Designed for Starlink Gen 3 / Standard (V4): Compatible with Starlink Standard 4X/Gen 3 / V4 dish systems, providing a secure and stable pole mounting solution for RV, roof, outdoor, and remote installations
- Heavy-Duty & Wind Resistant: Made from premium weather-resistant aluminum alloy with an upgraded 70 mm extended socket design for a tighter grip, improved stability, and enhanced wind resistance in harsh outdoor environments
- Perfect for RV & Off-Grid Use: Ideal for RVs, vans, trailers, cabins, rooftops, and off-grid setups. Keeps your Starlink dish securely mounted during travel and in extreme weather conditions
- Quick & Secure Installation: Includes all necessary mounting hardware for fast setup on poles ranging from 25 mm (1 in) to 53 mm (2.1 in) in diameter. Designed for a firm, long-lasting fit with minimal effort
- Clean & Reliable Outdoor Setup: Engineered for durability and stable long-term performance. Supports clean cable routing for a more organized and professional outdoor installation
Assign nearby, bandwidth-heavy equipment to 5 GHz. Put a distant camera, sensor or legacy printer on 2.4 GHz if it is more reliable there. Splitting does not increase the internet capacity delivered to the home; it gives you control over band selection and can prevent one troublesome device from repeatedly switching.
Extend coverage in a large or heavily built home
When a central router cannot reach every room, first test whether moving it a few metres improves the weak area. If the cable entry point prevents a central position, add coverage rather than leaving the router in a corner. Starlink’s mesh guidance recommends placing nodes about one to two rooms apart, upright and elevated, with as few barriers as possible.
Put a wireless node before the dead zone
A wireless mesh node needs a usable connection to the main router. Place it roughly halfway toward the problem room, not inside the dead zone where it has little signal to repeat. A node hidden behind a concrete wall, metal appliance or closed cabinet may have excellent signal to the client device but a poor backhaul to the router.
Rank #4

- Compatible with Starlink Standard 4/4X/Gen 3/V3 – Built for the Starlink Standard dish series with a secure steel mounting frame, giving your satellite dish stable support on roofs, exterior walls, eaves, cabins, garages, and outdoor setups while helping improve signal reception through better positioning.
- Tilts 0-180° for any roof angle – Base adjusts from flat to 180° tilt so you mount on slanted roofs, flats, attics or eaves with up to 4-inch overhang to dodge ground obstacles and grab the best elevation angle.
- Weathers storms with 2mm thick steel – 2mm wall tubing delivers rigid wind/quake resistance while sandblasted and baked paint coating amps up rust, UV, and harsh weather protection for years of outdoor reliability.
- Installs fast with included hardware – Comes with wood self-tapping screws and concrete expansion anchors for various walls like wood, brick, or concrete – grab a drill and screwdriver to set up in minutes without extra trips to the store.
- Lightweight yet bombproof at 3.31lb – Balanced 3.31lb design makes handling easy during install but the thick steel and dual adjustments lock everything solid once tightened to avoid wobbles.
Metal roofs and concrete or brick walls can reduce mesh range, a limitation Starlink calls out in its Mini guidance. In such construction, the one-to-two-room rule may need to become a shorter spacing plan, or a wired link may be preferable.
Prefer Ethernet backhaul when the layout permits
For difficult floor plans, connect an additional router or mesh node by Ethernet instead of relying on a wireless hop. Starlink says, “For best performance use a wired connection to your main Starlink router or Starlink Mini.” Its installation guidance recommends Cat5e or higher for router Ethernet connections. A wired link avoids adding another radio hop and is often the most consistent choice across concrete floors, brick walls or metal-clad buildings.
| Coverage approach | When it fits | Trade-off |
|---|---|---|
| Move the main router | The cable can reach a central, open shelf. | Lowest equipment and configuration effort, but the dish cable route may limit placement. |
| Wireless mesh node | You need coverage in one or more rooms and can place nodes one to two rooms apart. | Simple installation, but walls, distance and wireless backhaul reduce available capacity. |
| Wired node or additional router | You can run Ethernet and the building has thick masonry, a metal roof or long distances. | Requires cable installation, but provides a more predictable backhaul. |
Use the Advanced Speed Test to find the weak link
Run the Starlink app’s Advanced Speed Test in two places: beside the main router and in the room where performance is poor. The test separates the device-to-router leg from the router-to-internet leg.
Best Value

- Wide Pole Compatibility: The Starlink Gen 3 pipe adapter fits poles with diameters ranging from 1.10″ (28mm) to 2.12″ (54mm). Its guided slot design ensures precise pole centering, delivering a secure and accurate installation.
- Premium Manganese Steel Construction for Starlink 4/4X/Gen 3 Pipe Adapter Crafted from high-quality manganese steel, this Starlink pole mount gen 3 boasts exceptional anti-deformation and impact-resistant performance, ensuring long-lasting durability even in harsh outdoor conditions. Perfect as a reliable Starlink pipe adapter, it stands up to daily use and keeps your Starlink Gen 3 secure on any mounting pole.
- Tool-Free Easy Installation for Starlink Mounts No need for extra tools—this XGMATT Starlink 4/4X/Gen 3 pipe adapter features a user-friendly design that allows quick setup on most standard poles. Whether you’re mounting on a roof, patio, or outdoor structure, the simple installation process makes it ideal for both DIY enthusiasts and beginners, fitting seamlessly with your Starlink mounting pole.
- Wide Compatibility for Starlink Gen3/V4/4X & Multi-Scenario Use Custom-made pipe adapter perfectly matches Starlink V3 standard dish, also fully compatible with Starlink 4 and 4X antennas. Flexible clamping structure fits most poles for all installation needs, including residential rooftops and RVs. It firmly holds your Starlink dish and delivers stable signal performance no matter where you install.
- Secure & Stable Support for Starlink Gen 3 Pole Mount Built with reliable locking structures, this Starlink pole adapter eliminates wobble and displacement to firmly fix your Gen 3 standard dish. It clamps tightly onto mounting poles even under strong winds and vibration, delivering steady installation and worry-free satellite internet use.
- If device-to-router speed is the weak leg, improve router placement, move the device to the more suitable band or add a mesh node. A wired connection can also remove the local Wi‑Fi leg from the equation.
- If router-to-internet speed is weak even beside the router, inspect dish obstruction alerts and consider weather, plan congestion or the Starlink service path. Moving an indoor node will not correct a satellite-side issue.
- If only one device struggles, check that device’s distance, software, Wi‑Fi capability and band assignment before changing the entire network.
A practical setup sequence
- Survey the dish sites: run Check for Obstructions at each candidate location with the phone held near the intended dish height and perspective.
- Select and mount: choose the clearest safe site, elevate it with an appropriate roof, pole, tower or Pipe Adapter Mount if necessary, and follow the installation guide’s orientation and attachment requirements.
- Verify after installation: watch the app for obstruction and outage alerts; inspect for leaves, branches, dirt or snow when an alert appears.
- Position the router: place it near the center of the service area, upright, elevated, uncovered and on a hard surface. Keep it away from masonry, metal, appliances, fluorescent lights and other access points; target about 20 feet from common interference sources where feasible.
- Measure both legs: use Advanced Speed Test near the router and from the problem room to determine whether the local Wi‑Fi or the Starlink connection is limiting performance.
- Set bands intentionally: enable Split 2.4 / 5 GHz networks when steering is unreliable, then place nearby high-bandwidth devices on 5 GHz and distant or legacy devices on 2.4 GHz.
- Extend coverage: put a wireless node halfway toward the weak area, about one to two rooms from the next node, or run Cat5e-or-better Ethernet to a node when walls and distance make wireless backhaul unreliable.
Common placement mistakes and fixes
Scanning from the wrong height
A clear view from eye level does not prove the dish will be clear on a roof edge or pole. Repeat the obstruction scan at the intended elevation and from the dish’s perspective.
Putting the node in the dead zone
A mesh node cannot manufacture a strong backhaul. Move it toward the main router until it receives a dependable signal, then test the target room again.
Assuming a faster plan fixes indoor interference
Internet-plan changes do not remove a concrete wall, a crowded 2.4 GHz channel or a router hidden in a cabinet. Correct the local placement first and use the Advanced Speed Test to separate in-home and service-side limits.
The Tool Desk
Outbyte Driver Updater FREEScan for outdated or missing drivers - takes under a minuteDriver Scan →Outbyte PC Repair FREERepair Windows errors before they cause bigger problemsFix Now →Expecting one setting to solve every outage
Obstructions, weather, seasonal foliage, local interference, wall materials, device distance and network congestion have different remedies. Use the app’s alert type and the two-part speed test to choose the relevant fix instead of moving every component at once.
What placement can—and cannot—guarantee
Clearer sky view and better indoor placement reduce avoidable interruptions and weak-room coverage, but Starlink does not publish a universal speed or outage improvement figure for these changes. Results vary with obstructions, building materials, device distance, weather and network congestion. Treat the 20-foot separation and one-to-two-room node spacing as practical guidance, then validate the result in your own rooms with the app’s obstruction alerts and Advanced Speed Test.
Quick Recap
Product prices and availability are accurate as of the date/time indicated and are subject to change. Any price and availability information displayed on Amazon at the time of purchase will apply.

