Dusty charging ports are one of those problems that looks minor—until your cable suddenly won’t seat, charging speeds drop, or your device repeatedly says it isn’t charging.
The good news: most port issues are lint, pocket fuzz, and debris stuck in the connector channel. With a simple, careful cleaning routine, you can often restore reliable charging without damaging the contacts.
As an Amazon Associate I earn from qualifying purchases.
This guide focuses on safe methods that work for common charging types, including Lightning on iPhone and iPad and USB-C on phones, tablets, and laptops.
Why dusty charging ports happen (and why it causes charging failures)
Your charging port is a magnet for lint. It collects fine fibers from pockets, bags, bedding, and even car seats. Over time, those fibers compress into the connector’s recess, preventing the plug from making solid contact.
#1 Best Overall

- CLEAN & REPAIR CHARGING PORT - Compatible with iPhone cleaning kit tool won't get stuck inside and is easy to plug and use. Use the port pick, U-shaped brushes, and port brushes to clean the dirt out of your Phone, Pad, and Type-c port, and keep your phone looking brand new. Charging port cleaners can effectively clean lint, hair, fluff, and dust from your personal device ports
- FIX POOR CONNECTIONS - Use the phone cleaning kit for charging port brush to recover Lightning cables and the detergent included to clean and repair damaged ports and charging cables, and repair intermittent charging, slow charging, and oxidation damage on connectors. The electronic cleaning kit effectively cleans, restores, and revives clogged ports and charging cables to eliminate unreliable connections. Note: This phone cleaner does NOT clean USB type -C cables
- CLEAN SPEAKERS & EARBUDS - The earbud cleaning kit for Airpod can clean earphone housings, speakers, switches, tiny gaps, and the front surface of the headset. Using a high-density brush cleans dirt from inside the charging case of the earphones. The metal pen tip and high-density brush are for cleaning dirt from the sound outlet hole of the earphones and other areas
- SAFE FOR YOUR DEVICES - This cleaning kit for iPhone charging port keeps your own devices and accessories clean and flawlessly connected from the inside out. This cleaning kit is safe for your Phone, Pad, and will not damage your device, and our phone cleaning kit includes a special small handle, which is more convenient to use, reduces operating errors, and keeps your device ensure safety
- STURDY & COMPACT PORTABLE DESIGN - Our phone cleaner is made of high-quality sturdy ABS plastic, which can be closely attached cleaning to the charging port/cables of electronic devices. Compatible with iphone cleaner kit is portable and lightweight so you can take it anywhere. The package includes 8 x tool cleaning brushes, 1 x Soft plastic lens cleaning pen 1 x Detergent, 1 x large microfiber cloth, 4 x cleaning putty, 1 x user manual
When contact is partial, you might see symptoms like: charging only when you wiggle the cable, slow charging, intermittent connection, or a total “not charging” message.
What you need before you start
Before you touch anything, gather the right supplies. The goal is to remove debris without scratching the inside of the port or bending the contacts.
- Bright light (flashlight or desk lamp)
- Magnification if possible (a phone camera in macro mode helps; a small USB microscope is ideal)
- Soft, dry anti-static brush (new, clean, and small-bristle is best)
- Wooden or plastic tool (a non-conductive pick; toothpick-style options are commonly used, but keep it gentle)
- Compressed air (optional, short bursts)
- Isopropyl alcohol (optional) 90%+ for stubborn gunk (use sparingly)
- Lint-free cloth to wipe exterior surfaces
If you don’t already have these, the “minimum kit” is a bright light + magnification + soft dry brush + a non-metal pick.
Recommended Free Tools
The simple cleaning trick: controlled brushing + dry contact cleaning
The simplest reliable approach is two-phase: first, lift the lint with a dry brush and gentle picks; second, finish with optional dry contact cleaning using a tiny amount of high-purity isopropyl alcohol—without flooding the port.
That combination works because lint usually acts like a physical barrier. Alcohol helps dissolve sticky residue, but only after you’ve removed the bulk fibers.
Best tools and what to avoid
Using the wrong tool is how people turn a fixable lint problem into a “dead port” problem.
| Tool | Use it? | Why it matters |
|---|---|---|
| Soft anti-static brush | Yes | Removes fibers with minimal risk |
| Non-metal pick (wood/plastic) | Yes (gentle) | Helps pull out compact lint |
| Compressed air | Yes (short bursts) | Blows loose debris out |
| Isopropyl alcohol 90%+ | Optional | Dissolves sticky residue; must be used sparingly |
| Metal needles, paperclips, pins | No | Can scratch contacts or bend internal pins |
| Cloth soaked in liquid | No | Soaking can drive liquid deeper into the device |
| WD-40, lubricants, oils | No | Can leave residue and worsen connection |
| Charger without looking | No | If debris is wedged, forcing the plug can compact it more |
Step-by-step: clean your charging port safely
Work slowly. Most successful cleanings take 5–10 minutes, but the safe version is the one where you stop if you see something unusual.
1) Power down and prep the area
Turn the device off completely. If it’s an iPhone or iPad, also disconnect any cable immediately. For MacBook, shut down if you’re cleaning a physical port to avoid accidental contact.
Pick a well-lit workspace. Cover the table so dropped lint doesn’t get kicked back into the connector.
Rank #2
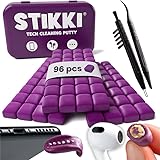
- PRO-LEVEL CLEAN FOR HARD-TO-REACH AREAS – Dust and lint hide deep inside charging ports, speaker grills, and earbuds. This cleaning putty and phone cleaning kit removes debris and earwax from devices safely.
- HELPS MAINTAIN DEVICE PERFORMANCE – Clogged ports and dirty earbuds reduce sound and charging. This earbud cleaning kit and charging port cleaner supports consistent performance and long-term device maintenance.
- ALL-IN-ONE PHONE & PORT CLEANING KIT – Includes cleaning putty and precision tools for charging ports, speakers, and electronics care. Compatible with iPhone, AirPods, keyboard, and laptop for detailed maintenance and repair tasks.
- SAFE FOR ELECTRONICS & USERS – Cleaning putty leaves no sticky residue and is non-toxic. Precision tools are designed for lightning ports, USB ports and for controlled and targeted cleaning.
- LONG-LASTING VALUE – Up to 96 uses. Works as a keyboard cleaner, phone cleaner, dust remover, and electronics maintenance and repair kit for everyday use.
2) Inspect the port clearly
Use a flashlight angled across the port. If you have macro mode, use it to see lint. You’re looking for compressed fibers, dark residue, or anything lodged deeper than the opening.
If you notice green/white crust, it can indicate corrosion or moisture damage. In that case, proceed extra carefully—and consider professional service if the damage looks significant.
Quick wins for a faster PC:
Repair Windows errors before they cause bigger problemsFix Now →Scan for outdated or missing drivers - takes under a minuteDriver Scan →Clear out junk files and repair common Windows errorsFree Scan →3) Remove lint with controlled, dry picks
Start dry. Use a soft brush to gently sweep along the inside walls of the port.
- Brush lightly from one side to the other, 3–5 strokes.
- Use a non-metal pick to gently pull fibers that are visibly packed at the entrance. Keep the tool flat—don’t jab.
- Repeat with 1–2 brush strokes and a check with your flashlight.
- If debris is loose, use short compressed air bursts from a small distance (avoid spraying continuously).
Stop when you can see clear channel space around the connector opening. Forcing the plug after you remove some lint is a quick test, but don’t assume it’s perfect if you still feel resistance.
4) Finish with a micro-swipe using dry contact cleaner (optional)
If lint removal doesn’t fully fix it—especially when you see sticky residue—use isopropyl alcohol sparingly. Use 90%+ isopropyl alcohol when possible (commonly sold as electronic-grade or standard high-purity).
- Put a small amount of alcohol on a lint-free swab or the very tip of a non-metal tool.
- Lightly wipe the entrance area only. Do not flood the inside.
- Wait 2–5 minutes for evaporation.
If your device is rated as water-resistant, that’s not an excuse to introduce liquid. You’re using alcohol only as a last step after dry debris removal.
What’s actually slowing this PC down?
Pick the symptom - the matching free tool is one click away.
5) Let it fully dry and test
Let the device sit for at least 10 minutes after cleaning if you used alcohol. Then reconnect a known-good cable.
Test in two ways: (1) plug it in and leave it still for 1–2 minutes, and (2) lightly reposition the connector once—charging should stay stable, not cut in and out.
Device-specific tips
Charging ports aren’t all built the same. The safest method stays “gentle and controlled,” but the port geometry changes what you can see and how you should clean it.
Rank #3

- Phone and Port Cleaning: Specialized tools lift lint and debris from Lightning and USB-C charging ports, speaker grilles and camera. The upgraded version adds a microfiber cloth and earbud cleaning putty to better care for your tech gadgets.
- Keyboard, Screen and Lens Care: Use the keycap puller, retractable brush and crevice tools on MacBook, laptop and PC keyboards. Pair the microfiber cloth with the refillable spray bottle for screens.
- For AirPods and Earbuds: A fine cleaning tip, high-density brush, flocked sponge and cleaning putty reach earbud mesh, sound outlets and charging cases to lift wax and dust. Use gently around delicate parts.
- 47-Piece Electronics Cleaning Kit: Includes 32 tools, 12 cleaning putty pieces, one microfiber cloth, one wet wipe and one dry wipe. One compact set for phones, earbuds, laptops, tablets, cameras and gaming consoles.
- Compact Holiday Gift: The 5.39 x 2.17 x 2.17 in case fits a desk, dorm or travel bag. A practical Christmas stocking stuffer, birthday present or tech gift for men, gamers, students and office workers.
iPhone and iPad Lightning ports
Lightning ports can collect compact lint quickly because the connector recess is tight. Use bright light and avoid metal tools—Lightning has tiny contact surfaces that can be damaged by scratching.
- Use a soft brush first.
- If you need a pick, use plastic/wood and keep pressure low.
- Avoid repeated “trying the cable” with force. If the cable doesn’t seat easily after lint removal, stop and inspect again.
If your iPhone shows moisture warnings, don’t keep cleaning with liquid. Dry the device and follow the on-screen guidance, then reassess after it’s fully dry.
USB-C ports on phones and tablets
USB-C ports are reversible, but debris can block both contact sides. Even “small” lint can create intermittent charging or “slow charging” behavior.
- Brush the port opening from two angles.
- Use the non-metal pick only to lift lint at the entrance, not to scrape the interior walls aggressively.
- Optional alcohol: micro-swipe only after dry removal.
Also check your cable plug for bent metal or worn shielding. A dirty cable end can reintroduce residue to the port.
MagSafe, wireless charging, and how to sanity-check the issue
If your device charges via wireless (MagSafe or Qi), you can sanity-check whether the problem is truly the port. If wireless charging works consistently, the issue is likely physical debris at the charging connector.
Windows Errors? Fix Them Before They Spread
Repair common Windows errors and clear accumulated junk for a smoother, more stable PC - no reinstall needed.Free scan · no reinstallCrashes, No Sound, or Screen Glitches?
Random freezes, missing sound and display glitches usually trace back to one bad driver. Find and replace yours safely.Free scan · under a minute- Wireless works + wired fails: focus on port cleaning and cable seating.
- Wireless fails too: consider battery health, adapter/cable power issues, or deeper hardware problems.
MacBook and iPad with USB-C/Thunderbolt
Laptop ports are deeper and more sensitive to damage from scraping. If you’re cleaning a MacBook USB-C port, don’t insert tools deep into the cavity—your goal is to extract debris at the opening.
- Power down (shut down, not just sleep).
- Inspect with strong light.
- Use a dry brush and a non-metal pick only near the entrance.
- Test with a known-good USB-C cable that seats fully without pressure.
If you see bent internal pins or corrosion, professional service is the safest option.
What to do if the trick doesn’t fix it
Sometimes charging problems aren’t just dust. Your next step should be evidence-based: confirm whether the plug is seating, whether the cable works elsewhere, and whether the port looks intact.
Rank #4

- 1.The Package 5 pcs cell phone cleanig kit blue mini brush dual side multi tools, Nylon Brushes & Hook Cleaner.They are durable, helps clean waste to protect your phone speaker from clogging; The nylon bristles are of nice flexibility, wear resistance and thermal deformation.
- 2.The Cleaner Brush is easy to use, just switch to the nylon bristles and insert into the phone port,the accumulating dirt inside can remove. Soft and durable bristles will not defom, but help you to clean phone speaker quickly and won't scratch phone.
- 3.Switch to the hook tip,this multi tool can clean deep. Its tip hook can easily pull out the dirts inside or some larger clumps.
- 4.Help maintain audio performance and clarity for your cell phone , airpods headphone accesorry ,camera, keyboard,ipad tablet etc.
- 5.Also It help a lot in daily life,the mini cleaning brush can remove gunk from hard to reach areas, like window slots, blinds, car vents, sliding door rails, straws, hummingbird feeders, airbrushes, phone holes, small nozzles and more.
Try a second pass with a different tool angle
Many lint clumps stick in one corner. If the first attempt didn’t change behavior, re-inspect the port and repeat the dry brush step, rotating the angle of the strokes.
Don’t escalate to needles. If lint is packed deeply, forcing it out can bend internal contact springs.
Suspect port damage or bent contacts
Signs include: visible deformation inside the port, a cable that never seats properly even after cleaning, or repeated “charging stopped” behavior even with clean contacts.
If you can see bent contacts, stop cleaning and consider repair. Trying to straighten contacts with tools is a common way to make things worse.
Watch for moisture warnings and take the right route
If your device reports moisture or won’t charge, follow the device guidance first. Don’t keep applying alcohol in a hurry. Drying time matters, and liquid trapped deeper can take longer than you expect.
The Tool Desk
Outbyte Driver Updater FREEFix the driver behind crashes, sound loss and screen glitchesFind Drivers →Outbyte PC Repair FREERepair Windows errors before they cause bigger problemsFix Now →Keep the device powered off and in a dry, well-ventilated area. Avoid heat sources like hair dryers—heat can stress seals and components.
Troubleshooting checklist (fast)
If you want a quick path to the truth, use this sequence. Each step helps isolate whether it’s the port, the cable, or the power source.
- Test the cable: try a different certified cable and charger (for USB-C, use a known-good adapter rated for charging).
- Check the wall adapter: plug into another outlet or adapter.
- Check cable seating: does it fully insert with no pressure?
- Inspect the port again: look for lint left near the entrance.
- Try a short clean re-test: after each cleaning pass, test without wiggling for 1–2 minutes.
- Compare wired vs wireless: if wireless charging works, it points to the physical port/cable connection path.
Common mistakes that make charging worse
- Scraping aggressively with metal tools. One slip can scratch contacts or bend pins.
- Using too much alcohol. Liquid can travel deeper and cause corrosion later.
- Forcing the plug while debris remains. That compacts lint further and may damage the connector.
- Ignoring signs of corrosion. Green/white crust often means moisture damage that cleaning can’t fully reverse.
- Cleaning only the outside of the port. The fibers that matter are inside the connector channel.
- Reusing a dirty cable. If a cable tip has fibers, it can re-contaminate the port after cleaning.
How often should you clean it?
If you carry your device in pockets and bags, do a quick monthly inspection with flashlight and magnification. You don’t need to clean every month—just verify whether lint is building up at the entrance.
Best Value
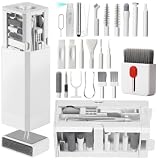
- PHONE & CHARGING PORT CLEANING KIT: Built for everyday phone care for Lightning and USB-C charging ports, speaker openings, earpieces, phone edges and camera areas. Removes pocket lint, dust and debris from hard-to-reach spaces on iPhone, Android and other smartphones.
- AIRPODS & EARBUDS CLEANING KIT: Cleaning pen tip, flocked sponge and detail brushes reach speaker mesh, vents, charging cases and narrow gaps to remove dust and buildup. Ideal for AirPods, wireless earbuds and other compact audio devices.
- KEYBOARD, LAPTOP & SCREEN CLEANER: Includes a keycap puller, switch puller, retractable keyboard brush and detail brushes for cleaning crumbs and dust between keys and around laptop ports. Screen-cleaning tools also help maintain monitors, tablets and device displays.
- CAMERA & MULTI-DEVICE CLEANING TOOLS: Includes camera lens cleaning tools, precision swab, stylus pen, SIM eject tool, tweezers and built-in storage for small accessories. One compact electronics cleaning kit for phones, tablets, laptops, keyboards, cameras and more.
- TECH GIFTS & STOCKING STUFFERS: Compact 2.17 x 2.17 x 5.39 in ABS case keeps all 32 tools organized and travel-ready. A practical Christmas gift, stocking stuffer, birthday gift or back-to-school gadget for men, teens, gamers, students, office workers and tech lovers.
Clean right away when you notice charging instability: slow charging, intermittent connection, or a plug that seats with resistance.
Do these 3 things before closing this tab:
1Scan for outdated or missing drivers - takes under a minute2Repair Windows errors before they cause bigger problems3Fix the driver behind crashes, sound loss and screen glitchesAlternatives if you can’t safely do it yourself
If you don’t have the right tools or you’re seeing corrosion/bent contacts, professional service is usually the safer choice.
- Authorized repair for iPhone, iPad, and MacBook where internal port integrity matters.
- Electronics repair shop for non-Apple devices, especially if the port is visibly damaged.
- Warranty and carrier support if the issue started unexpectedly after normal use and you didn’t cause physical damage.
If you go in for service, tell them you suspect lint/debris and mention what you tried (e.g., dry brush, no metal tools). That helps technicians avoid unnecessary steps.
FAQs
Can I clean a charging port with a Q-tip?
A dry Q-tip tip can be useful at the entrance, but it shouldn’t be pushed deep. If you use alcohol, keep it minimal and let it dry fully. If the Q-tip sheds fibers, switch tools immediately.
Is compressed air safe for phone charging ports?
Yes when used carefully. Use short bursts, keep the nozzle at a distance, and avoid continuous spraying. The goal is to move loose debris out, not to force liquid or contaminants inside.
Free tools Windows power users keep installed
One-click scans. No signup required.
Will toothpicks damage a charging port?
They can if you push too hard or scrape aggressively. If you use a toothpick (or similar non-metal tool), keep it gentle and only work near the entrance while inspecting with light.
My device still won’t charge after cleaning. What’s next?
Test with a different certified cable and adapter, confirm the plug seats fully, and compare wired vs wireless charging (if available). If you see bent pins, persistent moisture warnings, or visible corrosion, stop and seek service.
Can I fix a corroded or water-damaged port by cleaning?
Sometimes light residue clears, but visible corrosion often indicates deeper damage. Cleaning alone may not restore reliable connection, and professional assessment is usually the best next step.
Bottom Line
Most “charging stopped” problems are just dusty charging ports blocking contact. The simple trick is controlled, dry cleaning first—soft brush and gentle non-metal picks—followed by an optional micro-swipe with 90%+ isopropyl alcohol if you see sticky residue.
Do these 3 things before closing this tab:
1Fix the driver behind crashes, sound loss and screen glitches2Repair Windows errors before they cause bigger problems3Scan for outdated or missing drivers - takes under a minuteIf the cable still won’t seat after a careful cleaning pass, don’t keep forcing it. Test with a known-good cable and adapter, and if you suspect corrosion or bent contacts, switch to professional repair for the safest outcome.
Quick Recap
Product prices and availability are accurate as of the date/time indicated and are subject to change. Any price and availability information displayed on Amazon at the time of purchase will apply.

