To determine whether a monitor will fit an arm, compare the monitor’s weight without its original stand—plus any accessories the arm will carry—with the arm’s stated minimum and maximum load. Then match the monitor’s exact VESA hole pattern, and verify screen dimensions, desk thickness, clamp or grommet clearance, and screw depth. A maximum screen-size label alone does not prove compatibility.
The safest process is: identify the monitor’s bare weight and rear mounting pattern, read the arm’s complete specification rather than its headline maximum, and check the physical installation at your desk before buying.
As an Amazon Associate I earn from qualifying purchases.
What a monitor arm’s weight rating really means
A monitor arm’s capacity is a model-specific load range, not a universal rule for every display. Adjustable gas-spring arms can have both a minimum and a maximum supported load. If your display is below the minimum, the arm may rise, drift, or fail to hold position even though it is far below the advertised maximum. If it is above the maximum, the arm can sag, move unexpectedly, or suffer premature mechanical wear.
Measure the monitor as it will be mounted. Fellowes’ official guidance states: “When selecting a monitor arm the weight of the monitor stand should NOT be considered.” Remove the factory stand and use the display-only weight from the monitor’s manual or manufacturer specification. Add anything that will remain on the arm, such as a webcam, speakers, a light bar, cable bundles, or a security lock. Fellowes specifically says accessory weight should be counted against the arm’s published limit.
#1 Best Overall
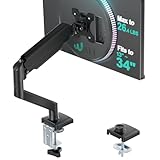
- Keep Your Desk Organized: By lifting screen off the desktop, this monitor arm opens up valuable space for your keyboard, notebook, docking station or a simple, clutter-free work area. Built-in cable management guides wires along the arms, keeping cords out of sight and out of the way. Enjoy a tidy, modern workstation that looks as good as it feels to use.
- Wide Compatibility: WALI single monitor arm is designed to fit most flat or curved LCD/LED screens up to 34", regular screen up to 32 inch, max load capacity 26.4 lbs for flat screens and 19.8 lbs for curved screens, with standard Mounting Pattern mounting holes 75x75mm and 100x100mm. Be sure to verify your monitor’s VESA pattern, size, and weight before purchasing to ensure a perfect fit.
- Full Motion for Ergonomic Comfort: WALI single vesa monitor mount allows to extend your screen out by 19.3" and raise the arm up to 17.3" above the desktop. It swivels +180°/-180°, tilts +70°/-45°and rotates 360°. Whether you’re working from home, gaming through the night, or switching between video calls and documents, getting the screens to your natural line of sight helps relieve neck, shoulder and back strain so you can stay focused longer with less fatigue.
- Engineered for Lasting Performance: This adjustable monitor stand features wider VESA head and tighter-fitting VESA panel to enhance stability and keep your monitor firmly in place. The high-performance durable core has been tested through 20,000+ cycles, delivering smooth, effortless adjustments and dependable performance for years of daily use.
- Two Ways to Install: We offer two desk mounting options: C-clamp mounting for desks 0.39″–2.76″ thick, or grommet base mounting for desks 0.39″–2.76″ thick. With straightforward instructions, you can set up your monitor arm effortlessly, making it a hassle-free addition to your desk. We only recommend installing it on a wooden desk, preferably with no crossbeam blocking the underside.
Compare both ends of the range
Write the display’s mounted weight next to the arm’s minimum and maximum. A suitable match satisfies both conditions:
- The display and attached accessories are at or above the arm’s stated minimum load.
- The same total is at or below the arm’s stated maximum load.
For example, an arm rated from 2 to 10 kg is not automatically suitable for a 1.5 kg monitor. Conversely, a 12 kg display cannot be safely installed on that arm merely because its VESA plate fits. If the monitor is unusually light, look for an arm designed for low minimum loads or for a manufacturer-approved weighted VESA mount. Fellowes lists weighted 75×75 mm and 100×100 mm mounting solutions for arms with higher minimum capacities, but the exact accessory and arm combination must be verified.
VESA compatibility: match the hole pattern, not just the label
VESA describes the spacing of the four threaded holes on the back of a display. The common patterns in the products covered here are 75×75 mm and 100×100 mm, measured horizontally and vertically between hole centers. An arm that says only “VESA compatible” is incomplete information; you need the exact patterns supported by that model.
Do these 3 things before closing this tab:
1Repair Windows errors before they cause bigger problems2Scan for outdated or missing drivers - takes under a minute3Clear out junk files and repair common Windows errorsHow to identify your monitor’s pattern
- Remove the stand if it blocks the mounting area and locate the four threaded holes.
- Measure center-to-center horizontally and vertically. A 75 mm measurement in both directions is 75×75; 100 mm in both directions is 100×100.
- Check the monitor manual for the permitted screw diameter, length, and tightening depth.
- Look for a recessed mounting bay, decorative cover, or protruding cable housing that could prevent the arm plate from sitting flat.
Do not assume that a physically similar pattern is interchangeable. A 100×100 plate does not fit a 100×200 monitor without a correctly specified conversion mount, and a conversion mount still has to clear the monitor’s recess, accept the arm’s screws, and remain within the arm’s load rating. Fellowes offers a 100×200 mm conversion mount, but that product’s existence does not establish compatibility with every monitor or arm.
Rank #2

- Ultrawide Compatibility: The ErGear heavy-duty monitor arm is compatible with most 13″–34″ flat or curved monitors up to 19.8 lbs with VESA mounting patterns 75x75mm or 100x100mm. Please verify the screen size, weight, and VESA pattern of your monitor before purchase.
- Engineered for Lasting Performance: This adjustable monitor arm features a 40% wider VESA head and a tighter-fitting VESA panel to enhance stability and keep your monitor firmly in place. The high-performance durable core has been tested through 20,000+ cycles, delivering smooth, effortless adjustments and dependable performance for years of daily use.
- Full Motion Flexibility: This premium VESA monitor mount delivers precise height adjustment up to 17.5″ and reach up to 18.1″, helping you achieve the perfect eye-level position to reduce neck and shoulder strain. It features +80°/-50° tilt, ±90° swivel, and 360° rotation, so you can always find your ideal viewing angle.
- Streamlined Finish with Cable Management: The upgraded cable clips open easily with no tools required, making cable organization faster and more convenient. This monitor arm lifts your screen to free up desk space while keeping cables tidy, helping you stay focused and productive in a clean, clutter-free workspace.
- Quick Setup with Tool-Free VESA Mounting: Set up in just three easy steps! Our computer monitor mount upgraded VESA plate enables tool-free mounting, saving time and avoiding complex installation. We offer two desk mounting options: C-clamp mounting for desks 0.39″–2.56″ thick, or grommet base mounting for desks 0.39″–2.95″ thick.
Screw length and recesses can decide the result
Even when hole spacing matches, the installation can fail if screws bottom out before clamping the plate or are long enough to damage internal components. Use the monitor maker’s permitted screw depth, spacers, and washers. Recessed VESA bays may need the arm manufacturer’s supplied spacers or a model-specific bracket. If the monitor has an unusual pattern, an offset plate, or a curved rear shell, rely on the exact monitor and arm manuals rather than a generic adapter chart.
Why screen size is only a secondary fit check
Arm listings often advertise a largest diagonal, but diagonal size does not account for weight, depth, bezel width, portrait orientation, or the leverage created by a large panel. ACT states that its screen-size indication depends on the arm’s weight limit and VESA compatibility. Its guidance also warns that portrait orientation can reduce the usable maximum size.
Use the diagonal as a preliminary filter, then confirm the actual load and mounting geometry. A heavy 32-inch display can exceed an arm’s rating while a lighter display of the same size may fit. In a multi-monitor setup, overall width matters as much as diagonal: two displays may fit the arm plates yet collide at the edges or leave no room for the arm joints to move. Fellowes advises considering total monitor width when configuring multiple arms.
What’s actually slowing this PC down?
Pick the symptom - the matching free tool is one click away.
Desk mounting constraints: clamp, grommet and thickness
The desk connection is part of compatibility. A monitor can satisfy weight and VESA requirements yet be unusable if the clamp cannot open far enough, the desk is too thick, or the underside has a frame, drawer, cable tray, or beveled edge.
Rank #3

- Great Adaptability: This HUANUO single monitor arm fits 13-32 inch monitors, holds 4.4-19.8 lbs, suitable for VESA patterns of 75x75mm & 100x100mm. This monitor mount is specially designed for ergonomics, aiming to help people work comfortably, and to help people have a better viewing experience.
- Full Adjustable: This PC monitor stand can remain completely stable at any angle without any extra work. Compared with other single monitor arm adjustment methods, huanuo can make you adjust screws repeatedly, this monitor arm is easy to use and has a tilt range from -50°to +85°, ±90 ° swivel, and 360°rotation, so your screen can be lifted up to 39.6cm from desktop with one hand.
- 80% Sturdier Than Others: At HUANUO, we focus on improving the strength and stability of our single monitor stand. The single desk monitor mount uses automotive-grade components and has undergone 20,000 motion tests, which means it can be used continuously for more than 5 years without issue.
- Installed In 3 Minutes: The 1-piece design monitor arm simplifies the installation, so all necessary hardware is included; The setup can be completed in 3 minutes. Step 1: Affix the bracket to your table; Step 2: Attach your monitor to the VESA plate; Step 3: Adjust tension according to your monitor weight.
- Two mounting options : You may choose to use either a C-clamp or grommet mount. For best results, make sure your table meets the following criteria: wood tabletop is recommended; the underside of the tabletop should ideally be free of any beams or panels that may interfere with the installation; the tabletop thickness and grommet mounting can support 0.59"-3.54”.
Clamp mounts
A clamp grips the rear edge of the desk. Check the arm’s minimum and maximum desk thickness, the required unobstructed depth under the edge, and whether the clamp pad can sit fully on a solid surface. Do not clamp to a hollow decorative panel unless the manufacturer explicitly permits it; the concentrated load can crush or deform weak material.
Grommet mounts
A grommet mount passes through a hole in the desktop and tightens from below. Confirm the required hole diameter, the available underside clearance, and whether your desk already has a cable-management opening in the correct location. Grommet and clamp limits can differ on the same arm. MSI publishes separate clamp and grommet desk-thickness ranges for its MPG MT201RG, so use the range for the installation method you actually plan to use.
When the desk is near a published limit, measure at several points. A desktop that varies in thickness, has a rear lip, or includes a metal frame may not provide the flat clamping area assumed by the specification.
Step-by-step compatibility check
- Record the display-only weight. Use the manufacturer’s figure with the stand removed. Add the weight of accessories that will remain attached to the arm.
- Record the arm’s complete load range. Note both minimum and maximum values, and whether the rating is per screen or shared across multiple screens.
- Identify the VESA pattern. Confirm 75×75 mm, 100×100 mm, another pattern, or no standard pattern. Check the permitted screw size and depth.
- Inspect the rear housing. Measure recess depth, look for cable obstructions, and determine whether spacers or an adapter are required.
- Check size and orientation limits. Compare diagonal, physical width, panel depth, and any portrait-orientation restriction. For multiple monitors, add the widths and check arm-joint travel.
- Measure the desk. Record desktop thickness, underside clearance, edge shape, and the location and diameter of any grommet hole.
- Verify the mounting hardware. Confirm that the arm includes the correct plate, screws, washers, spacers, and clamp or grommet parts for your monitor and desk.
- Recheck after installation. With the display mounted, move it through the arm’s full range slowly. It should stay where placed without drifting, scraping the desk, or pulling cables tight.
Real specifications to use as comparison points
The following examples illustrate how to read manufacturer specifications. They are not universal limits for all monitor arms.
Rank #4

- Compatible with Wide Screens - To ensure compatibility with the dual monitor mount, your each monitor must meet three conditions at the same time: First, computer screens size range: 13 to 32 inches. Second, screen weight range: 4.4 to 19.8 lbs. Third, the back of the monitor screen must have VESA mounting holes with a pitch of 75x75mm or 100x100mm.
- Regarding the compatibility with desks - Your desk must meet three conditions at the same time: First, desk material: Only wooden desks are recommended, plastic or glass desks cannot be used. Second, desk thickness range: 0.59" - 3.54". Third, the bottom of the desk should not have any cross beams or panels, as this will interfere with installation. We recommend carefully checking that your desk and monitors meets all above conditions before purchasing.
- Dual C-Clamp Hold - Worried your dual monitors might wobble or slip? Our upgraded base uses a larger platform plus a dual C-clamp structure to lock the dual monitor arm firmly to your desk. Each arm safely keeps your screens steady while you type, click and game—no shaking, no sliding, just a clean and secure setup you can trust every day. It also provides Grommet Mounting installation choice, both options ensure stable and secure fixation for your 0.59" - 3.54" desk.
- Full-Motion Adjustment For Comfortable View - Pull the screen closer when you’re deep in a spreadsheet, push it back to watch videos, or rotate to portrait for coding — moving everything smoothly with just one hand. The monitor stand offers +85°/-50° tilt, ±90° swivel and 360° rotation. Raise your monitor up to 15.75″ to support a healthy sitting posture. Whether you’re working from home, gaming through the night, or switching between video calls and documents, getting the screens to your natural line of sight helps relieve neck, shoulder and back strain so you can stay focused longer with less fatigue.
- Keep Your Desk Organized: By lifting both screens off the desktop, this dual monitor stand opens up valuable space for your keyboard, notebook, docking station or a simple, clutter-free work area. Built-in cable management guides wires along the arms, keeping cords out of sight and out of the way. Enjoy a tidy, modern workstation that looks as good as it feels to use.
| Arm or model | Published load | VESA patterns | Screen or installation notes |
|---|---|---|---|
| MSI MPG MT201RG | 2–20 kg (4.4–44 lb) per screen | 75×75 mm and 100×100 mm | MSI lists separate desk-thickness ranges for clamp and grommet mounting; use the range for your chosen method. |
| BenQ Ergo Arm BSL01 | 4.4–24.2 lb | 75×75 mm and 100×100 mm | Listed for 17–40 inch screens; the weight and VESA requirements still govern a particular monitor. |
| ACT AC8329 | Up to 16 kg for a standard monitor; up to 13 kg for a curved monitor | 75×75 mm and 100×100 mm | ACT cautions that screen-size indications depend on weight and VESA compatibility. |
| SIIG models | Varies by model | Varies by model | SIIG’s product pages and comparison table show that capacity, VESA patterns, and mounting features differ across its range. |
These figures are manufacturer ratings accessed in 2026. They describe the named models under their stated conditions; they are not a general standard for monitor arms. A display that weighs 18 kg, for instance, falls within the MSI example’s maximum only if its VESA pattern, desk installation, and accessory load also meet the other requirements.
When an adapter or weighted mount is appropriate
An adapter is useful only when its complete mechanical specification matches both sides of the installation. Confirm the monitor’s hole spacing and recess, the adapter’s supported pattern, the arm plate’s hole arrangement, screw compatibility, and the resulting load rating. An adapter can move the load farther from the arm, increasing leverage even when the scale weight is unchanged.
A weighted VESA mount may solve a light-monitor problem on an arm with a higher minimum capacity. It must be the accessory specified for that arm series and installed exactly as directed. Do not improvise with steel plates, extra hardware, or stacked adapters; those changes can shift the center of gravity and invalidate the rating.
Common mismatch symptoms and fixes
The arm rises or will not stay down
The monitor-plus-accessory load may be below the arm’s minimum. Remove unnecessary accessories, choose a lower-minimum arm, or use the manufacturer’s approved weighted mount. Tension adjustment alone cannot make an underweight setup safe if the mechanism is outside its design range.
Best Value

- Check Desk & Monitor Compatibility: To ensure a proper fit, your monitor must meet these 3 conditions at the same time: First, screen size ranges 13"–32". Second, monitor weight must be between 4.4–15.4 lbs. Third, supports VESA 75×75mm or 100×100mm. Meanwhile, we recommend mounting this arm only on wood desks 0.59"–3.54" thick (other desk types not recommended). Note: If your desk has irregular edges, please choose this monitor arm carefully.
- MechaSpring Arm — Built for 2× Longer Life: Featuring the MechaSpring arm, this VESA monitor mount delivers consistent support over time for dependable performance that lasts. Unlike gas-based designs that may lose pressure, this monitor desk mount helps keep your monitor steady through everyday adjustments, offering up to 2× the service life of conventional mounts. Moreover, with 90% professional-grade metal construction, the single monitor arm delivers strong reliability, day after day.
- LockSteady System — Adjust with Ease, Hold with Strength: With the upgraded system, the monitor mount helps resist screen droop and moves smoothly with just one finger if you adjust screens often. For set-and-forget setups or deep focus work—like designing, coding and data analysis—where the monitor stays in place most of the time, it holds steady right where you leave it for reliable viewing. This monitor stand is also TÜV Rheinland certified and tested at 3x its load for added safety.
- ACA-Endorsed Design for Ergonomic Comfort — Backed by the American Chiropractic Association (ACA), the desk monitor mount helps reduce neck & back strain by raising your monitor to eye level and fine-tuning it. It transitions smoothly between focused coding, intense gaming and screen sharing during meetings, creating a more comfortable setup for both work and play. Not only does it transform your desk into a professional workstation, but it also supports your health as much as your productivity.
- PrecisionView Window — Tension Adjustment Made Visible: Stop guessing. Start seeing. Unlike a traditional monitor mount where tension is adjusted by feel alone, our integrated PrecisionView window provides instant visual feedback through the yellow indicator movement. You'll know exactly when the tension is perfectly calibrated for your monitor's weight — no more over-tightening or endless trial and error. This professional-grade precision puts you in full control from the first turn.
The arm sags or slowly drops
The load may exceed the maximum, the tension may be incorrectly adjusted, or the display may sit too far forward because of an adapter. Recheck the total mounted weight, move the monitor closer to the joint if the design allows, and set tension according to the manual. If the load remains over the rating, use a higher-capacity arm.
The plate will not sit flush
A recessed VESA bay, cable cover, or incompatible screw length is often responsible. Stop tightening, inspect the recess, and use only the specified spacers or screws. Never force the plate against a curved plastic shell.
The clamp slips or damages the desk
Verify desk thickness and underside clearance, reposition the clamp on a solid section, and use the supplied pad. A hollow or weak desktop may require reinforcement or a grommet installation approved by the manufacturer.
Recommended Free Tools
Two mounted screens collide
Measure each display’s actual width and depth, then account for the arm joints’ minimum spacing and travel. Reposition the arms before tightening, or select a wider multi-monitor arm designed for the combined envelope.
A practical decision framework
Choose an arm only after all four compatibility gates pass:
- Load gate: the mounted total lies inside the arm’s minimum-to-maximum range.
- Pattern gate: the exact VESA spacing and screw requirements match, with any recess handled correctly.
- Envelope gate: diagonal, width, depth, portrait use, and multi-monitor spacing remain within the stated limits.
- Desk gate: clamp or grommet hardware fits the desktop thickness, hole, edge, and underside clearance.
If any gate is uncertain, pause and obtain the exact monitor and arm manuals. Manufacturer listings can omit details that matter for recessed mounts, unusual patterns, screw depth, clearances, or model revisions. The manual is the controlling document for the specific hardware you are installing.
Bottom line
A monitor arm fits when its complete mechanical requirements—not just its headline screen-size number—match your setup. Weigh the monitor without its stand, include attached accessories, satisfy both ends of the load range, match the precise VESA pattern and screw depth, and measure the desk interface. Treat adapters and portrait or multi-monitor arrangements as separate engineering checks. This method prevents the two most common errors: buying an arm that cannot support the display and buying one whose plate fits on paper but cannot be mounted safely in practice.
Quick wins for a faster PC:
Fix the driver behind crashes, sound loss and screen glitchesFind Drivers →Clear out junk files and repair common Windows errorsFree Scan →Quick Recap
Product prices and availability are accurate as of the date/time indicated and are subject to change. Any price and availability information displayed on Amazon at the time of purchase will apply.

