A blurry iPhone selfie is usually worth troubleshooting in a short sequence rather than guessing at a failed camera. Clean and uncover the front camera, test it against the rear camera, restart and update iOS, then check repair history if the problem began after service. If the image remains soft, Apple says the camera may need service.
Start with the checks most likely to reveal the problem
Work through these checks in order. Each one removes a different possibility, so you can tell whether the blur is caused by something covering the camera, an accessory, a software state, or a hardware or repair issue.
As an Amazon Associate I earn from qualifying purchases.
- Clean the front-camera area. Use a clean microfiber cloth over the camera lens area.
- Remove anything that could cover it. Take off the case, film, screen protector, or other accessory if it reaches the camera area, then test again.
- Compare cameras. In Camera, take a front-camera selfie and switch to the rear camera for another test image.
- Restart the iPhone. After it starts again, take another selfie.
- Update iOS. Install the latest iOS version available for that iPhone, then repeat the camera test.
- Review repair history if the symptom remains. On iPhone 12 models and later, open Settings > General > About > Parts and Service History when that section is available.
Apple’s camera guidance states: “If the photo is blurry, clean the front and back camera lenses with a microfiber cloth.” Cleaning is a sensible first step, but it is not a guarantee that every blurry selfie will be fixed.
The Tool Desk
Outbyte Driver Updater FREEFix the driver behind crashes, sound loss and screen glitchesFind Drivers →Outbyte PC Repair FREERepair Windows errors before they cause bigger problemsFix Now →What the blur pattern can—and cannot—tell you
Comparing symptoms helps narrow the next step, but it does not identify a failed part by itself. Use the two comparisons below as evidence, not as a diagnosis.
#1 Best Overall

- Glasses cleaner - Sourced from the highest quality microfiber that absorbs and removes dust, oil, smudges, fingerprints, dirt, and more. Leaves no scratches, streaks, marks, or lint behind. The perfect eyeglass cleaner for reading glasses, women, men, adults, him, her, teens, and more.
- Screen cleaner: Our Microfiber cloth accommodates all your screen cleaning needs. It's the perfect eyeglass cleaning cloth, glasses wipes, glass cleaning cloth, lens cleaning cloth, screen cleaning cloth, and even tv cleaning cloth.
- Quality protection: Each MagicFiber lint free cloth comes in its own polybag so that they are always new and ready to use. Includes MagicFiber Microfiber Cleaning Cloth (5 black, 1 grey) 6 x 7 inches (15cm x 18 cm).
- Designed for all products: The delicate craftsmanship of our Microfiber Cleaning Cloth allows for the most versatile use cases. It can be used on any delicate surface such as LCD, OLED, laptop, phone, car, tablet, dvd, mirror, glass, glasses, cameras, lenses, gaming, toys and more!
- MagicFiber: Magical results for the things you care about most
| Comparison | What to record | What it suggests | What it does not prove |
|---|---|---|---|
| Front camera versus rear camera | Whether the selfie camera, rear camera, or both produce soft images | If only selfies are blurry, concentrate checks on the front-camera area, its covering accessories, and any front-camera repair history | It does not prove that the front-camera module is defective |
| Camera image versus Face ID | Whether Face ID also has trouble or cannot be set up | A smudge, case, or screen protector over the TrueDepth camera should be checked when Face ID is affected too | A Face ID problem does not establish one single cause for blurry photos |
Take both test images under similar conditions and look at the saved photos, not only the live preview. The comparison is useful because it tells you whether the symptom is isolated to one camera system, but a technician may still need to inspect the device to determine the exact cause.
Step 1: clean the camera and remove obstructions
Use a microfiber cloth
Turn the iPhone so you can see the front-camera area and gently wipe it with a clean microfiber cloth. Fingerprints, skin oil, and dust can soften contrast and detail. Apple specifically recommends microfiber cleaning for blurry photos.
Temporarily remove coverings
Remove the case, film, screen protector, or accessory if any edge, adhesive, cutout, or raised lip could overlap the camera area. Take a test selfie with the iPhone completely uncovered. If the image becomes clear, refit or replace the covering rather than continuing to troubleshoot the phone itself.
Check the TrueDepth area when Face ID is involved
The front camera system used for Face ID is called TrueDepth. If Face ID is also failing, inspect that area for a smudge, case edge, or screen protector. Apple’s Face ID guidance specifically calls for removing those obstructions. This check is relevant when Face ID has a problem as well as when the selfie image is blurry; it does not show that every blurry selfie comes from a TrueDepth obstruction.
Do not improvise cleaning methods
The official guidance calls for a microfiber cloth. Do not scrape the glass, use an abrasive material, or apply a liquid cleaner directly to the camera area. Those methods are not part of the cited troubleshooting instructions and could create a new problem while you are trying to solve the blur.
Step 2: remove accessories that can affect a low-light test
Apple also calls out motion blur in low light when an iPhone is used with a lens converter, metallic case, or magnetic lens mount. If any of those accessories is attached, remove it and repeat the selfie in the same lighting. This is a targeted test: it tells you whether the blur disappears when the accessory is no longer part of the setup.
Do not treat this as proof that every case or magnet causes blur. The relevant check applies when the accessory is present, the scene is dim, and the image appears affected. If the selfie remains soft with the iPhone bare, continue through the software and repair-history checks.
Free tools Windows power users keep installed
One-click scans. No signup required.
Rank #2
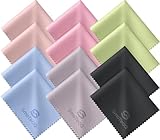
- Premium Ultra-Soft Microfiber: Effortlessly removes fingerprints, smudges, oil, and dust without scratching—leaving lenses and screens spotless and streak-free.
- Safe for All Glasses & Screens: Gentle on coated, polarized and blue-light lenses; perfect for phones, tablets, monitors, and camera optics.
- Individually Wrapped for Clean Storage: Each cloth is sealed in a protective PE sleeve—ideal for home, office, travel, or keeping inside your eyeglass case.
- Color-Coded Organization: Six colors (2× each) help you assign cloths to different devices, tasks, or family members—making everyday cleaning more hygienic, organized, and effortless.
- Durable, Washable & Reusable: With reinforced micro-weave, each cloth can be washed and reused hundreds of times without losing softness or cleaning power.
Step 3: test the front and rear cameras
Make a controlled pair of photos
- Open the Camera app.
- Take one selfie with the front camera.
- Switch to the rear camera and photograph a nearby subject with visible edges or text.
- Save both images and inspect them at the same zoom level.
Record whether the softness affects the entire image or only part of it, and whether the rear-camera image is also affected. The important result is the scope of the symptom: front only, rear only, or both. Apple recommends comparing the front and rear cameras as part of general camera troubleshooting.
Repeat after every change
Take another pair after cleaning, uncovering the camera, removing an accessory, restarting, and updating. Changing one factor at a time makes the result easier to interpret. If you remove several things at once and the image improves, you may know that the setup changed but not which item caused the improvement.
Step 4: restart the iPhone
Restart the iPhone after the physical checks. A restart clears the current operating session and gives the Camera app another start without changing your photos or camera settings. Once the phone is back on, open Camera and take a new selfie before reinstalling any accessory you removed for testing.
If the image is still blurry, the restart result is useful evidence: it makes a temporary camera-app state less likely, but it does not rule out every software or hardware issue.
What’s actually slowing this PC down?
Pick the symptom - the matching free tool is one click away.
Step 5: update iOS and retest
Install the latest iOS release available for your particular iPhone, then repeat the front- and rear-camera test. Apple lists restarting and updating iOS among its general camera troubleshooting steps. Keep the phone connected to power if an update requires it, and allow the installation to finish before judging the camera.
An update is a troubleshooting step, not a promise that the lens or camera module will become sharper. If the same blur remains after the update and the physical checks, move to repair history and service rather than repeatedly reinstalling software.
Step 6: check Parts and Service History after a repair
Where to look
On iPhone 12 models and later, open Settings > General > About > Parts and Service History when the section appears. Availability and the information shown depend on the iPhone model and its service history.
Rank #3

- 30-pack of ultra-soft cleaning cloths (29 grey and 1 white) made of high-quality tightly woven microfiber material
- Each cloth measures 6 x 7 inches (15cm by 18cm)
- Contain no harsh chemicals
- Lint-free and streak-free performance saw-tooth pattern edges prevent fraying, ensuring no coarse strings (won’t scratch surfaces)
- Machine washable and reusable
Why repair history matters
Apple says a non-genuine front camera or an incompletely performed front-camera repair can cause poor focus or reduced image sharpness. If the selfie became blurry immediately after a screen, camera, or other repair, that timing is important to report to the service provider.
Crashes, No Sound, or Screen Glitches?
Random freezes, missing sound and display glitches usually trace back to one bad driver. Find and replace yours safely.Free scan · under a minutePC Slower Than It Used to Be?
A free scan shows the junk files, broken settings and background clutter dragging Windows down - then fixes them in one click.Free scan · Windows 10 & 11Apple also notes that an affected front-camera repair can have consequences beyond ordinary selfies. Portrait mode, third-party camera previews, and Memoji may be affected. These symptoms do not identify a specific replacement part, but together they are a reason to have the front-camera system inspected by a qualified technician.
What to do with the result
- If Parts and Service History shows a front-camera service event and the blur began afterward, contact the provider that performed the repair and describe the timing.
- If the history is unavailable, that does not prove that no repair occurred; the section is model-dependent.
- If no repair is listed and the camera remains blurry after cleaning, testing, restarting, and updating, proceed to professional service rather than attempting to open the phone yourself.
When Face ID is also failing
Face ID adds a useful symptom comparison. First remove a smudge, case edge, or screen protector that could cover the TrueDepth camera, then try Face ID and the selfie camera again. If Face ID cannot be set up and the camera is not working properly, Apple’s guidance indicates that service may be needed.
Do not assume that a Face ID failure automatically explains a blurry selfie, or that a blurry selfie automatically means Face ID hardware has failed. The two functions share the front-camera area, but the available guidance supports an obstruction check and a service decision, not a single universal diagnosis.
Document the symptom before seeking help
A short record can make a service visit more efficient. Note the iPhone model, iOS version, and the date the blur first appeared. Save one front-camera image and one rear-camera image made under similar lighting, and record whether the softness is visible in the saved file, the live preview, or both. Also note whether the blur covers the whole frame or a particular area.
Quick wins for a faster PC:
Repair Windows errors before they cause bigger problemsFix Now →Fix the driver behind crashes, sound loss and screen glitchesFind Drivers →Clear out junk files and repair common Windows errorsFree Scan →Write down every accessory present during the failed test, including a case, film, screen protector, lens converter, metallic case, or magnetic mount. If removing one changes the result, record that exact change. Include the date and type of any recent repair, even if the work was for a screen or another component rather than the camera. These details do not diagnose the phone remotely, but they give a technician reproducible information.
Check related functions without treating them as proof of a single cause. Face ID setup, Portrait mode, third-party camera previews, and Memoji can reveal that the front-camera system needs closer inspection, particularly after a repair. They cannot identify which component is at fault without examining the device.
Rank #4

- Glasses cleaner - Sourced from the highest quality microfiber that absorbs and removes dust, oil, smudges, fingerprints, dirt, and more. Leaves no scratches, streaks, marks, or lint behind. The perfect eyeglass cleaner stocking stuffers for adults, men, women, him, her, teens, and more.
- Screen cleaner: Our Microfiber cloth accommodates all your screen cleaning needs. It's the perfect eyeglass cleaning cloth, glasses wipes, glass cleaning cloth, lens cleaning cloth, screen cleaning cloth, and even tv cleaning cloth.
- Quality protection: Each MagicFiber lint free cloth comes in its own polybag so that they are always new and ready to use. Includes MagicFiber Microfiber Cleaning Cloth (29 black, 1 grey) 6 x 7 inches (15cm x 18 cm).
- Designed for all products: The delicate craftsmanship of our Microfiber Cleaning Cloth allows for the most versatile use cases. It can be used on any delicate surface such as LCD, OLED, laptop, phone, car, tablet, dvd, mirror, glass, glasses, cameras, lenses, gaming, toys and more!
- MagicFiber: Magical results for the things you care about most
Service expectations and safe next steps
When the camera still does not work properly after cleaning, uncovering it, comparing cameras, restarting, and updating iOS, Apple says service may be needed. At that point, avoid opening the phone or trying to polish, scrape, or replace the camera yourself. Further handling can obscure the original symptom or create additional damage.
Apple describes service through Apple, Apple Authorised Service Providers, and Independent Repair Providers using genuine parts. Availability depends on location. There is no single official price or turnaround that applies to every iPhone model and repair, so ask the selected provider for a current estimate and service terms. If another provider performed a recent repair, return with the saved test images and the timing of the blur.
Recommended Free Tools
A missing Parts and Service History section is not a clean bill of health: Apple makes that information available only on supported models and circumstances. Likewise, a clear rear-camera image does not prove that the front module must be replaced. The reliable conclusion is narrower: the symptom appears limited to one camera path and deserves the remaining checks or an inspection.
Use this decision table after the basic checks
| Observed result | Next action |
|---|---|
| Selfie clears after wiping the camera | Keep the camera area clean and check it again if blur returns. |
| Selfie clears only after removing a case, film, or accessory | Reinstall the item carefully or replace it with one that leaves the camera area unobstructed. |
| Front camera is blurry; rear camera is clear; no repair history or accessory explains it | Restart, update iOS, and retest. If it remains blurry, arrange service. |
| Both front and rear images are blurry | Repeat the cleaning, restart, and update sequence, then seek service if both remain affected. |
| Blur began after front-camera repair | Check Parts and Service History when available and return to the repair provider or another qualified service route. |
| Blur accompanies Face ID trouble | Remove TrueDepth obstructions. If Face ID still cannot be set up and the camera remains faulty, seek service. |
| Blur appears with a lens converter, metallic case, or magnetic lens mount in low light | Remove the accessory and repeat the low-light test without it. |
When the iPhone needs service
Apple says service may be needed when the camera still does not work properly after the basic troubleshooting steps. That is the appropriate point to stop experimenting with coverings, cleaners, or software resets.
Service routes Apple describes
For a front-camera replacement or inspection, Apple describes service through Apple, Apple Authorised Service Providers, and Independent Repair Providers using genuine parts. Availability depends on location. The guidance does not establish one universal price, turnaround time, or provider for every iPhone, so ask the selected provider for current terms before handing over the device.
Prepare useful information
- The iPhone model and iOS version.
- Whether the rear camera is clear.
- Whether the blur appears in saved photos, the live Camera view, or both.
- Any case, film, lens converter, metallic case, or magnetic mount used during the failed test.
- The date and type of any recent repair.
- Whether Face ID, Portrait mode, third-party camera previews, or Memoji are also affected.
Providing those details helps a technician reproduce the symptom and distinguish an obstruction or accessory issue from a front-camera repair problem.
What not to conclude from a blurry selfie
- Do not assume the camera is permanently broken after one photo. Clean the camera, uncover it, and repeat the test first.
- Do not treat a clear rear-camera photo as proof that the front camera must be replaced. It only shows that the symptom may be limited to the front-camera path.
- Do not treat a Face ID error as a complete diagnosis. Check for TrueDepth obstructions and use service guidance if the problem persists.
- Do not assume a missing Parts and Service History section means the phone was never repaired. Apple makes that information available only on supported models and circumstances.
- Do not keep using an accessory that reproduces blur in low light. Remove it and confirm whether the image improves before deciding what to do next.
A concise troubleshooting checklist
Use this checklist if you need to work through the issue quickly:
Best Value

- 【PREMIUM MATERIALS】 – Made with 100% premium microfiber material, Zeefpod glasses cleaning cloths are designed to be ultra-soft, lint-free, and scratch-free.
- 【WIDELY USED】-Perfectly sized at 6x7 inches, Zeefpod microfiber cleaning cloths are ideal for all surfaces, including eyeglasses, camera lenses, phone screens, tablets, laptops, and TVs, delivering crystal-clear results every time.
- 【REUSABLE & WASHABLE】-Designed for repeated use, Zeefpod eyeglass cleaning cloths are washable and long-lasting, offering a sustainable cleaning option for environmentally conscious users.
- 【GREAT VALUE PACK】-Each pack includes 60 lens cleaning cloths, ensuring you’re always prepared for smudge-free screens and lenses at home, in the office, or on the go.
- 【LOGO-FREE for DIY and GIFTING】- Zeefpod eye glass clean cloths come without any branding, making them perfect for DIY, personal projects, or adding your own logo. They’re also an affordable and thoughtful gift for family, friends, and coworkers.
- Wipe the front camera area with a microfiber cloth.
- Remove the case, film, screen protector, or accessory that may overlap it.
- If using a lens converter, metallic case, or magnetic lens mount in low light, remove it.
- Take a selfie and a rear-camera test image.
- Restart the iPhone.
- Update to the latest iOS available for the device.
- Repeat both camera tests.
- On iPhone 12 and later, inspect Settings > General > About > Parts and Service History when available.
- If Face ID also fails, check the TrueDepth area for a smudge or covering.
- Arrange qualified service if the camera remains blurry.
The sequence matters because it starts with reversible, low-risk checks and ends with service only when the symptom survives them. It also preserves useful evidence about whether the blur is linked to an obstruction, an accessory, a software state, or a repair.
Frequently Asked Questions
Why is my iPhone selfie camera blurry but the rear camera is clear?
A front-only symptom can come from a smudge, case, film, screen protector, accessory, or front-camera repair issue. Clean and uncover the front camera, restart and update iOS, then check Parts and Service History on iPhone 12 and later when available. A clear rear image does not by itself prove the front module has failed.
Can a screen protector make selfies look blurry?
Yes, if its edge, adhesive, or cutout overlaps the TrueDepth or front-camera area. Remove the protector temporarily and take another saved selfie. If Face ID is also affected, Apple specifically recommends checking for a smudge, case, or screen protector covering the TrueDepth camera.
Do these 3 things before closing this tab:
1Clear out junk files and repair common Windows errors2Scan for outdated or missing drivers - takes under a minute3Repair Windows errors before they cause bigger problemsWhat should I do if blur started after an iPhone repair?
Record when the blur began, check Settings > General > About > Parts and Service History if the iPhone is a supported model, and contact the repair provider. Apple says a non-genuine or incompletely repaired front camera can cause focus or sharpness problems, and Portrait mode, third-party previews, or Memoji may also be affected.
Can a magnetic case or lens mount cause a blurry selfie?
Apple identifies motion blur in low light as a possible issue when using a lens converter, metallic case, or magnetic lens mount. Remove the accessory and repeat the test in the same lighting. If the image remains blurry with the iPhone bare, continue with restart, update, and service checks.
Should I replace the camera after one blurry photo?
No. First clean the lens area with a microfiber cloth, remove coverings and accessories, compare front and rear cameras, restart the iPhone, and update iOS. If the symptom persists after those checks, Apple says service may be needed.
How much will iPhone selfie-camera repair cost?
Apple’s guidance does not establish one price or turnaround for every model and location. Apple, Apple Authorised Service Providers, and Independent Repair Providers using genuine parts are service routes Apple describes. Ask the selected provider for current terms and an estimate.
The Bottom Line
Clean and uncover the front camera, remove problematic low-light accessories, compare front and rear photos, restart and update iOS, then check repair history if relevant. Persistent blur—especially after a front-camera repair or alongside Face ID trouble—should be assessed by a qualified service provider.
Quick Recap
Product prices and availability are accurate as of the date/time indicated and are subject to change. Any price and availability information displayed on Amazon at the time of purchase will apply.

