What’s actually slowing this PC down?
Pick the symptom - the matching free tool is one click away.
On any MacBook Air, the quickest screenshot shortcuts are Shift-Command-3 for the entire screen, Shift-Command-4 for a selected area, and Shift-Command-4 followed by Space for a window or menu. Screenshots normally appear on the desktop. Hold Control with a shortcut when you want the capture copied to the clipboard instead of saved as a file.
These instructions follow Apple’s current guidance for macOS. See Apple’s “Take a screenshot on Mac” instructions if you need Apple’s illustrated reference.
Choose the capture you need
| What you want | Keys | What happens |
|---|---|---|
| Entire screen | Shift-Command-3 | The whole display is captured and saved to the desktop. |
| A rectangular area | Shift-Command-4 | The pointer becomes a crosshair. Drag over the area, then release. |
| One window or menu | Shift-Command-4, then Space | The pointer becomes a camera. Click the window or menu to capture it. |
| More controls | Shift-Command-5 | Opens the Screenshot controls for screen, window, selection, timer, destination and other options. |
Press and release the keys; you do not need to hold the shortcut while the image is being created. A floating thumbnail can appear briefly in the corner. Click it to mark up or edit the image, drag it to another location, or wait for it to disappear while macOS saves the file.
Capture the entire MacBook Air screen
- Arrange the screen exactly as you want it captured.
- Press Shift-Command-3.
- Wait for the thumbnail, if it appears, or look on the desktop for the new file.
The default filename includes the date and time. This is useful for a quick record of an error, a complete webpage, or everything visible across your display.
Recommended Free Tools
#1 Best Overall

- 【Universal】These spudger kit and pry tools professional designed for disassembling a variety of electronics - iPhone, android phone, laptop, tablet, apple watch, iPad, iPod, Macbook, computer, LCD screen, battery and more
- 【Plastic Spudger】Nylon spudger set is made of quality carbon fiber plastic, tough-yet-soft, which makes the tools effective at prying & opening electronics cases and screen without scratching or marring their surface
- 【More Tools】Metal Spudger helps pry and poke when you need a little more power. Ultra thin opening tool easily slips between the tightest gaps and corners. Opening picks are useful for prying open iPad and other glue-laden devices
- 【Package】This electronics pry tool kit includes 1 x plastic spudger, 1 x metal spudger, 1 x ultra-thin opening tool, 1 x hook tool, 1 x pry tool, 2 x opening tools and 4 x opening picks
- 【Warranty】Each electronic pry tool kit is covered by STREBITO's lifetime warranty and 30 days money-back. If you have any issues with your toolkit, simply contact us for troubleshooting help, replacement, or refund
Capture part of the screen
- Press Shift-Command-4. A crosshair with coordinate numbers appears.
- Press and drag from one corner of the required region to the opposite corner.
- Release the trackpad or mouse button to take the shot.
Adjust the selection while dragging
- Press Escape before releasing to cancel.
- Hold Space while dragging to move the entire selection without changing its dimensions.
- Continue dragging from an edge or corner to refine the boundaries before you release.
This method is usually the cleanest choice for a dialog box, a chart, a single paragraph, or any area that does not fill the display.
Capture a window or menu
Window capture
- Open and focus the window you want.
- Press Shift-Command-4, then press Space.
- Move the camera pointer over the window. macOS highlights the candidate window.
- Click to capture it.
Hold Option while clicking if you want to omit the window’s shadow.
Menu capture
- Open the menu so its items are visible.
- Press Shift-Command-4, then Space.
- Click the menu with the camera pointer.
If the menu closes when you press the shortcut, open it again and use the selection method instead, dragging around the menu.
Use the Screenshot app for timers and settings
Press Shift-Command-5 to open macOS Screenshot. You can also open it through Applications > Utilities > Screenshot. A control bar offers buttons for capturing the entire screen, a window, or a selected portion.
Change the save location
- Open Screenshot with Shift-Command-5.
- Click Options.
- Choose a destination such as Desktop, Documents, Clipboard, Mail, Messages, or another location available in the menu.
The destination you select applies to subsequent captures until you change it. If you prefer files in a project folder, choose that folder from the same Options menu rather than moving every image afterward.
Rank #2
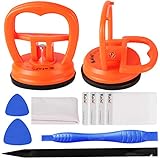
- High Quality & Super Suction-- Screen suction cup is made of durable ABS and natural rubber materials, and has a long service life. The suction cup has a lifting capacity of 1-2 kg , which can help you open the phone screen.
- Important - Do NOT Use for Heavy Objects Examples:Large screens such as TV, moving appliances (refrigerators, washing machines), or installing architectural glass.These tasks require industrial-grade vacuum lifters or mechanical clamps.Small suction cups lack the strength to hold heavy weights, and misuse could lead to falls or injuries. Weight limit: Designed for lightweight items (up to 1-2kg), such as phones or tablets.
- 【Easy to use】- LCD suction cup with locking handle with latch, easy to use. If you want to open a mobile phone screen other than iPhone, use a tool to remove the glue layer connected to the LCD screen, and then use the screen suction cup to open the screen.
- 【Wide Application】-The lcd screen suction cups designed for electronic devices, LCD screens, and smooth surface screens. Suitable for opening iPhone, iPad, iMac, MacBook, tablet, laptop, Samsung and other LCD screen.
- 【Screen opening tools】- The phone repair suction cup tool in the screen opening tool set have high hardness and toughness, can be reused, can help open the screen cover, and prevent scratching the casing, which is ideal for professionals and DIY.
Set a timer
In Options, choose 5 Seconds or 10 Seconds. Start the capture, arrange menus or other controls during the countdown, and macOS will take the selected type of screenshot when the timer ends.
Control the thumbnail and pointer
The Options menu also controls whether the floating thumbnail appears and whether the mouse pointer is shown. Turn the thumbnail off for repeated automated-looking captures; leave it on when you want immediate access to markup tools.
Format on supported newer systems
On supported Mac models running macOS Tahoe 26 or later, Apple documents an SDR (Most Compatible) choice that produces PNG and an HDR choice that produces HEIF. This format choice is not presented as a universal option on every MacBook Air, so the controls you see depend on your model and macOS version.
Outdated Drivers Are Slowing You Down
One free scan finds every outdated or missing driver and matches the right update for your exact hardware.Free scan · exact hardware matchWindows Errors? Fix Them Before They Spread
Repair common Windows errors and clear accumulated junk for a smoother, more stable PC - no reinstall needed.Free scan · no reinstallSave a screenshot to the clipboard instead
To paste a capture directly into an email, document, chat or image editor, hold Control with the normal shortcut:
- Entire screen: Control-Shift-Command-3.
- Selected area: Control-Shift-Command-4, then drag and release.
- Window or menu: Control-Shift-Command-4, press Space, then click.
You can also Control-click the floating thumbnail and choose Save to Clipboard. Paste with Command-V. A clipboard capture may not leave a desktop file, so save it from the destination app if you need a permanent copy.
Rank #3

- 0.1mm ultra thin opening card, excellent for prying and opening task.
- Non-slip silicone handle for comfortable grip and better control.
- Polished and smooth edge, will not damage or scratch your phone.
- A nice tool to open LCD screen, back cover housing and battery.
- Material: Stainless steel + Silicone; Size: 123 x 35 mm( L*W)
Where screenshots are saved and how to find them
With the default settings, a screenshot is saved on the desktop with a date-and-time filename. If it is not there:
- Press Shift-Command-5 and open Options to see the selected destination.
- Check whether the last capture was sent to Clipboard, Mail, Messages or another app instead of a folder.
- Use Finder search for “Screenshot” or sort the selected folder by Date Added.
- Check the floating thumbnail; dragging it can place the image directly in a Finder folder or another app.
Changing the destination in Screenshot affects future captures, not files that were already saved elsewhere.
The Tool Desk
Outbyte PC Repair FREERepair Windows errors before they cause bigger problemsFix Now →Outbyte Driver Updater FREEScan for outdated or missing drivers - takes under a minuteDriver Scan →What to do when a shortcut does not work
Nothing happens
- Press the keys together, then release them; do not wait for a separate screenshot key.
- Open Applications > Utilities > Screenshot to verify that macOS’s capture tool launches.
- If another app has remapped the shortcut, review that app’s keyboard settings or temporarily close it.
The image is in the wrong place
Open Shift-Command-5 > Options. The destination may have been changed from Desktop, or the shortcut may have included Control and therefore copied the image rather than creating a file.
The selected rectangle is wrong
Press Escape and start again. Hold Space during the drag to reposition the selection. Release only after the crosshair encloses the exact region.
The window shadow is unwanted
Use the window workflow, then hold Option while clicking the highlighted window. For precise cropping, use a selected-area capture instead.
Rank #4

- Start the First Gap on Glued Screens: Suction cup, ultra-thin metal pry tool, and curved screen opener help create entry on tight seams when opening iPhone, Android phones, iPad, and other tablets.
- Keep the Seam Open While You Work: The 4 plastic triangle paddles help slice softened adhesive and stay in place around the edge, reducing the need to reopen the same section again and again.
- Non-Marring Opening for Laptops and Housings: Plastic opening tools, wide opener, and long spudger help release MacBook and laptop bottom-cover clips with more control and fewer pry marks.
- Anti-Static Tools for Internal Repairs: ESD-safe spudgers and anti-static brush are ideal for disconnecting battery and flex connectors, guiding cables, lifting small sockets, and cleaning around delicate components.
- Complete 15-in-1 Professional Assortment: Includes 4 plastic triangle paddles, 2 spudgers, 2 double-sided spudgers, 1 double-sided wide opener, 1 double-sided long spudger, 1 anti-static brush, 1 metal thin pry tool, 1 curved screen opener, 1 dual-head opening tool, and 1 suction cup.
A video or app window is blank or refuses capture
Some apps, including Apple TV, may not allow screenshots of their windows. macOS shortcuts do not guarantee a way around protected content or application restrictions; the available source does not provide a universal workaround.
Pick the right method for common jobs
- Quick full-screen evidence: Shift-Command-3.
- One control, paragraph or image: Shift-Command-4 and drag.
- A clean app window: Shift-Command-4, Space, then click; use Option to remove the shadow.
- A menu, tooltip or delayed state: Shift-Command-5 with a five- or ten-second timer.
- Pasting directly into another app: add Control to the relevant shortcut.
- Repeated captures with a consistent destination: configure Screenshot’s Options once, then use the shortcut that matches the required scope.
Or skip the browser setup
If what you actually need is a screenshot of a website rather than your MacBook Air’s current display, ScreenshotNeo is a website screenshot API and MCP server for developers. It accepts a URL and returns PNG, JPEG, WebP or PDF output. Before capture it can accept cookie or consent banners and remove more than 60 known consent platforms, newsletter popups and chat widgets; each step can be disabled.
Only clean shots are billed. Bot checks or CAPTCHAs, blank pages, timeouts, failed loads and cache hits cost nothing, and the response identifies the result with X-Page-Verdict and X-Billed headers. An MCP server provides take_screenshot, get_page_info and capture_pdf tools to Claude, Cursor and other MCP clients.
One GET request with cURL
See the ScreenshotNeo API documentation for the complete parameter reference.
curl -G "https://api.screenshotneo.com/v1/shot" -d access_key=YOUR_API_KEY --data-urlencode url=https://stripe.com -o shot.webpPython
import requests
r = requests.get("https://api.screenshotneo.com/v1/shot", params={"access_key": "YOUR_API_KEY", "url": "https://stripe.com"}, timeout=90)
open("shot.webp", "wb").write(r.content)
Node.js
const q = new URLSearchParams({ access_key: 'YOUR_API_KEY', url: 'https://stripe.com' });
const res = await fetch(`https://api.screenshotneo.com/v1/shot?${q}`);
For web capture workflows, options include full-page screenshots with lazy images loaded, CSS-selector element capture, dark mode, 12 device presets or a custom viewport, retina scale, PDF paper size and margins, custom CSS or JavaScript, a click before capture, hidden selectors, waits for a selector, delay or network idle, blocking ads, trackers, requests or resource types, custom headers, cookies, user agent and Authorization, timezone and geolocation, transparent backgrounds, image resizing, a chosen cache TTL, signed links for public <img> tags, asynchronous jobs with signed webhooks, bulk capture of up to 100 URLs per call, a usage API and an OpenAPI specification. Parameter names used by other screenshot APIs also work for easier migration.
The Free plan includes 1,000 shots per month with no card. Paid plans start at $5 for 3,000 shots; yearly billing provides two months free, and every feature is included on every plan. Create a free ScreenshotNeo account to begin without entering a card.
Frequently Asked Questions
Can I move the floating screenshot thumbnail before it disappears?
Yes. Drag the thumbnail to another location, such as a Finder folder or an open document, instead of waiting for the normal save action.
Does every MacBook Air offer the PNG-versus-HEIF choice?
No. Apple documents that choice for supported models running macOS Tahoe 26 or later; other model and macOS combinations may show different format controls.
Quick Recap
Product prices and availability are accurate as of the date/time indicated and are subject to change. Any price and availability information displayed on Amazon at the time of purchase will apply.
Free tools Windows power users keep installed
One-click scans. No signup required.




