What’s actually slowing this PC down?
Pick the symptom - the matching free tool is one click away.
The safe method depends on the edge you have. For a plain-edge Leatherman blade, set a 16° angle on each side (32° included), then use a whetstone, sharpening rod, or suitable guided kit. For a serrated section, use a tool that follows each scallop, set Leatherman’s 20° one-sided angle, and sharpen only the beveled, edged side. Never run a flat stone over the back of a serrated blade: that removes the serrations.
Before touching an abrasive to the blade, identify the exact model, steel, and whether the edge is plain, serrated, or partially serrated. Those details determine the correct technique and whether Leatherman’s sharpening service can handle it.
As an Amazon Associate I earn from qualifying purchases.
Identify the blade before sharpening
Open the knife fully and work in good light. Look at the cutting edge from heel to tip rather than assuming the whole blade has one geometry.
Plain edge
A plain edge is a continuous, smooth bevel. Leatherman’s maintenance guidance gives a standard sharpening angle of 32° included, or 16° per side. This is the specification to use when setting a stone, rod, or guided system.
#1 Best Overall
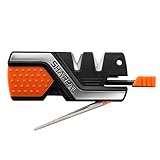
- 6 FUNCTION: 1. No. 1 V-Notch slot (Coarse CARBIDE)-Quickly set a new edge; 2. No. 2 (Fine CERAMIC)-Hone for a smooth finished edge; 3. Tapered diamond rod (Medium 400 Grit) for serrations & gut hooks; 4. Diamond rod with groove for fishhooks; 5. Ferro rod; 6. High-pitched emergency whistle
- PORTABLE EDC FIELD TACTICAL KNIFE SHARPENER: A portable EDC field tactical knife sharpener with built-in lanyard hole for hunting, camping, outdoor survival use. It also works well for your kitchen chef knife
- DURABLE ABRASIVES & SUPERIOR SHARPENING PERFORMANCE: The CARBIDE and CERAMIC abrasives pass 10,000 times field use test. NEVER WEARS OUT. Preset optimal sharpening angle
- VERSATILE & EASY USE: This pocket knife sharpener not only quickly sharpens very dull or damaged blades, but also hone for razor sharp; Not only for straight edge but also serrated knife
- COMPACT DESIGN WITH LANYARD HOLE: Compact body with built-in lanyard hole fits conveniently in your pocket, hunting pack, or tool box for easy portability and accessibility wherever you go
Serrated edge
A serrated edge has repeating scallops or teeth. Leatherman specifies a 20° one-sided angle for serrated sections. The bevel is normally visible on one side, while the opposite side is comparatively flat.
Partially serrated blades
Many multi-tools combine a smooth section near the tip with serrations near the handle. Treat the two portions as separate jobs: use 16° per side on the plain section and a serration-compatible tool at 20° on one side for the serrated section. Do not drag a plain-edge sharpener across both portions.
Check the model and steel
Record the model name and blade steel before choosing a service route. Leatherman’s free service described on its sharpening page is limited to eligible MagnaCut blades and to non-serrated edge portions. A different steel or an ineligible model may require home sharpening or another qualified sharpening service.
Rank #2

- Convex-carbide - quickly creates a durable convex cutting edge on any knife/ steel
- Controlled sharpening - pivot response follows the curve of the knife for a consistent angle and edge across the entire blade. Sharpening Angles 25°
- Ceramic hone - hones/ re-sharpens any blade steel quickly and easily with just a few passes
- Diamond taper rod - sharpens serrations and fine edge tools with durable medium grit diamond
- On the go - compact, easy to use knife sharpener to quickly and easily maintain any knife edge anywhere, anytime
Safety setup
Sharpening removes metal and exposes a very keen edge. The following precautions are general safe-handling practices, not a guarantee of a particular result.
- Work on a stable, well-lit surface with enough room for the full sharpening motion.
- Secure the multi-tool so it cannot fold or slide. Lock the blade open if the design provides a lock; otherwise use a position that keeps the handles and pivots away from the sharpening path.
- Keep the free hand behind the edge and out of the direction of travel. Do not place a fingertip on the blade to “feel” the edge while it is moving.
- Wear eye protection when using a powered system or a tool that can shed abrasive particles.
- Keep the abrasive and blade clean. Metal filings can contaminate a stone or clog a fine surface.
- Use light, controlled pressure. Forcing the blade increases the chance of slipping and removes more metal than necessary.
- Put the tool away or cover the edge when you pause. A freshly sharpened blade is easy to forget on a workbench.
Choose a sharpening method
| Method | Best fit | What to verify | Important limitation |
|---|---|---|---|
| Whetstone | Plain-edge sections and users who can hold a consistent angle | That the stone is stable and the blade can be held at 16° per side | It does not naturally follow serration scallops |
| Sharpening rod | Plain edges; a narrow rod can suit some serrations if its diameter matches the scallops | Angle control and a rod profile that reaches the bottom of each serration | A rod that is too large or used on the wrong side can change the edge geometry |
| Guided sharpening kit | Plain edges when repeatable angle control matters | That its angle range includes 16° per side and that the clamp holds a multi-tool blade securely | Do not assume a plain-edge guide is suitable for serrations |
| Serration-specific system | Serrated or partially serrated sections | That it follows the scallop curvature and supports a 20° one-sided bevel | Sharpen only the beveled side |
| Leatherman Blade Sharpener | Owners wanting the manufacturer’s accessory format | Use the appropriate element; Leatherman identifies the diamond-coated rod for serrated blades | The U.S. product page showed it unavailable when checked on 2026-10-13; stock can change |
Leatherman says plain-edge blades may be sharpened with standard equipment such as whetstones, rods, or sharpening kits. The company’s optional Blade Sharpener contains carbide, ceramic, and diamond-coated sharpening elements and was made in collaboration with Work Sharp. Its diamond-coated rod is the element Leatherman identifies for serrated blades.
How to sharpen a plain-edge Leatherman blade
- Clean and inspect the edge. Remove oil, dirt, and debris. Look for a rolled edge, small chips, deep nicks, or a bent tip. A chip or break is a repair issue rather than a normal touch-up.
- Secure the tool. Open and lock the blade where possible. Arrange the handles so your hands never cross the cutting path.
- Set the angle. Establish 16° between one side of the blade and the abrasive. The two sides together make Leatherman’s 32° included angle. A guided system can help maintain this relationship; with a freehand stone or rod, keep the spine at a consistent height throughout each pass.
- Work one bevel at a time. Move the blade so the abrasive travels along the existing bevel from heel toward tip, or use the motion specified by your sharpening system. Keep the contact point on the bevel rather than grinding the flat of the blade.
- Use controlled pressure. Let the abrasive cut the steel. There is no manufacturer-specified stroke count, pressure value, or guaranteed grit sequence for this procedure, so stop periodically and inspect rather than continuing by a fixed number.
- Switch sides while preserving the same angle. Repeat on the opposite bevel at 16°. The goal is a consistent apex, not a wider or narrower secondary angle created by changing hand position.
- Finish and clean. Remove abrasive residue and filings. If your system includes a finishing surface, use it according to that system’s instructions while maintaining the same edge geometry.
- Test cautiously. Use a non-finger test such as slicing a piece of paper or shaving a small corner from suitable material while keeping the blade pointed away from your body. If the edge catches, tears, or shows a visible flat, return to the bevel rather than applying more force.
When a plain edge has a chip
A chip removes more steel than a routine touch-up. Do not keep sharpening only the surrounding high spots; that can create an uneven bevel and shorten the blade. Leatherman says chipped or broken blades are assessed case by case under its service terms and may be excluded from standard service. For substantial damage, contact the manufacturer or a professional sharpener before removing more material.
Rank #3

- COMPLETE KNIFE SHARPENER: For field, home, or shop use designed for sportsmen who need a complete, compact field sharpening solution. The diamond plates can be easily removed to expose a broad head wrench to speed sharpening in the field.
- ALL THE TOOLS & ACCESSORIES: Includes diamond plates, ceramic rods, leather strop, and sharpening guides. The ceramic honing rod rotates to expose coarse & fine honing surfaces, as well as a grooved surface for sharpening fish hooks.
- CONSISTENT, COMPACT & DURABLE: Includes a 20-25-degree angle to customize your sharpening with 5 abrasives. Maintain a sharp edge while on the go, in the woods, hiking, or camping. All elements are self-contained & require no tools, assembly, or set-up
- 3-YEAR WARRANTY: All Work Sharp sharpeners come with a comprehensive 3-year warranty. Each knife & tool sharpener is meticulously designed and quality-checked at our Oregon facility. We proudly stand behind our products.
- DESIGNED, ENGINEERED, & CALIBRATED IN OREGON: We design, engineer, and calibrate our sharpening machines all under one roof in Ashland, Oregon & ensure our products are sourced from the highest caliber manufacturers, both in the USA and globally.
How to sharpen a serrated Leatherman blade
Serrations require a different approach because each scallop is a concave cutting surface. A flat stone or a broad pull-through designed for plain edges cannot follow that shape.
Free tools Windows power users keep installed
One-click scans. No signup required.
- Locate the beveled side. Hold the blade under a light and identify the side where the bevels of the teeth are visible. The opposite side is the flat or back side.
- Select a matching tool. Use a tapered or otherwise serration-compatible rod or system that can reach the bottom of each scallop without riding only on the tooth peaks. Leatherman identifies the diamond-coated rod on its Blade Sharpener for serrated blades.
- Set the one-sided angle. Hold the abrasive at Leatherman’s 20° angle to the beveled side. Unlike a plain edge, you are not creating matching bevels on both sides.
- Sharpen only the edged side. Follow each scallop’s curve with short, controlled movements. Keep the tool aligned with the existing concavity and progress tooth by tooth. Do not flatten the scallop by rocking a straight surface across it.
- Leave the flat side alone. Leatherman’s maintenance instruction is explicit: “Sharpen serrated blades only on the edged side.” Sharpening the flat/back side wears away the serrations.
- Inspect every tooth. Check that the bevel remains even from the heel toward the tip and that no tooth has been rounded over. Stop if the rod is too large, too small, or unable to reach the scallop’s base.
- Remove the burr carefully. Clean away loose filings. If your serration system provides a method for removing a small burr, follow that method without grinding the back side flat.
Why a plain-edge pull-through is risky
A pull-through sharpener built for a straight blade fixes the user’s motion but not the geometry of a serration. It can scrape across tooth peaks, fail to reach the scallops, or remove metal from the wrong side. “It fits in the slot” is not evidence that it preserves a serrated edge.
Sharpening a partially serrated blade without mixing methods
Mask or otherwise clearly separate the two sections before starting. Complete the smooth section with the 16°-per-side method, clean the tool, then change to a serration-compatible rod for the scalloped section at 20° on the beveled side only. Keep the abrasive from crossing the transition: a plain-edge stone can damage the first serration, while a narrow serration rod can leave an irregular scratch pattern on the smooth bevel.
Rank #4
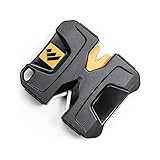
- Convex-carbide - quickly creates a durable convex cutting edge on any knife/ steel
- Controlled sharpening - pivot-response follows the curve of the knife for a consistent angle and edge across the entire blade
- Ceramic hone - hones/ re-sharpens any blade steel quickly and easily with just a few passes
- Diamond plate - sharpens Fish hooks and a wide range of edge tools
- On the go - compact, easy to use knife sharpener to quickly and easily maintain any knife edge anywhere, anytime
When to use Leatherman’s sharpening service
Home sharpening is not the only option. Leatherman’s service page describes a free service for specific MagnaCut blades, but the eligibility limits matter.
| Question | Service implication |
|---|---|
| Is the blade MagnaCut? | The free service described by Leatherman is limited to MagnaCut blades. |
| Is the section plain edge? | Free service covers non-serrated edge portions; serrated portions are not included in that stated coverage. |
| Is the model listed? | Leatherman lists ARC, Blazer, Glider, Pioneer, Rustle, Trac, and Wave Alpha as eligible models on its service page. |
| Is the blade chipped or broken? | Leatherman says such damage is assessed case by case and may be excluded from standard service. |
| Where are you located? | Readers outside the United States are directed to contact their local distributor. |
| How long does processing take? | The service page says to allow seven business days for assessment and processing after receipt or check-in. The FAQ states that return shipping is covered. |
Confirm the current terms before shipping. The service details above were checked on October 13, 2026, and eligibility, timing, and regional procedures can change. If your model, steel, or edge type does not match the listed conditions, do not mail it assuming the free service applies.
Preparing a service request
- Read the current Leatherman sharpening-service page and confirm the model and MagnaCut steel.
- Describe whether the blade is plain, serrated, or partially serrated, and identify any chips or breaks.
- Follow the company’s submission and packaging instructions. Protect the blade so it cannot move through the package or injure anyone opening it.
- Record the tool’s condition and any tracking information before sending it.
- Allow the stated seven business days for assessment and processing after the tool is received or checked in, then account for transit time.
Common mistakes and fixes
Using the wrong angle
Symptom: the new bevel is visibly wider on one side, or the edge feels blunt despite many passes. Fix: return to the specified geometry: 16° per side for plain edge, 20° on the beveled side for serrations. A guided system can reduce angle drift.
Best Value

- EASY TO USE: A dull knife is a dangerous knife, the edgefield keeps you sharp in the field and safer with each cut
- DIAMOND COATED SHARPENERS: Rotating core has diamond coated 220 Coarse Grit, 600 Fine Grit sharpeners and a ceramic rod for honing
- PERFECT ANGLE: Includes an edge angle guide to make sure you're consistent with each pass plus stabilized feet and protective closure so you can safely sharpen your blades
- IDEAL HOLIDAY GIFTS FOR MEN - Perfect stocking stuffer for dads, boyfriends, and outdoor enthusiasts seeking practical, reliable tools for adventures and everyday carry
- TRAVEL FRIENDLY: Just 7.1" long, less than an inch wide, and weighing under 3 oz it easily fits in your pack for your hunting, fishing, camping trips and more
Sharpening the back of a serrated blade
Symptom: scallops look shallower or tooth tips are disappearing. Fix: stop grinding the back side. Work only on the beveled side with a tool that follows each scallop. Severe loss of serration shape may require professional service.
Using a rod that does not fit the scallops
Symptom: the rod contacts only the tops of the teeth or cannot reach the bottom of a scallop. Fix: choose a compatible diameter or tapered profile. Do not compensate by increasing pressure.
Trying to repair a broken blade with routine sharpening
Symptom: a missing section, crack, or large chip remains after repeated passes. Fix: stop and ask Leatherman or a qualified professional about repair eligibility. Standard sharpening is not a substitute for structural repair.
Expecting a fixed number of strokes to work
Steel condition, abrasive type, angle control, and the amount of damage vary. Leatherman’s published guidance does not specify a universal stroke count, grit progression, or pressure. Inspect the bevel and edge during the process instead of following an invented recipe.
Quick Recap
After sharpening: cleaning and maintenance
- Wipe away metal filings and abrasive residue before folding the tool.
- Inspect the pivot and blade path for debris that could interfere with opening or locking.
- Apply only the maintenance product and amount recommended for your tool’s mechanism; keep lubricant off the cutting edge.
- Store the multi-tool so the blade cannot contact loose metal objects that could nick the edge.
- Touch up early when the edge is merely dull. Removing less metal preserves the original blade shape and reduces the need for aggressive grinding.
A practical decision checklist
- Plain edge, minor dullness: use a whetstone, rod, or guided kit at 16° per side.
- Serrated edge, minor dullness: use a serration-compatible system at 20° on the beveled side only.
- Partially serrated edge: use the two methods separately and keep abrasives on their matching sections.
- MagnaCut ARC, Blazer, Glider, Pioneer, Rustle, Trac, or Wave Alpha with a non-serrated portion: check the current Leatherman service terms before sharpening at home.
- Chipped or broken blade: seek an eligibility assessment rather than trying to grind the damage away.
- No suitable serration tool or uncertain angle control: postpone sharpening until you have the correct equipment or can use an appropriate service.
Product prices and availability are accurate as of the date/time indicated and are subject to change. Any price and availability information displayed on Amazon at the time of purchase will apply.

