A reliable Starlink installation starts with a temporary test, not a permanent mount. Connect the supplied dish, router, power supply and cables; use the Starlink app to verify an unobstructed view of the sky; confirm that service works; then mount the dish securely, route its cable without stress or moisture exposure, and position the router centrally indoors. If you need your own router, the correct Ethernet connection depends on your Starlink kit, and bypass mode changes how Wi-Fi is managed.
What makes a Starlink installation reliable?
Starlink performance depends on more than plugging in the router. The dish needs a clear view of the sky, the mast should remain close to vertical, and the outdoor cable must be protected from bending, crushing, tension and water. Indoors, the router needs a central location with as few signal blockers as possible. Your kit generation, network load, subscription plan, geography and obstruction level all affect results, so no universal household speed, latency or uptime figure can be promised.
As an Amazon Associate I earn from qualifying purchases.
The most important installation rule is to separate testing from permanent work. A temporary setup lets you discover an obstructed location, damaged cable or unsuitable Wi-Fi position before drilling, climbing onto a roof or buying a mount.
Do these 3 things before closing this tab:
1Repair Windows errors before they cause bigger problems2Scan for outdated or missing drivers - takes under a minute3Clear out junk files and repair common Windows errorsPrepare the equipment and test service first
Inventory the box
Before choosing a final location, identify the dish, router, power supply and every supplied cable. Check connectors for bent pins, cracked housings or contamination. Do not route a cable through a wall or under roofing until you know which end belongs outside and which end connects to the router or power equipment for your kit.
#1 Best Overall
![LUCMO Multi Ports Starlink Ethernet Adapter for Starlink Actuated Gen 2 | Starlink Wired External Network, 2-Port Starlink Ethernet Adapter 1 to 2 [2 Devices Networked Simultaneously] Up to 1 Gbps](https://m.media-amazon.com/images/I/41lWcIMDS1L._SL160_.jpg)
- Compatibility: Our 2 Ports Starlink Ethernet Adapter is specially designed for the Starlink Standard Actuated Generation 2, with optimal connection guaranteed.
- Gigabit Ethernet Support: The adapter features two Gigabit Ethernet (RJ45) ports, allowing you to connect two wired devices directly to your Starlink system, taking full advantage of Starlink’s high-speed internet capabilities.
- Convenience: Just plug in to use, easy to install and no complicated setting up necessary.
- Seamless Performance: Ensures minimal lag and uninterrupted connectivity for demanding tasks, whether for work, entertainment, or smart home management.
- Secure Cable Connections: Features well-designed ports that provide a snug fit, reducing the risk of disconnection and maintaining a stable connection at all times.
Run a temporary connection
- Place the dish outdoors or in another location with the broadest practical view of the sky. Keep it stable while testing; a temporary stand is acceptable if it cannot tip or move.
- Connect the dish, router and power supply using the supplied cables. Seat each connector fully without forcing it.
- Apply power and wait. Starlink’s fixed-install guidance says the initial connection can take up to 20 minutes.
- Join the default Starlink Wi-Fi network from a phone or computer and open the Starlink app.
- Use the app to create a network name and a strong password, then run the app’s connectivity or speed check.
Older Gen 1 equipment does not password-protect the network until you set a password, so complete that step before using the connection for normal household devices.
Use the Starlink app to find a clear dish location
Run the obstruction tool before mounting
In the Starlink app, open the obstruction or field-of-view tool and scan the proposed dish position. Follow the alignment alerts and move the dish when the scan identifies trees, rooflines, poles or other objects in its view. Starlink states that “Starlink must be 100% unobstructed for best performance.” Treat that as the target for a permanent installation rather than assuming a short test proves the location will remain reliable.
When elevation is necessary
If nearby trees or a roofline intrude into the viewing area, raise the dish on a suitable roof or pole installation. Higher placement can clear those objects, but it also increases wind exposure and makes cable routing and maintenance more difficult. Re-run the app’s obstruction check after changing height; do not rely on a visual estimate from the ground.
What’s actually slowing this PC down?
Pick the symptom - the matching free tool is one click away.
Keep the mast close to vertical
Choose a mounting surface and hardware that let the dish mast remain as close to vertical as practical. A roof mount, pole mount or Pipe Adapter Mount can be appropriate when it provides a stable base and the required clearance. Complete the app check before drilling so the chosen location is based on the dish’s actual field of view.
Rank #2

- ⚠️ COMPATIBILITY WARNING: Designed EXCLUSIVELY for Starlink Standard Actuated Gen 2. ❌NOT COMPATIBLE with Starlink Gen 3, Flat High-Performance, or any other models. Please verify your dish model before purchase!
- PLUG & PLAY INSTALLATION: Simply connect the adapter between your Gen 2 Starlink router and the cable. No drivers or complex setup needed. Ensure a firm click on both ends for a stable connection.
- ENABLE HARDWIRED SPEEDS & STABILITY: Unlock the full potential of your Starlink by connecting gaming consoles, PCs, and smart TVs directly via Ethernet for lower latency and smoother streaming.
- RELIABLE DATA TRANSFER: Experience lag-free online gaming, 4K video conferencing, and ultra-fast file transfers with a stable, wired internet backbone.
- TROUBLESHOOTING TIP: If not working, first check both connections are secure and restart your Starlink router.
Install the dish permanently only after the test succeeds
Select a mount for the site
A roof position is useful when it clears trees and neighboring structures. A pole position can provide similar clearance when a roof penetration is undesirable. A Pipe Adapter Mount is an option when an existing compatible pipe gives the dish a stable, near-vertical support. Whichever method you choose, verify that the structure can support the mount and that the dish will not be struck by doors, branches or routine maintenance activity.
Protect the cable during the installation
- Plan the shortest practical path from the dish to the indoor equipment while avoiding sharp edges and hot surfaces.
- Leave the cable with a gentle bend radius. Do not kink, twist, crush or pull it taut.
- Secure the run so wind or movement cannot repeatedly flex the connector.
- Use a protective routing device or a weatherproof wall pass-through when bringing the cable indoors.
- Keep connector ends dry while routing. Seal or shield the entry point so rain cannot track along the cable into the building.
Do not permanently close a wall penetration until the dish has connected and the app shows the expected status. If the temporary test fails after mounting, troubleshooting a sealed or inaccessible cable route is harder than moving an unsecured dish.
Place the Starlink router for whole-home Wi-Fi
Start with a central, elevated position
Put the router as close to the center of the living area as the cable layout allows, and keep it off the floor when possible. A central position reduces the distance to rooms around it and gives you a better starting point before adding mesh hardware.
The Tool Desk
Outbyte Driver Updater FREEFix the driver behind crashes, sound loss and screen glitchesFind Drivers →Outbyte PC Repair FREERepair Windows errors before they cause bigger problemsFix Now →Remove common signal blockers
Avoid placing the router behind concrete walls, inside cabinets, beside large mirrors or behind large furniture. These materials and objects can weaken or redirect the Wi-Fi signal. Keep the router in an open, ventilated location rather than stacking it beneath other equipment.
Rank #3
![Multi Ports Ethernet Adapter for Starlink Standard 4X/ Gen 3/ Starlink Mini | For Starlink Wired External Network 4 Ports Ethernet Adapter 1 to 4 [4 Devices Networked Simultaneously] - Up to 1 Gbps](https://m.media-amazon.com/images/I/410vGlCO+8L._SL160_.jpg)
- Compatibility -- Works seamlessly with Starlink Gen3/ Standard 4X and Starlink Mini antenna, suitable for various environments.
- Multi-Device Connectivity -- 4 Gigabit Ethernet ports support multiple devices simultaneously, maximizing Starlink's high-speed internet.
- Reliable Performance -- Tested for 72 hours under full load, ensuring stable performance with no speed drops or interruptions.
- Easy to Use -- Plug-and-play design makes installation quick and hassle-free.
- High-Speed Stability -- Whether for work, entertainment, or smart home management, this adapter delivers fast, stable, and convenient networking performance. Upgrade your network setup today
Name and secure the network
Use a network name that household members can recognize and a long, unique password. Change the default details during the initial app setup, then reconnect phones, computers, televisions and smart-home devices to the new network. Keep a record of the password in a secure place so a later reset does not leave you locked out.
Extend coverage when one router is not enough
Try placement before buying another node
Dead spots often result from the router being placed at one end of the house or behind a dense wall. Move the router toward the center, recheck the weak room and test again before adding equipment. A small change in height or a less obstructed position can improve coverage without changing the Starlink connection.
Add compatible mesh equipment for persistent dead zones
If the central location still cannot cover the home, add a compatible mesh node or Router Mini. Follow Starlink’s recommended spacing so the node remains close enough to maintain a useful link while serving the weak area. Do not hide a node in a cabinet or place it directly behind the same concrete wall or large furniture that caused the original problem.
When the Starlink Mini is outdoors
For an outdoor Starlink Mini serving people indoors, Starlink identifies wired Ethernet to Router Mini as the most reliable arrangement. Plan the Ethernet route and weather protection before fixing the Mini in place. A wired connection avoids making the indoor network depend on a marginal wireless link through an exterior wall.
Rank #4
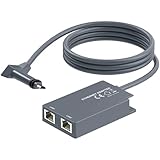
- 【Dual-Port Connection】For Starlink Gen2 Ethernet Adapter simplifies wiring with two ports.Connect devices like a PC+game console or NAS + smart TV simultaneously.Overcome your Starlink Gen2 router's limit for a reliable wired network — ideal for streaming,gaming,and remote work.
- 【Optimized for Starlink Gen2 Routers】Optimized for Starlink Gen2 satellite router, this adapter delivers broad compatibility — seamlessly works with Starlink Gen2 routers paired to Enterprise, mobile HP-Flat High Performance Kit (Gen2), High Performance (Gen1), and Standard Actuated (Gen2) systems.
- 【Multi-Device Compatibility】This Ethernet Adapter supports diverse third-party devices — including PCs, Macs, PS5, Xbox, Smart TVs, NAS, mesh routers, and security systems. It automatically optimizes network performance for reliable connectivity.
- 【High-performance network speed】Support Gigabit wired transmission, provide low-latency, high-bandwidth network, perfect for 4K/8K streaming media, online games, large file downloads, network speed up to 1Gbps say goodbye to wireless lag
- 【Enhanced Reliability:】Features gold-plated ports, energy-efficient chips, and ABS housing with IP65 rating in a compact design. Validated by 72-hour industrial stress testing — rated for 24/7 operation in multiple environments.
Use your own router without creating a wiring or mode conflict
Starlink supports third-party routers, but the physical connection differs by kit. Identify the kit before purchasing an adapter or changing settings. The third-party router’s WAN interface should normally be set to DHCP.
| Starlink kit | Connection to a third-party router | Wi-Fi and mode notes |
|---|---|---|
| Standard Actuated | Insert the Starlink Ethernet Adapter between the Starlink router and the third-party router. | Bypass mode is required when the Starlink router remains connected and the third-party router is to manage the network. |
| Standard with native Ethernet | Connect the third-party router directly to the kit’s Ethernet port. | Use bypass mode when you want the third-party router to control Wi-Fi instead of the Starlink router. |
| Performance or Enterprise variants listed by Starlink | Use the Ethernet connection provided from the power supply. | Set the third-party WAN interface to DHCP; follow the kit’s documented topology. |
Understand bypass mode before enabling it
Bypass mode turns off the built-in Starlink Wi-Fi so your own router controls the wireless network. Enable it only after the Ethernet path works and the third-party router is ready to provide DHCP and Wi-Fi. A violet router light indicates bypass mode. On the relevant Gen 3 guidance, leaving bypass mode requires a factory reset with the router’s reset pinhole, so do not enable it as a casual troubleshooting experiment.
Avoid accidental double-router arrangements
If both routers continue routing instead of one operating as the intended access point, devices can end up behind two layers of network address translation. Choose one device to manage the household network, connect the WAN cable correctly, and use bypass mode when Starlink’s router should stop providing Wi-Fi. If you keep the Starlink router as the network controller, do not enable bypass mode simply because a second router is connected.
Verify the finished installation
- Open the Starlink app and confirm that the dish is online with no active obstruction or outage alert.
- Walk through the rooms where people work, stream or use voice calls. Test both close to the router and at the edge of coverage.
- Check that the router and any mesh node remain in open locations and that cables are not under tension.
- Recheck the outdoor cable entry after rain to make sure water has not collected around the connector or pass-through.
- Record the final mount location, cable route, network name and which device supplies DHCP. This information makes later troubleshooting faster.
A single speed test is only a snapshot. Compare results at different times and in the rooms that matter, while recognizing that network load, plan, geography, kit generation and obstructions can change performance.
Best Value

- Extend a Network Port for Your Devices: This for Starlink Ethernet Adapter seamlessly integrates your new for Starlink system into your existing business or home network, maximizing throughput from your outdoor dish. It’s an affordable solution for adding or replacing an RJ45 port on your devices, perfect for connecting to a wired network when your device lacks a network port or has a faulty one.
- Improved Speeds: This for starlink adapter ethernet enabled to connect for Starlink dish to existing home mesh Wi-Fi system, significantly boosting the speed. And can extend network to previously unreachable areas of your house due to numerous walls. The direct connection to PC significantly improve internet speeds, providing a more reliable and faster network experience throughout your home.
- 1000Mbps Hyper Speed: The for starlink v2 ethernet adapter is designed to connect a device directly to the for Starlink Router for a reliable wired connection. It supports speeds of up to 1 Gbps, ensuring fast and stable internet performance. Perfect for enhancing your online working, meeting, classing, gaming, HD video streaming, upload, download, and more.
- Easy Installation: for Starlink to RJ45 Gigabit Ethernet Adapter is driver-free. (Installation Way: 1. Turn off the for Starlink router by unplugging its AC power cord from the wall outlet. 2. Unplug the for Starlink antenna cable from the bottom of the router. 3. Insert the for Starlink Ethernet Adapter into the port on the router where the for Starlink antenna cable was previously connected. 4. Connect the for Starlink antenna cable to the connector on the for starlink adapter ethernet. 5. Power everything back on by plugging the router's AC power cord back into the wall outlet )
- Compatible with the for Starlink Standard Actuated Kit V2, this adaptador ethernet for starlink v2 is highly recommended for rural areas. It dramatically enhances internet performance, nearly doubling speeds and reducing latency, making it perfect for browsing, streaming, and gaming.
Troubleshoot dropouts and missing Wi-Fi
Start in the Starlink app
Check the app for service alerts, reported outages and new obstruction reports. An obstruction that was not obvious during a short scan can appear as the dish’s view changes with foliage, construction or a different mounting angle.
Read the router light
| Light state | Meaning | Next action |
|---|---|---|
| Flashing white | The router is trying to connect. | Allow startup time, then inspect connections and the app for an alert. |
| Solid white | The router is connected. | If a device still has no internet, test another device and check its Wi-Fi settings. |
| Red | The router is not connected. | Check every connector, inspect cables for damage and power-cycle the router. |
| Violet | Bypass mode is active. | Use the third-party router as the Wi-Fi controller, or factory-reset the Starlink router if you need to exit bypass mode. |
Check connectors and cables
Unplug power before reseating connections. Confirm that every connector is fully inserted, then inspect the entire cable for cuts, crushed sections, severe bends or moisture. A connection that works when the cable is moved but drops when it is released usually indicates routing stress or a damaged connector.
Power-cycle before resetting
Unplug the router’s power, wait briefly, and reconnect it. Give the system time to restart and check the app again. Use the reset pinhole only after connection checks and a power-cycle fail, because a factory reset removes configuration such as your Wi-Fi network details. If the light is violet, the Gen 3 guidance specifies a factory reset to exit bypass mode.
Free tools Windows power users keep installed
One-click scans. No signup required.
Escalate persistent faults
If alerts continue, the dish remains offline, or a cable and connector appear damaged, contact Starlink support through the app or the Starlink support site. Include the kit type, light state, app alert and the checks you have already completed.
Quick Recap
Choose the installation approach that fits your home
| Situation | Practical approach | Main trade-off |
|---|---|---|
| You are still deciding where the dish belongs | Use a temporary setup and run the obstruction tool before drilling. | The dish is less protected until the final mount is selected. |
| Trees or rooflines block the scan | Raise the dish on a suitable roof or pole mount and keep the mast near vertical. | More height can improve clearance but increases wind exposure and cable-routing difficulty. |
| The router covers most rooms | Keep it central, elevated and away from concrete, mirrors and large furniture. | A central location may require a longer or less direct cable route. |
| One or two rooms remain weak | Reposition first, then add a compatible mesh node or Router Mini. | Additional nodes add equipment and require correct spacing. |
| You already manage a home network | Use the kit-specific Ethernet path, set WAN to DHCP and enable bypass mode when Starlink Wi-Fi should be disabled. | Wrong adapter or mode can leave the third-party router offline or create an unintended two-router network. |
| Starlink Mini is outside and users are inside | Use wired Ethernet to Router Mini. | The cable route needs weather protection and planning. |
Periodic reliability checklist
- Open the app when dropouts begin and review outage and obstruction information.
- Inspect the dish mount after severe weather for movement or a mast that is no longer close to vertical.
- Look for new tree growth, construction or other objects entering the dish’s field of view.
- Check the outdoor cable, connector protection and wall pass-through for tension, damage or moisture.
- Keep the router and mesh nodes in open, central positions rather than allowing furniture or stored items to surround them.
- Keep your Wi-Fi password and network-controller choice documented so a reset or router change can be completed without guesswork.
Product prices and availability are accurate as of the date/time indicated and are subject to change. Any price and availability information displayed on Amazon at the time of purchase will apply.

