Free tools Windows power users keep installed
One-click scans. No signup required.
Apple does not have a separate product called HomeView in its current documentation; the setup interface is the Home app. Open Home on your iPhone, let the setup assistant create a home and rooms, then use Home > Add Accessory to scan an Apple Home or Matter code. The accessory must be powered and connected to its required network first. Thread devices also need a Thread-enabled home hub, such as an Apple TV 4K, HomePod (2nd generation), HomePod mini, or compatible third-party Thread border router.
What Apple HomeView means
“Apple HomeView” is best understood as Apple Home, managed in the Home app. Apple’s setup assistant appears the first time you open the app and helps you create a home, define rooms, and prepare a place for accessories. The same app can pair Apple Home (formerly HomeKit) accessories and Matter accessories. Apple says iOS 16.1 and later includes Matter support, allowing compatible devices to work across platforms.

As an Amazon Associate I earn from qualifying purchases.
Use the official iPhone Home app setup guide for Apple’s current screen names. Apple’s broader Home platform documentation is at Apple Home technologies, and its Matter overview explains the cross-platform standard at Apple Developer: Matter.
Windows Errors? Fix Them Before They Spread
Repair common Windows errors and clear accumulated junk for a smoother, more stable PC - no reinstall needed.Free scan · no reinstallCrashes, No Sound, or Screen Glitches?
Random freezes, missing sound and display glitches usually trace back to one bad driver. Find and replace yours safely.Free scan · under a minuteBefore adding a device
Complete these checks before opening the pairing screen. Most failed pairings are caused by a device that is not ready, rather than by the Home app itself.
#1 Best Overall
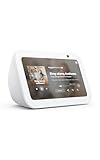
- Alexa can show you more - Echo Show 5 includes a 5.5” display so you can see news and weather at a glance, make video calls, view compatible cameras, stream music and shows, and more.
- Small size, bigger sound – Stream your favorite music, shows, podcasts, and more from providers like Amazon Music, Spotify, and Prime Video—now with deeper bass and clearer vocals. Includes a 5.5" display so you can view shows, song titles, and more at a glance.
- Keep your home comfortable – Control compatible smart devices like lights and thermostats, even while you're away.
- See more with the built-in camera – Check in on your family, pets, and more using the built-in camera. Drop in on your home when you're out or view the front door from your Echo Show 5 with compatible video doorbells.
- See your photos on display – When not in use, set the background to a rotating slideshow of your favorite photos. Invite family and friends to share photos to your Echo Show. Prime members also get unlimited cloud photo storage.
- Use a supported iPhone and software: Matter support starts with iOS 16.1 and later. Install the latest iOS update available for your iPhone.
- Power the accessory: Plug in a light, plug, camera, thermostat, or hub, or install charged batteries in a portable device. Leave it powered throughout pairing.
- Connect it to the right network: Wi-Fi accessories need access to your home Wi-Fi. Ethernet accessories should be connected to the same home network used by the iPhone during setup. A Thread device needs a Thread-enabled home hub or border router.
- Locate the setup code: Look on the device, its quick-start sheet, or its packaging for an Apple Home QR code or numeric code. Apple Home codes are eight digits; Matter codes are 11 or 21 digits.
- Keep the manufacturer app available when necessary: A Matter accessory that was already commissioned in another compatible app is added through that app’s generated pairing code, as described below.
- Put the accessory close enough for setup: Keep the phone near the device until pairing and firmware or network configuration finish. Do not turn the device off during this process.
Create your home and rooms
- Open the Home app on your iPhone.
- Follow the first-run setup assistant to create a home. Enter a useful home name if you have more than one location.
- Define rooms such as Living Room, Kitchen, Bedroom, or Office. Rooms determine where accessories appear and make voice commands unambiguous.
- If you already skipped the assistant, open Home and use the add or setup controls to create the home before pairing an accessory.
Room names are not cosmetic. Siri uses the accessory name and room context to distinguish commands such as “turn on the desk lamp” from “turn on the kitchen lamp.” Choose names you can say naturally and avoid giving two devices the same name in one room.
Add an Apple Home or HomeKit accessory
Use this procedure for an accessory labeled for Apple Home or HomeKit and for a Matter device that presents a code directly to Apple Home.
- Open the Home app and select your home.
- Tap Home > Add Accessory. Depending on the iOS version and screen, you may instead tap the Add button and then Add Accessory.
- Make sure the accessory is on and connected to power and its required network. Wait for the Home app to display the camera view or code-entry screen.
- Scan the Apple Home QR/setup code. If scanning is unavailable, tap the option to enter a code and type the required numeric code. Apple Home setup codes are eight digits; Matter codes may contain 11 or 21 digits.
- Approve the pairing prompt and wait while Home communicates with the accessory. Keep the iPhone nearby and do not close the app.
- Assign the accessory to a room when prompted. Select the device category or icon if Home asks for one.
- Give it a short, unique name that describes its location or purpose, such as “Hallway light” or “Entry lock.” This is the name you will use with Siri.
- Finish the setup and test the accessory from its tile in the Home app. Turn a light on and off, check a plug’s state, or view a camera feed before moving on.
If the accessory offers suggested automations, review them rather than accepting them blindly. A suggested automation is optional; you can organize favorites, scenes, and automations after confirming that the individual accessory works.
Pair a Matter accessory
Pairing a new Matter device directly in Home
On iOS 16.1 or later, start with Home > Add Accessory and scan the Matter QR code or enter its 11- or 21-digit setup code. Follow the onscreen prompts, choose a room, and name the device. Matter is a connectivity standard, not a separate Home app, so the Home app remains the place where you control the accessory after commissioning.
Importing Matter hardware already paired elsewhere
A Matter accessory can belong to more than one compatible ecosystem. If it was already paired in another app, do not reset it immediately. In Home:
- Tap Home > Add Accessory (or Add > Add Accessory).
- Choose More Options when Home does not find a new, unpaired device.
- Select the Matter accessory from the list.
- Open the app in which the accessory was originally paired.
- Use that app’s option to generate a new pairing or sharing code, then enter or scan the generated code in Home.
- Complete room assignment and naming in Home, then test control from both ecosystems if you intend to use both.
Apple says Matter pairings synchronize across your Apple devices with iCloud Keychain. You can review and manage those pairings in Settings > General > Matter Accessories.
Thread devices: when a hub is required
Thread is a low-power mesh networking technology used by some Matter accessories. A Thread accessory cannot rely on the iPhone alone to provide the home network. Apple states that Thread-based accessories require a Thread-enabled home hub such as an Apple TV 4K, HomePod (2nd generation), HomePod mini, or a compatible third-party Thread border router.
Do these 3 things before closing this tab:
1Clear out junk files and repair common Windows errors2Fix the driver behind crashes, sound loss and screen glitches3Repair Windows errors before they cause bigger problemsA HomePod mini is a practical physical hub for a small Apple Home installation because it combines a Thread border-router function with a compact, always-powered speaker. The important requirement is the Thread capability, not the speaker’s audio features. Confirm the exact model and software support before buying any hub or accessory.
Rank #3

- Google Nest Hub 1st Gen H1A – 7-inch smart display with Google Assistant built in for hands-free help, smart home control, entertainment, and daily organization.
- Korean Spec Model – International/Korean version of the Google Nest Hub H1A. Language can be changed to English after setup through the Google Home app/device settings.
- Smart Home Control – Use voice commands or the touchscreen to control compatible smart lights, cameras, thermostats, plugs, speakers, and other Google Assistant devices.
- Entertainment & Daily Help – Stream music, watch videos, view Google Photos, check weather, set timers, manage reminders, follow recipes, and get answers hands-free.
- Compact 7" Display Design – Great for kitchens, bedrooms, desks, offices, counters, and nightstands with a clean modern smart display design.
Recognizing a Thread setup problem
- The accessory is advertised as Matter over Thread rather than Matter over Wi-Fi or Ethernet.
- Home accepts the code but cannot complete commissioning because no Thread network is available.
- The device works in the manufacturer’s app through Bluetooth or another temporary connection but does not appear reliably in Home.
Place the Thread-enabled hub in the same home, keep it powered, and retry pairing with the accessory nearby. If the product supports more than one transport, follow its instructions to select Wi-Fi or Thread deliberately; do not assume that a Matter label alone identifies the transport.
Understand the connection choices
The protocol printed on a box tells you how the accessory communicates. It does not by itself tell you whether every feature is available in Apple Home, so verify Apple Home or Matter support for the exact model.
| Connection type | Typical setup-code location | Hub requirement | Manufacturer app | Power and device examples | Remote control and automation |
|---|---|---|---|---|---|
| Apple Home/HomeKit | Apple Home QR code or eight-digit Apple Home code on the device, insert, or packaging | Not necessarily required for initial local pairing; a home hub is used for dependable control and automations when you are away | Home app is the primary setup path; the maker’s app may still be needed for its own features | Wi-Fi or Ethernet lights, plugs, cameras, locks, thermostats, and other powered or battery devices | Local control can work without a separate hub; remote access and many automations depend on a home hub |
| Matter over Wi-Fi or Ethernet | Matter QR code or 11- or 21-digit Matter code | No Thread hub; network connectivity is required. A home hub is used for remote access and automations outside the home | Home can commission it directly. If it is already paired elsewhere, use More Options and the original app’s generated sharing code | Lights, plugs, cameras, locks, thermostats, and other mains- or battery-powered products, depending on the model | Availability of remote control and automations depends on the Apple Home hub and the accessory’s supported features |
| Matter over Thread | Matter QR code or 11- or 21-digit Matter code | Thread-enabled home hub or border router required, such as Apple TV 4K, HomePod (2nd generation), or HomePod mini | Home can commission it; another compatible app can share it with Home using a generated code | Often battery-powered sensors, buttons, locks, and low-power lights or plugs | Requires the Thread network and a suitable home hub for reliable remote control and automations |
Exact capabilities vary by device category and model. A Matter badge does not guarantee that every manufacturer feature, camera function, or firmware control is exposed in Apple Home.
Quick wins for a faster PC:
Clear out junk files and repair common Windows errorsFree Scan →Scan for outdated or missing drivers - takes under a minuteDriver Scan →Repair Windows errors before they cause bigger problemsFix Now →Name, organize, and automate your accessories
Choose names Siri can understand
Use one clear noun phrase per accessory and include the location when needed. “Bedroom ceiling light” is more useful than “Device 3.” Avoid punctuation, duplicate names, and names that sound like room names. After renaming, test a Siri command using the exact phrase you chose.
Rank #4
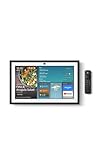
- MEET ECHO SHOW 15 - A stunning 15.6" Full-HD (1080p) smart display that's perfect for your kitchen and ready to show you more. Use customizable widgets to keep your day on track, watch your favorite shows with Fire TV and powerful vibrant sound, and enjoy natural video calling, with 3.3x zoom and wide field of view.
- FAMILY ORGANIZATION HUB - See your top widgets at a glance, like your family’s calendars and to-do lists, local weather, smart home, and more.
- ALL YOUR FAVORITES, ALL RIGHT HERE - Built-in Fire TV unlocks endless entertainment, so you can enjoy your favorite content from thousands of apps like Prime Video, Netflix, YouTube, Apple TV, and more (subscription may be required). Fire TV remote included. Plus, now you can quickly add a device to play music with Active Media - start playing a song in the kitchen, then add the living room and bedroom on the fly.
- SMART HOME CENTRAL - Control smart devices with your voice or a few taps using the smart home dashboard. Easily turn on all your living room lights at once or check live camera feeds to see what's happening around your home.
- YOUR FAVORITE MEMORIES ON DISPLAY - Brighten your space (and your day) by turning your home screen into a photo slideshow that displays your favorite memories. Auto curate your images and show off your favorite family memories.
Set favorites and scenes
Mark frequently used lights, locks, plugs, or cameras as favorites so they appear at the top of Home. A scene combines several actions, such as turning off lights and locking a door. Build scenes only after each accessory works independently; otherwise it is difficult to tell whether the problem is in the device or the scene.
Add automations carefully
Use Home’s automation controls to trigger actions by time, location, sensor state, or another accessory. Review the trigger and every action before saving. For actions that must run while you are away, make sure your home has a compatible home hub and that the participating accessories support the required remote behavior.
Independent reader supportYour contribution helps us test, update, and keep practical guides available for everyone.Where to manage Matter after setup
Apple keeps Matter commissioning information in the system settings as well as in Home. Open Settings > General > Matter Accessories to review Matter accessories and their pairing relationships. This is useful when an accessory was shared with another compatible ecosystem or when you need to understand which Apple device holds the commissioning information.
Because Matter data is synchronized with iCloud Keychain, sign in to the same Apple account on the Apple devices you expect to use for management. If a device is missing from the list, confirm that the devices use the intended account and that iCloud Keychain is available before attempting a factory reset.
Best Value

- 7" Touchscreen Display: View weather, calendar, YouTube videos, and Google Photos on a vibrant 1024x600 resolution screen.
- Google Assistant Built-In: Control smart home devices, set reminders, and get answers hands-free with voice commands.
- Smart Home Integration: Compatible with over 200 devices from 50+ brands, including lights, cameras, and thermostats.
- Entertainment Hub: Stream music and videos from YouTube, Spotify, Pandora, and more with high-quality sound.
- Personalized Routines: Use Voice Match to access your calendar, commute, and reminders tailored to your voice.
Troubleshoot “Home can’t find my accessory”
Check power and reset state
Confirm that a light is actually powered at its wall switch, a plug is not switched off, and a battery device has charge. If the product was previously installed in another home, follow its manufacturer reset procedure before trying to pair it as new. Do not reset a device that you intend to import through Matter until you have tried More Options.
Verify the code
Scan the code printed for the exact device, not a code from a similar model or a shipping label. If scanning fails, enter the code manually. Use eight digits for an Apple Home code and the complete 11- or 21-digit Matter code, including every digit.
Confirm the network path
- For Wi-Fi products, connect the iPhone and accessory to the intended home network and temporarily move the accessory closer to the access point.
- For Ethernet products, check the cable and link status, then retry discovery.
- For Thread products, verify that an Apple TV 4K, HomePod (2nd generation), HomePod mini, or compatible Thread border router is powered and belongs to the same Home.
- For an accessory already in another Matter app, use More Options and obtain a fresh sharing code from that original app.
Restart in a controlled order
- Close and reopen the Home app.
- Power-cycle the accessory according to its instructions.
- Restart the iPhone if the camera or code-entry screen is unresponsive.
- Retry pairing with the phone close to the accessory and the home hub, if one is required.
If the accessory still will not commission, check the maker’s instructions for model-specific firmware, reset, or network requirements. Apple Home can only pair a product that is correctly advertising Apple Home or Matter support; a generic Bluetooth or Wi-Fi device without that support will not become compatible through the Home app alone.
Remote access and privacy expectations
Initial pairing is normally performed locally with the iPhone near the accessory. Controlling devices while away from home, and running many automations without your iPhone present, requires a home hub and a functioning home network. Thread accessories add the separate requirement for a Thread-enabled hub or border router.
Apple’s Matter implementation is designed for interoperability across platforms, while iCloud Keychain synchronizes Matter pairing information among your Apple devices. Keep setup codes private: anyone who obtains an unused code may be able to attempt commissioning, and a sharing code should be generated only when you intentionally add another compatible ecosystem.
A reliable setup order
- Update the iPhone to iOS 16.1 or later for Matter support.
- Open Home and complete the setup assistant, including the home name and rooms.
- Install and power the accessory, then connect it to Wi-Fi, Ethernet, or Thread as required.
- Prepare the Apple Home or Matter QR/numeric code.
- Add the accessory from Home > Add Accessory.
- For a Matter device already paired elsewhere, choose More Options and use the original app’s generated sharing code.
- Assign a room, choose a unique Siri-friendly name, and test direct control.
- Add favorites, scenes, and automations only after direct control is reliable.
- For Thread devices or away-from-home control, verify that a compatible home hub is powered and connected.
This order separates the three issues that are most often confused: whether the device is compatible, whether it has a network, and whether the home has a hub for Thread or remote operation.
Quick Recap
Product prices and availability are accurate as of the date/time indicated and are subject to change. Any price and availability information displayed on Amazon at the time of purchase will apply.

