Free tools Windows power users keep installed
One-click scans. No signup required.
Short answer: Attach the supplied feet or a compatible wall mount, connect power, prepare the remote, and follow the on-screen Guided Setup. Select your language and country, choose Set up for home use, connect to Wi-Fi, allow Roku OS to update and restart, then link the television to a Roku account. An antenna, cable box, game console, and audio equipment are optional and can be added after the basic setup.
This guide describes the US setup flow. Menu names, remote types, ports, and some prompts can differ by television model, manufacturer, software version, and region, so keep the quick-start guide that came with your exact set nearby.
As an Amazon Associate I earn from qualifying purchases.
What you need before turning the TV on
Gather the items that make Guided Setup straightforward:
- The television, its power cord, and the included feet or stand hardware, unless you are mounting it.
- The supplied remote and the correct batteries, or the charging cable for a rechargeable remote.
- Your home Wi-Fi network name and password. Roku-branded televisions require an internet connection to complete initial setup.
- An existing Roku account, or an email address you can use to create one.
- Optional equipment such as an HDTV antenna, cable or satellite receiver, game console, disc player, streaming device, or soundbar.
- A sturdy, level surface with enough ventilation around the television, or a wall mount confirmed to fit your precise model.
Do not buy a mount based only on screen size. Mount-hole spacing, screw size, weight limits, and clearance vary. Check the model number on the carton or rear label against the television’s manual and the mount manufacturer’s compatibility information.
#1 Best Overall
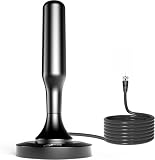
- 𝗡𝗲𝘃𝗲𝗿 𝗣𝗮𝘆 𝗠𝗼𝗻𝘁𝗵𝗹𝘆 𝗕𝗶𝗹𝗹: Watching local channels with this HD digital tv antenna for smart tv indoor 4K, you can watch crystal HDTV channels without cable service and enjoy local tv channels.
- 𝗜𝗻𝗱𝘂𝘀𝘁𝗿𝘆 𝗟𝗲𝗮𝗱𝗶𝗻𝗴 𝗧𝗲𝗰𝗵𝗻𝗼𝗹𝗼𝗴𝘆: This digital indoor tv antenna for local channels is made of eco-friendly flame-retardant dual PC soft material (not ordinary PVC), providing moisture resistance and lightning protection for indoor use.
- 𝗢𝗺𝗶𝗻𝗶-𝗱𝗶𝗿𝗲𝗰𝘁𝗶𝗼𝗻𝗮𝗹 𝗥𝗲𝗰𝗲𝗽𝘁𝗶𝗼𝗻 & 𝗠𝗮𝗴𝗻𝗲𝘁𝗶𝗰 𝗕𝗮𝘀𝗲: The indoor HDTV antenna brings omini-directional Reception; Whether hd digital tv antenna indoor is installed on the TV stand or on the table, you can receive the crystal clear picture
- 𝗖𝗼𝗺𝗽𝗮𝗰𝘁 𝗮𝗻𝗱 𝘀𝗺𝗮𝗹𝗹 𝗗𝗲𝘀𝗶𝗴𝗻: The indoor antenna for tv without cable features a compact and slim design, making it easy to hide without taking up space. The lightweight build allows you to move it conveniently and adapt to different living environments effortlessly.
- 𝗡𝗼𝘁𝗲 𝗮𝗻𝗱 𝗖𝘂𝘀𝘁𝗼𝗺𝗲𝗿 𝗦𝗲𝗿𝘃𝗶𝗰𝗲 : Read the manual first, set up your TV properly, and scan for channels. 𝐅𝐨𝐫 𝐨𝐩𝐭𝐢𝐦𝐚𝐥 𝐫𝐞𝐜𝐞𝐩𝐭𝐢𝐨𝐧, 𝐭𝐞𝐬𝐭 𝐛𝐨𝐭𝐡 𝐯𝐞𝐫𝐭𝐢𝐜𝐚𝐥 𝐚𝐧𝐝 𝐡𝐨𝐫𝐢𝐳𝐨𝐧𝐭𝐚𝐥 𝐩𝐥𝐚𝐜𝐞𝐦𝐞𝐧𝐭. Mount the antenna high, near a window facing local broadcast towers (Check "dtv gov maps" for available channels), to avoid obstacles and interference. Actual Reception depends on location, terrain, and weather, always re-scan for channels after moving the antenna. If you have any issues, please contact us. We will provide professional service and a satisfactory solution for you.
Check the box and identify the remote
Roku TV models do not all include the same remote. Roku says Select models use a voice remote with standard batteries, while Plus and Pro Series models use a rechargeable voice remote. Televisions made by other manufacturers can have different remotes, buttons, or pairing procedures. Identify which type you received before removing protective film or disposing of packaging.
If a quick-start sheet shows a model-specific hardware step, follow it even when the general on-screen process described here looks different. The supplied guide is the authority for stand screws, cable routing, remote charging, and port locations on that set.
Install the television and connect power
Using the supplied feet or stand
- Place the screen face-up on a clean, padded surface large enough to support it without pressure on the panel.
- Insert each foot in the position shown in the quick-start guide. Some sets have more than one foot position, so use the pair specified for your furniture.
- Tighten every supplied screw firmly, but do not force a screw or substitute hardware.
- Lift the television with two people when the size or weight requires it, and set it on a level surface that cannot tip.
Leave space around ventilation openings and do not cover them with fabric, books, or decorative objects. Keep the power cord where it cannot be pinched or pulled from the socket.
Quick wins for a faster PC:
Scan for outdated or missing drivers - takes under a minuteDriver Scan →Repair Windows errors before they cause bigger problemsFix Now →Wall-mounting instead
Wall mounting is an alternative to the included feet, not a requirement for setup. Verify the exact model’s mounting pattern, hardware requirements, wall type, and weight rating before drilling. If the manual does not specify a detail, obtain the model’s installation information rather than guessing. A mount that fits a different Roku TV, even one with the same screen diagonal, may be unsafe.
Power on
Connect the power cord to the television and a suitable outlet, then press the power button on the set or remote. The startup screen should lead into Guided Setup. If nothing appears, confirm that the outlet works, the cord is fully seated, and the physical power button is not being held in an unusual position.
Prepare and pair the remote
Battery-powered remote
Remove any battery pull tab. If batteries are not installed, insert fresh batteries matching the polarity marks inside the compartment. Close the cover and point the remote toward the television when the setup screen asks for input.
Rank #2

- Enjoy More Tv antenna for Local Channels: Get more channels by antenna for smart TV, receive local broadcasting, ABC, CBS, NBC, CPS, FOX, CW, ION, UMAS, etc.
- HD Antenna for TV: Our digital TV antenna indoor adopts an upgraded Smart IC Chip, receives TV broadcasts including 4K, UHD and 1080 HDTV for the hd picture.
- 16FT Coax Cable: Coaxial cable is composed of a solid center conductor, dielectric insulation, three aluminum shielding layers, and a durable outer layer. so that you will never lose signal or suffer distortion even in bad weather.
- Compatibility and Usage Tips: Not suitable for older analog televisions; supports smart TVs and digital TVs. For optimal signal reception, try placing the antenna near a window or in other locations, and test both vertical and horizontal orientations.
- Easy to Install: Plug the coaxial cable from your digital indoor HDTV antenna into the ANT/IN connector on the back of your TV, point the TV antenna toward your local TV tower and scan for channels. (Check "dtv gov maps" for available channels).
Rechargeable voice remote
Charge the remote with the supplied cable as directed by its guide. A rechargeable remote may arrive with enough charge to begin, but charging it before extended setup prevents an avoidable interruption.
Recommended Free Tools
When pairing is required
Some voice remotes pair during Guided Setup. Follow the prompt and keep the remote close to the television while both devices enter pairing mode. On remotes that have a dedicated pairing button, press it as shown on the screen or in the remote guide. On some models without that button, Roku’s instructions use Back and Home held together to start pairing. The exact combination is model-dependent.
If pairing fails, make sure the remote has working power and that the television is also in its pairing prompt. Restart the television and try the pairing sequence again. Do not assume that a standard infrared remote and a voice remote use the same procedure.
Complete Guided Setup step by step
1. Choose the language and country
Use the directional buttons to select the on-screen language. Select the country where the television is actually being used. Country selection affects available services and channel behavior, so do not choose a different country merely to change the list of apps.
2. Select home use
When asked how the television will be used, choose Set up for home use for a personal or household installation. Store or display modes are intended for retail demonstration and can change how the set behaves. If you accidentally select a store option, look for the setup option to return to home use or restart Guided Setup according to the model’s guide.
Windows Errors? Fix Them Before They Spread
Repair common Windows errors and clear accumulated junk for a smoother, more stable PC - no reinstall needed.Free scan · no reinstallCrashes, No Sound, or Screen Glitches?
Random freezes, missing sound and display glitches usually trace back to one bad driver. Find and replace yours safely.Free scan · under a minute3. Connect to Wi-Fi
- Select your home wireless network from the list.
- Enter the Wi-Fi password carefully. Use Show password to check the characters you have typed.
- If the network is absent, choose Scan again after confirming that the router is powered and within normal range.
- Submit the password and wait for the connection result instead of repeatedly pressing buttons while the television is working.
Roku-branded TVs need internet access to finish first-time setup. The television downloads the latest available Roku OS update after connecting and then restarts. Leave it powered on and connected until the restart and any follow-up prompts are complete; interrupting power during an update can leave setup unfinished.
Rank #3
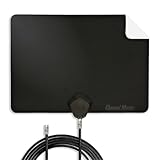
- Clear Reception with Realistic Range: The FLATenna captures HD and digital signals with a 35-mile range, designed to accommodate real-world factors such as obstructions and interference, making it suitable for urban and suburban environments.
- Access to Free Local Channels: Provides access to local networks such as ABC, CBS, FOX, NBC, PBS, Univision, and Telemundo without requiring a subscription.
- Practical and Flexible Design: Features an ultra-thin, lightweight, and reversible black-and-white design for easy integration into various home setups, with multiple mounting options for walls, windows, or tabletops.
- Future-Ready Compatibility: Supports ATSC 3.0 NextGen TV and 4K broadcasts, and includes a 12' professional-grade RG6 coaxial cable with enhanced shielding for improved signal reliability.
- Established Manufacturer: Developed by Channel Master, a long-standing provider of TV antenna technology since 1949, designed for reliable over-the-air TV reception.
4. Activate and link the television
Choose Sign in if you already have a Roku account, or select the option to create one. The current activation flow can provide an email-based path, a QR-code path, or both. Follow the method shown on the television rather than entering a code from an unrelated browser page.
- Open the activation link supplied by the TV, or scan its QR code with a phone.
- Sign in or create the account using an email address you can access.
- Complete the account prompts shown in the browser.
- Keep the television on its activation screen until it confirms that linking is complete.
Roku states that account creation and activation are free. A payment request from an unofficial page or a person claiming to charge an activation fee is not part of the normal process. If the email does not arrive, check the spam or junk folder, verify the address entered on the television, and request a new link when that option appears. If available, use the alternative QR-code or code-entry route.
5. Let setup finish
After activation, the home screen and any remaining setup prompts appear. Allow the television to finish loading before unplugging it or changing network settings. You can add optional devices now or return to them later.
Add an antenna for free over-the-air channels
An antenna is needed only if you want local broadcasts received through the television’s tuner. It is not required for streaming apps, HDMI equipment, or completion of the basic Roku setup.
- Connect an HDTV antenna’s coaxial cable to the television’s Ant/Cable In port.
- Open Live TV from the home screen and choose the channel-scan option.
- If Live TV is not shown, open Settings > TV inputs > Live TV > Set up input on software versions that use that path.
- Start the scan and wait several minutes for it to complete.
Reception and channel availability depend on your location, antenna placement, terrain, building materials, and local transmitters. There is no reliable channel count to promise. If expected channels are missing, check that the coaxial connector is tight and the cable is undamaged, move the antenna higher and near a window when practical, keep it away from large obstructions, and scan again. An indoor HDTV antenna is the appropriate accessory category if you do not already own one.
Connect a cable or satellite receiver
- Connect the receiver’s HDMI output to an open HDMI input on the Roku TV. Use an HDMI cable that you already have or verify the receiver’s box contents before buying another.
- Turn on the receiver and the television.
- On the Roku home screen, select the HDMI input that matches the port used.
Some cable systems may support a direct coaxial connection, but many require the provider’s receiver. If the screen says No Signal, reseat both ends of the HDMI cable, confirm that the receiver is powered, and select the matching input. The receiver’s own remote is generally still needed to change channels, open its guide, or use provider features.
Rank #4

- FREE LOCAL HD TV — Watch local channels in crystal clear 1080p HD with no monthly fees; 4K and 8K Ultra HD for future ready performance
- 70+ MILE LONG RANGE RECEPTION — Captures VHF and UHF broadcast signals from up to 70+ miles away for reliable local channel access
- UNIVERSAL TV COMPATIBILITY — Works with all TV brands and converter boxes that use a standard coax cable connection
- HIDDEN ATTIC OR OUTDOOR MOUNTING — Designed for attic installation to stay out of sight; weather resistant and outdoor rated for flexible roof or mast mounting
- NEXTGEN TV READY — Supports ATSC 3.0 over the air broadcasts where available for improved signal strength, picture and sound
Connect consoles, disc players, and other HDMI devices
Use an available HDMI port for a game console, disc player, streaming box, or computer. Turn on the external device, then select its corresponding input from the Roku home screen. The television may offer to label the input; choose a label that makes the source clear, such as a console or cable box.
You can add or manage equipment later through Settings > Remotes & Devices > Add Devices. This does not replace the external device’s own setup, account, controller, or remote. If a source is connected but absent from the input list, verify that the cable is in an actual HDMI port rather than an audio-only connector and wake the source from standby.
Add optional audio equipment
The built-in speakers are sufficient to complete setup. A compatible soundbar or other Roku audio product can be added later if you want louder sound, clearer dialogue, or a different speaker arrangement. Connect it according to the audio product and television manuals, then test volume control and audio output before routing cables permanently.
Do not treat an audio upgrade as a prerequisite for activation. Finish Guided Setup first if you are troubleshooting the television; adding several devices at once makes it harder to identify which connection caused a problem.
Independent reader supportYour contribution helps us test, update, and keep practical guides available for everyone.Troubleshoot the most common setup problems
The Wi-Fi network does not appear
- Confirm that the router is powered and that another device can see the network.
- Move within normal wireless range if the television is far from the router.
- Choose Scan again on the network-selection screen.
- Re-enter the network name and password, using Show password to catch capitalization or spacing errors.
If the network remains unavailable, follow the router manufacturer’s connection checks before continuing. The Roku TV cannot complete its required online activation until it has internet access.
The Tool Desk
Outbyte PC Repair FREERepair Windows errors before they cause bigger problemsFix Now →Outbyte Driver Updater FREEFix the driver behind crashes, sound loss and screen glitchesFind Drivers →The update or restart seems slow
Roku OS downloads and installs an update after the television connects to the internet, then restarts. Keep the TV connected to power and avoid pressing buttons repeatedly during that process. If the set returns to a network or activation prompt, complete that prompt and leave the activation screen open until linking finishes.
Best Value
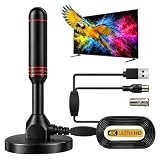
- ADVANCED DUAL-SIGNAL BOOSTERS: Unlike standard antennas with a single amplifier, our TV Antenna Indoor model features dual-booster technology to capture signals from multiple directions, helping reduce dead zones and provide more stable reception.
- 32FT CABLE FOR FLEXIBLE PLACEMENT: The extra-long coaxial cable lets you position this Indoor Antenna for Smart TV setups wherever reception is strongest—behind your TV, on a tabletop, or near a window.
- CRISP 4K & 1080P PICTURE QUALITY: Enjoy uncompressed over-the-air broadcasts with clear, vibrant images. This TV Antenna for Smart TV supports 4K and 1080P signals when available, helping you get more from your television.
- ENJOY LOCAL CHANNELS WITHOUT MONTHLY FEES: This powerful TV Antenna for Local Channels helps you receive available broadcasts from networks such as ABC, CBS, NBC, FOX, PBS, and more—no cable subscription required.
- COMPACT, DISCREET & EASY TO INSTALL: The minimalist design blends naturally into any room, while the magnetic base provides quick and secure placement. Simply connect the antenna, position it for the best signal, and scan for available channels.
The activation email never arrives
- Check spam, junk, promotions, and other filtered folders.
- Confirm that the email address displayed or entered on the TV is correct.
- Request a resent activation link when the TV provides that option.
- Use the QR-code or alternate code method if it is offered.
Do not close the television’s activation screen while waiting if the on-screen instructions say to remain there.
The voice remote will not pair
- Install fresh batteries or charge the remote.
- Place the remote close to the TV.
- Start pairing on both devices at the same time, using the remote’s pairing button or the model-specific Back plus Home method where applicable.
- Restart the television and retry if the first attempt fails.
Because remote hardware differs between Roku TV lines and manufacturers, use the supplied remote instructions when these controls do not match your handset.
The antenna scan finds no channels
Check the coaxial connection at both ends and inspect the cable for damage. Reposition the antenna higher or nearer a window, away from obstructions, then run the Live TV scan again. A successful scan in one room does not guarantee the same result in another; local reception conditions determine which broadcasts are available.
Do these 3 things before closing this tab:
1Scan for outdated or missing drivers - takes under a minute2Clear out junk files and repair common Windows errors3Fix the driver behind crashes, sound loss and screen glitchesAn HDMI device shows “No Signal”
Make sure the external device is on, the HDMI plugs are fully inserted, and the Roku TV input selected is the one used physically. Try the source’s own remote to wake it or change its output state. If the device works on another display but not this input, consult the television and device manuals for compatible output settings.
What works without Wi-Fi after setup
For Roku-branded televisions, internet is required for the initial setup and activation. Once setup is complete, an HDMI source can still display its own content without Wi-Fi, and antenna-based Live TV can still play when an antenna is connected and channels have been scanned. Streaming apps and other online features require an internet connection.
This distinction matters if your internet service is temporary or unreliable: complete activation while connected, then use the television as a display for local sources when the connection is unavailable.
First-day checklist
- Feet or wall mount are secure and the TV is stable.
- Power and remote batteries or remote charging are working.
- The correct language, country, and home-use mode are selected.
- Wi-Fi credentials are saved and Roku OS has finished updating and restarting.
- The television is linked to the intended Roku account.
- Each HDMI source is connected, powered, and labeled correctly.
- The antenna is connected to Ant/Cable In and a channel scan has completed, if local broadcasts are wanted.
- Audio output and volume control work with the built-in speakers or optional audio equipment.
Once these checks pass, normal use is simply selecting an app, Live TV, or an external input from the Roku home screen. Keep the model’s manual and remote information for later hardware-specific questions, because Roku TV menus and accessories are not identical across every set.
What’s actually slowing this PC down?
Pick the symptom - the matching free tool is one click away.
Quick Recap
Product prices and availability are accurate as of the date/time indicated and are subject to change. Any price and availability information displayed on Amazon at the time of purchase will apply.

