Recommended Free Tools
Set up the Quest 3S by pairing it with the Meta Horizon app, connecting the headset to Wi‑Fi, and completing the tutorial inside the headset. For a stable, clear view, position the rear and split straps, use the top strap to share the weight, tilt the headset on its arms, select the clearest of the three lens-spacing positions, and adjust facial-interface depth with the eye-relief buttons. Make each change in small steps while the headset is on your face, except for interface-depth adjustments, which should be made with the headset removed.
What you need before you begin
Set the headset and its included parts on a clean surface before putting anything on your face. The package listing identifies these items:
As an Amazon Associate I earn from qualifying purchases.
- Meta Quest 3S headset
- Standard facial interface
- Two Touch Plus controllers with wrist straps
- AA batteries for the controllers
- Charging cable
- Power adapter
Keep your phone nearby for the Meta Horizon app pairing step, and place the headset where you can reach its controls while it connects to Wi‑Fi. Clear hair away from the area where the facial interface will rest; hair caught under the interface can make the headset slide and can create uneven pressure.
Initial Quest 3S setup
1. Install and open the Meta Horizon app
Use the Meta Horizon app on your phone to begin pairing. The available setup instructions identify app pairing as the first part of the basic process. Keep the phone close to the headset while the app searches for it and presents the pairing flow.
#1 Best Overall
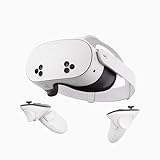
- NO WIRES, MORE FUN — Break free from cords. Game, play, exercise and explore immersive worlds — untethered and without limits.
- 2X GRAPHICAL PROCESSING POWER — Enjoy lightning-fast load times and next-gen graphics for smooth gaming powered by the SnapdragonTM XR2 Gen 2 processor.
- EXPERIENCE VIRTUAL REALITY — Take gaming to a new level and blend virtual objects with your physical space to experience two worlds at once.
- 2+ HOURS OF BATTERY LIFE — Charge less, play longer and stay in the action with an improved battery that keeps up.
- 33% MORE MEMORY — Elevate your play with 8GB of RAM. Upgraded memory delivers a next-level experience fueled by sharper graphics and more responsive performance.
2. Pair the headset
Follow the pairing prompts shown by the app. The exact screens can change as Meta updates its software, so use the labels currently displayed on your phone rather than relying on an older screenshot or a remembered menu name. If the headset does not appear immediately, keep it powered on and close enough to the phone for the app to communicate with it.
3. Connect Quest 3S to Wi‑Fi
Choose your wireless network when the setup flow asks for Wi‑Fi and enter its password. A reliable connection is important during onboarding because the headset must communicate with the app before you continue into the device tutorial. If your network has separate names for different bands, select the network your phone can use consistently in the same room.
4. Complete the in-headset tutorial
Put on the headset after the app and Wi‑Fi steps have advanced far enough for the device to continue. Follow the tutorial shown inside Quest 3S, using the included Touch Plus controllers and their wrist straps. The tutorial is the point at which you learn the basic hand-controller interactions and see the headset’s own guidance for its play area and controls.
The Tool Desk
Outbyte Driver Updater FREEScan for outdated or missing drivers - takes under a minuteDriver Scan →Outbyte PC Repair FREERepair Windows errors before they cause bigger problemsFix Now →The available setup listing does not establish every current onboarding screen, account prompt, update screen, or recovery path. Those screens can vary by software version and account state, so do not assume that a guide written for an earlier Quest release will match your display exactly.
How to wear the stock strap correctly
The included strap can provide a secure fit when its contact points are positioned before you tighten it. Start with the headset slightly loose, then settle it against your face and adjust one part at a time.
Rank #2

- NO WIRES, MORE FUN — Break free from cords. Game, play, exercise and explore immersive worlds — untethered and without limits.
- 2X GRAPHICAL PROCESSING POWER — Enjoy lightning-fast load times and next-gen graphics for smooth gaming powered by the SnapdragonTM XR2 Gen 2 processor.
- EXPERIENCE VIRTUAL REALITY — Take gaming to a new level and blend virtual objects with your physical space to experience two worlds at once.
- 2+ HOURS OF BATTERY LIFE — Charge less, play longer and stay in the action with an improved battery that keeps up.
- 33% MORE MEMORY — Elevate your play with 8GB of RAM. Upgraded memory delivers a next-level experience fueled by sharper graphics and more responsive performance.
Place the rear straps around the back of your head
Guide the rear portion of the strap around the back of your head rather than leaving it high on the crown. The rear contact helps resist the headset’s forward weight. If the rear strap is too high, the front of the headset can lever downward or lift when you move your face.
Center and tension the split straps
Adjust the split side straps so the headset sits level and the pressure is distributed across both sides. Tighten only until the facial interface stays in contact with your face during normal head movement. Excess tension can create pressure at the cheeks, forehead, or nose without solving an alignment problem.
Do these 3 things before closing this tab:
1Fix the driver behind crashes, sound loss and screen glitches2Clear out junk files and repair common Windows errors3Scan for outdated or missing drivers - takes under a minuteUse the top strap as a support, not a clamp
Position the top strap over your head and adjust it so it carries some of the headset’s weight. Meta support guidance specifically recommends the top strap to reduce pressure on the face. It should support the headset rather than pull it tightly downward; make a small change, then check whether the facial interface still sits evenly.
Check the interface seal
With the headset on, look for gaps caused by hair, an uneven strap position, or a tilted interface. A consistent seal helps block stray light and keeps the display in a repeatable position. If you feel a single pressure point, loosen the strap slightly and correct the headset angle before tightening again.
Adjust the headset angle for a clearer, more comfortable view
Quest 3S can be tilted on its headset arms. Meta support’s published guidance is: “You can adjust the angle of the headset to improve comfort by holding the headset with both hands and tilting it up or down on the headset arms.”
Rank #3
- Transform your reality and do everything you love in totally new ways. Welcome to Meta Quest 3S.
- Explore thousands of unreal experiences with mixed reality, where you can blend digital objects into the room around you or dial up the immersion in VR.
- Have more fun with friends in Quest. Whether you’re stepping into an immersive game with people from around the world, watching a live concert together in Meta Horizon or inviting everyone over to cast your play onto the TV.
- Multi-tasking has never been this easy. Pull up multiple screens at once to browse the web, watch YouTube and direct message with friends — all while keeping your room in view.
- Hold the headset with both hands while it is on your face.
- Keep the straps in place so you can judge the change without moving the whole fit.
- Tilt the headset slightly up or down on the arms.
- Stop when the display is easiest to view without lifting your eyebrows, pressing the headset into your cheeks, or bending your neck.
- After finding a useful angle, make a small strap adjustment to keep that position stable.
Angle and strap position interact. If the image becomes clear only when you push the headset upward with your hands, use the top strap and rear strap to hold that angle instead of relying on face pressure.
Quick wins for a faster PC:
Fix the driver behind crashes, sound loss and screen glitchesFind Drivers →Repair Windows errors before they cause bigger problemsFix Now →Scan for outdated or missing drivers - takes under a minuteDriver Scan →Choose the correct lens-spacing position
Quest 3S has three preset lens-spacing positions. This is a stepped adjustment, not a continuously adjustable wheel, so move through the available positions and compare them rather than searching for an in-between setting.
- Start at one preset and look at text or another high-contrast object.
- Move to the next preset and compare edge clarity, eye comfort, and whether either eye is working harder.
- Try the third preset if needed.
- Return to the position that gives the clearest, most relaxed view for both eyes.
Move the lenses only through the headset’s designed positions. Do not force them beyond a preset or treat the spacing control as a fine-grained dial. If the view is still unclear, recheck headset angle and interface seating before assuming the lens position is the only problem.
Adjust facial-interface depth for your face or glasses
The facial interface can move forward or backward using its eye-relief buttons. This changes the distance between your eyes and the lenses and can provide extra clearance for glasses. Remove the headset before making this adjustment.
- Take Quest 3S off and hold it securely.
- Find the eye-relief buttons on the facial-interface assembly.
- Press the buttons and slide the interface to a different depth.
- Choose a position that leaves enough room for your face or glasses without making the headset loose.
- Put the headset back on and recheck strap tension, angle, and lens-spacing position.
Meta’s guidance supports using this control for face or glasses clearance, but it does not establish that every pair of glasses will fit. Frames that are especially wide, tall, thick, or heavily curved may still contact the lenses or interface. Never force glasses into the headset or continue if the frames press against the optics.
Rank #4

- CARDBOARD MONKENAUT — Get our best Gorilla Tag bundle yet with this Amazon exclusive deal. Purchase Meta Quest 3 to get exclusive items, including the Gorilla Space Program Suit and Helmet, plus 2,000 SHINY ROCKS.
- NEARLY 30% LEAP IN RESOLUTION — Experience every thrill in breathtaking detail with sharp graphics and stunning 4K+ Infinite Display.
- NO WIRES, MORE FUN — Break free from cords. Game, play and explore in immersive worlds — untethered and without limits.
- 2X GRAPHICAL PROCESSING POWER — Enjoy lightning-fast load times and next-gen graphics for smooth gaming powered by the Snapdragon XR2 Gen 2 processor.
- EXPERIENCE VIRTUAL REALITY — Blend virtual objects with your physical space and experience two worlds at once in your VR headset.
A symptom-to-adjustment sequence for common fit problems
When the image or stability is wrong, change one variable at a time. The sequence below prevents you from tightening every strap and losing track of what helped.
| Symptom | First adjustment | What to check next |
|---|---|---|
| Headset lifts when you smile or move your face | Move the rear straps lower around the back of your head and retension the split straps. | Use the top strap, then fine-tune the headset angle. |
| Image is clearer when you hold the headset in one position | Tilt the headset on its arms until that view is reached. | Use the top strap to support the angle and reduce facial pressure. |
| Text looks blurred or one eye feels strained | Try each of the three lens-spacing presets. | Recheck angle and whether the interface is centered on your face. |
| Glasses touch the lenses or the headset feels cramped | With the headset off, move the facial interface using the eye-relief buttons. | Confirm that the frames have physical clearance; do not assume all glasses fit. |
| Pressure builds on the cheeks or forehead | Loosen the side straps slightly and adjust the top strap to carry more weight. | Change the headset angle instead of tightening harder. |
| Light enters around one side | Remove hair from under the interface and recenter the headset. | Check that both split straps have similar tension and that the interface depth is even. |
Fixing the “When I smile, my Quest 3S lifts up” problem
“When I smile, my Quest 3S lifts up” describes a fit that is being displaced by movement of the cheeks or jaw. Treat it as a positioning issue first, not as proof that you need a replacement accessory.
- Lower the rear portion of the strap so it sits securely around the back of your head.
- Center the split side straps and tighten them just enough to stop front-to-back movement.
- Adjust the top strap so some headset weight rests on the top of your head rather than entirely on your face.
- Hold the headset with both hands and tilt it on the arms until the display remains usable while you smile and look around.
- If your face or glasses needs more room, remove the headset and change facial-interface depth with the eye-relief buttons.
Test after each step by smiling, speaking, and turning your head. If one change fixes the lift but creates forehead pressure, back off the tension and use the top strap and angle adjustment to share the load.
Independent reader supportYour contribution helps us test, update, and keep practical guides available for everyone.Quest 3S optical and display specifications that affect fit expectations
Meta’s 2026 device specifications list the following figures for Quest 3S. They describe the device, not a guarantee that every wearer will see the full field of view or find the headset comfortable.
Crashes, No Sound, or Screen Glitches?
Random freezes, missing sound and display glitches usually trace back to one bad driver. Find and replace yours safely.Free scan · under a minuteWindows Errors? Fix Them Before They Spread
Repair common Windows errors and clear accumulated junk for a smoother, more stable PC - no reinstall needed.Free scan · no reinstall| Specification | Published figure | How it relates to setup |
|---|---|---|
| Lens-spacing adjustment | Three preset positions | Compare the three positions; there is no continuously adjustable lens mechanism. |
| Horizontal field of view | 96° | Headset angle and interface seating affect how naturally the view sits in your vision. |
| Vertical field of view | 90° | A poor tilt can make the usable view feel less comfortable even though the published specification is unchanged. |
| Resolution | 1832 × 1920 pixels per eye | Clear text still depends on lens spacing, angle, and keeping your eyes in the optical sweet spot. |
| Maximum refresh rate | Up to 120 Hz | This is a device capability, not a promise that every application or mode runs at that rate. |
Meta describes Quest 3S as using “the tried and tested optical stack of Quest 2” while running the latest Quest 3 apps. That combination explains why the physical lens-spacing adjustment remains a small set of presets even though the headset supports the Quest 3 software ecosystem.
Best Value

- CARDBOARD MONKENAUT — Get our best Gorilla Tag bundle yet with this Amazon exclusive deal. Purchase Meta Quest 3S to get exclusive items, including the Gorilla Space Program Suit and Helmet, plus 2,000 SHINY ROCKS.
- NO WIRES, MORE FUN — Break free from cords. Game, play and explore immersive worlds — untethered and without limits.
- 2X GRAPHICAL PROCESSING POWER — Enjoy lightning-fast load times and next-gen graphics for smooth gaming powered by the Snapdragon XR2 Gen 2 processor.
- EXPERIENCE VIRTUAL REALITY — Take gaming to a new level and blend virtual objects with your physical space to experience two worlds at once in your VR headset.
- 2+ HOURS OF BATTERY LIFE — Charge less, play longer and stay in the action with an improved battery that keeps up. *Based on the graphic performance of the Qualcomm Snapdragon XR2 Gen 2 platform vs the Meta Quest 2 platform.
When an accessory may help
Start with the stock facial interface and included strap. Correct positioning, angle, lens spacing, and interface depth address the main causes of blur, slippage, and facial pressure without adding another part to adjust.
Meta lists a Quest 3S Breathable Facial Interface as an optional accessory. A replacement is not required for initial setup, and the available guidance does not establish that it will solve a particular wearer’s fit problem. Consider an alternative interface only after you have tried the stock adjustments and identified a specific need, such as a different surface feel or airflow preference.
A replacement head strap is likewise a category rather than a guaranteed fix. No particular compatible model is established here. If you eventually consider one, verify that it is explicitly designed for Quest 3S and that it does not obstruct the headset, facial interface, charging connection, or controller use.
Free tools Windows power users keep installed
One-click scans. No signup required.
A repeatable comfort check before a longer session
- Put on the headset with hair clear of the facial interface.
- Set the rear and split straps so the headset does not slide when you look down.
- Adjust the top strap until it supports some weight without pulling the headset out of alignment.
- Tilt the headset on its arms to place the display naturally in your view.
- Test all three lens-spacing presets and keep the clearest comfortable position.
- If you wear glasses or need more facial clearance, remove the headset and set interface depth with the eye-relief buttons.
- Look at text, move your head, smile, and speak for a short check. Make only one further adjustment if a problem appears.
Stop and readjust if you feel sharp pressure, persistent eye strain, or frame contact with the lenses. Comfort should come from balanced support and correct alignment, not from tightening the side straps until the headset is clamped to your face.
Quick Recap
Product prices and availability are accurate as of the date/time indicated and are subject to change. Any price and availability information displayed on Amazon at the time of purchase will apply.

