Original Nintendo Switch Joy-Con controllers work with Nintendo Switch 2 over Bluetooth. They do not slide onto, magnetically attach to, or otherwise physically connect to the Switch 2 console. To use them, turn on the console, open Controllers → Change Grip and Order from the HOME Menu, hold each Joy-Con’s SYNC Button for at least one second, and then confirm whether you will use the controllers as a pair or as separate horizontal controllers.
Pairing and grip selection are separate steps. The console can remember a Joy-Con after it has been paired, but the button confirmation on the Change Grip and Order screen tells Switch 2 how the controller or controllers are being held for the current session.
| # | Preview | Product | Price | |
|---|---|---|---|---|
| 1 |
|
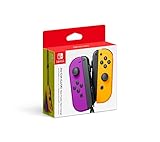
Nintendo Neon Purple/Neon Orange Joy-Con (L-R) - Switch | $87.95 | Buy on Amazon |
| 2 |

|
Nintendo Joy-Con (L/R) - Neon Red/Neon Blue (Renewed) | $60.00 | Buy on Amazon |
| 3 |

|
Nintendo Blue/Neon Yellow Joy-Con (L-R) - Switch | $79.99 | Buy on Amazon |
| 4 |

|
Nintendo Joy-Con (L)/(R) - Pastel Purple/Pastel Green | $87.00 | Buy on Amazon |
As an Amazon Associate I earn from qualifying purchases.
What works with Nintendo Switch 2
Nintendo’s compatibility guidance covers the original Joy-Con controllers released for the first Nintendo Switch. These controllers can connect wirelessly to Nintendo Switch 2, so you do not need to buy a new pair simply to play with Joy-Con you already own.
The important limitation is physical: original Joy-Con cannot attach to the sides of a Switch 2 console. Nintendo Support states, “It is not possible to attach Joy-Con controllers to the Nintendo Switch 2 console.” They must be used wirelessly, either held separately or placed in an appropriate grip.
#1 Best Overall
- Two Joy Con can be used independently in each hand, or together as 1 game controller when attached to the Joy Con grip
- They can also attach to the main console for use in handheld mode, or be shared with friends to enjoy two player action in supported games
- Each Joy Con has a full set of buttons and can act as a standalone controller, and each includes an accelerometer and gyro sensor, making independent left and right motion control possible
Joy-Con 2 are a different controller generation. Their physical attachment method and accessories are designed for Switch 2, while original Joy-Con accessories are designed for the original controllers. Do not assume that a grip, charging grip, or stand made for one generation is interchangeable with the other.
| Controller or use | How it works with Switch 2 | Important qualification |
|---|---|---|
| Original Nintendo Switch Joy-Con | Pair wirelessly through the Controllers menu | Cannot attach directly to the Switch 2 console |
| Original Joy-Con used as a two-controller set | Pair both controllers, then confirm the left/right grip | Press the matching L/R or ZL/ZR buttons on the Change Grip and Order screen |
| Original Joy-Con used separately | Pair each controller and confirm horizontal use | Press SL and SR on each Joy-Con used as an individual controller |
| Joy-Con 2 | Switch 2-generation controllers with their own attachment and accessory system | Do not treat Joy-Con 2 grips or charging equipment as original Joy-Con accessories |
Before you start
Have the following ready before opening the pairing screen:
- A Nintendo Switch 2 console that is fully powered on. Pairing cannot be completed while the console is asleep.
- The original Joy-Con controller or controllers you want to use.
- Enough battery charge in the Joy-Con to keep the LEDs active while you pair.
- A clear decision about the intended arrangement: two Joy-Con held together as one controller, or one Joy-Con per player held horizontally.
You do not need a charging grip to pair Joy-Con. Charging equipment solves a battery problem; it is not part of the wireless pairing process.
What’s actually slowing this PC down?
Pick the symptom - the matching free tool is one click away.
Pair an original Joy-Con with Switch 2
Use these steps for the first connection, or whenever you need to select a different controller arrangement.
- Wake and power on Switch 2. The console must be running rather than in sleep mode.
- Open the HOME Menu. Select Controllers.
- Choose “Change Grip and Order.” This opens the screen that listens for controller-pairing requests and accepts the grip confirmation.
- Press and hold the Joy-Con’s SYNC Button. Hold it for at least one second. The SYNC Button is the small pairing button on the controller.
- Watch the player LED. When pairing succeeds, the player LED for the assigned controller number remains lit. That light identifies the controller number assigned by the console.
- Confirm the way you will hold the controller. Use the button combination for the selected arrangement described below. Pairing is not finished until this confirmation is made.
If you are pairing two original Joy-Con, repeat the SYNC-button process for the second controller while the Change Grip and Order screen is open. Then perform the grip confirmation that matches the way the two controllers will be used.
Use two Joy-Con together as one controller
For a left Joy-Con and a right Joy-Con used together in a paired grip, press one of the following combinations on the Change Grip and Order screen:
- Press L on the left Joy-Con and R on the right Joy-Con.
- Alternatively, press ZL on the left Joy-Con and ZR on the right Joy-Con.
The two combinations represent the controller’s available shoulder-button layouts. Use the combination that corresponds to the buttons you can comfortably reach in the intended grip. The console uses this input to register the left and right Joy-Con as one two-controller unit.
Use each Joy-Con as an individual horizontal controller
To give one Joy-Con to each player, hold each controller horizontally and press SL and SR on that controller when the Change Grip and Order screen prompts for confirmation. Perform the confirmation on every Joy-Con being used individually.
This horizontal confirmation matters because a single Joy-Con has a different button orientation and player assignment from a left/right pair. If the console shows the wrong arrangement after pairing, return to Controllers → Change Grip and Order and repeat the appropriate button confirmation.
How to tell whether pairing succeeded
The player LED on a Joy-Con provides the immediate confirmation. After the console accepts the wireless connection, the LED for the assigned controller number remains lit. The number is the player position the console has allocated to that controller, not a battery indicator.
A lit player LED does not, by itself, confirm that the controller is configured as a left/right pair or as a horizontal single controller. That is why the grip button press follows the SYNC-button pairing step. If a controller appears connected but the game interprets its buttons in the wrong orientation, repeat the grip selection rather than pairing the controller again from scratch.
The Tool Desk
Outbyte Driver Updater FREEScan for outdated or missing drivers - takes under a minuteDriver Scan →Outbyte PC Repair FREEClear out junk files and repair common Windows errorsFree Scan →Pairing two Joy-Con versus pairing one
| Goal | Controllers to pair | Confirmation on Change Grip and Order | Result |
|---|---|---|---|
| One player using a two-controller grip | Left and right original Joy-Con | L on the left plus R on the right, or ZL on the left plus ZR on the right | Both Joy-Con operate as one controller |
| Two players sharing one Joy-Con each | One or more individual Joy-Con | SL and SR on each Joy-Con held horizontally | Each Joy-Con operates as an individual controller |
| One-player testing or menu use with one Joy-Con | One original Joy-Con | Use the horizontal SL/SR confirmation if it is being held as a single horizontal controller | The console assigns that Joy-Con as one controller |
The key decision is not which controller is left or right in the storage case; it is how the buttons will be held during play. If you change from a paired grip to separate horizontal use, revisit Change Grip and Order and confirm the new arrangement.
How many wireless controllers can be paired?
Nintendo Support says that up to eight wireless controllers can be paired to a Nintendo Switch 2 or Nintendo Switch console. “Paired” is the important word: it describes the controllers the console can remember, not a promise that eight controllers can be used simultaneously in every game or setup.
Nintendo also qualifies that the number that can be connected at once varies with the controller type and the features in use. A title may support fewer simultaneous players, and a particular mix of controllers or active wireless features can change the practical limit. Do not interpret the eight-controller pairing ceiling as an eight-player guarantee.
Rank #3
- Two Joy Con can be used independently in each hand, or together as 1 game controller when attached to the Joy Con grip
- They can also attach to the main console for use in handheld mode, or be shared with friends to enjoy 2 player action in supported games
- Each Joy Con has a full set of buttons and can act as a standalone controller, and each includes an accelerometer and gyro sensor, making independent left and right motion control possible
Charging original Joy-Con when they cannot attach to Switch 2
Because original Joy-Con cannot slide onto the Switch 2 console, the console cannot charge them through a physical side connection. You need a Nintendo Switch console that accepts the original Joy-Con, or a compatible charging accessory made for original Joy-Con.
Use an original Nintendo Switch console
If you have an original Nintendo Switch console, its Joy-Con rails can provide the normal charging connection for original Joy-Con. This is a charging method; the controllers can still be paired wirelessly with Switch 2 afterward.
Use a Joy-Con Charging Grip
A Joy-Con Charging Grip is designed to hold original Joy-Con and charge them through its cable connection. Check that the listing or packaging specifically identifies compatibility with original Nintendo Switch Joy-Con. A grip made for Joy-Con 2 is not automatically suitable for the original controllers.
Use a Joy-Con Charging Stand (Two-Way)
A Joy-Con Charging Stand (Two-Way) is another option for charging original Joy-Con without attaching them to Switch 2. As with a charging grip, verify the controller generation before buying or connecting the accessory.
Nintendo lists approximately 3.5 hours for a full Joy-Con charge and up to 20 hours of continuous battery use, with actual duration varying according to the software and controller use. Those figures are battery guidance, not pairing requirements. A Joy-Con only needs sufficient charge to complete the wireless connection and remain usable.
Quick wins for a faster PC:
Clear out junk files and repair common Windows errorsFree Scan →Scan for outdated or missing drivers - takes under a minuteDriver Scan →What to do if the grip is wrong after pairing
Seeing a controller on the screen does not mean the console has selected the arrangement you intended. Correct the configuration from the same menu:
- Open the HOME Menu.
- Select Controllers.
- Choose Change Grip and Order.
- For a two-controller grip, press L on the left and R on the right, or press ZL on the left and ZR on the right.
- For separate horizontal controllers, press SL and SR on each individual Joy-Con.
Use the buttons on the controllers in the physical orientation you plan to use. The console is waiting for the grip signal, so pressing an unrelated face or shoulder button will not complete this step.
Rank #4
- Expand your collection with these colorful pastel Joy-Con controllers.
When a Joy-Con does not appear to pair
Check that Switch 2 is awake
Pairing cannot be performed while the console is asleep. Press the console’s power or wake control, return to the HOME Menu, and open the Change Grip and Order screen before holding SYNC.
Hold SYNC long enough
The required action is a press and hold for at least one second, not a quick tap. Keep the button held until the console begins processing the controller and then look for the player LED to remain lit.
Do these 3 things before closing this tab:
1Fix the driver behind crashes, sound loss and screen glitches2Clear out junk files and repair common Windows errors3Scan for outdated or missing drivers - takes under a minuteReturn to the correct screen
Start pairing from HOME Menu → Controllers → Change Grip and Order. The pairing and grip-confirmation instructions are presented together there. Opening a different controller menu may not provide the same confirmation prompt.
Confirm the player LED
If the assigned player LED does not remain lit, the console has not completed the connection. Repeat the SYNC-button step from Change Grip and Order, then wait for the LED response before attempting the grip confirmation.
Consider Bluetooth audio as a special case
Nintendo has a separate support note covering attempts to pair an additional wireless controller while Bluetooth audio is connected. That guidance discusses controller limits in that specific combination and notes that each Joy-Con 2 controller connects as an individual controller when wirelessly connected. It is a narrow limitation, not a universal explanation for every original Joy-Con pairing failure. If your situation does not involve Bluetooth audio, begin with the standard power, menu, SYNC-button, LED, and grip-confirmation checks above.
Common mistakes to avoid
- Trying to attach original Joy-Con to Switch 2: the controllers are wireless-only with this console and cannot physically connect to it.
- Confusing original Joy-Con with Joy-Con 2: the generations use different physical systems and corresponding accessories.
- Assuming pairing selects the grip automatically: you must press L/R, ZL/ZR, or SL/SR as appropriate on Change Grip and Order.
- Pairing while the console sleeps: wake Switch 2 first.
- Using the eight-controller figure as an eight-player promise: the pairing ceiling and the number usable at once depend on controller type, active features, and software support.
- Buying a charging grip as a pairing requirement: charging accessories are optional and address battery charging only.
- Mixing accessory generations: verify that a grip or stand is made for original Joy-Con rather than Joy-Con 2.
Quick reference
| Question | Answer |
|---|---|
| Can original Joy-Con work with Switch 2? | Yes, through wireless pairing. |
| Can original Joy-Con attach to Switch 2? | No. |
| Where is pairing started? | HOME Menu → Controllers → Change Grip and Order. |
| How long should SYNC be held? | At least one second. |
| What confirms a successful connection? | The assigned player LED remains lit. |
| What confirms a two-controller grip? | L plus R, or ZL plus ZR, on the corresponding controllers. |
| What confirms separate horizontal use? | SL and SR on each individual Joy-Con. |
| Is a charging grip required? | No. It is only an optional way to charge original Joy-Con. |
| How many wireless controllers can be paired? | Up to eight, although the number connectable at once varies by controller type and features in use. |
FAQ
Do I need to pair Joy-Con every time I use Switch 2?
After a controller has been paired, Switch 2 can remember it. You may still need to open Change Grip and Order when you change from a two-controller grip to separate horizontal controllers, because the grip confirmation determines how the console interprets the buttons.
Can I charge original Joy-Con from Switch 2 while playing?
No physical attachment to Switch 2 is possible for original Joy-Con. Charge them with an original Nintendo Switch console or a compatible original-Joy-Con charging grip or stand, then use them wirelessly with Switch 2.
Will every game recognize eight paired controllers?
No. Eight is Nintendo’s wireless-pairing ceiling, while simultaneous use depends on the controller types, features in use, and the individual game’s player support.
Are original Joy-Con charging accessories interchangeable with Joy-Con 2 accessories?
Not automatically. Nintendo identifies corresponding accessories for each controller generation, so confirm that a charging grip or stand explicitly supports the original Joy-Con model you own.
Quick Recap
Product prices and availability are accurate as of the date/time indicated and are subject to change. Any price and availability information displayed on Amazon at the time of purchase will apply.

