Lubing a mechanical keyboard can remove spring ping, reduce scratchiness and tame stabilizer rattle, but the correct lubricant and application depend on the switch type and the exact part you are treating. For most linear MX-style switches, a very thin coat of Krytox GPL 205 Grade 0 (commonly called 205g0) on the stem and housing is a common starting point. Tactile switches need a lighter, more selective approach so their bump is not flattened. Springs are handled separately, often with GPL 105 oil, while stabilizer wires require a wire-specific grease rather than stem lubricant.
The reliable method is controlled disassembly, a fine brush, tiny amounts of lubricant and careful testing after reassembly. The instructions below cover removable switches, switch internals, springs and stabilizers, including the mistakes that make keys sluggish or destroy useful tactility.
As an Amazon Associate I earn from qualifying purchases.
Identify the switch and the part before opening anything
Lubrication is not a universal treatment. First determine whether your switches are linear or tactile, then identify whether they can be removed from the keyboard and opened without damage.
Linear versus tactile switches
- Linear switches move straight down with no intentional bump. A thin, even film on the stem rails, stem legs and housing contact surfaces usually reduces friction without changing the basic feel. Krytox GPL 205 Grade 0 (205g0) is a commonly cited choice for this job.
- Tactile switches use a shaped stem and a metal tactile leaf to create a bump. Too much grease, or grease on the wrong faces, can make that bump weak or inconsistent. In its May 24, 2022 guide, Kinetic Labs specifically cautions builders using 205g0 on tactile switches to avoid the tactile leaf and the front legs of the stem.
Clicky switches add another complication because their click jacket or click mechanism is part of the sound and feel. Unless you have a procedure made for that exact design, do not coat the click mechanism as though it were a linear stem.
#1 Best Overall
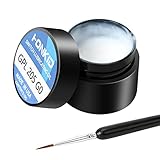
- KEY SWITCH LUBE-Precision instruments lube grease.205GPL G0 grease can be used on satellite and balance bar.Nonvolatile nonflammable and stable synthetic grease
- CONVENIENT:The design of the new packaging is convenient for every use and ensures that the lube oil is not contaminated
- SELECTED LUBE BRUSHES: After many experiments, choose a lubricating brush with a smaller brush head to better lubricate your switches
- WEIGHT:0.35oz. Apply only a very thin layer of grease. This 10 gram jar should last for about 300-400 switches if applied correctly
- ACKAGE INCLUDED: 1 pcs 205G0 lubricating grease , 1 lubricating brush
Check whether the board is serviceable
Hot-swappable boards let you pull switches from the plate with a switch puller, while soldered boards require desoldering before a switch can be opened comfortably. Some low-profile, optical and proprietary switches do not accept standard MX-style tools. Do not force an opener or a switch into a housing it was not designed for.
Kinetic Labs distinguishes MX-style and Kailh-style opener compatibility. Match the opener to the switch family, and test it on one switch before processing a whole board. If the switch cannot be opened cleanly, use a compatible replacement housing or leave that switch assembled rather than cracking its clips.
Tools and lubricants
Good results come from control, not from applying more product. Set up a clean, well-lit work area and use separate containers for housings, stems, springs and stabilizer parts.
What’s actually slowing this PC down?
Pick the symptom - the matching free tool is one click away.
| Tool or lubricant | Where it fits | Important qualification |
|---|---|---|
| Compatible switch opener | Separating switch top and bottom housings | Choose an MX-style, Kailh-style or other opener that matches the switch family. |
| Fine detail brush | Spreading a controlled film on switch parts | A small size 0 or 00 brush makes it easier to avoid pooling. |
| Tweezers | Handling stems, springs, leaves and wires | Use clean, fine tips; do not bend the tactile leaf. |
| Stem holder or lubing station | Holding parts during batch work | Optional, but useful when doing many switches. |
| Krytox GPL 205 Grade 0 (205g0) | Commonly used on linear switch stems and housings; selected stabilizer applications | Use a thin coat. It is not automatically suitable for every tactile or clicky switch. |
| Krytox GPL 105 oil | Bag-lubing switch springs | This is a spring-specific oiling method, not a substitute for controlled stem grease. |
| Molykote EM-50L in a stabilizer set | Stabilizer wire and the wire area | Wooting’s product guidance says not to apply it to switch or stabilizer stems. |
Lubricant names describe viscosity and formulation, not a promise that a product works everywhere. Keep the container closed, prevent brush contamination between products and never use a brush loaded with spring oil on a stem.
Rank #2

- GPL 205G0- It can lubricate about 300 mechanical key switches
- PURPOSE- It suitable for lubricating mechanical keyboard switches, stabilizers, springs and other parts
- EFFECT-It can enhance the flexibility of the keyboard and improve your typing feel
- PACKAGE INCLUDES- A bottle of GPL 205g0, 2 pcs lubrication pen
- WARM TIPS- This products only includes a 205g0 switch lube and 2 pcs lubricating pens. These switch ,springs and switch opener in the picture are only for display and are not included in the product. If the product is missing or damaged, we wii send you replacement
How to lube mechanical keyboard switches
Work on a small batch first—one to five switches—so you can compare the result with an untouched switch before committing to the entire keyboard.
- Document the original feel. Press several keys and note scratchiness, spring noise, return speed and, for tactile switches, the location and strength of the bump. This gives you a reference when you reassemble.
- Remove the keycap and switch. Pull the keycap straight up. On a hot-swappable board, use a switch puller on the top and bottom tabs and pull vertically. On a soldered board, desoldering is required; do not pry the switch out of the plate.
- Open the housing with the matching opener. Hold the switch squarely, release all housing clips and keep the top housing, bottom housing, stem and spring together as one set. Mixing parts can change tolerances and sound.
- Inspect before brushing. Look for molding flash, bent leaves, damaged clips or debris. Remove loose debris with a dry, clean tool. Do not bend the tactile leaf to make it “fit.”
- Load only a trace amount on the brush. Touch the brush to the lubricant, then work most of it off on the inside of the container or a clean surface. The bristles should look coated, not wet or dripping.
- Lubricate the bottom housing. For a linear switch, brush a thin film along the stem rails and the bearing surfaces where the stem slides. Keep the film smooth and continuous rather than leaving blobs at the ends.
- Lubricate the stem selectively. Hold the stem with tweezers or a stem holder. On a linear switch, lightly coat the side rails and sliding faces. Keep the amount especially small around the pole and bottom-out surfaces; excess grease can slow return and make the switch feel muted or sticky.
- Place the spring and close the switch. Seat the spring centrally, orient the stem correctly and press the top housing down until every clip is engaged. If the housing does not close easily, stop and check stem orientation instead of forcing it.
- Test before continuing. Install the switch or press it in a test jig. Check that it returns promptly, registers consistently and has no new crunch, binding or metallic noise.
Linear switches: where 205g0 fits
Linear switches are the most forgiving place to start with 205g0. The objective is a barely visible film on the moving interfaces, not a thick coating. A brush that is too wet can push grease into the spring cavity, slow the stem and create a heavy, uneven key feel. If a switch feels sluggish after lubing, disassemble it, wipe away excess and reapply less.
Tactile switches: preserve the bump
Tactile switches require a different map of “safe” surfaces. You can lightly treat the stem’s sliding rails and the housing rails, but keep the tactile leaf and the stem’s front legs clear when you are trying to retain the original bump. Those front legs interact with the leaf to produce tactility; coating them can make the bump weaker or less defined.
Free tools Windows power users keep installed
One-click scans. No signup required.
Use the same brush-loading discipline as with a linear switch, then compare the lubed switch with an untouched one. If the bump is noticeably dulled, remove the switch grease from the contact area rather than adding more lubricant elsewhere. A tactile switch that is already smooth may need only minimal treatment, or none at all.
Rank #3

- GPL 205G0-This gpl 205g0 switch lube can be used to lubricate keyboard switches and stabilizers, which can effectively enhance your keyboard flexibility and allow you to enjoy a comfortable typing experience
- GPL 105-It can lubricate the spring of the mechanical keyboard,improve the flexibility of the switch, and bring you a nice percussion sound
- Purpose-This is the lubricating grease used for the switches and springs of mechanical keyboards to improve the flexibility of the switches and improve your typing feel. This will be a necessary product for you to build a keyboard
- Package Includes-1 bottle of 205g0, 1 bottle of 105, 2 lube pens
- Warm Tips-If the product is missing or damaged, don't worry, customer service will send you a new one
Bag-lubing switch springs with GPL 105
Springs are a separate lubrication target. Kinetic Labs’ spring guide identifies Krytox GPL 105 oil for bag-lubing, a batch method that coats many springs evenly without brushing each coil individually.
- Remove and count the springs. Keep the spring set for one switch model together. Do not mix different lengths or weights.
- Put the springs in a sealable bag. Use a clean bag with enough room for the springs to move. Add only a small amount of GPL 105 oil.
- Distribute the oil. Seal the bag and massage it until the springs have a light, even film. The goal is coverage, not a pool of oil at the bottom.
- Drain excess. Tip the springs onto a lint-free surface or paper and allow surplus oil to collect away from the parts. Wipe obvious droplets before installation.
- Reassemble and test a sample. A properly treated spring should reduce ping without making the switch slow or oily. If the switch feels damped or returns lazily, use less oil on the next batch.
Do not substitute spring oil for stem grease, and do not assume that a spring treatment fixes scratchy housing surfaces. Each part needs its own method.
How to lube stabilizers without creating sluggish keys
Stabilizers support long keys such as space, shift, enter and backspace. They have separate components: a central stabilizer stem or slider, a housing, and a metal wire that connects the two sides. Wire noise and stem friction are different problems, so they should not be treated as one surface.
Wire lubricant and stem lubricant are not interchangeable
Wooting’s product guidance for its stabilizer set assigns Molykote EM-50L to the stabilizer wire and the area where the wire sits. It explicitly says not to apply that product to switch or stabilizer stems. Follow the lubricant maker’s stated target rather than spreading one grease across every component.
Rank #4

- 【GPL-205-GD0】A blend of 105 and 205 grease in an 8:2 factory ratio. Features a perfluorinated base oil with a density of 2.06 g/ml (2-3 times denser than standard grease), viscosity of 522 cSt at 20°C and 160 cSt at 40°C, ensuring stable performance across diverse environments
- 【Suitable】Professionally formulated for mechanical keyboard switches and stabilizers
- 【Product Effect】Reduces friction on switch stems, rails, springs, and stabilizer surfaces. Delivers a smoother texture and more consistent lubrication than 205G0, effectively eliminating noise
- 【Using Upgrade】Upgraded lubrication experience with pre-filled syringes. Includes two interchangeable nozzle tips (varying sizes) for precise application, saving time and enhancing usability
- 【Packaging】GPL 205 GD0-10ML (sufficient for ~300 switches) with two replacement nozzles
Some builders use 205g0 for selected stabilizer stem or housing surfaces, but the amount must remain small enough for the stem to return freely. The wire channel and wire ends are where a thicker, wire-specific grease is normally useful for reducing rattle. Keep grease away from electrical contacts and from areas where it could migrate onto the switch.
Stabilizer servicing procedure
- Remove the keycap and inspect the symptom. Press each side and the center of the key. A rattle that changes when you hold the wire usually points to the wire or its seating; a stiff side often points to alignment or excess grease.
- Remove the stabilizer if accessible. Plate-mounted, PCB-mounted and screw-in designs release differently. Follow the design’s clip or screw arrangement and keep left and right parts oriented.
- Clean old contamination. Wipe away visible excess with a lint-free swab. Do not flood the assembly with a solvent you cannot verify is safe for its plastic.
- Apply wire grease sparingly. Put a small amount of the wire-specific grease on the wire ends, bends and the contact area inside each stabilizer housing. Work the wire through the housing to distribute it.
- Treat stem surfaces only with a compatible stem lubricant. If the stabilizer manufacturer or lubricant instructions permit 205g0 on the stem or housing, brush on a very thin film. Do not coat the entire cavity.
- Reinstall and align. Confirm both stems sit at the same height, the wire is fully seated and the stabilizer is parallel to the plate or PCB before tightening screws or snapping clips.
- Test the key from multiple positions. Press the left edge, center and right edge repeatedly. The key should return at every point without ticking, binding or scraping.
Over-lubing often disguises rattle briefly while making the key slow. If the key feels heavy after service, remove the stabilizer, wipe away excess and check alignment before applying anything else.
Independent reader supportYour contribution helps us test, update, and keep practical guides available for everyone.Reassembly and quality checks
After servicing, reinstall a few switches and keycaps rather than rebuilding the entire keyboard immediately. Compare serviced and untouched keys at the same typing speed and listen in a quiet room.
Quick wins for a faster PC:
Scan for outdated or missing drivers - takes under a minuteDriver Scan →Repair Windows errors before they cause bigger problemsFix Now →- Return speed: the stem should rise fully after every press.
- Consistency: neighboring switches of the same model should not have dramatically different resistance.
- Sound: spring ping and stabilizer tick should be reduced, not replaced by a wet or muffled noise.
- Tactility: a tactile bump should remain distinct if that was the goal.
- Electrical function: on a reinstalled hot-swap switch, verify that both pins are straight and seated before pressing hard.
There is no guaranteed result from a particular grease or quantity. The cited guides are practical how-to instructions, not controlled performance tests, so evaluate your own board and stop when the desired symptom is gone.
Troubleshooting common mistakes
| Symptom after lubing | Likely cause | Correction |
|---|---|---|
| Key returns slowly or stays down | Too much grease, oil migration or a misaligned stem | Open the switch, remove excess and verify stem and spring orientation. |
| Tactile bump is weak | Lubricant reached the tactile leaf or stem front legs | Clean the contact area and reapply only to permitted sliding surfaces, or leave it dry. |
| Scratchiness remains | Dry rail, debris, molding roughness or inconsistent application | Inspect the sliding faces, clean debris and add a trace film rather than a thick coat. |
| Spring ping continues | Spring was not treated, or the bag contained too little oil | Process springs separately with a light GPL 105 bag-lube treatment. |
| Stabilizer ticks on one side | Wire not fully seated, uneven housing height or insufficient wire-area grease | Re-align both sides and treat the wire contact area with the compatible wire lubricant. |
| Stabilizer feels sluggish | Excess grease on the stem or wire, or screws tightened unevenly | Remove surplus, check parallel alignment and retighten evenly. |
| Housing will not close | Stem is rotated incorrectly, spring is off-center or clips are mismatched | Separate the parts and reassemble without force; keep each switch’s original components together. |
A practical decision guide
- Choose 205g0 when you are treating compatible linear switch sliding surfaces and can apply a very thin film.
- Use a lighter, selective treatment on tactile switches, keeping the tactile leaf and front stem legs clear.
- Choose GPL 105 when your target is a batch of switch springs.
- Use a wire-specific stabilizer grease, such as the Molykote EM-50L application described by Wooting, on the wire and wire area—not on switch or stabilizer stems unless the manufacturer explicitly allows it.
- Buy or borrow a compatible opener, fine brush and tweezers before opening the board; a stem holder or lubing station is optional for larger batches.
Starting with a sample batch, measuring lubricant in brush-loads rather than drops and testing each assembly before scaling up prevents most permanent-feeling mistakes. Lubing is successful when the key is smoother and quieter while still returning quickly and retaining the switch characteristics you wanted to keep.
Quick Recap
Product prices and availability are accurate as of the date/time indicated and are subject to change. Any price and availability information displayed on Amazon at the time of purchase will apply.

