Fix a blurry VR view in this order: identify the exact headset, remove any lens film, clean the lenses with the supplied cloth, refit and stabilize the headset, then adjust IPD or the model’s fit-calibration screen. Check glasses clearance before tightening anything. If the image is sharp in the center but slightly soft only at the edges, that can be an intentional peripheral-vision effect on some PlayStation VR displays. Blur that remains across the central view after the model’s adjustments needs the manufacturer’s troubleshooting or repair support.
Do not assume every headset uses the same strap position, lens control, or calibration routine. The safe steps below separate model-specific instructions from general checks.
As an Amazon Associate I earn from qualifying purchases.
Start with the headset model
Write down the model name before changing settings. “VR headset” is not one standardized optical system: some headsets use a physical IPD wheel or slider, some provide software-guided eye-position checks, and the correct face position differs by design. Open the manufacturer’s support page for your model and use its labels for IPD, lens spacing, eye relief, scope position, or visibility calibration.
PC Slower Than It Used to Be?
A free scan shows the junk files, broken settings and background clutter dragging Windows down - then fixes them in one click.Free scan · Windows 10 & 11Outdated Drivers Are Slowing You Down
One free scan finds every outdated or missing driver and matches the right update for your exact hardware.Free scan · exact hardware matchThe sequence in this guide is deliberately conservative. It begins with reversible optical checks, continues through fit and alignment, and ends with support if the center image is still unclear.
#1 Best Overall

- Glasses cleaner - Sourced from the highest quality microfiber that absorbs and removes dust, oil, smudges, fingerprints, dirt, and more. Leaves no scratches, streaks, marks, or lint behind. The perfect eyeglass cleaner for reading glasses, women, men, adults, him, her, teens, and more.
- Screen cleaner: Our Microfiber cloth accommodates all your screen cleaning needs. It's the perfect eyeglass cleaning cloth, glasses wipes, glass cleaning cloth, lens cleaning cloth, screen cleaning cloth, and even tv cleaning cloth.
- Quality protection: Each MagicFiber lint free cloth comes in its own polybag so that they are always new and ready to use. Includes MagicFiber Microfiber Cleaning Cloth (5 black, 1 grey) 6 x 7 inches (15cm x 18 cm).
- Designed for all products: The delicate craftsmanship of our Microfiber Cleaning Cloth allows for the most versatile use cases. It can be used on any delicate surface such as LCD, OLED, laptop, phone, car, tablet, dvd, mirror, glass, glasses, cameras, lenses, gaming, toys and more!
- MagicFiber: Magical results for the things you care about most
1. Check the lenses before changing fit or software
Remove protective film
Look closely at both lenses under a bright, indirect light. New headsets can arrive with a transparent protective film. Remove it only by the pull tab or edge intended for that film; do not scrape the lens with a fingernail, card, or tool. HTC VIVE’s VIVE Pro 2 blurry-display guidance lists protective film as an initial check.
Clean with the supplied cloth and the approved method
Dust, fingerprints, and skin oil can create haze or glare that looks like a display fault. PlayStation instructs PS VR owners to use the supplied microfiber cloth, while VIVE specifies the cloth supplied with its headset. Follow the cleaning method in your model’s manual or support page: do not assume tap water, glass cleaner, alcohol wipes, paper towels, tissues, or a generic spray are safe for coated VR optics. Keep liquid away from the headset and never spray directly onto a lens.
Wipe gently in the direction and pattern the manufacturer specifies. Inspect again from the normal viewing distance. A scratch, coating mark, or persistent cloudy patch is a support issue rather than a reason to polish harder.
What’s actually slowing this PC down?
Pick the symptom - the matching free tool is one click away.
Check both lenses and the display area
- Confirm that both eyes show the same type of haze. Blur in one eye only can indicate a lens, fit, or vision-correction problem on that side.
- Look for a smudge, condensation, or debris near the lens edge.
- Check that no face gasket, cable, or accessory is pressing the headset out of alignment.
2. Refit the headset and make it stay put
Use the manufacturer’s wearing sequence
Loosen the top and rear straps before putting the headset on. Seat the face interface evenly, then tighten the rear strap and top strap in small increments. The display should remain in the same position when you turn your head, look up, or lean forward. If the sweet spot appears only when you hold the headset with your hands, the fit is not stable enough.
Rank #2
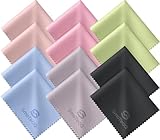
- Premium Ultra-Soft Microfiber: Effortlessly removes fingerprints, smudges, oil, and dust without scratching—leaving lenses and screens spotless and streak-free.
- Safe for All Glasses & Screens: Gentle on coated, polarized and blue-light lenses; perfect for phones, tablets, monitors, and camera optics.
- Individually Wrapped for Clean Storage: Each cloth is sealed in a protective PE sleeve—ideal for home, office, travel, or keeping inside your eyeglass case.
- Color-Coded Organization: Six colors (2× each) help you assign cloths to different devices, tasks, or family members—making everyday cleaning more hygienic, organized, and effortless.
- Durable, Washable & Reusable: With reinforced micro-weave, each cloth can be washed and reused hundreds of times without losing softness or cleaning power.
VIVE Pro 2 fit reference
For VIVE Pro 2, VIVE says the bottom edge should rest on the cheekbones and the standard strap should cup the back of the head. Its support page notes that wearing the headset too low can make the display appear blurry. This is VIVE Pro 2 guidance, not a universal rule for every headset; use your own model’s fit diagram when it differs.
Keep the headset level rather than tilting it to chase a sharp patch. A tilted headset can make one eye clearer than the other and can cause the image to change when you move.
Use eye relief or scope adjustment when provided
Some headsets let you move the visor or lens assembly closer to or farther from your eyes. Set the eye-relief or scope control to a comfortable position that keeps the lenses clear of your eyelashes and glasses. Do not force a mechanism past its stop. If the model has a face-position or visibility view, run it after the physical adjustment while wearing the headset normally.
3. Align the optical center with IPD
What IPD changes
Interpupillary distance (IPD) is the spacing between your pupils. The headset’s lenses have a central “sweet spot”; your pupils need to sit over it for the clearest image. VIVE’s Focus Vision support explains that IPD adjustment tunes this lens sweet spot and states: “Misaligned IPD and improperly adjusted headsets are common causes of blurry images, dizziness, and eye strain.” Read the statement in context on VIVE’s IPD adjustment page.
Rank #3

- 30-pack of ultra-soft cleaning cloths (29 grey and 1 white) made of high-quality tightly woven microfiber material
- Each cloth measures 6 x 7 inches (15cm by 18cm)
- Contain no harsh chemicals
- Lint-free and streak-free performance saw-tooth pattern edges prevent fraying, ensuring no coarse strings (won’t scratch surfaces)
- Machine washable and reusable
Use only the supported control
- Put the headset on in its normal, stable position.
- Find the model’s physical IPD wheel, dial, or slider, if it has one.
- Move the control slowly while looking at fine text or a high-contrast object in the center.
- Stop at the position where both eyes see a comfortable, equally sharp image; do not optimize one eye by making the other worse.
Some headsets display an IPD number; others provide only a visual adjustment. Treat the number as that headset’s setting, not as a universal prescription. Never push lenses sideways by hand unless the manufacturer explicitly says that is the adjustment method. VIVE’s instructions use the supported headset control rather than manual lens forcing.
Physical IPD versus software calibration
| Alignment method | What you do | When it applies | Main caution |
|---|---|---|---|
| Physical dial or slider | Turn or slide the built-in control while the headset is worn. | Models that provide mechanical lens spacing. | Move it gently; do not pry or push the lenses themselves. |
| Software visibility or eye-position check | Open the model’s fit or visibility calibration and follow its on-screen prompts while wearing the headset correctly. | Models that guide eye position digitally. | Run it again if you change strap tension, face position, or glasses. |
If your headset offers both, perform the physical adjustment first and then complete the software check. The exact menu name and screen order vary by model, so use the headset’s own instructions rather than a generic path.
4. Run the headset’s fit or visibility calibration
A calibration screen can reveal that your eyes are too high, low, close, or far from the lenses. Start it only after cleaning and fitting the headset. Keep your head in the position requested by the prompts; do not lift the visor or hold it away from your face to make the picture look better.
- Place the headset so the face interface is evenly supported.
- Tighten the strap enough that the visor does not slide.
- Open the model’s visibility, eye-position, or fit-calibration function.
- Adjust the headset or lens spacing until the display reports a clear, centered view.
- Save or confirm the setting, then look at text in the center and near the edges.
If a calibration repeatedly reports an eye-position or tracking problem, remove the headset and repeat the physical fit steps. Persistent warnings after a correct fit should be handled through the manufacturer’s support process for that model.
Rank #4

- Glasses cleaner - Sourced from the highest quality microfiber that absorbs and removes dust, oil, smudges, fingerprints, dirt, and more. Leaves no scratches, streaks, marks, or lint behind. The perfect eyeglass cleaner stocking stuffers for adults, men, women, him, her, teens, and more.
- Screen cleaner: Our Microfiber cloth accommodates all your screen cleaning needs. It's the perfect eyeglass cleaning cloth, glasses wipes, glass cleaning cloth, lens cleaning cloth, screen cleaning cloth, and even tv cleaning cloth.
- Quality protection: Each MagicFiber lint free cloth comes in its own polybag so that they are always new and ready to use. Includes MagicFiber Microfiber Cleaning Cloth (29 black, 1 grey) 6 x 7 inches (15cm x 18 cm).
- Designed for all products: The delicate craftsmanship of our Microfiber Cleaning Cloth allows for the most versatile use cases. It can be used on any delicate surface such as LCD, OLED, laptop, phone, car, tablet, dvd, mirror, glass, glasses, cameras, lenses, gaming, toys and more!
- MagicFiber: Magical results for the things you care about most
5. Fit glasses without letting them touch the lenses
Clearance is the safety requirement
Wear your glasses normally, then check that the frames do not contact the headset lenses when you move your head or adjust the visor. PlayStation warns that glasses touching PS VR lenses can damage the glasses or the headset lenses. Do not solve blur by pressing the headset tightly against your frames.
PS VR2 can be worn with glasses, but PlayStation notes that unusually wide or shaped frames may not fit. Its fitting instructions are at How to put on and adjust your PS VR2 headset. For the original PS VR, see the glasses and lens-contact warning in PlayStation VR Support.
Compare the available vision-correction approaches
| Approach | Advantages | Checks before use | Possible drawback |
|---|---|---|---|
| Glasses inside the headset | No change to your usual prescription routine. | Frames must fit the facial opening and stay clear of both headset lenses. | Wide or unusual frames may not fit; contact can damage either lens. |
| Contact lenses | No frame clearance issue inside the headset. | Use them only if they are suitable for your eyes and normal wear. | Comfort and dryness vary by wearer; they do not correct a headset fit problem. |
| Model-compatible prescription inserts | Can avoid wearing frames inside the headset. | Verify exact headset compatibility, prescription range, installation, and return terms. | Availability, price, and suitability vary; the sources here do not establish one insert as best. |
Whichever option you use, correct your vision first and then repeat IPD and fit calibration. A prescription change can alter the position at which the image looks sharp.
Do these 3 things before closing this tab:
1Clear out junk files and repair common Windows errors2Fix the driver behind crashes, sound loss and screen glitches3Repair Windows errors before they cause bigger problems6. Separate expected edge softness from a true blurry display
Peripheral edge blur on some PlayStation VR displays
PlayStation’s troubleshooting guidance says the edges of some PS VR screens may be a little blurred to mimic peripheral vision. It recommends moving your head to see those areas more clearly. Read the model-specific note in PlayStation VR troubleshooting.
Best Value

- 【PREMIUM MATERIALS】 – Made with 100% premium microfiber material, Zeefpod glasses cleaning cloths are designed to be ultra-soft, lint-free, and scratch-free.
- 【WIDELY USED】-Perfectly sized at 6x7 inches, Zeefpod microfiber cleaning cloths are ideal for all surfaces, including eyeglasses, camera lenses, phone screens, tablets, laptops, and TVs, delivering crystal-clear results every time.
- 【REUSABLE & WASHABLE】-Designed for repeated use, Zeefpod eyeglass cleaning cloths are washable and long-lasting, offering a sustainable cleaning option for environmentally conscious users.
- 【GREAT VALUE PACK】-Each pack includes 60 lens cleaning cloths, ensuring you’re always prepared for smudge-free screens and lenses at home, in the office, or on the go.
- 【LOGO-FREE for DIY and GIFTING】- Zeefpod eye glass clean cloths come without any branding, making them perfect for DIY, personal projects, or adding your own logo. They’re also an affordable and thoughtful gift for family, friends, and coworkers.
That behavior is not evidence that every VR headset is designed the same way. It also does not explain text or objects that remain blurry in the central view. To test, keep your head still and look at a high-contrast object in the middle; then turn your head toward an edge instead of rolling your eyes alone.
Signs the blur is not just an edge effect
- Central text is unreadable in both eyes after cleaning, refitting, and IPD adjustment.
- One eye remains much blurrier than the other with the headset level.
- The image changes sharply when the headset shifts by a few millimeters.
- You see a persistent cloudy patch, scratch, double image, or condensation.
- Dizziness or eye strain continues after the headset is correctly fitted and the IPD is aligned.
7. A model-specific troubleshooting sequence
VIVE Pro 2
- Remove any protective film.
- Clean both lenses with the cloth supplied with the headset, following VIVE’s method.
- Refit the headset so the bottom edge rests on the cheekbones and the strap cups the back of your head.
- Raise the headset if it has slipped too low.
- Adjust IPD with the supported control while viewing a central target.
- If the center remains blurry, follow the remaining steps on VIVE’s VIVE Pro 2 display troubleshooting page and contact VIVE support if its prescribed checks do not resolve the problem.
VIVE Focus Vision
- Wear the headset in a stable, level position.
- Use the headset’s IPD adjustment procedure rather than moving lenses by hand.
- Set the optical sweet spot for both eyes, not just the dominant eye.
- Repeat any available eye-position or visibility calibration after changing the strap or face position.
- Use VIVE’s Focus Vision IPD instructions if you need the exact control and sequence.
PS VR2
- Follow PlayStation’s wearing sequence so the headband and visor are seated correctly.
- Set the lens spacing and eye-relief position while wearing your usual glasses, if you use them.
- Run the headset’s visibility or eye-position check and keep the visor stable during the prompts.
- Confirm that your frames do not touch the lenses; unusually wide or shaped frames may not fit.
- Use the instructions at PlayStation’s PS VR2 adjustment page for the exact fit controls.
Original PS VR
- Remove protective material and clean with the supplied microfiber cloth.
- Refit the headset and adjust its position until the central image is clear.
- Keep glasses from touching the headset lenses.
- Interpret slight edge softness only in light of PlayStation’s documented peripheral-vision behavior; central blur still requires troubleshooting.
- Use PlayStation VR troubleshooting for the model’s calibration and position checks.
8. Use a symptom-to-action check
| What you see | Most useful next action |
|---|---|
| Everything is hazy immediately after unboxing. | Check for protective film, then clean with the supplied cloth. |
| The view sharpens when you hold the visor in one spot. | Adjust the straps, face interface, and scope position so the headset stays there by itself. |
| Both eyes are blurred and text looks doubled. | Recheck IPD or lens spacing, then run the model’s fit or visibility calibration. |
| Only one eye is consistently unclear. | Check that the headset is level, inspect that lens, and verify your glasses or contact-lens correction. |
| Only the outermost edges are soft on a PS VR display. | Turn your head toward the area; this can match PlayStation’s documented peripheral effect. |
| Your glasses touch the headset lenses. | Increase safe clearance using the model’s fitting adjustment; never force the visor against the frames. |
| The center remains blurry after every supported adjustment. | Stop repeated cleaning or mechanical adjustments and contact the manufacturer for diagnosis or repair guidance. |
9. When to contact support or request repair
Contact the manufacturer when central blur survives the complete sequence for your model: film removal, approved cleaning, stable fit, IPD or lens-spacing adjustment, calibration, and glasses-clearance checks. Include the model, purchase region, whether the blur affects one or both eyes, and whether it appears in the center, edges, or both. A short description of what changes when you move the headset helps support distinguish fit from an optical or hardware fault.
Do not disassemble the visor, remove lens coatings, or use abrasive cleaners while troubleshooting. Those actions can create damage that is not covered by normal support or warranty terms.
Quick Recap
Practical checklist before your next session
- Model identified and its own support instructions open.
- Protective film removed.
- Lenses cleaned only with the supplied or manufacturer-approved cloth and method.
- Headset level, comfortably tight, and stable during head movement.
- IPD or lens spacing adjusted for both eyes.
- Visibility or eye-position calibration completed when the model provides it.
- Glasses clear of the headset lenses, or an explicitly compatible correction method installed.
- Center image tested separately from the edges.
Product prices and availability are accurate as of the date/time indicated and are subject to change. Any price and availability information displayed on Amazon at the time of purchase will apply.

