Windows Errors? Fix Them Before They Spread
Repair common Windows errors and clear accumulated junk for a smoother, more stable PC - no reinstall needed.Free scan · no reinstallOutdated Drivers Are Slowing You Down
One free scan finds every outdated or missing driver and matches the right update for your exact hardware.Free scan · exact hardware matchThe safest way to fit or remove a Nintendo Switch 2 case is to use the instructions for that exact case, work with a clean console and case interior, and never force, slide, or pry hard material across the display. Nintendo does not publish one universal installation or removal sequence for every third-party snap-on shell. A travel carrying case is a different product: it holds the console rather than attaching around it.
First identify what “case” means
Scratch-prevention advice depends on the product type. Before touching the console, determine whether you have an attached shell or a travel carrying case.
As an Amazon Associate I earn from qualifying purchases.
| Product type | How it is used | What the official descriptions establish | What is not established |
|---|---|---|---|
| Attached protective shell | Fits around some or all of the console and normally remains attached during play. | Use the installation and removal instructions supplied by the shell manufacturer. Confirm that the listing explicitly supports Nintendo Switch 2. | Nintendo’s cited support pages do not provide a universal snap-on shell sequence, so a particular corner, edge, latch or removal direction cannot be assumed. |
| Travel carrying case | The console is placed inside a separate case for transport and storage. | Nintendo’s carrying-case instructions say to store the console with Joy-Con 2 controllers attached. A Nintendo carrying case is listed with a screen protector and cloth; a licensed PowerA listing describes a molded interior and padded screen flap. | A travel case is not an attached shell, and its placement method must not be used as a shell-removal method. |
If the packaging, manual or product page does not clearly identify the exact Switch 2 model, stop and verify compatibility before fitting it. A case made for an earlier console can obstruct controls, ports, vents or the screen even when it appears to fit.
What’s actually slowing this PC down?
Pick the symptom - the matching free tool is one click away.
Why careful handling matters
Nintendo’s Health & Safety Precautions: Nintendo Switch 2 warns: “The screen may be damaged by sharp objects or pressure. Take care to protect the display from scratches or stains.” That warning applies while you are installing, removing, cleaning or transporting accessories.
#1 Best Overall

- Travel case
- Protection Library holds 12 game cards and offers full screen and analog stick protection
- microSD Card Case 2pcs, each holds 2 microSD Cards
- Comfortable carrying handle and soft cleaning cloth
Fine grit is a particular concern because a particle trapped between a shell and the console can act like an abrasive when the parts move against each other. The practical response is simple: inspect both surfaces under good light, remove loose dust with an appropriate soft cloth, and do not slide a dirty or rigid surface across the display. These are cautious handling measures, not a claim that any particular shell prevents scratches.
Nintendo also states that its carrying case and screen protector “cannot completely prevent scratches or other damage that may occur to the touch screen.” Treat any protection as risk reduction, not a guarantee.
Prepare a clean, low-risk workspace
Preparation is the part of the process that applies regardless of the case brand. Set up the work before you bring the shell or console together.
Rank #2

- NINTENDO CASE - SWITCH 2 COMPATIBLE: Our premium Nintendo Switch case is custom fit for your Switch 2, shielding your console with anti scratch velvet lining and shock absorbing materials—perfect for daily storage, commutes, or long travel days
- TRAVEL READY DESIGN: This compact portable Nintendo Switch 2 carrying case fits easily in a backpack or carry-on or can simply be carried by itself with a wristlet handle for secure handling without risk of drops—great for on-the-go everyday players
- CONVENIENT GAME & AIRTAG STORAGE: Whether at school, traveling or on the go, you can organize up to 12 game cards in a dedicated slot system and track your Case for Nintendo Switch 2 accessories using a hidden AirTag compartment, so it's never lost
- DURABLE & STYLISH: Crafted with an abrasion- and water-resistant polyester exterior and brushed velvet interior lining, plus hidden, no-snag zippers, this Nintendo Switch 2 travel case protector resists wear and tear for lasting device protection
- SUSTAINABLY MADE + 2-YEAR COVERAGE: This durable Belkin Switch 2 Case comes in 100% plastic-free packaging. Plus, you can purchase the Nintendo Switch carrying case with peace of mind knowing that it comes with 2-year coverage
- Choose a clean, flat, well-lit surface. Keep coins, keys, tools and other hard objects away from the display.
- Wash and dry your hands so fingerprints and grit are not transferred to the screen or case lining.
- Power the console down if the case manufacturer instructs you to do so; otherwise follow that manufacturer’s stated handling procedure. Do not invent a button sequence from another model.
- Remove loose dust and fingerprints from the screen and the case interior with the cloth supplied for that product or another clean, suitable soft cloth. Do not use a sharp object to lift debris.
- Read the entire case manual before starting. Look for diagrams showing orientation, latches, hinges, controller clearance, port openings and the approved removal order.
- Check for damage. A cracked shell, distorted latch, rough seam or detached lining should not be forced onto the console.
Place the console face-up only when the surface beneath it is clean and padded enough to avoid pressure points. Keep the screen visible so you can see whether a particle or misalignment is developing.
How to fit an attached Switch 2 shell safely
There is no verified, brand-independent snap-on sequence for Nintendo Switch 2 shells. Use the following as a safety framework around the exact procedure supplied with your shell, not as a substitute for that procedure.
- Confirm the model and orientation. Match the shell’s labels, diagrams and cut-outs to Nintendo Switch 2. Identify which section is intended for the front, back, controls, cameras, vents, ports and Joy-Con 2 rails.
- Inspect both mating surfaces. Hold the shell so its interior can be examined. Remove visible dust or grit with a soft cloth. Check that no protective film, packaging tab or loose trim is trapped inside.
- Follow the manufacturer’s stated starting point. Some products use hinges, separate sections or latches; others may have a different order. Start only where the supplied instructions say to start. Do not choose a corner because it seems convenient.
- Align without sliding. Bring the shell and console together slowly, keeping the surfaces as parallel as the design allows. Avoid dragging a hard rim across the screen. If a cut-out does not line up, lift the shell away and realign rather than pushing it sideways.
- Seat each retention feature gently. Apply only the light pressure described in the instructions. A latch that will not close, a seam that remains open or a button that becomes restricted indicates misalignment, incompatibility or debris. Stop and inspect instead of increasing force.
- Check operation before carrying the console. Verify that the screen is unobstructed, Joy-Con 2 controllers attach and detach as the product instructions allow, buttons and sticks move freely, vents are not covered and required ports remain accessible. Remove the shell if any control is held down or any opening is blocked.
Do not use a knife, screwdriver, card, key or other hard implement to force a shell into place. Nintendo’s warning about sharp objects and pressure is directly relevant to this situation. If the shell needs unusual force, contact the manufacturer or retailer with the exact model number rather than improvising.
Rank #3

- Hard shell case protects & is compatible with Nintendo Switch 2, Nintendo Switch OLED, Nintendo Switch system
- Protection Library holds 12 game cards and offers full screen and analog stick protection
- MicroSD Card Case 2pcs, each holds 2 microSD Cards
- Comfortable carrying handle
How to remove an attached shell without scraping the console
Removal is often riskier than fitting because people are tempted to pry at an unspecified corner. The cited Nintendo material does not authorize a universal corner, edge or tool, so use the shell’s own removal diagram. The safe sequence below limits movement while you follow that product-specific method.
- Clear the work area. Put the console on a clean, stable surface and move hard objects out of reach. Wash and dry your hands.
- Read the removal instructions again. Identify every latch, hinge or release point. If the shell uses separate pieces, learn which piece must be removed first. Do not pull on a section that the instructions identify as fixed.
- Support the console. Hold the console by its solid frame as directed by the manufacturer, keeping fingers away from the display and controls that could be pressed accidentally.
- Release only the specified retention points. Use your fingers unless the supplied instructions explicitly provide another approved method. Release one feature at a time; do not twist the entire shell to make a latch let go.
- Lift away rather than dragging. Once the retention points are released, separate the shell in the direction shown by its manual. Keep the shell from rubbing across the screen. If it resists, stop: a remaining latch, trapped debris or incorrect order is more likely than a need for extra force.
- Inspect immediately. Check the screen, frame, rails and shell interior for grit, scuffing, displaced pads or broken clips. Clean loose debris before storing either piece.
Never insert a sharp object into the seam unless the manufacturer specifically supplies and approves that tool and procedure. Nintendo’s guidance is to protect the display from sharp objects and pressure; a generic prying technique would conflict with that precaution.
Putting the console into a travel carrying case
A travel case surrounds the console for transport; it does not snap onto the console. Follow the instructions for that case’s molded interior, straps, flap and storage compartments. Nintendo’s carrying-case instructions specifically say to store the console with Joy-Con 2 controllers attached, so do not detach them merely because a different accessory uses another arrangement.
Rank #4

- Hard and High Quality: Designed to make your new Switch 2 Console even more portable & travel friendly. High quality hard shell case protects Switch from drops and scratches. Not for the switch 1st 2017 and switch oled model.
- Perfect carry case for keeping your Switch 2 securely stored when travelling or when not in use.
- Hard EVA shell keeps your device protected while the soft inner material keeps your device free from scratches.
- Large Storage: A mesh pocket provides secure storage room for some small accessories like charging cable, ear buds, and 2 extra JoyCons.
- Compatibe with Nintendo Switch 2 console with both its Joy-Con controllers attached to it, and the upper section features a separate inner pocket which can fit extra JoyCons, Cables, Games, and other smaller but essential accessories. (Please note this cannot accommodate larger items like the dock or pro-controllers)
Before closing the case, confirm that the console is seated in the intended recess and that no game card, cable, cloth edge or other object lies on the display. Close the padded flap or lid without pressing down on the screen. If the case cannot close normally, remove the console and check the orientation and contents rather than compressing it.
Nintendo lists a Switch 2 carrying case with a screen protector and cloth. A licensed PowerA listing describes a soft lining, molded interior, padded screen flap and game-card storage. Those descriptions identify storage features; they do not establish a snap-on shell’s fitting or removal method, and they do not prove that either product is scratch-proof.
Quick wins for a faster PC:
Fix the driver behind crashes, sound loss and screen glitchesFind Drivers →Clear out junk files and repair common Windows errorsFree Scan →Applying the included screen protector
Nintendo’s official screen-protector procedure is separate from case installation. Use it when your carrying-case package includes the protector, or when its instructions identify the same product.
Best Value
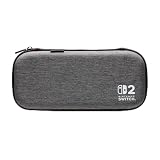
- Structured Protection: Molded interior with soft fabric lining
- Game Storage: Securely holds up to 10 game cards*
- Integrated Play Stand: unfold the convenient play stand and enjoy tabletop mode with ease
- Padded Screen Protector: The play stand doubles as a padded screen protector when the system is inside the case
- Compatibility: Compatible with Nintendo Switch 2
- Use the included cloth to remove fingerprints, dust and dirt from the screen.
- Peel the backing from the screen protector without touching the adhesive surface.
- Align the protector with the screen frame. Check the position before allowing the adhesive to make full contact.
- Apply it carefully while gently pushing air bubbles outward with the cloth.
- Remove the top film, then gently wipe the surface to finish.
If the protector is misaligned, Nintendo says to place tape at a corner and slowly peel it off before starting again. Do not lift it with a blade or other sharp object. A screen protector can reduce contact with the display, but Nintendo says these products cannot completely prevent scratches or other touch-screen damage.
Symptoms that mean you should stop
| What you notice | Likely concern | Safe response |
|---|---|---|
| The shell will not close or a seam remains open. | Misalignment, incompatible model, trapped debris or an unreleased latch. | Stop, remove the shell using its stated method, inspect the interior and verify Switch 2 compatibility. Do not increase pressure. |
| A button, stick, rail or port feels restricted. | The case is obstructing a control or opening. | Remove it and consult the exact product instructions. Do not continue playing with a restricted control. |
| You see dust between the shell and console. | Movement may rub the particle against the finish or display. | Remove the shell carefully, clean both surfaces with a suitable soft cloth and refit only after the debris is gone. |
| The shell requires a tool or unusual force. | The product may be damaged, incorrectly fitted or designed for another model. | Do not pry. Contact the manufacturer or seller with the model number and request the approved procedure. |
| The case lid presses on the screen. | The console may be incorrectly seated or the case may be overloaded. | Open it, remove loose items and reseat the console according to the carrying-case instructions. |
How to choose protection without confusing product types
- Choose an attached shell when you need protection that remains on the console during play, but verify the exact Switch 2 fit and retain the manufacturer’s removal instructions.
- Choose a travel carrying case when your priority is transport and storage. Confirm the interior shape, lining, flap and storage capacity, and follow its instructions for Joy-Con 2 placement.
- Add a screen protector only after confirming its Switch 2 compatibility and following the separate application steps. Alignment and dust control matter as much as the product itself.
Official listings may state compatibility, molded or lined interiors, screen coverage, storage and an included protector. They do not make all case types interchangeable. Treat each listing’s features as product-specific and do not infer how an attached shell releases from how a travel case opens.
What the available guidance does—and does not—prove
Nintendo’s safety statement supports avoiding sharp objects, pressure, scratches and stains. Its screen-protector instructions support a cleaning, alignment and bubble-removal process for that protector. Its carrying-case instructions support storing the console with Joy-Con 2 attached in that product. None of those documents establishes a universal installation or removal sequence for every third-party snap-on shell.
Free tools Windows power users keep installed
One-click scans. No signup required.
No numeric rate of scratches caused by fitting or removing Switch 2 cases has been established in the cited official materials. Avoid claims that a certain shell eliminates scratches or that a particular removal technique has a measured success rate. The reliable outcome is procedural: keep both surfaces clean, follow the exact product instructions, stop when resistance appears and never trade alignment for force.
Quick Recap
Product prices and availability are accurate as of the date/time indicated and are subject to change. Any price and availability information displayed on Amazon at the time of purchase will apply.

