Free tools Windows power users keep installed
One-click scans. No signup required.
XMP and EXPO are stored memory profiles that set a module’s advertised speed, timings and voltage. Enabling one is a memory overclock, not a guarantee that every CPU, motherboard and kit will run those values reliably. Before changing anything, identify the exact CPU, motherboard model, BIOS version and memory-kit part number, then check the board manual and Qualified Vendor List (QVL).
Use the documented UEFI/BIOS option for your platform, save once, and verify the reported speed after Windows starts. If the computer does not complete POST, stop forcing restarts: use the motherboard’s power-flush and Clear CMOS procedure, then test compatibility, seating and individual DIMMs methodically.
As an Amazon Associate I earn from qualifying purchases.
What XMP and EXPO actually change
A memory module contains baseline JEDEC settings and may also contain one or more higher-performance profiles. A profile is a bundle of values rather than a single speed switch.
Quick wins for a faster PC:
Repair Windows errors before they cause bigger problemsFix Now →Fix the driver behind crashes, sound loss and screen glitchesFind Drivers →- Speed: the data rate the memory is intended to use.
- Timings: latency parameters stored with the profile.
- Voltage: the profile’s requested memory voltage.
Intel describes XMP as preset combinations of speed, timing and voltage and explicitly classifies enabling it as memory overclocking. See Intel’s XMP guidance. AMD describes EXPO as DDR5 memory overclocking for Ryzen processors on socket AM5; its overview is available at AMD’s EXPO page.
#1 Best Overall

- Boosts System Performance: 32GB DDR5 RAM laptop memory kit (2x16GB) that operates at 5600MHz, 5200MHz, or 4800MHz to improve multitasking and system responsiveness for smoother performance
- Accelerated gaming performance: Every millisecond gained in fast-paced gameplay counts—power through heavy workloads and benefit from versatile downclocking and higher frame rates
- Optimized DDR5 compatibility: Best for 12th Gen Intel Core and AMD Ryzen 7000 Series processors — Intel XMP 3.0 and AMD EXPO also supported on the same RAM module
- Trusted Micron Quality: Backed by 42 years of memory expertise, this DDR5 RAM is rigorously tested at both component and module levels, ensuring top performance and reliability
- ECC Type = Non-ECC, Form Factor = SODIMM, Pin Count = 262-Pin, PC Speed = PC5-44800, Voltage = 1.1V, Rank And Configuration = 1Rx8
The profile is stored on the DIMM, but the CPU’s memory controller, motherboard trace layout, firmware and the number of installed modules all affect whether it works. A kit advertised as DDR5-6000, for example, does not make 6000 MT/s a universal operating guarantee.
Intel’s XMP FAQ states: “Intel XMP memory modules will first boot with the default JEDEC settings. This ensures the first boot is successful even if the system does not support overclocking.”
That fallback applies to Intel’s documented XMP behavior; it should not be interpreted as a promise that every board will recover automatically after any failed setting.
Profile names you may see
| Label | Where it is used | What to expect |
|---|---|---|
| XMP | Intel-compatible memory and motherboards that expose Intel profiles | One or more stored speed, timing and voltage combinations; board support is required. |
| EXPO | DDR5 systems based on AMD Ryzen socket AM5 | AMD’s memory-overclocking profile format; CPU, firmware and board compatibility still determine stability. |
| A-XMP, DOCP or a vendor equivalent | Some motherboard firmware interfaces | An alternate menu name for loading a stored profile. The exact label depends on the board and BIOS version. |
Check compatibility before opening the BIOS
Do this preparation while the computer still boots at its current settings. Write down the current memory speed and whether a profile is already selected. Keep a copy of important work elsewhere before making firmware changes.
Identify the four parts that matter
- CPU model: record the exact processor, not just the family name. Its integrated memory controller and supported memory generation define part of the limit.
- Motherboard model and revision: a board name can cover several revisions with different firmware. Use the label on the board, the manual or the system-information page.
- BIOS/UEFI version: note the version currently installed. Firmware can change profile availability and memory compatibility.
- Memory kit: record the complete part number, capacity, number of DIMMs and the kit’s stated speed, timings and voltage. Modules sold as one matched kit are preferable to mixing separate packages.
Download firmware only from the computer or motherboard maker and follow its update instructions. If you use a laptop or an OEM desktop, Intel advises contacting the system maker for XMP compatibility rather than assuming that a retail-board procedure applies.
Use the board’s QVL and slot guidance
AMD’s memory troubleshooting guidance recommends checking the motherboard QVL, using a matched kit and placing modules in the slots specified by the board manual. The QVL is evidence that a particular part number was tested on that board; absence from the list does not prove incompatibility, but it removes that documented reference point. Read AMD’s memory troubleshooting guidance alongside your manual.
Do not move modules to arbitrary sockets because the profile fails. Two-DIMM boards commonly have a preferred pair, while four-slot boards may require specific sockets for two modules. Follow the diagram printed in the manual and make sure each latch is fully closed.
What’s actually slowing this PC down?
Pick the symptom - the matching free tool is one click away.
Compatibility questions to answer
| Question | Why it matters | Where to confirm it |
|---|---|---|
| Does the CPU support the memory generation and intended profile? | The memory controller is part of the CPU platform; a board cannot guarantee a profile its processor cannot train. | CPU documentation and motherboard CPU-support list. |
| Does the motherboard firmware expose XMP, EXPO or an equivalent? | Profile names and available options vary by model and BIOS version. | Board manual and current BIOS release notes. |
| Is the exact kit on the QVL? | It provides a model-specific validation reference. | Motherboard maker’s QVL, searched by the full kit part number. |
| Are the DIMMs installed in the recommended sockets? | Socket order affects signal integrity and training. | Installation diagram in the board manual. |
| Are all modules from one matched kit? | Different kits can contain different chips and stored timings even when their labels look similar. | Purchase packaging and module labels. |
How to enable XMP or EXPO safely in UEFI/BIOS
Menu names, locations and behavior differ between boards. The following sequence is deliberately model-neutral; use the exact key and labels in your manual. ASUS’s memory FAQ, for example, notes that choices vary by model and BIOS version and shows how to verify the result in firmware or Windows; see the ASUS setup instructions.
Rank #2
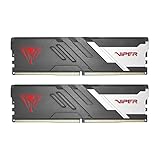
- Capacity: 32GB (2 x 16GB) 6000MHz
- Tested Timings: 30-40-40-76
- Feature Overclock: XMP 3.0 / EXPO overclocking supported
- Compatibility: Tested across latest DDR5 platforms for reliability on high performance
- Limited lifetime warranty
1. Enter firmware with the documented key
Restart and press the key specified by the board maker, commonly a function key or Delete, until the UEFI/BIOS screen appears. If the machine uses a fast-boot mode, the manual may provide a Windows recovery path into UEFI instead. Do not guess at hidden overclocking menus when the manual identifies a different location.
2. Find the memory or overclocking section
Look for a page labelled memory settings, overclocking, tweaker or an equivalent. Some firmware has an easy mode with a profile selector; others require an advanced view. Select the setting that corresponds to your platform:
- On an Intel system, choose the available XMP profile that matches the kit.
- On an AMD socket-AM5 DDR5 system, choose the available EXPO profile that matches the kit.
- If the firmware calls it A-XMP, DOCP or another vendor-specific name, confirm in the manual that it loads the DIMM’s stored profile rather than creating unrelated manual values.
If no profile is listed, do not substitute random frequency, timing or voltage numbers. The board may not support that profile, the firmware may need an update, or the installed memory may not contain one.
The Tool Desk
Outbyte PC Repair FREEClear out junk files and repair common Windows errorsFree Scan →Outbyte Driver Updater FREEScan for outdated or missing drivers - takes under a minuteDriver Scan →3. Select one profile and inspect the summary
Choose the profile whose stated speed, timings and voltage correspond to the kit label and board documentation. Read the change summary before accepting it. Leave unrelated CPU multipliers and voltage controls unchanged. Timing changes can make a system unstable or unbootable, so do not combine a profile change with several manual adjustments on the same restart.
4. Save once and allow the normal restart
Use the firmware’s Save and Exit command. The board may restart more than once while it trains memory. Official guidance does not establish one safe waiting period for every model, so use the recovery opportunity and indicators described in your manual rather than a universal timer. Do not repeatedly cut power during a normal training cycle.
How to verify that the profile applied
After the operating system starts, verify the reported memory speed instead of relying only on a successful POST.
- Re-enter UEFI/BIOS and read the memory information page or easy-mode summary.
- In Windows, open Task Manager, choose Performance, then Memory, and read the reported speed. ASUS documents both this Windows check and the corresponding BIOS check in its FAQ.
- Confirm that the capacity and number of installed modules are still correct.
Use the computer normally while watching for application errors, blue screens, freezes or unexpected restarts. A successful boot is not proof of long-term stability, and the cited official sources do not prescribe one mandatory stress-test program or duration. If instability appears, return to firmware, disable the profile or load the board’s default settings, save and restart.
What to do if the PC will not POST after enabling the profile
Separate a documented memory-training restart from a persistent no-POST condition. If the board’s status indicators show that it is still training, follow the manual’s recovery opportunity. If it never reaches a successful POST, stop experimenting with the profile and restore defaults.
Rank #3

- Boosts System Performance: 32GB DDR5 overclocking desktop memory RAM kit (2x16GB) that operates at 6000MHz to improve gaming, multitasking and system responsiveness for smoother performance
- Accelerated gaming performance: Every millisecond gained in fast-paced gameplay counts—benefit from lower latency for higher frame rates, perfect for AAA games
- Optimized DDR5 compatibility: Compatible 13th gen intel core CPUs or newer AMD Ryzen 9000 series CPus
- Trusted Micron Quality: Backed by 42 years of memory expertise, this DDR5 RAM is rigorously tested at both component and module levels, ensuring top performance and reliability
- Top-Tier Overclocking: 32GB of DDR5 RAM 32GB, 6000MHz at extended timings of 36-38-38-80 provide stable overclocking performance and lower latency compared to usual Crucial Pro Series DRAM modules
Step 1: Perform a safe power flush
AMD’s generic procedure is:
- Turn the computer off.
- Unplug all external power cables.
- Hold the chassis power button for 20 seconds.
- Reconnect the cables and try to start the system.
This removes residual power; it does not replace the motherboard’s Clear CMOS procedure.
Step 2: Clear CMOS exactly as the manual specifies
AMD says a recent BIOS change may be corrupt and recommends a power flush or clearing CMOS to restore BIOS settings. Its boot-failure article is at AMD’s troubleshooting guidance.
Use the board’s documented Clear CMOS button, jumper or other method. Some boards require the power supply to be disconnected first; others provide a rear-panel button. Do not short random pins, and do not treat removing the coin-cell battery as a universal method. The correct location, sequence and waiting instructions are model-specific.
Step 3: Confirm that defaults boot
After a successful reset, enter UEFI/BIOS and make sure the XMP, EXPO or equivalent option is disabled or set to defaults. Save and boot once at baseline settings. If the system now starts, the profile change—not necessarily a damaged component—was the immediate trigger.
If clearing CMOS does not restore boot
Work through the hardware and firmware checks in a fixed order instead of changing several variables at once.
- Check CPU and BIOS support: verify that the installed processor is supported by the current BIOS. If the board requires a firmware update, use only the maker’s documented procedure.
- Reseat the DIMMs: turn the system off, disconnect power and reseat each module. Confirm that both latches engage.
- Use the recommended sockets: consult the board diagram and move the modules only as that diagram directs.
- Test one module at a time: try a single DIMM in the primary recommended slot, then test the other module and other documented slots if necessary. This separates a bad module from a slot, seating or training problem.
- Use recovery firmware features only when supported: a backup BIOS or USB BIOS Flashback can help on boards that provide it, but follow that board’s instructions exactly. These features are not universal.
AMD’s full boot-troubleshooting article covers supported CPU/BIOS combinations, memory placement and one-DIMM testing. If the machine still cannot POST at defaults after those checks, seek the board or system maker’s support rather than repeatedly forcing power cycles.
Independent reader supportYour contribution helps us test, update, and keep practical guides available for everyone.When the computer boots but the profile is unstable
Symptoms such as crashes, freezes, corrupted files or intermittent application errors after a successful POST indicate that the selected settings are not reliable for the current combination. Return to UEFI/BIOS and disable XMP, EXPO or the equivalent, then save and confirm that the system is stable at defaults.
Only retry after rechecking the QVL, kit part number, DIMM slots, CPU support and BIOS version. If the firmware offers a lower or alternate stored profile, use it only when the manual identifies it as supported for the installed kit. Do not compensate by manually raising voltage or changing timings unless you understand the board’s documented controls and accept that this is a separate overclocking experiment.
Rank #4

- Elevated performance for gamers & creators: 128GB kit DDR5 for enhanced productivity—accelerate demanding tasks and enjoy higher frame rates with this high-speed RAM
- Enhanced PC performance: Crucial Pro RAM 128GB kit with 2x64GB DDR5 operating at the speed of 5600MHz with 5200MHz or 4800MHz downclock support
- Top-tier RAM capacity: 128GB DDR5 RAM kit (2x64GB) compatible with latest Intel Core Ultra Series 2 & 14th Gen Core CPUs and AMD Ryzen 9000 Series desktop CPUs and above
- Low-profile, matte black heat spreader: Enhance your gaming rig with a sleek, modern look. With our integrated low-profile heat spreader, Crucial DDR5 Pro can even fit in smaller PCs
- Supports Intel XMP 3.0 and AMD EXPO on the same module: Achieve easy performance recovery on CPUs that suppress rated memory speeds with Intel XMP 3.0 or AMD EXPO turned on in the UEFI/BIOS settings. Get the full value of your investment without overpaying for performance
Platform-specific points that are easy to miss
Intel systems
XMP compatibility depends on both the motherboard and the certified memory. Intel’s guidance treats XMP as overclocking and documents the JEDEC first-boot behavior quoted above. Retail desktop procedures do not automatically apply to laptops or OEM desktops; contact the system manufacturer for those machines.
AMD Ryzen socket AM5 systems
EXPO is specifically described for DDR5 on Ryzen socket AM5. Check the board QVL, use a matched kit and follow the board’s slot order. The presence of an EXPO label on a kit does not remove the need to verify CPU, firmware and motherboard support.
Different firmware labels
A board may expose the same stored information under XMP, EXPO, A-XMP, DOCP or a vendor-specific equivalent. Treat the manual as authoritative for the exact label and menu path; a tutorial for another model can point to a setting that does not exist or behaves differently on yours.
Do these 3 things before closing this tab:
1Repair Windows errors before they cause bigger problems2Fix the driver behind crashes, sound loss and screen glitches3Clear out junk files and repair common Windows errorsWhat performance improvement should you expect?
There is no broadly applicable official statistic for XMP or EXPO failure rates or performance gains. Results depend on the application, CPU, graphics workload, memory configuration and whether the system was previously running at a lower baseline.
AMD’s EXPO page includes a vendor performance-lab configuration dated March 2026: a Ryzen 7 9700X, 32 GB of DDR5-6000, an X870E motherboard, Windows 11 Pro and a GeForce RTX 5090, with comparisons involving AMD’s Ultra Low Latency memory. That is a controlled, vendor-specific setup, not evidence of a universal benefit for every Ryzen system or every game.
How to evaluate a replacement memory kit
Buying new memory is not required to follow this guide. If your current kit lacks a suitable profile or is incompatible, use these criteria before choosing another:
| Criterion | What to match |
|---|---|
| Platform | CPU family, motherboard socket and supported memory generation. |
| Profile type | XMP for the intended Intel platform or EXPO for a supported Ryzen socket-AM5 DDR5 platform. |
| QVL status | The exact kit part number, not merely the brand or capacity. |
| Capacity and DIMM count | Total capacity and the number of modules recommended by the board. |
| Rated settings | Advertised speed, timings and voltage, checked against the board’s documented limits. |
After purchase, install the modules in the board’s specified sockets, boot once at defaults, and then follow the profile procedure above. A profile is one part of compatibility; it cannot override a CPU, firmware or motherboard limitation.
Recommended Free Tools
Quick Recap
Quick recovery decision tree
- System boots and the reported speed matches: keep monitoring for errors or crashes during normal use.
- System boots but the old speed remains: re-enter firmware, confirm that the profile was saved, and check whether the board actually supports that profile.
- System restarts during training but eventually POSTs: follow the board’s documented training behavior and verify the resulting settings.
- No POST after the documented recovery opportunity: power off, perform the 20-second power flush, then use the exact Clear CMOS method.
- No POST at defaults: check CPU/BIOS support, reseat memory, use recommended slots and test one DIMM at a time; use backup BIOS or USB BIOS Flashback only if the board supports it.
- Instability after a successful boot: disable the profile and return to defaults before investigating compatibility again.
Product prices and availability are accurate as of the date/time indicated and are subject to change. Any price and availability information displayed on Amazon at the time of purchase will apply.

