What’s actually slowing this PC down?
Pick the symptom - the matching free tool is one click away.
Connect an analog preamp or line output from the source to a matching line input on the power amplifier, then connect the amplifier’s speaker terminals to passive speakers. Use RCA or balanced XLR only when the same connector type is available and compatible at both ends. Turn everything off before wiring, and verify how a streamer controls volume before using it as the only source control.
Understand the signal path before plugging in cables
A separate power-amplifier system has three functional stages:
As an Amazon Associate I earn from qualifying purchases.
- Source or preamp: supplies an analog, line-level signal. A streamer can fill this role only if its output is an appropriate analog output and its volume behavior is suitable for your system.
- Power amplifier: raises that signal to speaker-driving power. Its RCA or XLR sockets are inputs for the low-level signal from the source.
- Passive speakers: receive amplified output through the power amplifier’s speaker terminals.
The correct order is therefore source preamp/line output → power-amplifier input → passive-speaker terminals. A digital-only output from a streamer is not the analog connection described here; it needs a suitable DAC or a preamp/DAC component between the streamer and amplifier.
The Tool Desk
Outbyte Driver Updater FREEScan for outdated or missing drivers - takes under a minuteDriver Scan →Outbyte PC Repair FREERepair Windows errors before they cause bigger problemsFix Now →Check compatibility on both rear panels
Identify a real analog output on the source
Look for labels such as PRE OUT, LINE OUT or an analog left/right output on the preamp or streamer. Read the manual if the label is unclear. A socket intended only for digital audio cannot be connected directly to an analog amplifier input with a passive cable.
#1 Best Overall

- IN THE BOX: (1) 4 foot 2-Male to 2-Male RCA audio stereo subwoofer cable
- CRYSTAL CLEAR AUDIO: Enhances audio connections; ideal for home-entertainment and high-fidelity (HiFi) systems
- RCA INPUT/OUTPUT: 2 RCA output (connect to either L or R input) and 2 RCA input; input can be high frequency (digital audio) or low frequency (subwoofer)
- GOLD PLATED CONNECTORS: Corrosion-resistant 24K gold-plated full-metal connectors
- RELIABLE PERFORMANCE: Eliminates unwanted noise/feedback for pure, clear audio; minimal signal loss for reliably consistent audio
If the streamer has an analog output, determine whether its level is fixed, variable, or controlled by an app, remote, or front-panel control. The exact behavior is model-specific. A variable output can sometimes feed an amplifier directly, while a fixed output requires another level-control stage for ordinary listening. Confirm the manufacturer’s instructions before relying on the streamer alone.
Find the matching amplifier input
Power amplifiers commonly provide stereo RCA inputs, balanced XLR inputs, or both. Choose an input that corresponds to the output you intend to use. Marantz documentation describes choosing the connector that matches the power amplifier, while Yamaha documentation covers RCA and balanced XLR connections to external equipment.
Confirm the speakers are passive
Passive speakers have speaker-wire terminals and need an external amplifier. Powered (active) speakers contain their own amplifiers and normally accept a line-level input. Their connection is fundamentally different, as explained below.
Safe connection procedure
- Power down the system. Switch off the power amplifier and the source. Yamaha’s connection instructions also call for disconnecting the source product’s AC cord from the outlet before wiring. Wait until indicators are off.
- Position the components. Leave ventilation space around the amplifier and place the source where its output cables can reach without tension. Keep signal cables away from places where they can be pulled from the sockets.
- Choose one interconnect type. Use a stereo RCA audio cable if the source and amplifier have compatible RCA sockets. Use balanced XLR cables when both provide compatible XLR output and input. Do not assume an adapter makes every XLR connection electrically equivalent; check the manuals’ connector and pin information.
- Connect the left channel. Insert the source’s left output into the amplifier’s left input. RCA plugs are commonly marked white or black for left; follow the labels on your equipment rather than color alone.
- Connect the right channel. Insert the source’s right output into the amplifier’s right input. Push plugs in fully without forcing them or twisting the connector body.
- Connect passive speakers to the amplifier. Run the left speaker cable from the amplifier’s left speaker terminals to the left passive speaker, and repeat for the right channel. Follow the amplifier manual for terminal polarity, wire preparation and any impedance limits it specifies.
- Set a conservative starting level. Turn the source or separate preamp volume control down before powering up. If the streamer is the only control device, verify its volume setting and startup behavior first.
- Power up and test quietly. Turn on the source and then the power amplifier according to their manuals. Start playback at low level, check that left and right channels are correct, and increase volume gradually.
Disconnect power again before changing RCA/XLR connections, moving speaker wires, or correcting a channel assignment.
Rank #2

- Durable PVC Jacket: The black PVC jacket provides excellent protection and flexibility for the cable, resisting wear and tear.
- Gold-Plated Connectors: The gold plating ensures optimal signal transfer and resists corrosion, resulting in a clear audio signal.
- Color-Coded Connectors: The red and silver white connector housings provide quick and easy identification for right (red) and left (silver white) audio channels.
- Molded Strain Relief : The molded strain relief boot provides protection to the cable where it separates, extending its life.
- Reliable Audio Transmission: This cable is designed for clear and accurate audio signal transfer, enhancing the audio experience.
RCA versus balanced XLR
RCA and XLR are alternative interconnect formats for the low-level link between source and power amplifier. The practical choice is determined first by compatibility, not by a universal sound-quality rule.
| Interconnect | Use it when | Checks before purchase or connection |
|---|---|---|
| Stereo RCA audio cable | The source provides left/right RCA outputs and the amplifier provides corresponding RCA inputs. | Match left and right channels and make sure both sockets are analog line/preamp connections. |
| Balanced XLR audio cable | The source has compatible balanced XLR outputs and the amplifier has compatible XLR inputs. | Verify XLR polarity and pin arrangement in both manuals; connector appearance alone is not sufficient. |
Yamaha and Marantz documentation supports using whichever of these connector types matches the equipment. It does not establish that RCA or XLR will sound better in every system. Buy a cable with the correct connector at each end rather than purchasing adapters on the assumption that any XLR and RCA combination will work.
When RCA is the straightforward choice
RCA is appropriate when both devices offer conventional left/right RCA line connections. Keep the left and right plugs together as a pair, avoid partially inserted connectors, and connect output to input—not output to output.
Recommended Free Tools
When XLR is appropriate
Use XLR only when the source output and amplifier input are both designed to work together as balanced connections. Check the manuals for pin assignment and polarity before connecting. If either device offers only an RCA connection, use RCA instead of forcing an adapter-based arrangement.
Rank #3

- Universal Compatibility: Utilizing standard RCA male connectors, these RCA cables ensure seamless audio signal transfer from AV receivers, amplifiers, mixers, DJ controllers, and home Hi-Fi systems, including car audio setups, for broad application across any home theater or stereo need.
- Professional Audio Quality: Engineered for digital audio and low-frequency performance, this subwoofer cable delivers pristine sound clarity, meeting professional demands for home theaters and stereo systems with unmatched fidelity.
- Superior Durability: Featuring heavy-duty metal connectors with molded strain relief, the RCA to RCA cable guarantees long-lasting reliability and robust construction, ensuring consistent performance in all environments.
- Interference-Free Clarity: With advanced aluminum shielding, these audio cables effectively block RF and EM interference, providing crystal-clear sound quality for RCA audio connections, free from disruptions.
- Satisfaction Assurance: Backed by a Limited Lifetime Replacement Warranty and a 30-Day Money-Back Guarantee, our RCA cables ensure complete customer satisfaction; contact us directly for easy support and peace of mind.
Connecting a streamer directly to a power amplifier
A streamer can feed a power amplifier directly when it has a suitable analog output and a dependable way to control listening level. The streamer’s digital output by itself is not enough; an intervening DAC, preamp, or integrated component with the appropriate conversion and output stage is required.
Verify the streamer’s output type
- Confirm that the socket is an analog line or preamp output, not optical, coaxial digital, USB audio, HDMI, or another digital-only connection.
- Read whether the analog output is fixed-level or variable-level.
- Check how volume is changed: app, remote, front-panel control, or another method.
- Find out what happens after a restart, power interruption, or switching between inputs. The manual should make clear whether the streamer returns to a safe level or a previously stored setting.
Use a safe first-playback routine
- Set the streamer’s volume to its lowest practical setting before connecting or powering the amplifier.
- Connect the streamer’s left and right analog outputs to the matching amplifier inputs with RCA or compatible XLR cables.
- Power the streamer first, then the amplifier, while keeping the level low.
- Start a familiar recording and raise the volume slowly.
- If the app shows no volume control, the manual describes a fixed output, or the level is unexpectedly loud, stop playback and add a proper preamp or level-control stage rather than continuing at full output.
Because output level and control behavior differ by streamer model, there is no universal safe setting or one-size-fits-all direct-connection instruction beyond confirming those details in the specific manual.
Connect passive speakers to the power amplifier
Speaker cables belong on the amplifier’s speaker terminals, not on its RCA or XLR input sockets. Connect the left amplifier channel to the left speaker and the right channel to the right speaker. Observe the polarity markings shown by the amplifier and speaker manufacturers, and make sure no loose wire strands can touch an adjacent terminal.
Quick wins for a faster PC:
Clear out junk files and repair common Windows errorsFree Scan →Scan for outdated or missing drivers - takes under a minuteDriver Scan →Repair Windows errors before they cause bigger problemsFix Now →Use only the terminal arrangement and speaker-load guidance supplied with the amplifier. If the manual provides separate terminals for different operating modes, follow its diagram instead of guessing. Keep the amplifier switched off while inserting or removing speaker wires.
Rank #4
![FosPower (2 Pack 2 RCA M/M Stereo Audio Cable [24K Gold Plated | Copper Core] 2RCA Male to 2RCA Male [Left/Right] Premium Sound Quality Plug - 3FT](https://m.media-amazon.com/images/I/41546KQF2BL._SL160_.jpg)
- Connectors: 2RCA male to 2RCA male (Left & Right)
- 24K gold plated connectors resist corrosion and reduce tarnish
- Copper braided and aluminum foil shielding provide cable flexibility and greatly reduce undesired EMI/RFI interference
- Polyethylene Foam (PF) dielectric insulator greatly minimizes signal loss
- Tin platted copper core reduces oxidation and increases wire life
Do not connect amplifier outputs to powered speakers
Powered speakers already contain an internal amplifier and generally expect a low-level line or preamp signal. A power amplifier’s speaker terminals carry amplified output. Feeding that output into a powered speaker’s line input can damage the speaker’s internal amplifier.
Edifier’s support guidance states: “If you are using a set of powered speakers you cannot connect them to a powered amplifier as this will cause damage to the speaker’s internal amplifier.” For powered speakers, connect the source’s appropriate line/preamp output directly to the speakers’ line input, using any level-control method specified by the speaker manufacturer. Do not use the power amplifier in that path.
How to distinguish the two connections
- Power amplifier to passive speakers: amplifier speaker terminals to passive speaker terminals.
- Source to powered speakers: source line/preamp output to the powered speaker’s line input.
- Source to power amplifier: source line/preamp output to the amplifier’s RCA or XLR input, with passive speakers connected afterward.
If a receiver, integrated amplifier, or other component has several outputs, read the label and manual to confirm that the socket is a preamp/line output before using it with powered speakers.
Free tools Windows power users keep installed
One-click scans. No signup required.
Common wiring mistakes and their fixes
No sound from either channel
- Confirm the source is playing and the correct input is selected on the power amplifier, if it has selectable inputs.
- Check that the cable is connected from an output on the source to an input on the amplifier. Two outputs or two inputs cannot complete the signal path.
- Verify that the streamer is not using a digital-only output and that a required DAC or preamp is present.
- Raise the source or preamp volume cautiously; a fixed-level output may not provide a listening-level control by itself.
Only one channel works
- Trace the left and right connections separately from source output to amplifier input and from amplifier terminal to speaker.
- Swap the left and right interconnect plugs at the source only if the equipment is powered down and the manual permits the test; label the cables so the original routing can be restored.
- Inspect for a plug that is not fully seated or a speaker wire strand touching the wrong terminal.
The sound is unexpectedly loud
Stop playback and turn the source level down immediately. Recheck whether the streamer output is fixed-level or variable-level and whether the app or remote is actually controlling it. A separate preamp or level-control stage may be required for predictable operation.
Best Value
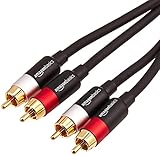
- IN THE BOX: (1) 15 foot 2-Male to 2-Male RCA audio stereo subwoofer cable
- CRYSTAL CLEAR AUDIO: Enhances audio connections; ideal for home-entertainment and high-fidelity (HiFi) systems
- RCA INPUT/OUTPUT: 2 RCA output (connect to either L or R input) and 2 RCA input; input can be high frequency (digital audio) or low frequency (subwoofer)
- GOLD PLATED CONNECTORS: Corrosion-resistant 24K gold-plated full-metal connectors
- RELIABLE PERFORMANCE: Eliminates unwanted noise/feedback for pure, clear audio; minimal signal loss for reliably consistent audio
Hum, noise, or intermittent operation
- Power down before reseating the RCA or XLR plugs.
- Confirm that the selected input and connector type are supported by both manuals.
- For XLR, verify pin compatibility and polarity rather than relying on the cable’s appearance.
- Replace a suspect interconnect with a known-good cable of the same connector type, changing one item at a time so the cause remains identifiable.
Damage risk after an incorrect connection
If a power-amplifier speaker output was connected to a powered speaker’s line input, switch off and disconnect the system immediately. Do not continue testing the speaker; arrange inspection according to the speaker and amplifier manufacturers’ service guidance.
A practical setup checklist
- The source has an analog PRE OUT or LINE OUT, or a suitable DAC/preamp is installed after a digital-only streamer output.
- The amplifier input matches the selected RCA or XLR connector.
- XLR pin arrangement and polarity have been checked in the manuals.
- The power amplifier and source were switched off before wiring; the source AC cord was disconnected when required by its instructions.
- Left and right channels are matched at both the interconnects and speaker terminals.
- Only passive speakers are connected to power-amplifier speaker outputs.
- The streamer’s volume-control behavior is understood before direct connection.
- Initial playback begins at a low level.
Which arrangement should you choose?
Preamp plus power amplifier
Choose this arrangement when you need dependable source selection and level control, or when your source offers only a fixed analog output. The preamp’s line output feeds the power amplifier, and the preamp manual determines the correct connector and operating sequence.
Streamer plus power amplifier
Choose direct connection when the streamer has a suitable analog output and its volume can be controlled safely and consistently. Confirm startup and restart behavior in the streamer manual before making it the sole control point.
Streamer, DAC or preamp, then power amplifier
Use an intervening DAC or preamp when the streamer provides only digital output, lacks a usable volume control, or needs additional source switching. The final analog output from that intervening component connects to the amplifier’s matching RCA or XLR input.
Final verification before regular listening
With the system powered down, visually follow the complete route from source output to amplifier input and from amplifier speaker terminals to the passive speakers. Confirm every connector is fully seated and every channel label agrees. Power up with the level low, play a short track, and listen for left/right placement and clean operation. Once that test passes, leave the cable choice that fits the actual connectors in place; neither RCA nor XLR has a universal quality advantage established by the referenced equipment manuals.
Quick Recap
Product prices and availability are accurate as of the date/time indicated and are subject to change. Any price and availability information displayed on Amazon at the time of purchase will apply.

