The Tool Desk
Outbyte Driver Updater FREEScan for outdated or missing drivers - takes under a minuteDriver Scan →Outbyte PC Repair FREEClear out junk files and repair common Windows errorsFree Scan →Configure a bartop in layers: first bind its physical controls to RetroArch’s virtual RetroPad, then assign a deliberate hotkey scheme, and finally create core- or game-specific remaps for arcade layouts. Keep display choices separate from input choices. For FinalBurn Neo vertical games, use the core’s documented rotation and aspect-ratio settings rather than rotating the video output as a blanket fix.
The reliable workflow is to verify the operating system sees the cabinet encoder, bind Port 1, test every direction and action in RetroArch’s menu, launch a game with the intended core, save only the remap scope you actually need, and then validate horizontal and vertical titles independently.
As an Amazon Associate I earn from qualifying purchases.
How RetroArch’s input layers work
RetroArch does not normally send a cabinet encoder’s raw button numbers straight to a game. It maps physical inputs to a standard virtual controller called a RetroPad. Cores then receive that virtual layout, while RetroArch itself uses the same layer for menu navigation.
This separation explains many bartop problems. A panel can work perfectly in the menu while an arcade game has an unsuitable button order, because the game may need a core-specific remap. Conversely, changing a game remap should not be necessary merely to make the main menu respond. Treat the two jobs independently:
#1 Best Overall
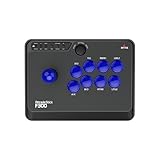
- Compatible with Switch/Switch 2, PS4, PS3, Xbox Series S/X, Xbox One, Xbox 360, PC Windows, macOS, Steam Deck, Android.
- Compatible with Sanwa Denshi buttons and joystick that is perfect for customization
- Supports the XINPUT and DINPUT when being used on PC
- Supports the Turbo functions with different speed settings.
- F300 is compatible with PS5 by MAYFLASH Magic-S Ultimate adapter or MagicBoots-S5 Converter.
- Global controller binding: tells RetroArch which physical switch means Up, Down, A, B, Start, Select and so on.
- Gameplay remapping: changes what a selected core receives after content is launched.
- Core and video options: control behavior such as rotation, aspect ratio and other settings that can vary by arcade core.
Libretro Docs summarizes the first layer this way: “RetroArch maps real-world controller inputs to a virtual controller called a RetroPad.” Its controls guide also distinguishes core remapping: “Core Controls Remapping alters how the core receives input rather than how the gamepad is coded.”
Use the narrowest setting that solves a problem. A global binding is appropriate for a control that should behave the same everywhere. A core remap is appropriate when one arcade emulator needs a different button order. A game remap is appropriate for a single title with an unusual layout.
Decide the cabinet’s control and screen model first
Before changing settings, identify what the bartop is expected to do. The official documentation describes the binding procedure, not the wiring, encoder firmware or operating-system compatibility of a particular cabinet. Do not assume that a red button, a six-button harness or a particular USB encoder uses the same button numbers as another build.
Confirm the input device is visible to the operating system
Connect the cabinet encoder or controller and make sure the operating system recognizes it as an input device before opening RetroArch. If the device is absent at the system level, RetroArch cannot bind it. Resolve the operating-system or hardware connection first; changing RetroArch mappings will not repair a device that is not being enumerated.
Choose how the screen will be used
Record whether the panel has a normal horizontal display or a physically vertical display. A horizontal screen can show vertical arcade content rotated by software, but the result depends on the core. A physically vertical screen may need a core’s vertical mode in addition to rotation and aspect-ratio settings. Do not choose one universal aspect ratio for every game: the correct geometry depends on the core, the game and the cabinet’s panel.
Plan an escape route before hiding the keyboard
A bartop may not have a keyboard that is easy to reach once the cabinet is closed. Make sure at least one physical control or connected controller can open the RetroArch menu, pause content and exit a game before you finalize the panel layout.
Bind the bartop to RetroPad controls
Use autoconfiguration when it matches the panel
RetroArch can autoconfigure many well-known controllers. If the recognized profile produces the directions and actions you want, test it rather than rebuilding the map. Autoconfiguration is a starting point, not proof that every cabinet switch has the intended function.
Free tools Windows power users keep installed
One-click scans. No signup required.
Manually bind an unrecognized or unsuitable device
- Open Settings → Input → RetroPad Binds → Port 1 Controls.
- Select Set All Controls.
- When RetroArch prompts for each control, activate the corresponding physical direction or button on the cabinet.
- Continue through the prompts until the required controls are assigned.
- Choose Save Controller Profile if you want this device and mapping recognized the next time it is connected.
Leave virtual controls unmapped when the cabinet does not have them. A two-button panel does not need invented bindings for extra actions, and assigning an unrelated switch can create accidental presses in games that read that input.
Verify the physical result, not just the labels
Press every direction and action in the RetroArch menu. Confirm that Up, Down, Left and Right move in the expected direction; then test Start, Select and each action button. Launch at least one game and verify the same controls there. This catches reversed joystick wiring, swapped action buttons and encoders that report unexpected button numbers.
RetroArch’s binding guide cannot tell you how a particular cabinet is wired. If a prompt appears to accept the wrong switch, cancel or correct the process and repeat it while watching the physical control being activated. Do not infer compatibility from the appearance of the panel or from a button’s printed label.
Rank #2

- Exquisite LED arace game DIY MAME parts selection!
- 100% Zero Delay Encoder and USB work perfectly all Windows systems!
- 2 Player Arcade MAME DIY Style Perfect Accessory!
- Use the highest quality materials! Made of high temperature resistant plastic!
- Perfect LED Kit Arcade PC Games DIY Choice! Easy to install!
Assign devices explicitly in a multi-player cabinet
For more than one player, open each port’s controls and select the appropriate Device Index. By default, RetroArch assigns controllers in the order supplied by the operating system. That order can change when devices are unplugged, reconnected or enumerated differently, so use explicit device assignment when player positions matter. Device reservation can make those assignments deliberate rather than dependent on connection order.
Set menu access and hotkeys deliberately
Menu navigation and gameplay controls are separate concerns. Open Settings → Input → Hotkeys and assign an intentional menu-toggle method and an exit method before relying on the cabinet without a keyboard.
Use an Enable Hotkeys button
Map a dedicated Enable Hotkeys button that must be held while another hotkey is pressed. This makes combinations deliberate and reduces accidental menu openings, resets or exits during play. It also helps avoid conflicts with cores that read keyboard-like input directly, because a single button press is less likely to be interpreted as a RetroArch command.
Choose a physical control that can be held comfortably without taking away an essential direction or action. Test the complete combination from inside a game, not only from the settings screen. If the panel has no spare button, use a connected controller or retain a reachable keyboard until the hotkey scheme has been validated.
Choose a menu-toggle combination you can reach
RetroArch provides several Quick Menu toggle combinations and lets you select among them at Settings → Input → Hotkeys → Menu Toggle. Pick the combination that is physically possible on your bartop and document it for anyone who will use the cabinet. A menu shortcut that works only with a hidden keyboard is not a practical cabinet control.
Use Game Focus when a core reads keyboard input
Some cores read keyboard interfaces directly. In those cases, Game Focus can disable RetroArch’s keyboard bindings while the mode is active, allowing the core to receive keyboard input without RetroArch interpreting the same keys as menu commands. This is a conflict-management tool; it does not replace a correct RetroPad binding for the cabinet’s joystick and buttons.
Build gameplay layouts with remaps
After the global RetroPad layer works, launch content with the target arcade core and open Quick Menu → Controls. Adjust the core’s button mapping there, then save the remap at the scope that matches your intent.
Choose the smallest useful remap scope
| Scope | Use it when | What it changes |
|---|---|---|
| Global RetroPad binding | The physical cabinet control should behave the same across RetroArch menus and content. | Maps real controls to RetroArch’s virtual RetroPad. |
| Core remap | All games running in one arcade core need the same gameplay arrangement. | Changes what that core receives while leaving RetroArch menu bindings unchanged. |
| Content-directory remap | A group of games in one directory needs a shared arrangement. | Applies to content in that directory and takes precedence over the core-level remap. |
| Game remap | One title needs an exception to the core or directory layout. | Applies only to that game and takes precedence over broader remaps. |
Save a Core Remap File for a core-wide layout. Save a Game Remap File when only one title needs a different arrangement. If you change a saved override later, save it again through the relevant Quick Menu action; editing a value without saving does not update the persistent override.
Do not use a gameplay remap to repair menu navigation
Core controls remapping changes the input received by the running core. It does not rewrite the global gamepad or menu bindings. If the RetroArch menu has the wrong direction or action, return to Settings → Input → RetroPad Binds instead of creating a game remap that masks the original problem.
Do these 3 things before closing this tab:
1Scan for outdated or missing drivers - takes under a minute2Clear out junk files and repair common Windows errors3Fix the driver behind crashes, sound loss and screen glitchesFinalBurn Neo: understand Classic and Modern device presets
FinalBurn Neo provides core-specific device-type presets named Classic and Modern. The documentation describes Modern as convenient with most arcade sticks and assigns R1 and R2 as the fifth and sixth buttons for six-button games. Treat that as a FinalBurn Neo preset, not as a universal arcade standard or a guarantee that every bartop’s physical buttons match it.
Rank #3

- Heavy-duty steel joystick with microswitch contact buttons: precise and robust
- 8 action buttons with microswitch leaf contacts: smoother, quieter and highly sensitive
- AUTO function: trigger very fast repetitive shots
- COMBO function: program and launch shots and special movements at the touch of a button
- Soft Touch" coating, rubberized wrist rest and 3-meter cable
After selecting a preset, launch a representative six-button title and verify all actions. If the panel’s fifth and sixth buttons are elsewhere, use the core’s controls screen to remap them while leaving the global RetroPad map intact.
Understand configuration and override precedence
RetroArch settings are layered. The broad default is applied first, then more specific saved settings can override it. The effective order is:
- Global settings.
- Core settings.
- Content-directory settings.
- Game-specific settings.
A game-specific setting therefore takes precedence over a directory setting, a directory setting takes precedence over a core setting, and a core setting takes precedence over the global default. This hierarchy is useful when a bartop runs several arcade systems with different control or display requirements, but it can also make an old override appear to “undo” a newer global change.
Recommended Free Tools
Save from the Quick Menu after changing a running game
When content is paused, the Quick Menu exposes core-specific options, video resolution, remapping and shaders. Use the relevant save-override action after making a change. Decide whether the setting belongs to the core, the content directory or one game before saving; otherwise a fix intended for one title can silently affect every title at that scope.
Diagnose a setting that will not stay changed
- Check whether a more specific game or directory override already exists.
- Reopen the content and inspect the active setting rather than assuming the global value is in use.
- Make the change while the intended core and content are loaded.
- Save the corresponding override again through the Quick Menu.
Option names and menu paths can vary by RetroArch version, platform and interface driver. If a label is not in the exact place described here, look for the same function under the Input, Controls, Core or Video sections rather than assuming the feature is unavailable.
Configure display geometry for a bartop
Use the RGUI display controls as a starting point
RetroArch’s RGUI exposes common display choices including aspect ratios, integer scaling, fullscreen and shaders. These are presentation controls, not universal correctness switches. Integer scaling can preserve whole-pixel multiples when the screen resolution allows it; an aspect-ratio choice can preserve the game’s intended geometry or fill more of the panel. The best choice depends on the core and the physical screen.
Test display changes with a game that has obvious circles, straight lines or a known playfield shape. If circles become visibly wide or narrow, the selected geometry is not preserving the appearance you want. Keep the setting at the scope where it belongs: a core-wide arcade behavior can be a core override, while one title with an unusual layout may deserve a game override.
What’s actually slowing this PC down?
Pick the symptom - the matching free tool is one click away.
Horizontal screen versus physically vertical screen
| Cabinet arrangement | Practical approach | What to verify |
|---|---|---|
| Horizontal display showing mostly horizontal games | Use the core’s normal presentation and choose an aspect ratio or integer scaling that suits the panel. | Menu access, geometry and fullscreen behavior across several cores. |
| Horizontal display showing a vertical game | Use the arcade core’s documented rotation behavior and a core-appropriate aspect ratio. | That the playfield is upright, not stretched, and that controls still correspond to the rotated view. |
| Physically vertical display | Use the core’s vertical-screen option when available, together with the documented rotation and aspect-ratio settings. | Whether menus, overlays and games all remain usable in the cabinet’s orientation. |
There is no single aspect-ratio value that is correct for every display and arcade core. Select Core Provided when the core supplies the geometry for the game, then compare it with the other available ratios or integer scaling on the actual cabinet.
Independent reader supportYour contribution helps us test, update, and keep practical guides available for everyone.FinalBurn Neo vertical games: the documented fix
“Why are vertical games not working properly?”
For FinalBurn Neo, the official core guidance calls for two settings when vertical games are not presenting correctly:
- Enable Settings → Core → Allow rotation.
- Set Settings → Video → Scaling → Aspect Ratio to Core Provided.
If the bartop has a physically vertical screen, also consider FinalBurn Neo’s Video Settings → Vertical Mode option. These instructions are specific to FinalBurn Neo. Another arcade core may expose different names or handle rotation through a different mechanism.
Rank #4

- Compatible with Switch and Windows.
- Supports ultimate software - customize button mapping and create macros
- Dynamic button layout - button mapping changes with mode functionally and visually
- Ultra-moddable arcade stick - Universal mounting plate supports Sanwa arcade sticks
- Three ways to connect: Bluetooth, 2.4g and wired USB-C. The included 2.4g receiver has a special hidden compartment to store it safely.
Why not rotate the video output as a blanket fix?
The FinalBurn Neo documentation cautions that rotating through Settings → Video → Output → Video Rotation may handle aspect ratio incorrectly. Use the core’s rotation and vertical-mode controls first so the core can provide the game’s intended geometry. Reserve general output rotation for cases where you understand the effect on the entire RetroArch video pipeline.
Crashes, No Sound, or Screen Glitches?
Random freezes, missing sound and display glitches usually trace back to one bad driver. Find and replace yours safely.Free scan · under a minutePC Slower Than It Used to Be?
A free scan shows the junk files, broken settings and background clutter dragging Windows down - then fixes them in one click.Free scan · Windows 10 & 11Validate controls after rotation
Rotation changes the way the playfield is presented, so test the cabinet from the player’s viewing position. Confirm that Up still moves toward the top of the displayed playfield, Left and Right are not exchanged, and action buttons remain in the expected physical order. If the image is correct but the controls feel rotated, inspect the FinalBurn Neo control remap rather than changing the global joystick directions.
Troubleshooting common bartop failures
The menu does not respond to the joystick
- Confirm the operating system sees the encoder or controller.
- Return to Settings → Input → RetroPad Binds → Port 1 Controls.
- Run Set All Controls and activate each physical direction when prompted.
- Test the result in the menu before launching a game.
- Save the controller profile if the mapping is correct and should persist.
If only one direction is wrong, inspect the physical wiring or repeat that binding instead of remapping every game.
The game works, but the buttons are in the wrong order
Leave the global RetroPad map alone if menu navigation is correct. Open Quick Menu → Controls with the target core loaded, arrange the gameplay buttons, and save a core, directory or game remap according to the intended scope. This keeps the menu controls stable while changing only what the game receives.
Hotkeys trigger accidentally
Assign an Enable Hotkeys button and require it to be held for other hotkeys. Move the menu-toggle combination away from common gameplay presses, then test it repeatedly during a game. If a core reads keyboard input directly, try Game Focus so RetroArch’s keyboard bindings do not compete with the core.
“Why is my favorite combo button not available?”
First check whether the physical panel actually has a spare switch and whether that switch was bound to an unused RetroPad control. Then inspect the active core’s controls screen. A core-specific layout may expose a different set of actions than the global menu, and a saved game or directory remap may be overriding the mapping you just changed. Save the correction at the narrowest required scope.
The vertical image is sideways, stretched or cropped
For FinalBurn Neo, enable Allow rotation and choose Aspect Ratio → Core Provided. On a physically vertical panel, review Video Settings → Vertical Mode. Avoid using global Video Rotation as the first remedy because the core documentation warns that it can produce incorrect aspect-ratio handling. If the issue occurs with another core, consult that core’s own rotation behavior rather than applying FinalBurn Neo’s instructions universally.
A change worked once but disappears after restarting
The change was probably made without saving the relevant profile, remap or override. Save a controller profile for a device-wide binding, save a remap file for gameplay controls, or save the appropriate Quick Menu override for core, directory or game settings. Then reopen the same content and verify the active value.
A repeatable setup and test sequence
- Connect the cabinet input device and verify that the operating system recognizes it.
- Open Settings → Input → RetroPad Binds → Port 1 Controls.
- Use autoconfiguration if it matches the cabinet; otherwise choose Set All Controls and bind every required direction and action.
- Leave controls the cabinet does not possess unmapped.
- Save the controller profile if the mapping should follow that device.
- Assign each player’s Device Index when more than one controller is present.
- Configure Settings → Input → Hotkeys, including an accessible menu toggle, exit method and Enable Hotkeys button.
- Test menu navigation, hotkeys and exit behavior before hiding the keyboard.
- Launch a representative game with the intended core and open Quick Menu → Controls.
- Apply a core, content-directory or game remap only if the gameplay layout requires it, then save that remap.
- Set display geometry in the scope that matches the need. Compare Core Provided aspect ratio and integer scaling on the actual screen.
- For FinalBurn Neo vertical games, enable Settings → Core → Allow rotation, choose Settings → Video → Scaling → Aspect Ratio → Core Provided, and consider Video Settings → Vertical Mode on a vertical display.
- Test at least one horizontal title, one vertical title and one title using the cabinet’s maximum action-button count.
- Reopen each test after restarting RetroArch to confirm that profiles, remaps and overrides were saved at the intended scope.
Maintenance as the cabinet evolves
Whenever you replace an encoder, add a button, change the screen orientation or switch cores, retest the layers in order: operating-system detection, RetroPad binding, hotkeys, gameplay remap and display override. A hardware change can alter device order, while a core change can alter available actions and rotation behavior.
Quick wins for a faster PC:
Repair Windows errors before they cause bigger problemsFix Now →Fix the driver behind crashes, sound loss and screen glitchesFind Drivers →Clear out junk files and repair common Windows errorsFree Scan →Keep a short note inside the cabinet describing the menu-toggle combination, the Enable Hotkeys button and the intended player-device assignment. That information is more useful than a generic button-number diagram because RetroArch’s labels describe the virtual RetroPad, while the cabinet’s wiring determines which physical switch reaches each label.
With those layers kept separate, a bartop can have predictable menu navigation, core-appropriate arcade layouts and display settings that respect each game’s orientation without turning one title’s fix into a cabinet-wide problem.
Quick Recap
Product prices and availability are accurate as of the date/time indicated and are subject to change. Any price and availability information displayed on Amazon at the time of purchase will apply.

