Buying or selling a used Starlink setup can save real money, but only if you handle the two separate parts correctly: the hardware (Dish + cables + power/POE where applicable) and the service/account pairing.
This 2024 guide walks you through buying used Starlink safely, transferring it to your own account the right way, and selling your equipment without leaving the new owner stuck or your account in a bad state.
As an Amazon Associate I earn from qualifying purchases.
What Counts as Used Starlink (and What You’re Actually Buying)
Most “used Starlink” listings bundle hardware and expect the buyer to activate service under their account. Starlink is different from many consumer devices: the service is tied to a Starlink account and the hardware is associated to that service through the transfer process.
Typical used Starlink components you may see
- Starlink dish (antenna) (often labeled “Dishy” or includes model markings)
- Power supply (for many older kits) or integrated cabling depending on generation
- Router (Starlink Wi‑Fi router) or Wi‑Fi is optional depending on kit and generation
- Cables (dish-to-router and/or dish-to-POE; lengths matter)
- Accessories (mounts, extension cables, tripods)
What to confirm in any listing
Ask the seller to confirm whether the hardware is fully functional and whether it has been deactivated and/or properly transferred via the Starlink app or website.
#1 Best Overall
![LUCMO Multi Ports Starlink Ethernet Adapter for Starlink Actuated Gen 2 | Starlink Wired External Network, 2-Port Starlink Ethernet Adapter 1 to 2 [2 Devices Networked Simultaneously] Up to 1 Gbps](https://m.media-amazon.com/images/I/41lWcIMDS1L._SL160_.jpg)
- Compatibility: Our 2 Ports Starlink Ethernet Adapter is specially designed for the Starlink Standard Actuated Generation 2, with optimal connection guaranteed.
- Gigabit Ethernet Support: The adapter features two Gigabit Ethernet (RJ45) ports, allowing you to connect two wired devices directly to your Starlink system, taking full advantage of Starlink’s high-speed internet capabilities.
- Convenience: Just plug in to use, easy to install and no complicated setting up necessary.
- Seamless Performance: Ensures minimal lag and uninterrupted connectivity for demanding tasks, whether for work, entertainment, or smart home management.
- Secure Cable Connections: Features well-designed ports that provide a snug fit, reducing the risk of disconnection and maintaining a stable connection at all times.
If a listing only says “works” but can’t provide device identifiers or account-transfer proof, treat it as a risk.
Before You Buy or Sell: Prerequisites
Before any money changes hands, you want the information you’ll need to complete the transfer and the expectations you’ll need for activation.
What the buyer should have ready
- Your Starlink account login (or ability to create one)
- Mobile app access (Starlink app) or web access to your account
- Shipping address that matches the service setup you plan to use (residential or portability where applicable)
What the seller should have ready
- Proof the hardware was paid for and is theirs to transfer
- Dish/service status in their Starlink account (so transfer can be completed)
- Serial/ID details to share with the buyer when requested
Important: Don’t confuse hardware ownership with service eligibility
You can own the dish and still not be able to activate it under your account if the previous account transfer wasn’t completed. Plan for the transfer step to be the “real transaction,” not just shipping a box.
Free tools Windows power users keep installed
One-click scans. No signup required.
How to Buy a Used Starlink (Step-by-Step, 2024)
Use a process that lets you verify the dish, reduce pairing risks, and ensure the seller can complete account transfer.
Step 1: Choose the right hardware generation for your needs
Most buyers are deciding between different dish generations. The listing should specify the dish generation or model terms (some sellers use “Gen 2” / “Standard” / “ROAM” language; verify with photos and labels).
If the listing is unclear, ask for a clear photo of the dish labeling and the included cables.
Step 2: Require listing verification from the seller
Ask the seller for:
- Photos of the dish label (serial/ID visible)
- Photos of the router (if included) and its label/ports
- Close-up photos of key cables and connectors
- A screenshot from their Starlink account showing the device is present and the status is transferable (they should be able to complete the transfer from their side)
Step 3: Confirm what’s included (and what isn’t)
A used dish without the correct cabling or power component can still be functional, but you may need to buy replacements. Make sure the listing includes the essentials for your configuration.
Recommended Free Tools
If you plan to use your own router, confirm whether the dish is meant to connect to that setup. Many users simply want the full kit.
Step 4: Agree on a payment method with protection
For used tech, protected payments (eBay or credit card) reduce your risk if something arrives dead or paired incorrectly.
Rank #2

- ⚠️ COMPATIBILITY WARNING: Designed EXCLUSIVELY for Starlink Standard Actuated Gen 2. ❌NOT COMPATIBLE with Starlink Gen 3, Flat High-Performance, or any other models. Please verify your dish model before purchase!
- PLUG & PLAY INSTALLATION: Simply connect the adapter between your Gen 2 Starlink router and the cable. No drivers or complex setup needed. Ensure a firm click on both ends for a stable connection.
- ENABLE HARDWIRED SPEEDS & STABILITY: Unlock the full potential of your Starlink by connecting gaming consoles, PCs, and smart TVs directly via Ethernet for lower latency and smoother streaming.
- RELIABLE DATA TRANSFER: Experience lag-free online gaming, 4K video conferencing, and ultra-fast file transfers with a stable, wired internet backbone.
- TROUBLESHOOTING TIP: If not working, first check both connections are secure and restart your Starlink router.
If the seller insists on non-recoverable payment, that’s a red flag.
Step 5: Ship-and-verify, but keep the transfer as a live step
When the hardware arrives, don’t just power it on and assume you’re good. If transfer wasn’t completed, the app may show the device isn’t active under your account.
Your goal: seller completes the transfer and you confirm it in your account before you call the deal done.
Step 6: Complete the transfer and activation under your account
Once the seller starts the transfer in their Starlink account, you’ll need to accept it on your account. After acceptance, the dish should be able to pull service when connected to the internet and powered correctly.
For best results, perform the transfer and setup using the same location you plan to use for service so you don’t run into restrictions or configuration mismatches.
How to Transfer Starlink Service to a New Owner
Transfer is the core step that makes used Starlink workable. The exact button names can vary slightly as Starlink updates the interface, but the flow is consistent: the current owner initiates transfer, and the new owner accepts it.
What’s actually slowing this PC down?
Pick the symptom - the matching free tool is one click away.
Prerequisites for transfer
- The seller must be logged into the Starlink account currently associated with the dish
- The seller must initiate transfer within the Starlink app or account dashboard
- You must have your own Starlink account and be logged in to accept the transfer
Transfer steps (seller initiates)
- On the seller’s phone, open the Starlink app.
- Go to Account or Settings (wording may differ by app version).
- Look for an option related to Transfer, Manage, or Transfer service.
- Select the device/service to transfer (the dish/service should be listed).
- Enter the buyer details requested by the app (often an email or account contact info) and confirm the transfer.
Transfer steps (buyer accepts)
- Log into your Starlink account (app or website).
- Look for a pending transfer invitation or message.
- Accept the transfer.
- After acceptance, plug in and power the dish using the included hardware and proper cable connections.
- Wait for the dish to register service in the app (the first boot/setup can take time depending on connectivity and sky conditions).
What to do if the transfer button isn’t available
Common causes include the seller’s account not being eligible for transfer, missing device association, or the interface changing. Ask the seller to verify the dish appears in their account and try again inside the app while both parties are ready.
If it still doesn’t show, pause the deal and troubleshoot before shipping the final payment.
How to Sell Your Starlink (Step-by-Step)
If you want the sale to go smoothly, treat transfer like a scheduled step, not an afterthought.
Rank #3
![Multi Ports Ethernet Adapter for Starlink Standard 4X/ Gen 3/ Starlink Mini | For Starlink Wired External Network 4 Ports Ethernet Adapter 1 to 4 [4 Devices Networked Simultaneously] - Up to 1 Gbps](https://m.media-amazon.com/images/I/410vGlCO+8L._SL160_.jpg)
- Compatibility -- Works seamlessly with Starlink Gen3/ Standard 4X and Starlink Mini antenna, suitable for various environments.
- Multi-Device Connectivity -- 4 Gigabit Ethernet ports support multiple devices simultaneously, maximizing Starlink's high-speed internet.
- Reliable Performance -- Tested for 72 hours under full load, ensuring stable performance with no speed drops or interruptions.
- Easy to Use -- Plug-and-play design makes installation quick and hassle-free.
- High-Speed Stability -- Whether for work, entertainment, or smart home management, this adapter delivers fast, stable, and convenient networking performance. Upgrade your network setup today
Step 1: Verify your hardware is in working condition
Before listing, power on the dish and confirm you can access its status in your Starlink app. If the dish is intermittently connecting or cables look worn, fix it or don’t claim full functionality.
Do these 3 things before closing this tab:
1Fix the driver behind crashes, sound loss and screen glitches2Repair Windows errors before they cause bigger problems3Scan for outdated or missing drivers - takes under a minuteStep 2: Deactivate correctly (as applicable) and prepare for transfer
Starlink accounts and services have specific management rules. Don’t just unplug and ship. You should ensure your account state matches what the transfer process expects.
If your service is still active, the buyer will still need the transfer to connect the dish to their account.
Step 3: Start the transfer during the sale window
- Agree on a pickup/delivery date and a time window for the transfer to be completed.
- When the buyer confirms payment, initiate transfer in your Starlink app.
- Provide any required buyer info so the invitation can be accepted.
- Stay available so the buyer can accept immediately and the hardware can be set up.
Step 4: Confirm transfer success on both sides
You should be able to see that the buyer’s acceptance completes the transfer. On the buyer’s side, the dish should be associated with their account and ready for setup.
Only then should you consider the sale fully completed.
Quick wins for a faster PC:
Clear out junk files and repair common Windows errorsFree Scan →Fix the driver behind crashes, sound loss and screen glitchesFind Drivers →Repair Windows errors before they cause bigger problemsFix Now →Step 5: Decide whether to include the router
Many used listings include the Starlink router. If you sell separately or keep it, make sure you tell the buyer what they’ll receive so they don’t discover they’re missing a required piece.
Safe Payment, Shipping, and Verification Practices
Used Starlink scams are usually about one of three things: non-transferable dishes, dead hardware, or payment disputes with no recourse.
Best places to sell (with buyer protections)
If you’re selling on eBay, use shipping with tracking and require signature where appropriate for higher-value items. The listing should be explicit about what’s included and the condition.
Payment practices that reduce risk
- Use payment methods with buyer/seller protection (credit card, eBay-managed payments, reputable marketplaces)
- Avoid wire transfers and gift cards
- Don’t accept “half now, half later” unless you can verify transfer readiness first
Verification checklist you can copy into your listing
| Item | What to check | Proof you can provide |
|---|---|---|
| Dish | Runs and connects | App status screenshot and photos of label |
| Cables | No cuts, correct connectors | Photos of ports and cable condition |
| Router (optional) | Boots and shows correct settings | Router label + brief power-on video |
| Transfer readiness | Seller can initiate transfer | Seller confirms transfer step available |
Shipping rules that prevent misunderstandings
- Ship in a box that protects the dish face and connectors
- Include all labeled accessories you claim included
- Use tracking; document packing with photos
Common Problems With Used Starlink Hardware
When used Starlink doesn’t work, it’s usually one of: wrong cabling, incomplete account transfer, missing components, or environment/placement issues.
Rank #4
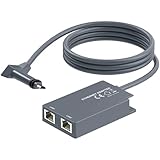
- 【Dual-Port Connection】For Starlink Gen2 Ethernet Adapter simplifies wiring with two ports.Connect devices like a PC+game console or NAS + smart TV simultaneously.Overcome your Starlink Gen2 router's limit for a reliable wired network — ideal for streaming,gaming,and remote work.
- 【Optimized for Starlink Gen2 Routers】Optimized for Starlink Gen2 satellite router, this adapter delivers broad compatibility — seamlessly works with Starlink Gen2 routers paired to Enterprise, mobile HP-Flat High Performance Kit (Gen2), High Performance (Gen1), and Standard Actuated (Gen2) systems.
- 【Multi-Device Compatibility】This Ethernet Adapter supports diverse third-party devices — including PCs, Macs, PS5, Xbox, Smart TVs, NAS, mesh routers, and security systems. It automatically optimizes network performance for reliable connectivity.
- 【High-performance network speed】Support Gigabit wired transmission, provide low-latency, high-bandwidth network, perfect for 4K/8K streaming media, online games, large file downloads, network speed up to 1Gbps say goodbye to wireless lag
- 【Enhanced Reliability:】Features gold-plated ports, energy-efficient chips, and ABS housing with IP65 rating in a compact design. Validated by 72-hour industrial stress testing — rated for 24/7 operation in multiple environments.
Problem: Dish powers on but app doesn’t register service
First, confirm the transfer is accepted on the buyer’s account. Then verify the dish is connected to the correct router/power path. Finally, check that you’re using a valid setup location for your service type.
If the dish still won’t register, try the basic hard reboot (power cycle) and ensure your internet connection for the router is active.
Problem: Transfer fails or never shows as pending
Ask the seller to re-initiate from the Starlink app while you’re both logged in. Account transfers can fail if the contact info doesn’t match or if the seller’s app state is out of sync.
Common fix: complete the transfer step in-app (not via screenshots), then retry once the seller confirms it’s ready.
The Tool Desk
Outbyte PC Repair FREERepair Windows errors before they cause bigger problemsFix Now →Outbyte Driver Updater FREEScan for outdated or missing drivers - takes under a minuteDriver Scan →Problem: Hardware looks intact but is dead on arrival
Inspect connectors for damage and verify the power supply is functioning (if external). If there’s no boot or router lights don’t appear, treat it as defective and use your marketplace dispute process.
Problem: Poor performance after setup
Used systems can be fine, but performance can collapse due to obstructions. Ensure the dish has an unobstructed view of the sky to the extent required. Starlink routing also depends on current conditions.
In the app, check obstruction/warnings and reposition carefully if needed.
Troubleshooting flow you can follow (quick order)
- Confirm transfer is completed and accepted under your account.
- Confirm all cables are seated correctly and match the dish/router/power ports.
- Power cycle the system.
- Check router internet status (WAN/connection lights) and confirm your Wi‑Fi/internet is working.
- Check app warnings for obstruction and installation guidance.
Pricing Guidance: What Used Starlink Often Costs in 2024
Used prices vary by dish generation, whether the router is included, and whether the seller is offering a verified transfer-ready setup. Use listing details and condition proof to guide offers.
PC Slower Than It Used to Be?
A free scan shows the junk files, broken settings and background clutter dragging Windows down - then fixes them in one click.Free scan · Windows 10 & 11Outdated Drivers Are Slowing You Down
One free scan finds every outdated or missing driver and matches the right update for your exact hardware.Free scan · exact hardware matchHow to evaluate a “good deal” (without guessing)
- Compare included components: dish-only typically costs less than a full kit with router and cables
- Require transfer readiness: a dish that requires manual or disputed transfer is rarely a bargain
- Check condition: bent connectors, missing mounts, or unclear labels reduce real value
Realistic offer strategy
Start with your target budget and insist on verification. If the seller can’t provide transfer proof or can’t show device status in their Starlink app, negotiate lower or walk away.
Best Value

- Extend a Network Port for Your Devices: This for Starlink Ethernet Adapter seamlessly integrates your new for Starlink system into your existing business or home network, maximizing throughput from your outdoor dish. It’s an affordable solution for adding or replacing an RJ45 port on your devices, perfect for connecting to a wired network when your device lacks a network port or has a faulty one.
- Improved Speeds: This for starlink adapter ethernet enabled to connect for Starlink dish to existing home mesh Wi-Fi system, significantly boosting the speed. And can extend network to previously unreachable areas of your house due to numerous walls. The direct connection to PC significantly improve internet speeds, providing a more reliable and faster network experience throughout your home.
- 1000Mbps Hyper Speed: The for starlink v2 ethernet adapter is designed to connect a device directly to the for Starlink Router for a reliable wired connection. It supports speeds of up to 1 Gbps, ensuring fast and stable internet performance. Perfect for enhancing your online working, meeting, classing, gaming, HD video streaming, upload, download, and more.
- Easy Installation: for Starlink to RJ45 Gigabit Ethernet Adapter is driver-free. (Installation Way: 1. Turn off the for Starlink router by unplugging its AC power cord from the wall outlet. 2. Unplug the for Starlink antenna cable from the bottom of the router. 3. Insert the for Starlink Ethernet Adapter into the port on the router where the for Starlink antenna cable was previously connected. 4. Connect the for Starlink antenna cable to the connector on the for starlink adapter ethernet. 5. Power everything back on by plugging the router's AC power cord back into the wall outlet )
- Compatible with the for Starlink Standard Actuated Kit V2, this adaptador ethernet for starlink v2 is highly recommended for rural areas. It dramatically enhances internet performance, nearly doubling speeds and reducing latency, making it perfect for browsing, streaming, and gaming.
For high-value kits, consider buying through a marketplace that supports disputes and returns rather than direct cash-only listings.
Frequently Asked Questions
Can I buy a used Starlink dish and activate it myself without a transfer?
No. Starlink service activation and association are tied to accounts. You generally need the seller to complete the official transfer so your account can manage that dish/service.
What if the seller says it was transferred, but my app still shows issues?
Ask the seller to confirm transfer completion from their side in the Starlink app. On your end, verify the transfer invitation is accepted and the dish is powered and cabled correctly. If problems persist, use screenshots and device IDs to support a dispute or to contact Starlink support.
Should I buy from eBay or another marketplace?
eBay can be safer because of payment protections and dispute processes. If you do buy elsewhere, use the strictest payment safeguards available and require evidence that transfer can be completed.
Do I need the original router?
Often buyers prefer getting the full kit. Whether you can substitute a router depends on your dish setup and Starlink requirements. If the listing doesn’t clearly state what works together, assume you’ll need the included router and cables.
Can I transfer Starlink internationally?
Transfer is an account action, but service availability and service type (and any portability/residential rules) can limit where it works. Confirm your intended location and service expectations before relying on a used purchase.
Bottom Line
In 2024, buying and selling used Starlink is mostly about one thing: completing the official service transfer correctly. Verify the hardware condition, insist on transfer readiness, and don’t treat “it powers on” as the end of the process.
If you follow a structured buy/sell workflow—protected payment, component checklist, and transfer completed while both parties are available—you’ll avoid most of the expensive mistakes that drive used-Starlink complaints.
Quick Recap
Product prices and availability are accurate as of the date/time indicated and are subject to change. Any price and availability information displayed on Amazon at the time of purchase will apply.

