The Tool Desk
Outbyte PC Repair FREEClear out junk files and repair common Windows errorsFree Scan →Outbyte Driver Updater FREEScan for outdated or missing drivers - takes under a minuteDriver Scan →PC wiring becomes straightforward when you separate it into three jobs: power (from the PSU), data (between a drive and the motherboard), and case controls (switches, LEDs, USB and audio). Shut the computer down, unplug it, and use the exact motherboard and case manuals for header names and pin layouts. They are the final authority because layouts differ between ATX, microATX and mini-ITX boards.
Safety before touching any cable
- Shut down the operating system, switch the PSU to
O, and unplug the AC cord. - Press the case power button briefly to discharge residual power.
- Work on a stable, non-carpeted surface where practical. Touch the bare metal case frame periodically or use an anti-static strap.
- Never force, twist or insert a connector into a header that is not keyed for it.
- Do not reconnect modular PSU cables while the PSU is connected to AC power. Use only cables supplied with that PSU or explicitly approved for its exact series; modular cables are not universal (Corsair; Seasonic).
An anti-static strap is useful, but careful handling and a grounded work environment are also effective precautions; static protection need not become an elaborate ritual.
As an Amazon Associate I earn from qualifying purchases.
PC cable identification chart
| Label or connector | Connects to | Purpose |
|---|---|---|
POWER SW, PWR SW |
Front-panel header | Case power button |
RESET SW |
Front-panel header | Case reset button |
PLED, POWER LED |
Front-panel header | Power indicator |
HDD LED, HD LED |
Front-panel header | Drive-activity indicator |
HD AUDIO |
AAFP, JAUD1 or similar |
Front headphone and microphone jacks |
| Internal USB 2.0 | USB 2.0 motherboard header | Front USB 2.0, controllers or AIOs |
| USB 3.x 19-pin | Internal USB 3.x header | Front USB-A ports |
| Internal USB-C | Internal Type-C header | Front USB-C port |
| SATA data | Motherboard SATA port to SATA drive | Data transfer |
| SATA power | PSU to SATA drive or controller | Electrical power |
| 24-pin ATX | PSU to motherboard | Main board power |
| 4+4 EPS/CPU | PSU to CPU power socket | Processor power |
| 6+2 PCIe | PSU to graphics card | GPU or expansion-card power |
| 3-pin 5 V ARGB | ARGB header or controller | Addressable lighting |
| 4-pin 12 V RGB | RGB header or controller | Non-addressable lighting |
| 3- or 4-pin fan | CPU_FAN, SYS_FAN or PUMP |
Fan or pump power and control |
Header names vary; examples include MSI’s JFP1, SATA, CPU_PWR and CPU_FAN (MSI guide). A 3-pin 5 V ARGB plug is not compatible with a 4-pin 12 V RGB header.
Install a 2.5-inch SATA SSD
Mount the drive
Secure the SSD in a dedicated 2.5-inch tray, behind the motherboard tray, a case bracket, or a 3.5-inch bay adapter. Use the supplied screws; never leave the drive loose where it can touch the chassis or fans.
#1 Best Overall

- Cable Management Kit: 4pcs Cable Sleeves( 20 in L x 0.4 in w), 20pcs reusable wire ties,35Cable Clips 11 Cord Holders, 2 Self Adhesive Cable Tie Rolls(The length of each roll is 118 in), 20Pcs Cable Zip Tie Mounts(3.54L*1.1in W),100 Cable Fastening Ties (size of every : 7.87in L x0.12in W)
- 6 kinds of Cable Clips:46pcs wire Clips is made from eco-friendly Polyamide66 material, nontoxic, extra strong.Works on all clean surfaces like desks, walls, baseboards, cabinets, wood, ceramics, etc.Two colors(black&transparent) meet your needs well
- Premium Material: Made of highly sturdy and quality materials the components included in this kit are built to las, ensuring clutter free organization of your cords and cables for years to come. The included cable holders boast strong self-adhesive sticky pads ensuring they remain affixed to your desired surface at all times
- Easy to Install:Our wire loom is split and easy to load wires. Once loaded, our braided cable sleeve will close on itself and perfect wire wrap. No drilling, nailing or taping required.This cord protector also can keeps cat from chewing cables
- 20pcs 2 Roll Self Adhesive Ties: Each wire ties is 5.75 in length and 0.5 inches in width. Include an eye hole in the tail allowing the tie to be attached to a cable or hung from a hook. Multiple wire organizer can be attached together to form one longer tie
Connect SATA data
- Find a motherboard SATA port, commonly along the board’s right edge.
- Insert one end of a keyed SATA data cable into that port.
- Connect the other end to the SSD’s narrow SATA socket.
SATA data goes to the motherboard, not the PSU (Crucial; Kingston installation guide).
Connect SATA power
- Find the PSU’s flat, wide 15-pin SATA power plug.
- Connect it to the SSD’s wider socket.
- For a modular PSU, connect the PSU end only to the socket marked SATA or peripherals.
SATA power comes directly from the PSU (Seasonic; Corsair). Route both cables through nearby cutouts, avoid sharp bends at the plugs, leave gentle slack, and keep them away from fan blades. A right-angle data plug helps in tight spaces only if it does not press against the side panel.
Install an M.2 SSD
M.2 describes a form factor, not a guaranteed protocol. Before installation, verify that the socket supports PCIe/NVMe or SATA as appropriate, the drive length (2230, 2242, 2260, 2280 or 22110), keying, generation and lane configuration. Check whether the socket disables SATA ports or shares PCIe lanes. Compatibility details are covered by Kingston.
- Power off and unplug the PC.
- Remove the motherboard heatsink, if fitted, and confirm the standoff is at the SSD’s length.
- Insert the drive into the socket at roughly a 20–30-degree angle.
- Press it down and secure it with the supplied screw, captive latch or tool-free retainer; do not overtighten.
- Remove protective film from a heatsink thermal pad, then reinstall the heatsink.
A motherboard-mounted M.2 SSD normally needs no separate SATA data or SATA power cable; it receives power through the socket. Do not install an NVMe drive in a SATA-only socket or vice versa, use the wrong standoff, install the drive upside down, or force its key.
Rank #2
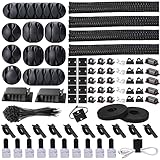
- Cable Management Organizer Kit: This comprehensive kit includes a variety of solutions including 4pcs Cord Protector( 20 inch l x 4 inch w), 10pcs reusable wire ties, 36 Self Black Adhesive Cord Holders, 2 Self Adhesive Cable Tie Rolls(The length of each roll is197 inch), 100 nylon wire ties (size of every : 7.9 inch L x0.12 inch w)
- Safety Material: Made of highly sturdy and quality materials the components included in this kit are built to las, ensuring clutter free organization of your cords and cables for years to come. The included cable holders boast strong self-adhesive sticky pads ensuring they remain affixed to your desired surface at all times
- 3 kinds of Black Cable Clips:36pcs wire Clips is made from Polyamide66 material, nontoxic, extra strong.Works on all clean surfaces like desks, walls, baseboards, cabinets, wood, ceramics, etc.Two colors(black transparent) meet your needs well
- Easy to Use:Our wire loom is split and easy to load wires. Once loaded, our braided cable sleeve will close on itself and perfect wire wrap. No drilling, nailing or taping required.This cord protector also can keeps cat from chewing cables
- Flexibility Versatility:including10pcs and 2 Roll Self Adhesive Ties. Each wire ties is 6 in length and 0.5 inches in width. Include an eye hole in the tail allowing the tie to be attached to a cable or hung from a hook. Multiple wire organizer can be attached together to form one longer tie
Connect case power, reset and LED wires
Find the exact front-panel header
Look for F_PANEL, JFP1, FP1, PANEL or SYSTEM PANEL, often near the bottom-right edge. Use the model-specific manual rather than a generic pin diagram.
- Match
POWER SWandRESET SWto their assigned pins. Their orientation normally does not matter. - Connect
PLEDandHDD LEDwith positive to positive and negative to negative. Reversed polarity normally prevents illumination rather than damaging the board. - If an LED plug is two-pin but the board uses three-pin spacing, follow the manual’s unused-pin position.
- Leave optional connectors disconnected instead of guessing.
Switches bridge two pins; LEDs are polarity-sensitive (Corsair). Some cases combine these wires in one block or require the supplied adapter; an integrated plug is not universally wired (Corsair case guidance).
Connect front USB and audio
- HD AUDIO: connect to
AAFP,JAUD1,F_AUDIOorHD_AUDIO. Align its blocked pin; it is not a USB plug. - USB 2.0: connect to a USB 2.0 header for front ports, lighting controllers or AIO controllers.
- USB 3.x Type-A: the large keyed 19-pin plug connects to the matching header. A case with more ports than the board supports may have reduced functionality.
- Internal USB-C: use the distinct internal Type-C header; USB 2.0 and 19-pin plugs cannot substitute for it.
Front ports work only when their matching internal cable and motherboard header are present.
Connect motherboard, CPU, GPU, fan and lighting power
- 24-pin ATX: fully seat it in the motherboard’s main socket.
- 4+4 EPS/CPU: connect near the CPU socket. Do not substitute a PCIe 6+2 plug. Additional CPU sockets may be optional or required depending on the board and processor; follow the manual.
- PCIe 6+2: connect to a graphics card or other expansion card that requires it.
- Fan and pump: use
CPU_FANfor the CPU cooler, and the board’s documentedSYS_FANorPUMPheaders for other devices. - RGB/ARGB: match voltage and pin count exactly; never put 5 V ARGB on 12 V RGB.
Connector destinations are summarized in Corsair’s PSU guide.
Rank #3

- Cable Management Organizer:4x cord protector 20in L x 0.4in w, 25 x Cable Zip Ties,35Cable Clips,11Cord Holders,200 Cable Fastening Ties:6inx 0.12in,20 Cable Zip Tie Mounts 3.54L x 1.1 inW, 5 Self Adhesive Cable Tie Rolls: each roll is 39 in
- 6 kinds of Cable Clips:Toally 46pcs wire clips is made from nontoxic material, , extra strong.Works on all clean surfaces like desks, walls, baseboards, cabinets, wood, ceramics, etc.Expand space visually by hiding the cables under the table and next to the back
- Easy installation Premium Material:No nails, no holes, no damage to the desktop, comes with a highly adhesive glue, leaving no marks. The included cable holders boast strong self-adhesive sticky pads ensuring they remain affixed to your desired surface at all times
- Self Adhesive Ties: Each wire ties is 5.75 in length and 0.5 inches in width. Include an eye hole in the tail allowing the tie to be attached to a cable or hung from a hook. Multiple wire organizer can be attached together to form one longer tie
- Safety and Tidy: Preventing pets from biting the wires that causing safety hazards. Keeps your feet from being snagged by cables while giving a cleaner look
Modular PSU warning
Never reuse a modular cable from another PSU brand or model family unless compatibility is explicitly documented. Incorrect pinouts can send the wrong voltage to components. Prefer native PSU SATA power over unknown Molex-to-SATA adapters; Crucial warns that poorly constructed adapters can overheat, melt or create a fire risk (Crucial warning).
Route cables for clearance and serviceability
- Connect difficult motherboard cables before routing the easy ones.
- Use the nearest cutouts and the back of the motherboard tray for excess length.
- Leave gentle slack instead of stretching a plug tight.
- Secure bundles with reusable Velcro or modestly tightened ties.
- Keep fan blades, heatsinks and side-panel clearance unobstructed.
- Power on and test before final tightening and closing the case.
Tidy routing can improve clearance, airflow and maintenance, but hiding cables by itself is not a performance upgrade.
Pre-power-on checklist
- 24-pin ATX, CPU EPS and required GPU power are fully seated.
- CPU cooler is connected to
CPU_FAN. - A SATA SSD has both data and power; an M.2 SSD is inserted and secured.
POWER SWis on the correct front-panel pins.- RAM is fully latched, no screw is beneath the motherboard, and no cable can hit a fan.
- Only after inspection, set the PSU switch to
I.
Troubleshooting by symptom
Nothing happens when you press power
- Confirm AC power and set the PSU to
I. - Reseat the 24-pin and CPU EPS plugs.
- Recheck the exact front-panel diagram and ensure
POWER SWis not on LED or reset pins. - If the manual identifies the pins, briefly bridge only those two pins with a screwdriver to test the board. If it starts, suspect the case switch, cable or placement. If not, use diagnostic LEDs and a minimal-hardware test.
Power LED is dark
Check polarity, pin spacing and the correct header. The computer can operate normally with the LED disconnected.
What’s actually slowing this PC down?
Pick the symptom - the matching free tool is one click away.
SATA SSD is missing
- Power down and unplug; reseat both connectors.
- Try another SATA data cable and motherboard port.
- Check whether an M.2 installation disabled that SATA port.
- Look in firmware setup. If visible there but absent from the operating system, initialize or partition it as appropriate. If absent from firmware, concentrate on power, cabling, port sharing and compatibility (Kingston troubleshooting).
M.2 SSD is missing
Reseat it at the correct angle, verify protocol and length, check the standoff and latch, review lane-sharing notes, and try another compatible socket if available.
Rank #4

- 327 PCS Cable Management Kit:4 cord protector 20 in L x 0.4 in w,25 Cable Zip Ties,65Cable Clips 13Cord Holders,200 Cable Fastening Ties:100pcs 6 in x 0.12 in and 100 pc 4 in x 0.12 in,5 Self Adhesive Cable Tie Rolls, each roll is 39 in,20 Cable Zip Tie Mounts 3.54L x 1.1 inW
- 7 kinds of Cable Clips:Toally 65pcs wire clips ,extra strong.Works on all clean surfaces like desks, walls, baseboards, cabinets, wood, ceramics, etc.Expand space visually by hiding the cables under the table and next to the back
- Easy installation :No nails, no holes, no damage to the desktop, comes with a highly adhesive glue, leaving no marks. The included cable holders boast strong self adhesive sticky pads ensuring they remain affixed to your desired surface at all times
- Premium Materials: cable sleeves are made from PET material, nontoxic, extra strong an durable,and easy self wrapping. While the cable clips are made from good materials, providing extra strength to securely hold your cables in place
- Safety and Tidy: Preventing pets from biting the wires that causing safety hazards. Keeps your feet from being snagged by cables while giving a cleaner look
Front USB or audio fails
Confirm the cable type and header, check for an offset or bent pin, and test rear ports to separate a wiring problem from an operating-system or driver problem. USB-C requires an internal USB-C header; audio requires HD AUDIO.
SATA versus M.2: practical trade-offs
| Consideration | 2.5-inch SATA SSD | M.2 SSD |
|---|---|---|
| Cables | SATA data plus SATA power | Usually none |
| Mounting | Tray, bracket or bay | Motherboard socket |
| Compatibility | Broad SATA support | Protocol, key, length and lane checks |
| Expansion impact | Uses a SATA port | May disable SATA ports or share lanes |
| Heat | Usually simple to cool | May benefit from a board heatsink |
M.2 is not automatically faster: performance depends on whether the drive uses SATA or PCIe/NVMe and on the drive design (Kingston comparison).
Useful tools and replacement parts
- A precision Phillips #0/#1 screwdriver, such as the iFixit Pro Tech Toolkit, helps with M.2 and tray screws.
- An anti-static strap is optional, for example iFixit’s strap.
- Buy a correctly sized SATA data cable from a reputable manufacturer such as Cable Matters or StarTech.
- If the case lacks a 2.5-inch mount, use a compatible bracket from SilverStone or StarTech.
- Use reusable Velcro or low-profile clips rather than over-tightened ties.
- Replace a PSU only when it lacks suitable native connectors or is unsuitable for the system; choose a quality unit from a manufacturer such as Corsair or Seasonic, and verify cable compatibility.
Frequently Asked Questions
Does an M.2 SSD need SATA power?
A motherboard-mounted M.2 SSD normally receives power through its socket and needs no separate SATA power or data cable.
Free tools Windows power users keep installed
One-click scans. No signup required.
Can the power-switch plug go in either direction?
Normally yes, because the switch is not polarity-sensitive. It must still be on the correct two front-panel pins.
Best Value

- Size: Diameter: 1/2"| Length: 10 Feet | Color: Black. Our wire loom is split and easy to load wires. Once loaded, our cable sleeve will close on itself and perfect wire wrap
- Operating temp (degree F.):-103 to 257|Melt temp: 446. Our cable management sleeve is used for Hifi speaker hdmi automotive wires
- Our cord protector keeps cat from chewing cables. Our cable protector is insulated
- Our wire sleeve: UL Recognized
- Our cable organizer keeps the cords organized with no more messy cables in your home and office
Can I use any modular PSU cable?
No. Use the cable supplied with the PSU or one explicitly approved for that exact PSU series.
Why did installing an M.2 drive disable a SATA port?
Some motherboards share lanes between M.2 sockets and SATA ports. Check the exact board manual for the disabled port combination.
Can a 3-pin ARGB plug go on a 4-pin RGB header?
No. They use different voltages and signaling; connecting them can damage lighting hardware.
Windows Errors? Fix Them Before They Spread
Repair common Windows errors and clear accumulated junk for a smoother, more stable PC - no reinstall needed.Free scan · no reinstallCrashes, No Sound, or Screen Glitches?
Random freezes, missing sound and display glitches usually trace back to one bad driver. Find and replace yours safely.Free scan · under a minuteWhy does my SSD appear in firmware but not Windows?
The drive may need initialization, partitioning or formatting in the operating system. If it is absent from firmware, investigate cabling, power, compatibility and port sharing first.
Is a SATA-to-Molex adapter safe?
Do not assume so. Poorly constructed adapters can overheat; a native PSU SATA lead or suitable PSU is preferable.
Quick Recap
Product prices and availability are accurate as of the date/time indicated and are subject to change. Any price and availability information displayed on Amazon at the time of purchase will apply.

