360-degree reframing on the Insta360 X4 Air means recording the entire scene first and choosing the direction, field of view and composition later. The camera combines the images from its two fisheye lenses into a 360-degree file; in the Insta360 mobile app or Insta360 Studio, you then look around that file and export a conventional flat video showing the angle you selected.
That “shoot first, point the view later” approach is useful for action clips, travel, demonstrations and group footage where you cannot predict the important moment. It does not mean the camera can recover detail that was never captured, and it does not make every lens or underwater setup stitch correctly. Capture technique, the selected viewing angle, distortion correction, stabilization and export settings still determine the result.
As an Amazon Associate I earn from qualifying purchases.
What reframing changes—and what it does not
A normal camera records one rectangle pointed in one direction. Reframing starts with a different kind of source: a complete spherical view. The X4 Air records overlapping fisheye images from its two lenses and stitches them into a 360-degree image or video. You choose a window into that sphere after recording, turning the immersive source into a conventional flat composition.
During editing, you can direct the virtual camera toward a person, turn it toward an event happening behind you, or follow an action as it moves through the scene. The original 360 capture remains the source; the exported flat video is a selected view from it. Insta360 describes the mobile process as swiping or moving the phone to change the angle, while the X4 Air manual confirms that both the mobile app and desktop Insta360 Studio can view and edit 360 footage.
#1 Best Overall

- Lightweight & Portable (165g): A sleek 165g* camera bursting with potential. Ultralight, easy to use, full 360 creativity—you won't even notice it's there. *Actual weight may vary slightly depending on configuration and production.
- 8K 360 Video: Dual lenses capture every second of the family fun, all angles of your favorite spot, and every highlight in stunning 8K30fps. Finally, no one is stuck behind the camera.
- Shoot First, Frame Later: Never aim the camera, always get the shot. Just hit record, live in the moment, and pick the best angles later with easy reframing tools in the Insta360 app.
- Invisible Selfie Stick Effect: Capture awesome third-person perspectives and drone-like angles with a selfie stick that magically vanishes from your shots. An iconic effect that's impossible with other action cameras. *Invisible Selfie Stick sold separately.
- Replaceable Lenses: X4 Air's lenses are rugged, durable, and easily replaceable with our handy kit. Swap them out if they get damaged without replacing the whole camera. No stress, no waiting.
Reframing is therefore different from cropping a normal video. A crop can only remove parts of an already chosen frame. Reframing lets you choose among directions that were recorded around the camera, although the final field of view, resolution and image quality depend on the capture mode and export settings you use.
Capture 360 footage that is easy to reframe
The editing stage cannot repair a poor stitch or a subject that was too close to a lens. Set up the camera with the later reframing decision in mind.
1. Select 360 mode
Use 360 mode when you want to choose the viewing direction after recording. The X4 Air’s two fisheye lenses must capture the surrounding scene so the software can build the spherical source. A single-lens recording does not give you the same all-around reframing choice.
2. Face one lens toward the main subject
For the cleanest stitch, the manual recommends facing one lens toward the subject while filming. Avoid standing between the lenses with the other lens pointed directly at the subject. Objects placed across the seam between the two lenses are more likely to show an alignment error or a visible join.
Rank #2

- Lightweight & Portable (165g): A sleek 165g* camera bursting with potential. Ultralight, easy to use, full 360 creativity—you won't even notice it's there. *Actual weight may vary slightly depending on configuration and production.
- 8K 360 Video: Dual lenses capture every second of the family fun, all angles of your favorite spot, and every highlight in stunning 8K30fps. Finally, no one is stuck behind the camera.
- Shoot First, Frame Later: Never aim the camera, always get the shot. Just hit record, live in the moment, and pick the best angles later with easy reframing tools in the Insta360 app.
- Invisible Selfie Stick Effect: Capture awesome third-person perspectives and drone-like angles with a selfie stick that magically vanishes from your shots. An iconic effect that's impossible with other action cameras. *Invisible Selfie Stick sold separately.
- Replaceable Lenses: X4 Air's lenses are rugged, durable, and easily replaceable with our handy kit. Swap them out if they get damaged without replacing the whole camera. No stress, no waiting.
3. Keep important action away from the stitch when possible
Leave a little space around faces, signs and fast-moving subjects instead of placing them exactly where the two lens views meet. You can still rotate the view later, but a badly positioned subject may remain difficult to fix because the problem was created during capture.
4. Consider the camera’s physical protection
The manufacturer lists a 49-foot (15-meter) waterproof rating for the camera and 197 feet (60 meters) when the compatible Invisible Dive Case is used. These are manufacturer specifications, not a guarantee for every setup or condition. For underwater 360 recording, the manual recommends the compatible case because water refraction can create stitching problems.
How to reframe in the Insta360 mobile app
The official product information confirms the basic interaction: open the 360 footage, swipe or move the phone to look around, choose the view that tells the story, and share or export the resulting video. App labels and placement can change with software updates, so treat the following as the stable workflow rather than a promise of identical button names on every release.
- Import or open the clip. In the Insta360 app, locate the recording in the camera connection or the app’s media area and open it in the viewer. The X4 Air manual says the app can view and edit both 360 and flat footage.
- Confirm that the source is 360. A 360 clip should let you look around the scene instead of showing only the direction selected at capture. If you cannot rotate around the camera, check that you opened the intended file and recorded in 360 mode.
- Set the opening view. Swipe across the preview, or physically move the phone as the product page describes, until the subject and horizon are framed correctly. This determines what the audience sees at that point in the exported flat video.
- Build the movement of the virtual camera. Scrub through the clip and adjust the viewing direction wherever the story needs to turn. Current official pages do not document a single fixed sequence of keyframe, timeline and export controls, so use the reframing controls presented by the installed app rather than relying on an old tutorial’s labels.
- Preview the entire result. Watch for abrupt direction changes, a subject leaving the frame, a tilted horizon or excessive cropping after stabilization. Correct the view while the source is still open instead of trying to repair the exported flat file.
- Apply optional corrections. If the image looks strongly curved, consider Dewarp. If camera movement makes the selected view uncomfortable, use FlowState Stabilization and, where available for that mode, Horizon Lock. These controls change the appearance of the chosen view; they are not replacements for selecting the correct direction.
- Export or share. Choose the output settings offered by the current app for the framing you created. Do not assume that every 360 capture exports at the same resolution or aspect ratio: the result depends on the capture mode, the selected view and the export settings.
How desktop reframing works in Insta360 Studio
Insta360 Studio provides the desktop alternative confirmed by the X4 Air manual. The concept is the same as on a phone: open the spherical clip, navigate around it, set the view over time, preview and export a flat composition. A larger monitor makes it easier to judge the stitch, horizon and edge cropping, and a computer can be more convenient for long clips or a detailed editing session.
Rank #3
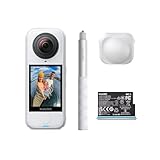
- Lightweight & Portable (165g): A sleek 165g* camera bursting with potential. Ultralight, easy to use, full 360 creativity—you won't even notice it's there. *Actual weight may vary slightly depending on configuration and production.
- 8K 360 Video: Dual lenses capture every second of the family fun, all angles of your favorite spot, and every highlight in stunning 8K30fps. Finally, no one is stuck behind the camera.
- Shoot First, Frame Later: Never aim the camera, always get the shot. Just hit record, live in the moment, and pick the best angles later with easy reframing tools in the Insta360 app.
- Invisible Selfie Stick Effect: Capture awesome third-person perspectives and drone-like angles with a selfie stick that magically vanishes from your shots. An iconic effect that's impossible with other action cameras. *Invisible Selfie Stick sold separately.
- Replaceable Lenses: X4 Air's lenses are rugged, durable, and easily replaceable with our handy kit. Swap them out if they get damaged without replacing the whole camera. No stress, no waiting.
- Open the X4 Air file in Studio. Use the current version of Insta360 Studio that supports the X4 Air, then load the 360 recording.
- Inspect the stitch before editing. Rotate around the entire sphere and look for a subject crossing the lens seam, a nearby object that appears doubled, or a damaged lens area. Fixing the source problem is preferable to hiding it with a narrow view.
- Choose the viewing direction and field of view. Position the virtual camera on the important action. A wider view shows more context but makes the subject smaller; a narrower view emphasizes the subject but leaves less room for movement.
- Animate the view using the controls available in your Studio build. Official documentation reviewed for this guide does not specify a universal keyframe and export-button sequence. Interface names can change, so follow the current on-screen timeline and reframing controls rather than copying an unverified path.
- Check stabilization and horizon treatment. Studio exposes a Stabilization Type control. Preview the clip after changing it because leveling and stabilization can alter the edges of the selected frame.
- Export with settings appropriate to the destination. Match the output dimensions, frame rate and codec options to the platform or editing program you will use next. The X4 Air product page advertises 8K 360 video as a capability, but that does not mean every mode, crop or export remains 8K.
Dewarp, stabilization and Horizon Lock are separate controls
Dewarp corrects lens perspective
Dewarp is an optional lens-distortion correction, not another name for reframing. In the app, Insta360 documents a Dewarp button on the Player page. It also documents the path Edit > Create a Video > select media > 360 Reframe > Dewarp. The stated Dewarp viewing-angle range is 70° to 100°, according to Insta360’s support page accessed October 13, 2026.
Dewarp is not supported in Single-Lens Mode. Use it when the selected view’s curved lines or stretched edges are distracting, and then check whether the corrected perspective leaves enough of the subject in frame.
FlowState Stabilization smooths movement
For mobile editing, locate the clip under Album, open playback Settings > Frame, and enable FlowState Stabilization when the control is available for that footage. In Studio, choose the appropriate option under Stabilization Type.
Free tools Windows power users keep installed
One-click scans. No signup required.
Horizon Lock levels the scene
Insta360 says Horizon Lock is enabled by default for all photo and video modes in 360 mode. For X4 Air video modes other than FreeFrame, FlowState Stabilization and Horizon Lock share a toggle. Leveling a moving camera can make a shot easier to watch, but rotating the frame to keep the horizon level may crop the edges. Always preview the full clip after enabling it.
Rank #4

- Insta360 X4 Air Snowboard Bundle is designed for snowboarders. With the dedicated Action Invisible Selfie Stick, you can capture your runs and record life on the slopes, while the included Lens Cap protects your camera lens from accidental damage during transport.
- Lightweight & Portable (165g): A sleek 165g* camera bursting with potential. Ultralight, easy to use, full 360 creativity—you won't even notice it's there.
- 8K 360 Video: Dual lenses capture every second of the family fun, all angles of your favorite spot, and every highlight in stunning 8K30fps. Finally, no one is stuck behind the camera.
- Shoot First, Frame Later: Never aim the camera, always get the shot. Just hit record, live in the moment, and pick the best angles later with easy reframing tools in the Insta360 app.
- Invisible Selfie Stick Effect: Capture awesome third-person perspectives and drone-like angles with a selfie stick that magically vanishes from your shots. An iconic effect that's impossible with other action cameras.
Mobile app or desktop Studio?
| Choice | Best fit | What the official information establishes | What not to assume |
|---|---|---|---|
| Insta360 mobile app | Quick reframing, phone-based review and sharing | The product page describes swiping or moving the phone to select a view; the manual confirms mobile viewing and editing of 360 footage. | Do not assume a particular keyframe or export-button layout; app interfaces change. |
| Insta360 Studio | Desktop review, larger-screen composition and computer-based editing | The manual confirms desktop viewing and editing of X4 Air 360 and flat footage. | The reviewed official pages do not establish that Studio produces better image quality than the app. |
Choose the tool that fits where you need to work. The evidence supports feature availability in both, not a universal quality advantage for one over the other.
Accessories that affect capture, not the reframing concept
| Accessory or setup | Use | Important limitation |
|---|---|---|
| X4 Air-compatible invisible selfie stick | Can disappear from a 360 shot to create a third-person or drone-like viewpoint. | Optional. You can reframe without one. |
| X4 Air Standard or Premium Lens Guards | Added protection for the exposed lenses in ordinary use. | They are not sealed for water activities. Use only the exact X4 Air version listed as compatible. |
| X4 Air Invisible Dive Case | Recommended by the manual for underwater 360 capture to address refraction-related stitching issues. | Remove lens guards before installing the dive case; bundle contents and availability vary by edition and region. |
| X4 Air Replacement Lens Kit | Repair option after lens damage. | It is separately purchased and is not an editing requirement. The manual recommends Stitching Calibration after lens replacement. |
For underwater work, the practical choice is between convenience in shallow, protected use and the stitching support of the compatible dive case. Do not describe the lens guards as waterproof, and do not leave them on when fitting the case.
Independent reader supportYour contribution helps us test, update, and keep practical guides available for everyone.Troubleshooting common reframing problems
The view is limited to one direction
Verify that the clip was recorded in 360 mode and that you opened the 360 file rather than a previously exported flat video. Reframing requires the spherical source; a flat export cannot recreate directions that were discarded.
Quick wins for a faster PC:
Repair Windows errors before they cause bigger problemsFix Now →Scan for outdated or missing drivers - takes under a minuteDriver Scan →A person or object is cut at the seam
This usually reflects capture position. For future recordings, face one lens toward the subject and avoid placing the subject between the lenses. In the current clip, rotate the virtual camera away from the seam or use a tighter composition that hides the damaged area.
Best Value

- Insta360 X4 Air Travel Bundle is designed for travelers. With the dedicated Foldable 2-in-1 Selfie Stick, you can easily capture the scenery during your trips, while the spare battery ensures extended shooting time.
- Lightweight & Portable (165g): A sleek 165g* camera bursting with potential. Ultralight, easy to use, full 360 creativity—you won't even notice it's there.
- 8K 360 Video: Dual lenses capture every second of the family fun, all angles of your favorite spot, and every highlight in stunning 8K30fps. Finally, no one is stuck behind the camera.
- Shoot First, Frame Later: Never aim the camera, always get the shot. Just hit record, live in the moment, and pick the best angles later with easy reframing tools in the Insta360 app.
- Invisible Selfie Stick Effect: Capture awesome third-person perspectives and drone-like angles with a selfie stick that magically vanishes from your shots. An iconic effect that's impossible with other action cameras.
Lines look bowed or faces look stretched
Try Dewarp within its documented 70°–100° viewing-angle range. Remember that Dewarp is unavailable for Single-Lens Mode, and compare the corrected preview with the untreated view before exporting.
The horizon tilts or the frame crops unexpectedly
Check FlowState Stabilization and Horizon Lock settings. Leveling can rotate the image and crop its edges, so reduce the correction, change the selected view or leave more margin around the subject during capture.
Underwater footage has a visible mismatch
Water refraction can interfere with the stitch. The manual recommends the compatible Invisible Dive Case for underwater 360 recording and says lens guards should be removed before water use. A case cannot repair a seam that was already recorded incorrectly, but it addresses the setup the manufacturer identifies for underwater stitching.
Recommended Free Tools
A practical reframing example
Imagine recording a cyclist passing the X4 Air on a roadside. In 360 mode, keep one lens facing the rider and leave space around the path. In the app or Studio, begin with a forward-facing view that establishes the road, turn the virtual camera toward the rider as they approach, then rotate toward the direction of travel after the pass. A wide opening view provides context; a narrower middle section emphasizes the cyclist; a final turn can reveal the surrounding landscape. Preview the transitions, apply stabilization only if it improves the motion, and export after confirming that the rider never crosses an unwanted stitch or leaves the frame.
The essential takeaway
On the Insta360 X4 Air, reframing is a post-capture composition process: record a complete 360 scene, inspect it in the mobile app or Insta360 Studio, choose where the virtual camera looks over time, correct distortion or motion when useful, and export a flat view. Capture in 360 mode, face one lens toward the subject, protect the lenses appropriately for the environment, and treat resolution, field of view and export behavior as settings to verify for the specific mode rather than assumptions about every clip.
Quick Recap
Product prices and availability are accurate as of the date/time indicated and are subject to change. Any price and availability information displayed on Amazon at the time of purchase will apply.

