For the most responsive Nintendo Switch 2 fighting-game setup, use your display’s Game or low-latency mode, enable Auto Low-Latency Mode (ALLM), and select 120 Hz Output at 1080p or 1440p when the game and display both support it. Choose 4K only when image detail matters more than a 120 Hz mode, because Nintendo limits 4K TV output to a maximum of 60 fps. Set HDR to Compatible Software Only, calibrate it with the console’s Adjust HDR tool, enable VRR when supported, and leave RGB Range on Automatic unless your display manual says otherwise.
The best starting profile for fighting games
Fighting games reward consistent frame timing, quick display response and controls that feel predictable. No single Switch 2 setting produces the same result on every television: Nintendo does not publish one universal end-to-end input-lag figure covering every display, game and controller combination. The practical goal is therefore to remove avoidable processing and choose the highest refresh mode that your particular game and screen can actually use.
As an Amazon Associate I earn from qualifying purchases.
Apply this profile in System Settings > Display, then verify the corresponding options in your television’s own menus:
PC Slower Than It Used to Be?
A free scan shows the junk files, broken settings and background clutter dragging Windows down - then fixes them in one click.Free scan · Windows 10 & 11Crashes, No Sound, or Screen Glitches?
Random freezes, missing sound and display glitches usually trace back to one bad driver. Find and replace yours safely.Free scan · under a minute| Switch 2 setting | Recommended value | Why it matters |
|---|---|---|
| TV picture mode | Game, Game Mode or Low Latency | Disables or reduces television processing that can delay controller-to-screen response. |
| Auto Low-Latency Mode (ALLM) | On | Allows a compatible television to switch itself into its low-latency mode when the console is active. |
| Resolution | 1440p if your display and game handle it well; otherwise 1080p for a 120 Hz target | Both resolutions support Switch 2’s 120 Hz output option. |
| 120 Hz Output | On when the game and display support 120 Hz | Enables the higher refresh-rate output at 1080p or 1440p. |
| 4K (2160p) | Use for detail-first play | 4K TV output is limited to a maximum of 60 fps. |
| HDR Output | Compatible Software Only | Prevents unsupported games from being forced into HDR. |
| VRR Output | On when both the game and display support it | Can accommodate supported variable frame rates, but is not a guaranteed millisecond reduction. |
| RGB Range | Automatic | Lets the console use the display’s expected range unless the display manual specifies Full or Limited. |
After changing a setting, launch the actual fighting game you play and check its own video options. A console-level 120 Hz or HDR setting cannot make a title support a mode that the software does not provide.
#1 Best Overall

- HD Rumble 2
- Motion controls
- Built-in amiibo functionality*
- Capture Button
- C Button for GameChat**
How Switch 2 resolution and refresh rate affect play
Resolution and refresh rate are separate choices. A higher resolution gives a sharper image; a higher refresh rate allows the display to update more often when the game supplies the necessary frames. On Switch 2, Nintendo’s documented output limits make the trade-off unusually clear: 120 Hz output is available only at 1080p and 1440p, while 4K TV output is capped at 60 fps.
1080p at 120 Hz: the safest speed-first choice
Choose 1080p when your television or monitor has its most reliable 120 Hz mode at that resolution, or when you sit far enough away that the additional detail of 1440p is difficult to see. A 1080p/120 Hz setup is also a sensible fallback for a display that accepts 1440p inconsistently, drops signal when switching modes, or applies a different processing path to 1440p.
In System Settings > Display, select 1080p under the TV resolution controls and turn on 120 Hz Output. The game must also support a mode that can use the higher refresh rate. If it remains a 60-frame-per-second title, the display may still accept a 120 Hz signal, but the game itself is not producing twice as many updates; do not assume the setting alone halves input delay.
The Tool Desk
Outbyte PC Repair FREERepair Windows errors before they cause bigger problemsFix Now →Outbyte Driver Updater FREEScan for outdated or missing drivers - takes under a minuteDriver Scan →1440p at 120 Hz: the balanced option
1440p is the preferred compromise when your display accepts it cleanly and the game offers a compatible high-refresh mode. It provides more output detail than 1080p while retaining access to the Switch 2 120 Hz setting. Confirm the mode in the television or monitor’s information panel after selecting it; some displays label 1440p as 2560×1440 or “QHD.”
Use the display’s Game mode at this resolution as well. A screen can have different processing and bandwidth behavior at 1440p than at 1080p, so judge the mode by its actual signal stability and the game’s behavior rather than by resolution alone.
4K at 60 fps: detail-first play
4K, also called 2160p, is appropriate when crisp image detail is your priority and a 60-fps ceiling is acceptable. Nintendo states that 4K TV output has a maximum frame rate of 60 fps. You cannot combine a 4K output target with the console’s 120 Hz output option; Nintendo limits that option to 1080p and 1440p.
That does not make 4K unusable for fighting games. A supported game may look cleaner at 4K, and a large television viewed from a short distance can make the extra detail obvious. It does mean that choosing 4K is a deliberate image-quality decision rather than a route to the highest refresh rate.
Rank #2

- This controller also works with Nintendo Switch 2 - C Button not available
- Eight RGB zones with four pre-set modes for dynamic lighting combinations
- Two programmable quick-action back buttons for customizable gameplay
- Built-in motion controls for immersive gameplay
- Ergonomic design for extended comfort
Quick decision table
| Priority | Switch 2 output | Refresh ceiling documented by Nintendo | Choose it when |
|---|---|---|---|
| Maximum refresh potential | 1080p | 120 Hz when supported by the game and display | Your screen’s best low-latency mode is 1080p, or you value a dependable high-refresh path over extra sharpness. |
| Balance of sharpness and speed | 1440p | 120 Hz when supported by the game and display | Your display accepts 1440p reliably and you want more detail without giving up the 120 Hz option. |
| Maximum output detail | 2160p (4K) | 60 fps maximum for TV output | You prefer a sharper image and the game’s 60-fps behavior is acceptable. |
Remove avoidable display latency first
Turn on Game or low-latency mode
Open your television’s picture settings while the Switch 2 input is selected and choose the mode named Game, Game Mode, Low Latency or a similar manufacturer label. This is a display-side control, not a Switch 2 menu item. Movie, Cinema, Vivid and filmmaker-oriented modes commonly retain image processing that is unnecessary for a competitive game.
Game mode may change color, motion smoothing, noise reduction and sharpness defaults. That is intentional: the screen is prioritizing prompt presentation of the incoming signal. If your display offers individual toggles, disable motion interpolation and other frame-processing features in the game preset unless you have a specific reason to retain them.
Enable Auto Low-Latency Mode (ALLM)
On the console, go to System Settings > Display and turn on Auto Low-Latency Mode (ALLM). Nintendo describes ALLM as a feature that automatically changes a compatible television to its low-latency mode. Your display must support ALLM, and its HDMI input or global settings may also need the feature enabled.
When ALLM works, switching to the Switch 2 input should move the television into its game preset. Check the on-screen picture-mode label the first time you configure it. If the label does not change, select Game mode manually and consult the display manual for an ALLM or HDMI-enhanced-input switch.
Do these 3 things before closing this tab:
1Repair Windows errors before they cause bigger problems2Fix the driver behind crashes, sound loss and screen glitches3Clear out junk files and repair common Windows errorsALLM is the first setting to check because it addresses processing in the display itself. It does not alter a game’s internal frame rate or promise a specific number of milliseconds, but it prevents the television from quietly using a slower cinema-oriented pipeline.
Configure HDR without washed-out menus or crushed shadows
HDR is conditional on both software and hardware. Nintendo lists three Switch 2 choices under System Settings > Display > HDR Output: For All Software, Compatible Software Only and Off. The television must support HDR, and the game must provide compatible HDR output for the feature to have its intended effect.
Why Compatible Software Only is the default
Set HDR Output to Compatible Software Only when you play a mixture of games. This lets supported titles use HDR while avoiding a forced HDR signal for software that was not designed for it. Forcing HDR on every title can produce an image that looks gray, overly dark or incorrectly saturated when the game does not contain an HDR presentation.
Rank #3

- Hall Effect Modules: Say goodbye to stick drift with contract-free magnetic sensors in the thumbsticks giving you smoother control, enhanced precision, and increased longevity
- Advanced Gaming Buttons: Get an edge over the competition with mappable Advanced Gaming Buttons you can program on the fly, mid-game—no system settings to configure
- Intuitive Motion Controls: Get immersed in your games with fluid, responsive motion controls that provide an intuitive way to aim, steer, fly, and more
- C Button: Easily activate fun GameChat features
- Rechargeable Battery: Get up to 30 hours of battery life on a single charge. Includes an extra-long 10 ft. USB-C cable to recharge the internal battery*
Use For All Software only if you have tested your library and prefer the display’s conversion behavior for non-HDR games. Choose Off when your television has poor HDR performance, you are troubleshooting a signal problem, or you deliberately want every game in the display’s standard dynamic-range mode.
Run the console’s HDR adjustment
- Connect the Switch 2 to an HDR-capable television or monitor and put that input in its Game picture mode.
- Open System Settings > Display > Adjust HDR.
- Follow the on-screen pattern controls until the reference symbols are visible as instructed. Do not set the image by eye from a bright showroom preset; use the pattern in the calibration tool.
- Save the adjustment, then open the television’s own HDR or game-HDR calibration menu if it provides one.
- Launch the fighting game and check its video settings. Some games expose an additional HDR brightness or paper-white control that is separate from the console calibration.
If the picture becomes dim or colors look clipped after enabling HDR, check that the television has switched to its HDR game preset, rerun Adjust HDR, and verify that the game itself is HDR-compatible. Do not solve a mismatch by immediately raising every brightness control; that can wash out the image and hide shadow detail.
When VRR helps—and what it cannot promise
Turn on VRR Output in System Settings > Display when the television and the game both support variable refresh rate. VRR allows a compatible display to vary its refresh timing to follow supported changes in the game’s frame delivery. That can make uneven motion look smoother in a title that does not hold a constant frame rate.
VRR is a compatibility feature, not a universal input-lag guarantee. It does not automatically make a 60-fps game behave like a 120-fps game, and it cannot compensate for a television that is not in low-latency mode. Keep ALLM or the manual Game preset enabled, and test the result in the specific title you play.
Nintendo says TV-mode VRR support was added in a system update released on September 10, 2026. Update the console before troubleshooting a missing VRR option, then confirm that your display firmware, HDMI input and game all support the feature. Some displays expose VRR only on particular HDMI ports or only at certain resolutions.
If enabling VRR causes a blank screen, flicker or repeated signal loss, turn it off temporarily, return to a supported resolution, and verify the display’s VRR range and HDMI setting. A stable fixed-refresh signal is preferable to an unreliable VRR connection during a match.
Set RGB Range correctly to avoid a dull or crushed image
Switch 2 offers Automatic, Full Range and Limited Range under its RGB Range control. Leave the setting on Automatic unless your television or monitor manual explicitly specifies a matching range.
Rank #4
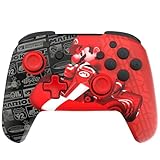
- This controller also works with Nintendo Switch 2 - C Button not available
- Experience the thrill of the race with the Grand Prix Mario design
- Glows in the dark
- Two programmable quick-action back buttons for customizable gameplay
- Built-in motion controls for immersive gameplay
A range mismatch changes black and white levels rather than improving responsiveness. If the console sends Full while the display expects Limited, blacks can look crushed and bright details can clip. The opposite mismatch can make the picture appear gray and low-contrast. If you must set the value manually, set the display and console to the same documented range, then inspect a game with both dark and bright detail before saving it.
Independent reader supportYour contribution helps us test, update, and keep practical guides available for everyone.Controller feel is a separate part of responsiveness
Display settings remove screen-side delay, but they do not determine the ergonomics of your buttons, stick or d-pad. Choose the controller layout that lets you perform your game’s motions consistently, and evaluate it separately from resolution and HDR.
Quick wins for a faster PC:
Repair Windows errors before they cause bigger problemsFix Now →Scan for outdated or missing drivers - takes under a minuteDriver Scan →Clear out junk files and repair common Windows errorsFree Scan →Nintendo’s Switch 2 Pro Controller includes GL/GR buttons that you can map to any button you choose. In a fighting game, those extra inputs can be assigned to a frequently used attack, shoulder combination or training-mode shortcut without changing the face-button arrangement. The documented feature is remapping flexibility; Nintendo does not state that these buttons provide a lower latency than other controller inputs.
Before a tournament or ranked session, check the game’s controller-configuration screen and save the layout. Confirm that the console recognizes the controller, that each mapped button performs the intended action, and that your grip does not cause accidental presses on the rear buttons. If a layout feels unfamiliar, practice it in training mode before using it in matches.
A complete setup procedure
- Update the console. Install the latest Switch 2 system update so current display features, including TV-mode VRR support added September 10, 2026, are available.
- Connect the correct display input. Use the HDMI input documented by your television or monitor for its high-refresh, HDR or VRR features. Enable any enhanced-format or gaming-input option the display requires.
- Set the display preset. Select Game, Game Mode or Low Latency. Disable motion smoothing and other processing that your display leaves active in that preset.
- Configure ALLM. In System Settings > Display, turn on Auto Low-Latency Mode, then verify that the television changes to its game preset when the console input is selected.
- Choose a resolution. Select 1440p for the balanced 120 Hz path, 1080p when it is your display’s more reliable high-refresh mode, or 2160p (4K) when image detail takes priority over 120 Hz.
- Set 120 Hz Output. Turn it on only for a 1080p or 1440p setup where both the display and software support it. Remember that 4K output cannot use this setting and is capped at 60 fps.
- Choose HDR behavior. Set HDR Output to Compatible Software Only for a mixed library, then run Adjust HDR and the television’s game-HDR calibration.
- Enable VRR if appropriate. Turn on VRR Output only when the display and game support it and the signal remains stable at your chosen resolution.
- Leave RGB Range on Automatic. Change it only when the display documentation calls for Full or Limited and both devices can be matched.
- Configure the controller. Map controls in the game, including the Pro Controller’s GL/GR buttons if that layout suits you, and test every input in training mode.
- Verify in the game. Check the title’s frame-rate, resolution, HDR and VRR options. Record the combination that gives you stable motion and a readable image, rather than changing several variables during a match.
Fighting-game setup choices by priority
| Player priority | Recommended setup | Main compromise |
|---|---|---|
| Competitive responsiveness | Game/low-latency mode, ALLM on, 1080p or 1440p, 120 Hz Output on when supported, HDR Compatible Software Only, VRR on only if stable | Lower output resolution than 4K and possible title-specific limits. |
| Sharp image on a large 4K television | Game/low-latency mode, ALLM on, 2160p output, HDR calibrated for compatible games | 4K TV output is limited to 60 fps, so there is no 120 Hz output at this resolution. |
| Mixed game library | Game mode, ALLM on, 1440p or 1080p, HDR Compatible Software Only, RGB Automatic, VRR enabled only for supported titles | Some games may use different resolution, HDR or frame-rate modes. |
| Inconsistent display compatibility | Game mode, ALLM off only if it fails, 1080p fixed output, HDR Off for diagnosis, RGB Automatic | Fewer advanced features while you isolate the unstable setting. |
Troubleshooting common problems
The game feels delayed even with 120 Hz enabled
- Confirm the television is actually in Game or low-latency mode; a 120 Hz signal does not disable all picture processing by itself.
- Check whether the game supports a high-refresh mode. The console toggle cannot add one to software that does not provide it.
- Try the display’s 1080p mode if 1440p uses a different processing path or causes signal conversion.
- Test another controller and check the game’s button configuration. Display latency and controller ergonomics are separate variables.
120 Hz is unavailable or the screen falls back to 60 Hz
- Make sure the output is 1080p or 1440p; Nintendo does not support 120 Hz output at 4K.
- Verify that the selected HDMI input and cable path support the display’s documented 120 Hz mode.
- Check the game’s video settings and the television’s current signal-information panel.
- If 1440p is unreliable, select 1080p and test again rather than assuming the console is faulty.
HDR looks gray, too dark or oversaturated
- Use Compatible Software Only instead of For All Software for a mixed library.
- Run System Settings > Display > Adjust HDR again with the display in its HDR Game preset.
- Confirm that the game supports HDR and that the television has detected an HDR signal.
- Check RGB Range only after HDR calibration; a Full/Limited mismatch can alter black and white levels.
VRR causes flicker or a lost signal
- Confirm the console is updated and that TV-mode VRR is supported on your display and selected HDMI input.
- Disable VRR temporarily and test a fixed 1080p or 1440p signal.
- Re-enable VRR only after the display remains stable at the game’s supported mode. Smoothness is not useful if the connection drops during a match.
The picture is washed out or shadow detail is missing
- Return RGB Range to Automatic on both the console and display.
- If the display manual requires a manual range, set both devices to the same Full or Limited value.
- Recheck the television’s Game preset after changing HDR or RGB settings, because some displays store separate values for SDR and HDR.
What Nintendo’s specifications establish—and what they do not
Nintendo establishes that 120 Hz Output is available only at 1080p and 1440p, that 4K TV output has a maximum of 60 fps, and that 4K, HDR and VRR in TV mode require compatible games and a compatible display. Those are console capability limits, not guarantees that every title exposes every mode.
The specifications also do not provide one input-lag number that applies to every television, game and controller. Your final result depends on the display’s processing path, the selected resolution and refresh mode, the game’s frame delivery, and the controller layout you can operate reliably. Use the settings above to remove avoidable processing, then keep the mode that remains stable and comfortable in the games you actually play.
What’s actually slowing this PC down?
Pick the symptom - the matching free tool is one click away.
Quick Recap
Product prices and availability are accurate as of the date/time indicated and are subject to change. Any price and availability information displayed on Amazon at the time of purchase will apply.

