Outdated Drivers Are Slowing You Down
One free scan finds every outdated or missing driver and matches the right update for your exact hardware.Free scan · exact hardware matchWindows Errors? Fix Them Before They Spread
Repair common Windows errors and clear accumulated junk for a smoother, more stable PC - no reinstall needed.Free scan · no reinstallThe best Nintendo Switch 2 Call of Duty settings are a starting point, not a universal code: begin at 4-4 or 5-5 look sensitivity, set ADS sensitivity below hip-fire (about 0.75–0.90), calibrate the sticks and motion sensors, and use gyro as a low-sensitivity fine-aim aid. If you are asking “What are the best Switch 2 Call of Duty sensitivity settings?”, “Should I use gyro/motion controls?”, “How do I stop over-aiming on Joy-Con 2?”, or “Why can’t my teammates hear me?”, the fixes are below.
There is no official best numerical sensitivity. Nintendo and Activision document configurable controls, but neither publishes one setting that suits every player, weapon and display. Tune one variable at a time in a firing range or low-pressure match so you know which change helped.
As an Amazon Associate I earn from qualifying purchases.
Quick-start settings for a new Switch 2 player
Use this baseline before making personal adjustments. It is deliberately moderate: fast enough to turn, but controlled enough to learn recoil and target tracking.
| Setting | Starting point | When to change it |
|---|---|---|
| Look sensitivity (horizontal and vertical) | 4-4 or 5-5 | Raise both axes one step if turning feels slow; lower them if the reticle passes the target. |
| ADS sensitivity or multiplier | Below hip-fire, about 0.75–0.90 when precision is the priority | Lower it when scoped aim feels twitchy; raise it gradually if tracking a moving target feels sluggish. |
| Gyro/motion sensitivity | Low, with sticks still handling the main turns | Increase in small steps until wrist movements make fine corrections without wobble. |
| Proximity chat | Off for a quieter competitive mix | Turn it on only when you intentionally want nearby opponents to hear you. |
| Vibration | A level that does not hide aim feedback | Reduce it if rumble distracts you while tracking or firing. |
These are editorial starting points, not promises of a faster kill time or better accuracy. Your hand size, screen distance, frame rate, controller, game mode and comfort with motion all affect the result.
#1 Best Overall

- HD Rumble 2
- Motion controls
- Built-in amiibo functionality*
- Capture Button
- C Button for GameChat**
Calibrate the Switch 2 before judging your aim
Many “bad sensitivity” problems are actually stick or motion calibration problems. A small center offset can make a normal setting feel too fast, while an uncalibrated gyro can move the camera when the controller is resting.
- Open the Nintendo Switch 2 System Settings and use the available stick-calibration controls. Follow the on-screen test for each Joy-Con 2 or controller you plan to use.
- In the same system settings, run the motion-control calibration. Keep the controller on a stable, level surface when the procedure asks you to do so.
- Return to Call of Duty and test the same weapon and optic after calibration. Do not change sensitivity until you know the reticle is centered when you release the sticks.
- If drift returns, test the other controller or Joy-Con pair. A repeatable movement at rest points to hardware or calibration trouble rather than a sensitivity preference.
Joy-Con 2 also exposes mouse controls and mouse sensitivity in Switch 2 system settings. Those controls are separate from traditional stick sensitivity. Test them independently instead of assuming a change to one will alter the other.
How to tune Call of Duty sensitivity one change at a time
Start with equal horizontal and vertical look values
Set both look axes to 4 or both to 5. Equal values give you a predictable baseline for turning and vertical corrections. Play a short drill: turn to a target, stop, aim down sights, and repeat from the opposite direction.
- If you cannot turn far enough before the target passes out of view, raise both axes by one step.
- If you repeatedly swing beyond the target, lower both axes by one step.
- If horizontal tracking is comfortable but vertical recoil control is not, change only the vertical axis and leave the horizontal value alone.
Do not jump from a moderate value to the maximum. Large changes make it difficult to tell whether the problem is turning speed, thumb pressure or an uncalibrated stick.
Keep ADS slower than hip-fire for precision
An ADS multiplier around 0.75–0.90 keeps fine aiming slower than hip-fire. That separation helps when you need to make small corrections through an optic but still want a responsive turn before aiming.
Choose the lower end of that range if your reticle overshoots heads or if a higher magnification optic feels nervous. Move upward in small increments if a strafing target consistently outruns your aim. Change the ADS value without changing look sensitivity, then test again so the result is attributable.
Rank #2

- This controller also works with Nintendo Switch 2 - C Button not available
- Eight RGB zones with four pre-set modes for dynamic lighting combinations
- Two programmable quick-action back buttons for customizable gameplay
- Built-in motion controls for immersive gameplay
- Ergonomic design for extended comfort
Use a repeatable test instead of changing settings every match
- Pick one familiar weapon and, if possible, one optic.
- Use the firing range or a low-pressure match rather than a high-stakes round.
- Test a stationary target, a target moving sideways, and a target that changes elevation.
- Record whether you stopped short, overshot, or lost the target while tracking.
- Change one value by one step, repeat the same tests, and keep the change only if the error becomes less frequent.
Switching several values at once can produce a temporarily comfortable feeling without telling you which setting is responsible. A stable setup is easier to rebuild after a game update or when you move between handheld and docked play.
Recommended Free Tools
How do I stop over-aiming on Joy-Con 2?
Over-aiming means the reticle travels past the target when you release or reverse the stick. On Joy-Con 2, start with the following order rather than immediately disabling every advanced control:
- Confirm stick calibration in Switch 2 System Settings.
- Lower look sensitivity one step on both axes if the overshoot occurs during hip-fire turns.
- Lower the ADS multiplier toward 0.75 if the overshoot appears only while aiming down sights.
- Use a lighter thumb movement and release the stick before the reticle reaches the target; the final correction should be small.
- If motion controls are enabled, temporarily turn gyro off and repeat the test. If the overshoot disappears, keep gyro off or reduce its sensitivity before re-enabling it.
- Check Joy-Con 2 mouse controls separately. A mouse-control setting should not be used to compensate for a stick problem.
When the reticle drifts while your thumb is not touching the stick, sensitivity is not the right fix. Recalibrate and compare another controller. If the behavior follows one controller, treat it as a controller issue; if it follows every controller, revisit the in-game settings.
Should you use gyro or motion controls?
For most new players, gyro works best as a supplement: use the sticks for broad turns and the motion sensor for the last few degrees of a shot. This preserves familiar thumb aiming while adding a precise wrist correction. A gyro-first style can work, but it has a steeper learning curve and demands a stable posture.
A practical gyro setup
- Calibrate motion controls in Switch 2 System Settings before opening the game.
- Enable gyro or motion aiming in Call of Duty if the game build you are using exposes that option.
- Set gyro sensitivity low and keep stick aiming as the main turning method.
- Practice tiny wrist movements on a stationary target, then track a target moving sideways.
- Raise gyro sensitivity gradually. Stop when a small wrist movement reaches the target without visible wobble.
Keep the controller close to your normal playing position. Large arm movements make it harder to separate intentional corrections from camera shake, especially in handheld mode.
Quick wins for a faster PC:
Scan for outdated or missing drivers - takes under a minuteDriver Scan →Clear out junk files and repair common Windows errorsFree Scan →When to turn gyro off
Disable motion aiming if it causes drift, fatigue, accidental camera movement or discomfort. A setting that is technically precise is not useful if you tense your wrists or avoid looking around. You can also use a short session with gyro off as a diagnostic: if aim immediately becomes predictable, lower gyro sensitivity or use it only for fine corrections.
Rank #3

- Hall Effect Modules: Say goodbye to stick drift with contract-free magnetic sensors in the thumbsticks giving you smoother control, enhanced precision, and increased longevity
- Advanced Gaming Buttons: Get an edge over the competition with mappable Advanced Gaming Buttons you can program on the fly, mid-game—no system settings to configure
- Intuitive Motion Controls: Get immersed in your games with fluid, responsive motion controls that provide an intuitive way to aim, steer, fly, and more
- C Button: Easily activate fun GameChat features
- Rechargeable Battery: Get up to 30 hours of battery life on a single charge. Includes an extra-long 10 ft. USB-C cable to recharge the internal battery*
Reduce motion discomfort in Black Ops 7
Black Ops 7 adds Advanced Motion Control visual anchors for players who are sensitive to camera motion. The optional anchors include a horizontal line, dot grid, border and vignetting. Try one anchor at a time and keep the least distracting option. Activision introduced these controls to make motion easier to follow without requiring full motion aiming.
Activision has estimated that about one-third of people are susceptible to motion sickness in some way. That figure is presented as an Activision estimate, not as an independently verified prevalence statistic. If you feel nausea, headache or eye strain, stop, rest and disable the motion feature rather than trying to push through it.
Choosing between Joy-Con 2, a Pro Controller and gyro-first play
The right setup depends on whether you play handheld or docked, how long you play, and whether you want motion aiming. The comparison below describes practical trade-offs, not laboratory measurements.
Do these 3 things before closing this tab:
1Scan for outdated or missing drivers - takes under a minute2Repair Windows errors before they cause bigger problems3Fix the driver behind crashes, sound loss and screen glitches| Setup | Stick precision and reach | Portability and comfort | Motion-control learning curve | Vibration and audio routing | Best fit |
|---|---|---|---|---|---|
| Joy-Con 2 | Compact controls; requires careful calibration and lighter thumb pressure when overshooting occurs. | Strongest fit for handheld play; small controls can feel tiring over long sessions. | Optional; use low gyro as a fine-aim supplement while sticks handle turns. | Use a vibration level that does not mask aim feedback; route chat through the active console audio setup. | Players who switch between handheld play and short sessions. |
| Nintendo Switch Pro Controller | Full-size layout gives more room for deliberate stick movement. | Supported wireless option for Switch 2; most natural for docked play and long sessions. | Optional; calibrate motion before deciding whether to keep it enabled. | Adjust vibration and verify the selected microphone or headset path in system and game settings. | Docked players who prefer a conventional controller. |
| Gyro-first play | Sticks still handle emergency turns, while wrist movement supplies most fine aim. | Requires a stable posture and consistent controller position. | Highest learning curve; start at low sensitivity and increase gradually. | Motion comfort matters more than rumble strength; disable the feature if it causes fatigue or camera movement. | Players who enjoy motion aiming and can practice consistently. |
The Nintendo Switch Pro Controller is a supported wireless controller option on Switch 2. Whichever controller you choose, calibrate first, then tune sensitivity. Changing hardware and sensitivity simultaneously makes it difficult to identify the source of an aim problem.
Display and system settings that affect feel
Docked output, 120 Hz and ALLM
Enable 120 Hz output or automatic low-latency mode (ALLM) only when both the display and the game support those modes. If either side does not support a mode, leave it off rather than treating the toggle as an automatic accuracy upgrade. A display setting cannot repair overshooting caused by sensitivity, drift or motion input.
Vibration
Vibration can help you notice firing or impact feedback, but excessive rumble can obscure the small corrections you are trying to feel through the stick. Lower it until you can track a target while firing without your hands being pulled off line.
Rank #4
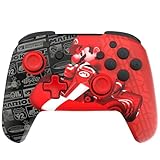
- This controller also works with Nintendo Switch 2 - C Button not available
- Experience the thrill of the race with the Grand Prix Mario design
- Glows in the dark
- Two programmable quick-action back buttons for customizable gameplay
- Built-in motion controls for immersive gameplay
Handheld versus docked
Recheck your setup after moving between handheld and docked play. Distance to the screen, grip, controller weight and posture change how a given sensitivity feels. Keep the same numerical baseline initially, then make one-step adjustments instead of creating a completely different profile from memory.
Free tools Windows power users keep installed
One-click scans. No signup required.
Why can’t my teammates hear me?
Voice chat has two layers on Switch 2: the console’s microphone and audio controls, and Call of Duty’s in-game voice-chat menu. Check both before replacing a headset or changing network settings.
Check the Switch 2 microphone first
- Open System Settings > Audio.
- Use the microphone test and confirm that the input meter responds to your voice.
- Set microphone input volume high enough to be intelligible, but raise it modestly so normal speech does not clip or overwhelm the channel.
- Check noise suppression and make sure the microphone is not muted.
- Confirm that the intended built-in microphone, headset or other connected input is selected.
Nintendo says GameChat supports voice chat through the built-in microphone. That confirms the console can provide voice input without a separate microphone, but Call of Duty still has its own voice-chat permissions and channel choices.
Set Call of Duty’s voice options
- Open Call of Duty Settings > Audio > Voice Chat.
- Enable voice chat and set voice-chat volume high enough to hear teammates over game audio.
- Choose the audience that matches your session: all lobby, party only, friends only, or friends and channels.
- Use proximity chat only when you want nearby opponents to hear you. Disable it for a quieter competitive mix.
- Leave the menu and test with a teammate. If the channel still fails, return to the voice menu and restart the voice channel.
If teammates still cannot hear you
- Verify the correct input device in Switch 2 audio settings and in any available Call of Duty voice controls.
- Check the mute state on the console, controller, headset and in-game voice menu.
- Raise microphone input volume a small amount and test again; extreme gain can make speech harder to understand.
- Confirm that your audience setting includes the people you are trying to reach. “Party only” will not send your voice to an entire lobby.
- Restart the voice channel, then restart the game if the channel does not reinitialize.
- Test the built-in microphone separately from a headset. This isolates an input-device problem from an in-game channel problem.
Audio and visual options for comfort and clarity
Black Ops 7 includes more than motion anchors. Intelligent Movement Customization can let you tailor movement behavior, while HUD and crosshair customization can make the aiming point easier to follow. Tinnitus reduction is intended to reduce harsh high-frequency effects, asymmetrical hearing compensation can help when hearing differs between ears, and Enhanced Headphone Mode provides a dedicated headphone-audio option.
Change one accessibility option at a time and play a short test match. A clearer crosshair or less aggressive audio mix can improve practical awareness even when sensitivity numbers stay unchanged.
The Tool Desk
Outbyte Driver Updater FREEFix the driver behind crashes, sound loss and screen glitchesFind Drivers →Outbyte PC Repair FREEClear out junk files and repair common Windows errorsFree Scan →A complete tuning routine for your first week
Session one: establish control
- Calibrate sticks and motion controls.
- Set look sensitivity to 4-4 or 5-5 and ADS to 0.75–0.90.
- Turn gyro off for the first test, or enable it at low sensitivity if you already use motion aiming.
- Run the same stationary and moving-target drills.
Session two: isolate ADS behavior
- Keep look sensitivity unchanged.
- Adjust ADS by one small step only if scoped tracking is too slow or too fast.
- Repeat the same optic and target movement from session one.
Session three: add motion carefully
- Enable low gyro while keeping sticks as the main turning method.
- Practice fine corrections without moving your whole arms.
- Increase gyro one step at a time until tracking improves without wobble.
- Turn it off if you experience drift, fatigue or discomfort.
After changing controllers or display modes
Recheck calibration, vibration and posture when moving from Joy-Con 2 handheld play to a Pro Controller in the dock. Keep your last known-good values written down so you can return to them instead of guessing.
Quick Recap
Common mistakes to avoid
- Copying a “pro” number as if it were official: no universal best sensitivity is published for Switch 2 Call of Duty.
- Changing every slider together: you lose the ability to identify the setting that solved the problem.
- Using sensitivity to hide drift: calibration and controller testing come first.
- Running high gyro immediately: low sensitivity is easier to learn and less likely to create wobble.
- Leaving proximity chat on by accident: nearby opponents can hear you, which changes the information you reveal.
- Checking only the game menu for microphone failures: Switch 2 Audio settings and Call of Duty’s Voice Chat menu both matter.
- Assuming mouse sensitivity changes stick aim: Joy-Con 2 mouse controls are separate from traditional stick sensitivity.
Product prices and availability are accurate as of the date/time indicated and are subject to change. Any price and availability information displayed on Amazon at the time of purchase will apply.

