For most high-performance gaming and overclocking systems, start with the ARCTIC Liquid Freezer III Pro family, especially the 360 mm version. Current independent roundups place the Pro line among the strongest liquid-cooling choices, and Tom’s Hardware specifically favors the 360 mm Pro for low temperatures without paying extra for a display. It is not a guarantee of higher frame rates or a safe overclock on every processor: radiator fit, socket support, case airflow, mounting, fan curves and CPU power determine the result.
CORSAIR’s own 2026 guide names the iCUE LINK TITAN 420 RX its best overall AIO, while NZXT’s Kraken Elite 360 RGB targets builders who value an LCD and lighting ecosystem. Those are different priorities, not contradictory universal rankings. Use the guide below to match the cooler to your case, CPU, noise target and feature budget.
As an Amazon Associate I earn from qualifying purchases.
What a CPU AIO cooler can—and cannot—do
An all-in-one (AIO) cooler combines a cold plate and pump block, flexible tubes, a sealed liquid loop and a radiator with fans. Heat moves from the CPU into the cold plate, through the coolant to the radiator, and then into the case air stream. The pump and fans need power and control from the motherboard or a controller.
Better cooling gives a processor more thermal headroom to sustain its configured boost behavior and can make manual overclocking easier to manage. It does not create a guaranteed gaming-performance increase. Frame rates depend on the game, graphics card, CPU limits, memory, operating-system settings and power limits. A cooler that keeps a CPU cool in a sustained workload may produce no visible FPS change when the graphics card is already the bottleneck.
#1 Best Overall

- CONTACT FRAME FOR INTEL LGA1851 | LGA1700: Optimized contact pressure distribution for longer CPU life and better heat dissipation
- ARCTIC's P12 PRO FAN: More power at any speed - more powerful and quieter than the P12, especially at low speeds. Higher maximum speed for optimal cooling performance under high load
- NATIVE OFFSET MOUNTING FOR INTEL AND AMD: Shifting the cold plate center towards the CPU hotspot ensures more efficient heat transfer
- INTEGRATED VRM FAN: PWM-controlled fan that lowers the temperature of the voltage converters and thus ensures reliable performance
- INTEGRATED CABLE MANAGEMENT: The PWM cables of the radiator fans are integrated in the sheathing of the hoses so that only a single visible cable is connected to the motherboard
Likewise, an AIO does not guarantee a particular overclock. Stability depends on the individual CPU, voltage, motherboard, firmware, memory and workload. Treat temperature, noise and stability measurements as your decision criteria rather than promises of a fixed clock speed.
Quick recommendations by buyer priority
| Priority | Best fit from the documented candidates | Why it fits | What to verify |
|---|---|---|---|
| Lowest temperatures without a display premium | ARCTIC Liquid Freezer III Pro 360 | Tom’s Hardware highlights the 360 mm Pro for low temperatures without paying for a screen; PC Gamer’s current roundup selects the Liquid Freezer III Pro family as its leading liquid cooler. | Exact Pro variant, socket support, radiator and fan clearance, current price and stock. |
| Manufacturer-defined all-round package | CORSAIR iCUE LINK TITAN 420 RX | CORSAIR’s own 2026 guide calls it its best overall AIO. | Remember that this is the manufacturer’s ranking; directly comparable independent test results were not established in the cited material. Check case support and software requirements. |
| LCD and RGB presentation | NZXT Kraken Elite 360 RGB | NZXT’s official collection emphasizes customizable LCD-focused features. | Exact model, socket list, radiator clearance, software, cable routing and the added cost of display hardware. |
| Replacing or repasting | MX-6 or another compound appropriate to your cooler | ARCTIC states that MX-6 is included with the standard Liquid Freezer III 360, so a separate purchase is unnecessary for its first installation. | Whether your specific cooler includes paste; buy extra only for repasting, replacement or a model supplied without compound. |
These recommendations are not one controlled benchmark. The roundups use different test systems and methods, so their rankings should not be merged into a single precise performance chart.
Why the ARCTIC Liquid Freezer III Pro 360 is the leading performance pick
The Pro family is the clearest documented choice when your first objective is CPU temperature at a sensible value. PC Gamer’s 2026 roundup names the family its leading liquid cooler, and Tom’s Hardware favors the 360 mm Pro for low temperatures without a screen premium. That combination makes it a logical starting point for high-power gaming CPUs and sustained workloads where radiator capacity and fan performance matter more than visual extras.
What’s actually slowing this PC down?
Pick the symptom - the matching free tool is one click away.
Do not confuse that recommendation with a universal claim that every 360 mm AIO beats every 240 mm or 420 mm design. A 360 mm radiator is a format; results vary with the CPU’s heat output, pump and fan behavior, mounting pressure, case intake and exhaust, ambient temperature and firmware settings. The cited evidence does not establish a guaranteed temperature advantage across all processors and cases.
Standard Liquid Freezer III 360 details that affect installation
The manufacturer information cited for the standard Liquid Freezer III 360 says MX-6 thermal compound is included. For a first installation, that means you should not need to add a separate tube merely to mount the cooler. The same material reports a six-year manufacturer guarantee for the cited model; verify the applicable region and the complete terms before relying on that coverage.
The official page cited in the evidence is for Liquid Freezer III 360, not necessarily the Pro 360 variant. Confirm the exact box and product page before ordering, because included accessories, socket lists, warranty language and physical dimensions can differ between revisions and variants.
Rank #2

- Simple, High-Performance All-in-One CPU Cooling: Renowned CORSAIR engineering delivers strong, low-noise cooling that helps your CPU reach its full potential
- Efficient, Low-Noise Pump: Keeps your coolant circulating at a high flow rate while generating a whisper-quiet 20 dBA
- Convex Cold Plate with Pre-Applied Thermal Paste: The slightly convex shape ensures maximum contact with your CPU’s integrated heat spreader, with thermal paste applied in an optimised pattern to speed up installation
- RS120 ARGB Fans: RS ARGB fans create strong airflow and high static pressure, with easy ARGB control via a compatible motherboard. CORSAIR AirGuide technology and Magnetic Dome bearings ensure great cooling performance and low noise
- Easy Daisy-Chained Connections: Reduce the wiring in your system by daisy-chaining your RS ARGB fans and connecting them to just one 4-pin PWM fan header and one +5V ARGB header
The auxiliary 60 mm PWM fan
ARCTIC describes a 60 mm PWM-controlled fan intended to cool the socket area when VRM cooling is insufficient, particularly in cases with poor airflow or in overclocking scenarios. That is a model-specific feature, not a property of every AIO. Connect and control it as the manual specifies, and do not assume it compensates for blocked case ventilation or an undersized motherboard heatsink.
When the CORSAIR iCUE LINK TITAN 420 RX makes sense
CORSAIR’s own 2026 guide calls the iCUE LINK TITAN 420 RX its best overall AIO. That statement is useful for understanding the manufacturer’s intended positioning, but it is not an independent consensus ranking. The cited material does not provide directly comparable test results for this model alongside the ARCTIC and NZXT candidates.
A 420-class radiator also imposes a different fit decision from a 360 mm unit. Before purchase, confirm that your case supports the radiator length, thickness, fan size, top or front mounting position, motherboard heatsink clearance and the required tube orientation. If any of those checks fail, the nominally larger radiator is not the better cooler for your build; it simply will not install correctly or may force a poor airflow layout.
When to choose the NZXT Kraken Elite 360 RGB
NZXT’s official collection presents Kraken Elite models around customizable LCD features. Choose this type of cooler when a screen, animated graphics and coordinated RGB are part of the build’s purpose. A display can make system status visible and personalize the case, but it also adds hardware, cables, software and cost considerations that do not directly lower CPU temperature.
Verify the exact Kraken Elite 360 RGB revision, supported sockets, radiator dimensions, controller requirements and operating-system software before buying. Decide where the display will be visible after the radiator is mounted; a top radiator under a solid panel may hide the feature you are paying for.
Recommended Free Tools
Start with compatibility, not the ranking
Compatibility is the first filter. A highly rated cooler that does not fit the socket or radiator position is unusable.
Rank #3

- CONTACT FRAME FOR INTEL LGA1851 | LGA1700: Optimized contact pressure distribution for longer CPU life and better heat dissipation
- ARCTIC's P12 PRO FAN: More power at any speed - more powerful and quieter than the P12, especially at low speeds. Higher maximum speed for optimal cooling performance under high load
- NATIVE OFFSET MOUNTING FOR INTEL AND AMD: Shifting the cold plate center towards the CPU hotspot ensures more efficient heat transfer
- INTEGRATED VRM FAN: PWM-controlled fan that lowers the temperature of the voltage converters and thus ensures reliable performance
- INTEGRATED CABLE MANAGEMENT: The PWM cables of the radiator fans are integrated in the sheathing of the hoses so that only a single visible cable is connected to the motherboard
1. Identify the exact CPU socket
Write down the processor model and motherboard socket, then compare both with the cooler’s current manufacturer support list. Do not infer support from the product family name. Pro and non-Pro versions, refreshed packaging and regional bundles can have different brackets. Check whether the required backplate, standoffs and mounting hardware are included.
2. Measure the radiator location
Use the case manual or manufacturer dimensions to confirm the supported radiator length and thickness, including fans. A case may advertise a 360 mm position but leave insufficient clearance for the radiator-and-fan stack, motherboard heatsinks, memory modules or a graphics-card backplate. Check front, top and side positions separately.
3. Plan tube routing and pump orientation
Choose a mounting orientation that avoids sharp tube bends and keeps the pump from becoming the highest point of the loop when the case layout allows a better option. Follow the cooler manual for the approved orientation. Make sure the tubes reach the CPU socket without pressing against memory, graphics-card connectors or the side panel.
Do these 3 things before closing this tab:
1Fix the driver behind crashes, sound loss and screen glitches2Repair Windows errors before they cause bigger problems3Scan for outdated or missing drivers - takes under a minute4. Check headers and controls
List the pump, radiator fans and any auxiliary fan or lighting controller connections. Confirm that your motherboard has suitable headers or that the package includes the required controller. Display-focused models may require additional USB or internal connections and software; account for those before routing cables.
How to install an AIO safely
- Prepare the system. Shut down, switch off the power supply and disconnect the power cable. Remove the side panels and ground yourself according to the case and motherboard manuals.
- Remove the old cooler. If replacing a cooler, loosen mounting screws gradually in a cross pattern. Clean old compound from the CPU heat spreader with an appropriate lint-free method and let the surface dry.
- Install the correct socket hardware. Use only the bracket, backplate and standoffs listed for your CPU socket and cooler revision. Keep unused hardware separate so it cannot be mixed with another socket kit.
- Apply the supplied compound correctly. If your cooler includes pre-applied compound, do not add another layer. For a cooler supplied with MX-6, follow the manufacturer’s application guidance; extra paste is not required for the initial installation.
- Mount the pump block evenly. Lower it straight onto the CPU and tighten in a cross pattern, a few turns at a time, until the manual’s stop or torque guidance is reached. Uneven pressure can hurt contact and temperatures.
- Secure the radiator and fans. Confirm that every screw is the correct length for the radiator. Overlong screws can damage the radiator channels. Set the fans for the intended intake or exhaust direction and keep cables clear of blades.
- Connect power and control leads. Attach the pump, radiator fans, auxiliary fan and any controller or display cables exactly as documented. A PWM lead should reach a controllable header so you can set a sensible curve.
- Inspect before closing the case. Check for pinched tubes, loose screws, blocked fan blades and cables touching hot components. Verify that the radiator is supported and that the side panel will close without pressure on the tubes.
- Test at startup. Enter firmware setup and confirm that the pump and fans report a speed. Boot the operating system, install only the control software you need, and watch temperatures at idle before running a sustained load.
Set performance and noise deliberately
Automatic motherboard profiles can run fans aggressively or apply power limits that differ from your intended configuration. Begin with the manufacturer’s default pump behavior and a moderate fan curve. Increase fan speed only when sustained CPU temperature requires it, then listen for the noise level at the workload you actually care about.
Compare coolers at the same CPU power, ambient temperature, case-panel state, fan-control policy and workload. A result taken with one cooler at maximum fan speed and another at a quiet profile is not a fair comparison. The cited roundups do not form a single normalized test, so use their recommendations directionally rather than treating them as interchangeable measurements.
Rank #4
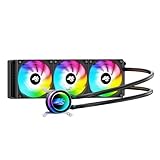
- High-Speed Ceramic Bearing Pump: Our 360mm AIO is equipped with a premium ceramic bearing water pump running at 3000 RPM, ensuring ultra-long lifespan and stable operation, offering higher lift and faster flow for maximum cooling efficiency. Our CPU cooler delivers reliable performance even under heavy workloads, keeping your system cool and stable.
- Industrial-Grade Motor for Elite Cooling: Our AIO cooler 360mm is powered by an advanced 3-phase, 4-pole motor that minimizes vibration and noise for ultra-smooth, silent operation. Our cpu water cooler accelerates heat transfer and boosts coolant flow to maximize thermal performance, ensuring greater efficiency and long-term reliability.
- Smart PWM Fan Control for Quiet Efficiency: Our water cooler CPU is equipped with PWM-controlled fans that automatically adjust their speed based on your system’s temperature, delivering optimal airflow only when needed. Running at up to 1600 RPM, these fans offer a perfect balance of high airflow and low noise, making our cpu liquid cooler ideal for gamers, creators, and power users alike.
- Exclusive 12-Channel Radiator for Superior Heat Dissipation: Our CPU liquid cooler features a 12-path water-cooled radiator with a low-resistance hydraulic design and optimized fin density, maximizing surface contact for faster heat transfer and enhanced cooling performance.
- Daisy-Chained Fans for Cleaner, Simpler Cable Management: Our 360mm aio cooler comes with pre-installed 120mm fans featuring a daisy-chain design, allowing all fans to connect through a single 4-pin PWM and 5V ARGB header—dramatically reducing cable clutter and simplifying installation.
For gaming
Use a repeatable game or benchmark scene and record CPU temperature, clock behavior, power and fan noise. If the graphics card is limiting frame rate, changing the AIO may alter acoustics or CPU headroom without changing average FPS. Check frame-time consistency as well as the headline frame rate.
For overclocking
Change one variable at a time: multiplier, voltage, power limit or memory setting. Validate with the workloads you actually run, not only a short boot test. Stop when temperatures, noise or stability are outside your acceptable range. A larger radiator cannot correct excessive voltage, inadequate case airflow or a CPU that simply does not overclock well.
Independent reader supportYour contribution helps us test, update, and keep practical guides available for everyone.Radiator size: how to choose 240, 280, 360 or 420 mm
Radiator size should follow heat load and case support, not a blanket promise. A 360 mm option can be a practical balance for sustained high-power CPUs when the case supports it. A 420 mm model may suit a case designed for that format, while a 240 or 280 mm unit can be the only viable choice in a compact chassis.
| Question | What the answer changes |
|---|---|
| Does the case support the radiator length and full fan stack? | Eliminates formats that cannot physically mount. |
| Will the radiator block memory, motherboard heatsinks or the graphics card? | Determines whether top or front mounting is practical. |
| Is sustained CPU power high enough to justify the larger format? | Balances thermal headroom against cost, weight and installation effort. |
| Is noise at a given temperature more important than peak cooling? | Favors the model and fan curve that meet your acoustic target, not simply the largest radiator. |
The evidence available here does not establish universal temperature deltas between these sizes. Treat every size claim as system-dependent.
Noise, airflow and maintenance trade-offs
Fans, pump speed and case airflow interact. A radiator mounted as an intake can feed warmer air into the case; mounted as exhaust, it can remove CPU heat while affecting the graphics card’s intake air. There is no single orientation that wins in every chassis. Choose the arrangement that preserves a clear intake path, a clear exhaust path and sensible tube routing.
Clean dust filters and radiator fins periodically, keep cables away from fan blades and watch for unusual pump noise or rising temperatures at the same workload. AIO loops are sealed and are not normally refilled by the user. If a pump stops reporting speed, shut down and troubleshoot the power connection before continuing to run heavy loads.
Common buying and installation mistakes
- Ordering by radiator size alone: a 360 mm label does not prove lower temperatures in your case.
- Confusing product variants: the documented official page is for Liquid Freezer III 360, while the roundup recommendation concerns the Pro family. Confirm the exact SKU.
- Ignoring total thickness: radiator plus fans may collide with motherboard heatsinks or memory even when the bare radiator length fits.
- Buying unnecessary paste: MX-6 is included with the cited standard Liquid Freezer III 360; extra paste is for repasting, replacement or another cooler without compound.
- Assuming a display improves cooling: LCD and RGB features are presentation and control choices, not a thermal guarantee.
- Comparing reviews as one benchmark: different test benches and methods can change rank order.
- Expecting guaranteed overclocking: stability remains specific to the CPU, motherboard, firmware, voltage and workload.
A practical decision checklist
- Record your CPU model, motherboard socket and case model.
- Measure the intended radiator position, including fan thickness and clearance around memory and motherboard heatsinks.
- Decide whether your priority is temperature, low noise, an LCD/RGB presentation or software integration.
- Shortlist the ARCTIC Liquid Freezer III Pro 360 for performance/value, the CORSAIR iCUE LINK TITAN 420 RX when its manufacturer-defined package and case fit appeal to you, or the NZXT Kraken Elite 360 RGB when the display is central to the build.
- Check the exact variant’s socket list, included hardware, current price, stock and regional warranty terms.
- Plan radiator orientation, fan direction, pump and controller connections before removing your existing cooler.
- After installation, verify pump and fan operation, then test temperatures, noise and stability under your real gaming and productivity workloads.
What is and is not established about these recommendations
The ARCTIC Pro family has the strongest independent recommendation in the cited 2026 coverage, with the 360 mm Pro singled out for low temperatures without a screen premium. CORSAIR’s “best overall” designation is the company’s own guide judgment. NZXT’s cited material establishes the Kraken Elite line’s LCD-focused positioning. The available evidence does not provide a normalized table of temperatures, decibels, prices, failure rates or gaming-FPS gains for all candidates, so those figures should not be invented or inferred.
Prices and availability change by region and date. Confirm the seller’s exact model name, socket hardware, radiator dimensions and warranty before placing an order.
Quick Recap
Product prices and availability are accurate as of the date/time indicated and are subject to change. Any price and availability information displayed on Amazon at the time of purchase will apply.

