Some links on this page are affiliate links: if you buy through them we may earn a commission, at no extra cost to you.
Undervolting lowers a CPU’s or GPU’s operating voltage in an effort to reduce power use and heat without giving up much performance. It can also reduce fan noise or help a component sustain boost clocks—but results vary by chip, firmware, cooling and workload. There is no universally safe voltage or offset.
Use the control made for your hardware: AMD Ryzen CPUs generally use Curve Optimizer; supported Intel systems may expose voltage controls through BIOS or Intel XTU; Radeon GPUs have tuning controls in AMD Software: Adrenalin Edition; and many NVIDIA GPUs can be tuned with MSI Afterburner. If controls are locked, a power limit or quiet mode is a more practical alternative.
What undervolting does—and what it does not
A processor or graphics card needs voltage to run at a given frequency. Undervolting reduces voltage for an operating point, typically aiming to keep similar clock speeds and performance with less power and heat. A successful tune may also reduce fan noise, improve performance per watt, and help a component avoid thermal or power throttling. None of those benefits is guaranteed.
What’s actually slowing this PC down?
Pick the symptom - the matching free tool is one click away.
- Undervolting: Reduces operating voltage while trying to retain the desired clock speed.
- Underclocking: Lowers the frequency target, usually reducing performance as well as power.
- Power limiting: Sets a cap on CPU package or GPU board power. It is often the simpler, more predictable way to reduce heat, though performance may fall.
- Eco or quiet mode: An OEM or vendor preset that can combine power, voltage, clock and fan changes.
- Curve optimization: Alters the voltage/frequency relationship rather than applying one fixed voltage at every operating point.
Temperature alone does not tell you whether an undervolt worked: a lower reading might come from lower clocks, a power limit, a faster fan or a cooler room. Compare voltage, effective clock, power, temperature and performance together.
#1 Best Overall

- [Brand Overview] Thermalright is a Taiwan brand with more than 20 years of development. It has a certain popularity in the domestic and foreign markets and has a pivotal influence in the player market. We have been focusing on the research and development of computer accessories. R & D product lines include: CPU air-cooled radiator, case fan, thermal silicone pad, thermal silicone grease, CPU fan controller, anti falling off mounting bracket, support mounting bracket and other commodities
- [Product specification] Thermalright PA120 SE; CPU Cooler dimensions: 125(L)x135(W)x155(H)mm (4.92x5.31x6.1 inch); heat sink material: aluminum, CPU cooler is equipped with metal fasteners of Intel & AMD platform to achieve better installation, double tower cooling is stronger((Note:Please check your case and motherboard for compatibility with this size cooler.)
- 【2 PWM Fans】TL-C12C; Standard size PWM fan:120x120x25mm (4.72x4.72x0.98 inches); fan speed (RPM):1550rpm±10%; power port: 4pin; Voltage:12V; Air flow:66.17CFM(MAX); Noise Level≤25.6dB(A), leave room for memory-chip(RAM), so that installation of ice cooler cpu is unrestricted
- 【AGHP technique】6×6mm heat pipes apply AGHP technique, Solve the Inverse gravity effect caused by vertical / horizontal orientation, 6 pure copper sintered heat pipes & PWM fan & Pure copper base&Full electroplating reflow welding process, When CPU cooler works, match with pwm fans, aim to extreme CPU cooling performance
- 【Compatibility】The CPU cooler Socket supports: Intel:115X/1200/1700/17XX AMD:AM4;AM5; For different CPU socket platforms, corresponding mounting plate or fastener parts are provided(Note: Toinstall the AMD platform, you need to use the original motherboard's built-in backplanefor installation, which is not included with this product)
Is undervolting right for your PC?
It is worth considering if your CPU or GPU is drawing more power or making more heat and noise than you want, or if it regularly throttles under sustained loads. For gaming heat and noise, the GPU is often a useful first target. On a compatible Ryzen CPU, Curve Optimizer is generally the preferred approach. Intel voltage controls depend on the processor, motherboard, BIOS and OEM configuration.
Start with the simpler fix when the cause is obvious. Dust-clogged vents, poor airflow or a cooling fault will not be repaired by changing voltage; clean or address the cooling system first. A power limit or laptop quiet mode may suit you better if you want a predictable reduction and do not want to tune and validate a curve.
Be cautious with workstations where unexplained errors are unacceptable, corporate-managed computers, systems already crashing, and laptops or prebuilts whose firmware locks voltage controls. An unstable setting can cause crashes, lost work, file corruption or hard-to-diagnose application errors. Undervolting is usually reversible, but it is not risk-free. Warranty terms depend on the vendor, product and region: AMD’s Ryzen Master guide warns that modifying stock CPU, memory or voltage settings can affect AMD product warranty coverage. Read the terms for your specific hardware before changing settings.
Quick wins for a faster PC:
Repair Windows errors before they cause bigger problemsFix Now →Fix the driver behind crashes, sound loss and screen glitchesFind Drivers →Before changing a setting
- Back up important files and save work before testing. If your system is a workstation, consider whether experimenting is appropriate at all.
- Identify the exact hardware. Note the CPU and GPU models, whether the PC is a laptop or desktop, and the BIOS and driver versions. Available controls vary by generation, motherboard, firmware and OEM.
- Know how to undo the change. Find the tuning utility’s reset control, learn how to load BIOS defaults, and locate the motherboard’s CMOS-reset procedure in its manual. Keep another device available in case the PC will not boot.
- Change one group of settings at a time. Do not change voltage, frequency, memory timings, power limits and fan curves together. Keep a written log of settings and results.
- Use small, reversible steps. There is no reliable universal CPU offset or GPU millivolt target. A value stable on one chip may fail on another, even when the model is the same.
Make a repeatable baseline
Before tuning, record idle and load temperatures, CPU or GPU power if available, clock or effective clock, fan speed, benchmark score and whether the component throttles. For games, record average frame rate and 1% lows. Note the room’s ambient temperature and the test duration.
Rank #2

- Cool for R7 | i7: Four heat pipes and a copper base ensure optimal cooling performance for AMD R7 and Intel i7.
- Quiet Cooling Fan: SickleFlow 120 Edge with Dynamic PWM control (690–2,500 RPM), designed for low noise and peak cooling performance.
- Simplify Brackets: Redesigned brackets simplify installation on AM5 and LGA 1851|1700 platforms.
- Versatile Compatibility: 152mm tall design offers performance with wide chassis compatibility.
- Easy Installation: Easy to install with included thermal paste for hassle-free setup and optimal cooling performance.
Repeat the same workload with the same resolution, game scene, driver, power plan and fan profile after each change. Avoid comparing a stock run on a cool morning with a tuned run in a warm room. You can use a spreadsheet or a simple log:
| Setting | Workload and duration | Clock | Power | Temperature | Score / FPS and 1% lows | Errors or symptoms |
|---|---|---|---|---|---|---|
| Stock or tuning step | Record test details | Record result | Record result | Record result | Record result | Record result |
Undervolting an AMD Ryzen CPU
For supported Ryzen processors, use Curve Optimizer in AMD Ryzen Master or the equivalent motherboard BIOS control rather than forcing a fixed voltage. AMD describes a negative Curve Optimizer value as shifting the voltage/frequency curve toward lower voltage; available modes include All Cores, Per Die and Per Core. The feature and controls depend on the CPU and platform. See AMD’s Curve Optimizer documentation.
- Measure stock performance, temperature, power and clocks.
- Open Ryzen Master or the motherboard’s BIOS tuning controls and select Curve Optimizer.
- Start with a conservative negative setting, without treating any particular number as guaranteed safe. Apply it temporarily in Ryzen Master if available.
- Run a quick benchmark. Check effective clock, CPU temperature, package power and score—not temperature alone.
- If results are good, increase the magnitude in small steps. Test both all-core work and single-core or lightly threaded work.
- Once you have a stable setting, you can reproduce it in BIOS for persistence, then test again. Recheck after BIOS, chipset-driver or major Windows updates.
All-core stress tests can miss failures during light or bursty work. Watch for idle or single-core reboots, application crashes, sleep/wake problems and WHEA hardware-error events in Windows Event Viewer. The absence of a WHEA event does not prove stability. AMD also cautions that larger Curve Optimizer offsets can lead to more restarts and stability problems; see its Ryzen Master CPU controls documentation.
If Ryzen Master changes are temporary, rebooting may clear them. If a BIOS setting prevents boot, load BIOS defaults or clear CMOS according to the motherboard manual. Return to the last known stable setting rather than immediately trying a more aggressive one.
Rank #3

- [Brand Overview] Thermalright is a Taiwan brand with more than 20 years of development. It has a certain popularity in the domestic and foreign markets and has a pivotal influence in the player market. We have been focusing on the research and development of computer accessories. R & D product lines include: CPU air-cooled radiator, case fan, thermal silicone pad, thermal silicone grease, CPU fan controller, anti falling off mounting bracket, support mounting bracket and other commodities
- [Product specification]AX120R SE; CPU Cooler dimensions: 125(L)x71(W)x148(H)mm (4.92x2.8x 5.83 inch); Product weight:0.645kg(1.42lb); heat sink material: aluminum, CPU cooler is equipped with metal fasteners of Intel & AMD platform to achieve better installation
- 【PWM Fans】TL-C12C; Standard size PWM fan:120x120x25mm (4.72x4.72x0.98 inches); fan speed (RPM):1550rpm±10%; power port: 4pin; Voltage:12V; Air flow:66.17CFM(MAX); Noise Level≤25.6dB(A), the fan pairs efficient cool with low-noise-level, providing you an environment with both efficient cool and true quietness
- 【AGHP technique】4×6mm heat pipes apply AGHP technique, Solve the Inverse gravity effect caused by vertical / horizontal orientation. Up to 20000 hours of industrial service life, S-FDB bearings ensure long service life of air-cooler radiators. UL class a safety insulation low-grade, industrial strength PBT + PC material to create high-quality products for you. The height is 148mm, Suitable for medium-sized computer case
- 【Compatibility】The CPU cooler Socket supports: Intel:1150/1151/1155/1156/1200/1700/17XX/1851,AMD:AM4 /AM5; For different CPU socket platforms, corresponding mounting plate or fastener parts are provided
Undervolting an Intel CPU
Intel voltage controls are not universal. Intel XTU requires a supported unlocked processor and compatible motherboard and platform configuration; the BIOS or system manufacturer may limit what is exposed. Intel says it does not provide undervolting controls or software for locked non-K processors, so do not assume an offset is available on those systems. Check Intel’s guidance for locked non-K CPUs and the Intel XTU guide.
On 12th-generation Intel Core and newer systems, Undervolt Protection (UVP) can block runtime voltage reductions below the BIOS or boot-time voltage. XTU may indicate affected controls with a yellow lightning-bolt icon. Laptop firmware may hide controls, and a BIOS update can alter or remove them. A slider that moves does not prove that voltage changed. Intel recommends against disabling UVP because doing so can expose security and compatibility risks. See Intel’s UVP documentation.
- Install the XTU version supported by your CPU and platform, or use available BIOS controls. Record a stock benchmark first.
- Check that the voltage-offset control is active and not clamped by UVP or the OEM.
- If controls are available, apply a small negative core-voltage offset. Change only that setting, then apply it.
- Run a short benchmark or stress test and compare temperature, power, clocks, throttling and score.
- Proceed only in small steps while stable. Then run longer tests and your real applications. Check whether the profile survives reboot.
Intel’s testing guidance describes a five-minute quick check, a 30-minute thermal check and three-to-five-hour or longer validation for 24/7 use. These are examples, not guarantees that a system will be stable in every future workload. Some systems also encounter XTU compatibility issues with Windows Virtualization-Based Security; check Intel’s XTU/VBS guidance. Intel has also documented VF Curve interface limitations for some 13th-generation systems and systems with undervolt protection enabled (Intel VF Curve support article).
Windows Errors? Fix Them Before They Spread
Repair common Windows errors and clear accumulated junk for a smoother, more stable PC - no reinstall needed.Free scan · no reinstallOutdated Drivers Are Slowing You Down
One free scan finds every outdated or missing driver and matches the right update for your exact hardware.Free scan · exact hardware matchIf Windows remains usable, reset XTU to defaults. If a startup-applied profile causes repeated crashes, boot into Safe Mode if needed and disable the tuning utility’s startup behavior. If BIOS settings prevent boot, load BIOS defaults or clear CMOS. Do not disable security features simply to force an undervolt.
Rank #4
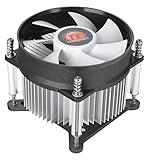
- Support Intel LGA 1200/1156/1155/1150/1151
- Low Profile Design. Air flow - 31.343 CFM. Noise level - 21.3 decibels
- Optimized for low power CPU's
- 7-Bladed Low Noise Fan
- Quick and Easy Installation
Undervolting an AMD Radeon GPU
On supported Radeon hardware, AMD Software: Adrenalin Edition offers an automatic Undervolt GPU preset and manual tuning controls. Depending on the GPU, these may include voltage and frequency controls expressed in millivolts and megahertz. AMD’s documented tuning interface starts with RX 5000-series hardware, but availability and controls vary by GPU. Check the AMD Adrenalin tuning FAQ.
- Record stock GPU clock, temperature, board power, fan speed and game or benchmark performance.
- Open AMD Software: Adrenalin Edition and go to the GPU performance-tuning section.
- If available, try the automatic Undervolt GPU preset first. For manual tuning, enable the available controls and change one setting in a small step.
- Apply the profile and repeat the same benchmark, followed by a demanding game you actually play.
- Watch for artifacts, flickering, driver resets, crashes, stutter and lower 1% lows. Compare performance per watt as well as temperature.
- Save the profile only after extended testing.
If the driver resets or the screen becomes unstable, return Adrenalin tuning to default and disable automatic application of the profile until testing is complete. Radeon cards expose different controls; do not assume a voltage field exists on every model.
Independent reader supportYour contribution helps us test, update, and keep practical guides available for everyone.Undervolting an NVIDIA GPU with MSI Afterburner
MSI Afterburner is commonly used to edit an NVIDIA GPU’s voltage/frequency curve, but the available behavior depends on the GPU, driver, firmware, power limits and whether it is a laptop. Download it only from MSI’s official Afterburner page or Guru3D; MSI warns users about impersonation and modified installers in its Afterburner support guide.
Free tools Windows power users keep installed
One-click scans. No signup required.
- Record a stock game benchmark and monitor GPU frequency, memory frequency, voltage, temperature, power, FPS and 1% lows.
- Open the Voltage/Frequency Curve Editor with Ctrl+F.
- Select a voltage point and set a frequency the GPU can plausibly sustain at that voltage. Adjust or flatten higher-voltage points as appropriate for that card and curve.
- Apply the curve, then test several games or demanding GPU workloads. Check for artifacts, flicker, driver recovery, crashes and frame-time or 1% low regressions.
- Save a profile only after it passes longer testing. Until then, avoid applying it automatically at startup.
MSI’s guide uses approximately 950 mV as an example, not as a recommended setting for every card. Do not copy a voltage-and-clock pair from another GPU model and assume it will be stable. If a driver reset or black screen occurs, reset Afterburner to defaults and lower the frequency target at the chosen voltage. See MSI’s voltage/frequency curve guide.
Best Value

- Simple, High-Performance All-in-One CPU Cooling: Renowned CORSAIR engineering delivers strong, low-noise cooling that helps your CPU reach its full potential
- Efficient, Low-Noise Pump: Keeps your coolant circulating at a high flow rate while generating a whisper-quiet 20 dBA
- Convex Cold Plate with Pre-Applied Thermal Paste: The slightly convex shape ensures maximum contact with your CPU’s integrated heat spreader, with thermal paste applied in an optimised pattern to speed up installation
- RS120 ARGB Fans: RS ARGB fans create strong airflow and high static pressure, with easy ARGB control via a compatible motherboard. CORSAIR AirGuide technology and Magnetic Dome bearings ensure great cooling performance and low noise
- Easy Daisy-Chained Connections: Reduce the wiring in your system by daisy-chaining your RS ARGB fans and connecting them to just one 4-pin PWM fan header and one +5V ARGB header
How to test a setting properly
Stability depends on voltage, frequency, temperature, workload, memory, power limits, firmware and brief changes in demand. A setting can pass a synthetic test yet fail in a specific game or application. A short test catches obvious problems; it does not certify a setting for every workload.
- Quick screen: Run a short benchmark or stress test. Record errors, peak temperature, sustained clocks, power and score.
- Sustained load: Run a longer CPU or GPU workload to see whether clocks and temperatures hold up over time.
- Your real applications: Test several games or the actual work you do—rendering, encoding, compiling, CAD or simulation. For laptops, include browser and office use, sleep/wake and external-display cycles.
- Observe over time: Use the setting for several days if appropriate. Check Event Viewer, WHEA errors, driver resets, unexpected reboots, application errors, sleep/resume failures and project files.
Accept a setting only if your tests and real workloads complete without crashes, errors, artifacts or performance regressions. There is no finite test suite that can prove every future workload will be stable. A crash is not usually evidence that the hardware is damaged, but unstable settings can still cause data loss or file corruption.
Symptoms, troubleshooting and recovery
- Windows, idle or application crashes: Reboot, revert to the last stable profile or defaults, and reduce the undervolt magnitude. Retest the workload that failed and check Event Viewer and WHEA logs.
- GPU black screen or driver reset: Allow time for driver recovery. Reset Adrenalin or Afterburner, disable apply-at-startup, and reduce the frequency at the chosen voltage before testing again.
- Boot loop: Enter BIOS recovery or firmware setup if possible and load defaults. If that fails, use the board’s documented CMOS-reset procedure.
- Setting seems to have no effect: Check whether UVP, an OEM policy or firmware has clamped the control. Compare observed voltage, effective clocks, power and benchmark results rather than trusting a slider.
- Lower temperature but lower score: Check whether frequency fell, a power limit is active, the CPU is clock-stretching, or the GPU is hitting a different limit. Repeat the baseline under the same room and fan conditions.
Do not raise voltage and frequency together while troubleshooting; it makes the cause of a failure harder to identify.
What to expect from desktops and laptops
Desktops more often expose BIOS controls and are generally easier to recover through CMOS reset. Laptops commonly have OEM-locked voltage controls, shared CPU/GPU thermal limits and power modes that override tuning. Lowering CPU temperature may not reduce the whole system’s heat if the GPU remains the limiting component. Battery-life improvements depend on the workload and platform power management; they are not guaranteed.
When controls are unavailable, try the manufacturer’s balanced or quiet mode, a GPU power limit, or a supported CPU power limit. Underclocking is simpler if reducing peak performance is acceptable. If heat is caused by dust, poor airflow or a cooling defect, address that first. The best result is the smallest stable change that meets your goal—not the largest offset your software allows.
Quick Recap
Product prices and availability are accurate as of the date/time indicated and are subject to change. Any price and availability information displayed on Amazon at the time of purchase will apply.

