Some links on this page are affiliate links: if you buy through them we may earn a commission, at no extra cost to you.
Yes—you can use a gamepad to control a DAW, synthesizer, effect or other MIDI-compatible audio software, but most gamepads do not send MIDI on their own. A bridge application reads the controller’s buttons and axes, converts them to MIDI, and sends that data through a virtual MIDI port:
Gamepad → gamepad-to-MIDI software → virtual MIDI port → DAW
No physical MIDI cable is needed when you are controlling software on the same computer. The key is to map buttons as notes or switches and analog controls as continuous MIDI data, then calibrate the sticks and triggers so they behave predictably.
Windows Errors? Fix Them Before They Spread
Repair common Windows errors and clear accumulated junk for a smoother, more stable PC - no reinstall needed.Free scan · no reinstallCrashes, No Sound, or Screen Glitches?
Random freezes, missing sound and display glitches usually trace back to one bad driver. Find and replace yours safely.Free scan · under a minuteWhat you need to make a gamepad send MIDI
- A USB or Bluetooth gamepad and a computer.
- Gamepad-to-MIDI bridge software that can read the controller and emit MIDI.
- A DAW, synthesizer or other application that accepts MIDI input.
- A virtual MIDI port connecting the bridge’s output to the audio software. Some bridges create one themselves; otherwise, you may need a separate routing utility.
The controller remains a USB or Bluetooth input device. The bridge performs the conversion: a button press might become a MIDI Note On, while a stick position might become a MIDI Control Change (CC) value. For external hardware, you also need a MIDI interface or other suitable MIDI connection; a virtual port only routes data between software applications.
#1 Best Overall

- With broad game support, the Logitech Gamepad F310 works with old standbys to today's biggest titles, so it's easy to set up and use with your favorite games.
- Profiler software allows the gamepad to be programmed to perform keyboard and mouse commands for games without gamepad support.* * Requires software installation.
- A familiar control layout that doesn't require a learning curve to be able to use, with all the same buttons as on an Xbox 360.
- The unique floating D-pad rests on four switches-instead of a single pivot point-making it responsive to quick changes in direction.
- The six-foot cord lets you lean back and play a comfortable distance from your PC monitor.
Choose a bridge that fits your setup
Dedicated gamepad-to-MIDI software
A dedicated bridge is the simplest starting point if you want the gamepad to produce notes, CC messages or pitch bend without assembling a custom translation chain. Gamepad MIDI Controller by Pounding Systems advertises Windows, macOS and Linux support, creates a virtual MIDI output, and offers mappings for buttons, D-pad directions, sticks, triggers and, on supported controllers, touch and motion inputs. Its product page also lists MIDI notes, CC and pitch bend. Those are vendor-stated capabilities; which controls are exposed depends on the controller, connection and operating system. See the Gamepad MIDI product page and its compatibility FAQ.
The vendor lists Windows 10/11 64-bit, macOS 10.13 or later, and Linux environments including Ubuntu 20.04+, Fedora 35+ and Debian 11+ in its FAQ. These are vendor-stated requirements, not a guarantee that every controller feature works on every listed system. Test your specific controller and operating system before relying on a mapping.
General-purpose MIDI translation
Bome MIDI Translator Pro is aimed at more involved translation and automation: its documented functions include MIDI processing, keyboard and mouse actions, timers, application focus and conditional rules. It can be useful when one control should do different things in different modes or when you want to combine music control with computer actions. It is not primarily a plug-and-play gamepad mapper, so direct gamepad input may require another input layer or additional setup. Check the Bome product page and manual for current capabilities and system requirements.
Free tools Windows power users keep installed
One-click scans. No signup required.
When keyboard emulation is enough
A gamepad-to-keyboard remapper can trigger shortcuts such as play, stop or save, but that does not make the controller a MIDI source. Choose MIDI conversion if you need a stick to send continuous CC data to a plug-in, or a button to send a note to an instrument. Choose keyboard emulation for simple shortcuts in software that has no useful MIDI-learning workflow.
Set up the bridge and make a first mapping
Start with a wired connection. USB removes Bluetooth pairing and reconnection as variables while you confirm that the controller, bridge and DAW can communicate. The dedicated app’s getting-started guide describes its controller display, MIDI-device selector, mapping editor and preset workflow.
- Download the bridge from its official source and install it. Read the platform-specific installation notes; a virtual MIDI driver may require extra steps or a restart.
- Connect the controller by USB and start the bridge. Confirm that its on-screen controller display responds when you press buttons and move sticks.
- Select the bridge’s virtual MIDI output, or create a separate virtual port if the application does not provide one.
- In the mapping editor, choose a control and assign a MIDI message. For a first test, map one button to a note and one analog control to a CC.
- Set the MIDI channel and useful value range. For analog controls, add a center dead zone or curve if the bridge provides those options.
- Save the mapping as a preset, then open your DAW and enable the matching virtual MIDI input.
- Test button press and release, the full stick or trigger range, and the stick’s resting position. Keep the audio volume low until you know what the mapping triggers.
Buttons used as notes need both a press and a release event. The bridge should send Note On when the button is pressed and Note Off when it is released; without the release, an instrument can sustain a stuck note.
Rank #2
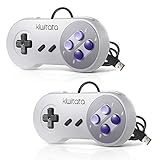
- ✅【Compatibility】Compatible with Raspberry Pi, Windows PC, Linux ,Mac. Specifically designed for playing classic old school retro snes games on computer or laptop.This is the USB controller what has a USB plug for PC, NOT compatible for Original SNES super Nintendo console
- ✅ 【Ergonomic Design】Super precise cross key and function buttons,the cross direction key adopts frosted concave design,anti-sweat and anti-slip.The shape of the controller is designed to fit the contour of your hands,easy and comfortable to hold.
- ✅ 【Advanced Game Experience】PC running operating system:Windows 98/2000/ ME/XP/Vista/Win7/8/8.1/11 or later,or Mac running OS X 10.0/Mac OS X or above.It works with most of emulators you wish to download and use,such as VirtuaNES(PC),sens9x,Zsens,sensgt,Uosnesw,RetroArch,OpenEmu(MAC),NESEmu and Jnes etc.
- ✅ 【Wired USB Connection】Standard USB 2.0 port with a 1.5 meters (5ft) cable, don't need to install any drivers, you must manually set the buttons and directionals within the emulator you're using, and the controller not automatically assigns buttons/directional axes. Notice: please download the game emulator first before start the games, you can download the emulator “VirtuaNES” on PC and “OpenEmu”on MAC.
- ✅【Satisfaction】Third party controller(USB Version), not for original snes console and not support for switch. If there is an incompatibility on MAC or Raspberry Pi , please contact the seller for a support.
Route the virtual MIDI port into your audio software
The bridge’s MIDI output and the DAW’s MIDI input must refer to the same port. This is a software connection, not an audio connection: a MIDI port carries control and note messages, not sound.
Recommended Free Tools
Windows
If your bridge creates its own virtual output, select that device in the DAW. If it does not, loopMIDI is a Windows utility for creating virtual loopback MIDI ports between applications. Create a port, select it as the bridge’s output, and enable that same port as an input in the DAW. A routing utility carries MIDI; it does not read the gamepad or convert its controls.
The Gamepad MIDI installation guide says its Windows installer installs a virtual MIDI component and that a restart is required before that device works. This is specific to that application, not a general Windows requirement. Consult its installation guide if its port is missing.
macOS
macOS provides virtual MIDI support through CoreMIDI. For the dedicated app, its installation guide says to check for the virtual device in Audio MIDI Setup → Window → Show MIDI Studio. A MIDI port is separate from an audio interface. If an application requests input-monitoring or accessibility permission, review its request and grant only the permissions needed for the intended function. Check the tool’s current compatibility information for your Mac; Intel and Apple silicon compatibility should not be assumed to be identical.
Linux
MIDI routing depends on the active audio and MIDI stack, which may involve ALSA, JACK or PipeWire. The dedicated app’s installation notes describe Linux setup, but the visible ports and routing steps vary by distribution and configuration. Confirm that the bridge output and DAW input are connected in the MIDI system your applications use rather than relying on a command intended for a different setup.
The Tool Desk
Outbyte PC Repair FREEClear out junk files and repair common Windows errorsFree Scan →Outbyte Driver Updater FREEScan for outdated or missing drivers - takes under a minuteDriver Scan →Enable and map the controller in Ableton Live
Live distinguishes between MIDI used to play instruments and MIDI used to control Live’s parameters. Enable Track for note input to an instrument, and Remote for MIDI mapping. Ableton explains these roles in its MIDI settings guide and MIDI controller FAQ.
Rank #3
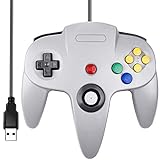
- Plug & Play: Standard USB controller; no drivers needed for compatible devices
- Compatible with Windows PC, macOS, Linux and Raspberry Pi
- Iconic original M-shaped configuration, featuring 10 action buttons, a precision analog Control Stick, and an 8-way D-pad.
- The 3D analog stick provides nuanced control for precise movements and enhanced gameplay comfort.
- Features a 6-foot (1.8 m) cable for comfortable gameplay.
- Connect the gamepad, start the bridge and select its virtual MIDI output.
- Open Live’s Settings/Preferences → Link, Tempo & MIDI.
- Find the virtual MIDI input. Enable Remote to map Live parameters. Enable Track as well if the gamepad will play notes on an instrument track.
- Enter MIDI Map mode with Ctrl+M on Windows or Cmd+M on macOS.
- Click the Live parameter you want to control, then press the gamepad button or move the axis you assigned in the bridge.
- Exit MIDI Map mode and test the mapping. For notes, arm or monitor the intended instrument track and confirm that release events arrive.
Live’s MIDI mapping mode lets you assign controls even when a device has no dedicated control-surface script. That does not make a gamepad a fully integrated Push-, Launchpad- or Mackie-style surface. See Ableton’s custom MIDI mapping instructions and control-surface guide.
Use MIDI messages that suit each control
These are suggested assignments, not universal defaults. Choose them to match the instrument or performance task, and avoid assigning one control to several functions until the basic mapping works reliably.
| Gamepad control | Suggested musical use |
|---|---|
| A / Cross button | Trigger a drum, sample or one-shot note |
| B / Circle button | Stop, mute or trigger an alternate sample |
| X / Square button | Launch a clip or scene |
| Y / Triangle button | Toggle an effect |
| D-pad up/down | Increment or decrement a parameter |
| D-pad left/right | Select tracks, presets or scenes |
| Left-stick X | Filter cutoff, pan or wavetable position |
| Left-stick Y | Resonance, effect mix or pitch |
| Right-stick X/Y | Delay time, stereo position, modulation, reverb size or feedback |
| Left/right triggers | Crossfader, expression, volume or effect send |
| Shoulder buttons | Bank or preset changes |
| Stick clicks | Momentary mode switch or transport function |
Use notes for hits and CC for continuous control
Map a button to a MIDI note when it should behave like a key, drum pad or one-shot trigger. Map an analog stick or trigger to CC when it should vary a parameter such as cutoff, pan, volume or effect mix. Pitch bend is useful when you want an analog control to use the instrument’s dedicated pitch-bend range rather than a general CC assignment.
A button can act as a momentary switch, active only while held, or a toggle, changing state with each press. Use momentary behavior for hold-to-sustain or temporary effect control; use toggles for on/off functions. Those behaviors are distinct from note press/release messages, so check the bridge’s assignment mode and the receiving software’s expected message.
Calibrate sticks and triggers to avoid jitter
Analog sticks may not rest at precisely the same center value every time. If that small variation reaches the DAW, a mapped parameter can drift or flicker even when you are not touching the controller. Adjust calibration while watching the output or the mapped parameter.
- Dead zone: Ignore small movements around the stick’s center. Begin with a modest dead zone and increase it until the parameter holds still when the stick is released.
- Curve: Change how quickly output rises with movement. A flatter response near center can make small adjustments easier; a steeper curve can reach larger changes with less travel.
- Range: Limit the MIDI output to a useful portion of the available CC range rather than forcing the full sweep if the target parameter is hard to control.
- Invert: Reverse an axis if its physical direction feels backward for the musical task.
- Smoothing: Reduce rapid fluctuations, accepting that heavier smoothing can make the control feel less immediate.
- Trigger range: Check the trigger’s actual minimum and maximum. Different controllers can expose their triggers differently, so do not assume one calibration fits every model.
If the target parameter is logarithmic while the controller output is linear, the control may feel uneven. Adjust the bridge curve or the plug-in’s response where available, and avoid assigning one axis to many unrelated parameters until its range feels usable.
Rank #4

- This usb foot switch keyboard mouse control foot pedal is equivalent to a standard USB keyboard and mouse with one key, the key can be defined through the supporting software as keyboard,mouse,multimedia.game,string,macro definition and MIDI function.One PC can suport more than one USB foot pedal, but you need program one by one, then plug in your PC.Once this switch is configured, can it be moved to a different computer and used without the software.
- Macro Function : Programmable Comand and customize the combination of keyboard and mouse movements.After pressing the pedal, the computer will automatically perform the steps that have been set through the software. For example, it can be set to be pressing F1 and then 10ms later pressing F2 etc..
- MIDI Cotroller User-defined Function : The MIDI function has three parts, command function, CC command function and PC command function.MIDI function enables guitarists to switch the types of musical instruments and control the sound information such as timbre and so on while using high-end equipment such as Software effector, advanced comprehensive effect device, rack equipment and electronic tube speaker with MIDI control
- Simple and easy to use. Once you program into the footswitch, the software can be removed. The key value is written to the switch and the software would only need to be loaded if you wish to change the key.
- USB Connection, Plug and Play, Free Software Download.You can even connect multiple foot pedals at a time to make them each do different things.The push to talk foot pedal can only store one settings profile at a time.The footswitch can be programmed single keypress or continuous, single key or combination of keys, and the key can be a keyboard value (including special keys), a mouse value, a string of keys, a multimedia key or a game controller key.
Use the same general process in other DAWs
Menu names vary across Logic Pro, FL Studio, REAPER, Cubase, Pro Tools, Studio One, Bitwig, Reason and other applications. Look for the MIDI input and controller assignment or MIDI-learn functions rather than assuming a specific menu path.
- Start the bridge and verify that its virtual MIDI output exists.
- Enable that port in the DAW’s MIDI input settings.
- Enable the appropriate input role: note/track input for instruments, and remote/control input for parameters or transport.
- Open MIDI Learn, controller assignment or the equivalent mode.
- Select the target parameter and press or move the desired gamepad control.
- Save the project, template or controller preset, then disable unused duplicate MIDI inputs.
| Goal | Setting or function to find |
|---|---|
| Play an instrument | MIDI input, track input or instrument monitoring |
| Control a plug-in parameter | MIDI Learn or parameter assignment |
| Control mixer or transport functions | Remote, controller assignment or control input |
| Send MIDI to external hardware | MIDI output and a suitable hardware MIDI interface |
Choose a gamepad for the controls you need
Xbox One and Series controllers, PlayStation DualShock 4 and DualSense controllers, Nintendo Switch Pro controllers, generic USB pads and Bluetooth controllers may be usable, but compatibility depends on the operating system, connection method, driver or input layer, and bridge. A bridge’s support claim is not a promise that every sensor or special feature will be exposed. Buttons and sticks may work even when a touchpad, gyro or accelerometer does not.
USB is the more predictable way to establish a working setup. Bluetooth can be convenient, but pairing, sleep behavior, interference and reconnection can interrupt a session. If wireless operation matters, test it with the same computer, controller and software configuration you plan to use; use wired operation for a performance where an unexpected disconnect is unacceptable.
Independent reader supportYour contribution helps us test, update, and keep practical guides available for everyone.Fix common gamepad-to-MIDI problems
The gamepad works in games but not in the bridge
- Disconnect and reconnect it by USB, then restart the bridge.
- Close games, Steam Input, controller remappers and other utilities that may be reading or translating the same input.
- Confirm that the controller is paired or in the correct connection mode, and try another cable or USB port.
- Check whether the bridge’s on-screen controller view responds. If not, verify that the operating system recognizes the gamepad and check the bridge’s supported input methods.
The virtual MIDI port is missing
- Restart the bridge; if its installer added a virtual MIDI driver, restart the computer as directed by that application.
- On macOS, check Audio MIDI Setup → Window → Show MIDI Studio.
- On Windows, use a separate virtual MIDI utility such as loopMIDI only if the bridge does not create a port itself.
- On Linux, inspect the active ALSA, JACK or PipeWire MIDI connections.
- Check for conflicting MIDI devices or duplicate routing; the dedicated app’s FAQ also recommends restarting and checking for conflicts when its virtual port is unavailable.
The DAW sees the port but receives nothing
- Confirm that the bridge has selected the intended MIDI output and that the DAW enabled the matching input.
- Enable the correct input role: Live’s Remote for parameter mapping and Track for instrument notes.
- Check MIDI channel and message type, and make sure no routing tool or input filter is blocking the message.
- Test the bridge’s output with a MIDI monitor if available, to distinguish a mapping problem from a DAW routing problem.
A note remains stuck
Check that the button mapping sends Note Off on release, not just Note On on press. If the target action is a toggle or CC-controlled function rather than a played note, use the appropriate message mode. Stop playback or reload the instrument to clear a persistent stuck note; where supported, assign an emergency all-notes-off action.
A stick moves a parameter by itself
Increase the center dead zone until the output is stable, then adjust smoothing or the response curve if needed. If the controller still will not hold a steady center, try another controller or a wired connection.
Quick wins for a faster PC:
Fix the driver behind crashes, sound loss and screen glitchesFind Drivers →Repair Windows errors before they cause bigger problemsFix Now →Scan for outdated or missing drivers - takes under a minuteDriver Scan →One press triggers two actions
Look for duplicate paths: Steam Input and the bridge may both be active, a button may be mapped as both MIDI and keyboard input, or the DAW may have the same source enabled through more than one route. Disable unused controller software and MIDI inputs, then test one path at a time.
Best Value
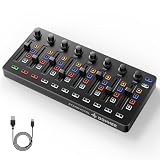
- Wireless Connectivity: Compared with traditional MIDI controllers, Donner STARRYCTRL built-in rechargeable 780mAh high-capacity lithium battery and low-latency wireless technology. A single USB Type-C cable provides fast recharging. The true wireless design keeps your creative workspace cleaner and more flexible
- Smart LED Anti-jump Indicator: This MIDI controller mixer has 8 faders and 8 knobs that are used to control volume and pan. The LED indicator flashes when the fader position does not match the track volume. This indicates that the device supports Soft Takeover or visual alignment, helping prevent sudden value jumps
- Supports Mackie Control Universal (MCU): No need to learn complex software mapping. One-click support for Mackie Control mapping reduces the learning curve. Complete Solo (S), Mute (M), Record (R), and Select button groups
- Fully Customizable: Donner STARRYCTRL MIDI computer recording controller for DAW has 43 assignable keys. Deeply customize CC mapping, Note messages, channel information, aftertouch information, and more through MidiSuite
- Grade Control for Music Creation & Live Performance: Built for professional music producers and semi-pro enthusiasts creating in home studios, outdoors, or on stage. Customizable multi-channel controls and global buttons speed up production and live mixing. DJs tweak filters, delay, and EQ in real time via knobs and pads—wireless mode cuts stage cable clutter. MIDI mapping also triggers visuals, lights, or OBS scenes for synced VJ and multimedia performances
The mapping responds but feels wrong
Check whether the axis is inverted, whether the stick center corresponds to the intended midpoint, whether a trigger spans the expected range, and whether the target parameter responds nonlinearly. Begin with one gamepad control assigned to one function so calibration changes have a clear effect.
The controller disconnects during use
Use USB for critical sessions unless you have tested wireless reconnection and sleep behavior. Keep an alternative control method available when a disconnect would interrupt a performance.
The macOS app is blocked by Gatekeeper
The dedicated app’s installation notes publish this command as a workaround:
xattr -cr /Applications/Gamepad MIDI.app
Removing quarantine attributes changes a security check. Use this only if you obtained the application from the official vendor and understand the implication; consult the vendor’s installation guide rather than applying the command to an unknown download.
What a gamepad does—and does not—replace
A gamepad can be a useful compact controller for clip launching, drum or sample triggering, effect toggles, filter sweeps, modulation, performance macros, DJ-style gestures and accessibility-oriented input. Sticks and triggers offer continuous control in a familiar handheld layout.
It is less suited to piano-style playing, precise velocity-sensitive performance, many simultaneous notes, or mixing with numerous independent faders. Most gamepads lack dedicated labels, knobs, displays and tactile position feedback; stick jitter and controller-specific ranges also make fine adjustments less predictable. MIDI feedback to lights, rumble motors or displays should not be assumed.
Use the gamepad you already own when experimentation, portability, accessibility or gestural control is the goal. If your priority is reliable keys, velocity, labeled controls or stage-ready tactile operation, a conventional MIDI controller is the more suitable tool.
What’s actually slowing this PC down?
Pick the symptom - the matching free tool is one click away.
Quick Recap
Product prices and availability are accurate as of the date/time indicated and are subject to change. Any price and availability information displayed on Amazon at the time of purchase will apply.

