Free tools Windows power users keep installed
One-click scans. No signup required.
Some links on this page are affiliate links: if you buy through them we may earn a commission, at no extra cost to you.
To install a desktop processor, first confirm that the motherboard supports the exact CPU and BIOS version. Open the socket, align the processor’s markers and keys, lower it without sliding or forcing it, and close the retention mechanism. Then fit a compatible cooler, use thermal paste only if needed, connect the CPU fan or pump, and check CPU detection in UEFI/BIOS.
Before you start: check compatibility and prepare
Confirm the CPU, motherboard, firmware, and cooler match
Check the motherboard maker’s CPU support list for your exact processor model and the minimum BIOS version it requires. A matching socket is necessary, but it does not guarantee that the board’s firmware supports the CPU. Intel LGA1700 and LGA1851 are different sockets; AMD AM4 and AM5 are also different platforms. Intel’s package and socket compatibility guide explains why socket and platform compatibility matter. For the board-specific CPU list and upgrade procedure, use the manufacturer’s support page; MSI’s CPU compatibility and installation guide describes how to check its support information.
Check the cooler’s manual for the exact socket and mounting hardware. A cooler may need a different bracket, backplate, standoffs, or mounting orientation for a new platform. Also confirm that the processor is a desktop model for the board, not a laptop, server, or embedded part. If the CPU has no integrated graphics, you need a discrete graphics card to get display output.
If a required BIOS update cannot be installed with the current CPU, check whether the motherboard offers a CPU-less update feature such as BIOS Flashback and follow that board’s instructions. If it does not, you may need a temporarily installed, supported older CPU or help from a retailer or service center. Update before removing an existing supported CPU when that is the practical option; do not assume every board can update without one.
#1 Best Overall

- 【Wide Application】This precision screwdriver set has 120 bits, complete with every driver bit you’ll need to tackle any repair or DIY project. In addition, this repair kit has 22 practical accessories, such as magnetizer, magnetic mat, ESD tweezers, suction cup, spudger, cleaning brush, etc. Whether you're a professional or a amateur, this toolkit has what you need to repair all cell phone, computer, laptops, SSD, iPad, game consoles, tablets, glasses, HVAC, sewing machine, etc
- 【Humanized Design】This electronic screwdriver set has been professionally designed to maximize your repair capabilities. The screwdriver features a particle grip and rubberized, ergonomic handle with swivel top, provides a comfort grip and smoothly spinning. Magnetic bit holder transmits magnetism through the screwdriver bit, helping you handle tiny screws. And flexible extension shaft is useful for removing screw in tight spots
- 【Magnetic Design】This professional tool set has 2 magnetic tools, help to save your energy and time. The 5.7*3.3" magnetic project mat can keep all tiny screws and parts organized, prevent from losing and messing up, make your repair work more efficient. Magnetizer demagnetizer tool helps strengthen the magnetism of the screwdriver tips to grab screws, or weaken it to avoid damage to your sensitive electronics
- 【Organize & Portable】All screwdriver bits are stored in rubber bit holder which marked with type and size for fast recognizing. And the repair tools are held in a tear-resistant and shock-proof oxford bag, offering a whole protection and organized storage, no more worry about losing anything. The tool bag with nylon strap is light and handy, easy to carry out, or placed in the home, office, car, drawer and other places
- 【Quality First】The precision bits are made of 60HRC Chromium-vanadium steel which is resist abrasion, oxidation and corrosion, sturdy and durable, ensure long time use. This computer tool kit is covered by our lifetime warranty. If you have any issues with the quality or usage, please don't hesitate to contact us
Gather the essentials
- Compatible CPU, motherboard, and CPU cooler
- Thermal paste, unless the cooler has suitable paste pre-applied
- A Phillips screwdriver if the cooler uses screws
- Motherboard and cooler manuals
- A clean, stable work surface; for a new build, a non-carpeted area is preferable
- Isopropyl alcohol and a lint-free or non-abrasive wipe if removing old paste
An anti-static wrist strap is optional. Reduce static risk by working in a clean area, avoiding carpet, and handling the processor by its edges. Keep it in its packaging until the socket is open and ready. AMD’s processor handling guidance covers careful handling and electrostatic-discharge precautions.
Choose where to work
For a new build, installing the CPU, memory, M.2 drive, and cooler with the motherboard outside the case often gives you better visibility and access to cooler backplates. Set the board on its box or another clean, non-conductive surface. Follow the cooler manual if it specifies a different sequence.
For an upgrade, shut down the PC, switch off and unplug the power supply, then press the case power button briefly. Remove any obstruction above the socket. If useful, lay the case on its side so the motherboard is level. Disconnect the CPU fan or pump before removing the cooler. An AM4 cooler deserves particular care during removal; see Removing a CPU or cooler.
Do these 3 things before closing this tab:
1Fix the driver behind crashes, sound loss and screen glitches2Repair Windows errors before they cause bigger problems3Scan for outdated or missing drivers - takes under a minuteIdentify the socket and where its pins are
The platform determines whether the delicate pins are on the motherboard or on the processor. In either case, do not touch the contacts, drop the CPU, or drag it across the socket. The table covers the current Intel desktop sockets and AMD AM4/AM5 addressed here; other Intel sockets and older PGA platforms can have different details, so use their own manuals.
Rank #2
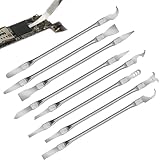
- Versatile Repair Kit:Perfect for safely removing BGA chips, CPUs, and other small components from smartphones and motherboards.
- Precision Design:Ultra-thin tools allow for easy maneuvering between chips and board without damage.
- Durable Material:Made from high-quality alloy, resistant to corrosion and bending, ensuring longevity.
- Time-Saving:Integrated blade and handle design eliminates the need for assembly, making repairs quicker.
- Comfortable Use:Ergonomic design ensures a comfortable grip, reducing hand fatigue during extended use.
| Platform | Where the pins are | Main handling risk | Alignment |
|---|---|---|---|
| Intel LGA1700 | Motherboard socket | Bending socket pins or damaging package corners | CPU triangle plus side notches and socket keys |
| Intel LGA1851 | Motherboard socket | Bending socket pins or using incorrect platform hardware | CPU triangle plus socket keys |
| AMD AM5 | Motherboard socket | Damaging socket pins | CPU triangle plus socket keys |
| AMD AM4 | CPU package | Bending processor pins | CPU triangle plus socket marker |
Alignment marks vary. Use the triangle, notches, or keys specified in the motherboard and CPU instructions rather than relying on orientation by appearance alone.
Install the processor
Before opening the socket, read the board’s instructions and locate its alignment marker. Keep the socket cover in place until the processor is ready. Intel has separate boxed processor installation manuals for desktop platforms; its LGA1700 installation procedure provides platform-specific detail. Do not assume that one Intel socket’s cooler parts or exact procedure apply to another.
Intel LGA1700
- Release the socket retention arm and lift the load plate as shown in the motherboard manual.
- Leave the protective cover in place until the CPU is ready to be installed.
- Hold the CPU by its edges. Match its small triangle to the socket triangle and align the side notches with the socket’s keying tabs.
- Lower the CPU vertically into the socket. Check that it lies level, with all package corners seated; do not slide it into position.
- Close the load plate and lower the retention arm to its latch. Follow the board’s instructions for the cover: it may release as the mechanism closes, or the manual may specify removal.
- Look over the socket and CPU package before mounting the cooler. If the CPU appears tilted or the pins look damaged, stop.
Do not close the loading mechanism over a processor that is incorrectly seated. Intel warns that this can damage package corners and leave the processor inoperable. Its LGA1700 installation transcript illustrates the alignment and loading sequence.
Intel LGA1851
- Use the motherboard’s LGA1851 instructions to open the retention mechanism; do not substitute LGA1700 cooler or socket instructions.
- When ready, hold the CPU by its edges, match the triangle, and align the package with the socket keys.
- Lower it straight into place and verify that it sits level before closing the retention mechanism as directed by the board manual.
- Follow the board’s instructions for the protective cover and inspect the seating before installing the cooler.
LGA1851 is not interchangeable with LGA1700. Verify the CPU, motherboard, BIOS, and cooler mounting hardware for LGA1851 specifically. Intel lists its platform manuals on the boxed processor installation manuals page.
Rank #3

- 【High-quality Material】Metal spudger is made of high-quality stainless steel, with high hardness, high toughness, rust resistance, high temperature resistance, and is not easy to break when used.
- 【Multiple Specifications】Include 8 flat spudger opening tools, double head design, a total of 16 different flat spudgers blade, which can meet your different needs.
- 【Perfect Design】Soft and lightweight, not easily deformed. The blade has a thinness of 0.1mm and high elasticity, making it easy to disassemble, weld, and layer the baseband CPU.Also can solve the dead corner of digital products,can quickly separate the tin point,fast degumming
- 【Widely Applications】Repairing disassembly tools are suitable for disassembling the casings of digital electronic products such as smart phones, tablet computers, cameras, etc., and can also be used for IC chip CPU desoldering and delamination.
- 【Features】CPU pry tool set with a variety of flat pry head designs, High temperature resistance, non deformation, non sticking tin, able to quickly separate tin points
AMD AM5
- Raise the socket retention mechanism according to the motherboard manual. Remove the socket cover only when the CPU is ready.
- Hold the processor by its edges. Match its triangle to the socket marker and align the socket keys.
- Lower the CPU straight down. Do not slide, twist, or press it into the socket.
- Close the retention mechanism as the board manual describes, then inspect the CPU perimeter and socket before installing the cooler.
AM5 has pins in the motherboard socket, so a dropped, angled, or dragged processor can damage the board’s socket pins. Handle the CPU carefully and keep debris away from the socket.
AMD AM4
- Raise the socket retention lever fully.
- Find the triangle on the CPU and match it to the socket’s triangle.
- Lower the CPU vertically into the socket. Correctly aligned pins should enter with little or no force; do not push down to make it fit.
- Lower the retention lever to lock the processor, then keep the board level while fitting the cooler.
AM4 has pins on the CPU itself, unlike AM5. If the processor does not settle into place, lift it and check the alignment and pins rather than forcing it. AMD’s handling guidance and ASUS CPU installation instructions show the relevant handling precautions.
Apply thermal paste—or leave pre-applied paste alone
- Paste already on a new cooler: Leave it intact. Do not add another layer. Intel notes that many boxed coolers ship with thermal interface material already applied in its thermal interface material guidance.
- No paste on the cooler: Apply the amount and pattern specified by that cooler’s manufacturer. There is no single paste pattern that is correct for every CPU and cold plate.
- Reusing a cooler: Remove the old compound from both the processor heat spreader and cooler base, let the surfaces dry, then apply fresh paste.
- Paste contaminated by dust or fingerprints: Clean it off and replace it rather than mounting the cooler over contaminated compound.
Intel recommends isopropyl alcohol for cleaning old thermal material and waiting for the surface to dry before fitting the cooler. Noctua’s NT-H2 AM5 manual, for example, specifies patterns for its paste and processor installation. Follow the instructions for the actual product rather than treating a pea-sized dot as a universal rule.
The Tool Desk
Outbyte PC Repair FREEClear out junk files and repair common Windows errorsFree Scan →Outbyte Driver Updater FREEScan for outdated or missing drivers - takes under a minuteDriver Scan →AM5 heat spreaders have cutouts around parts of their perimeter, where excess paste can collect. A compatible paste guard is optional; Noctua’s AM5 paste-guard manual shows how its guard is used. Keep paste away from contacts, socket pins, and board components even when the compound is non-conductive.
Rank #4

- 122 in 1 Precision Screwdriver Set: This precision screwdriver set contains 101 precision bits and 21 auxiliary tools—screwdriver handle, flexible shaft, extension rod, magnetizer, magnetic mat, spudgers, and more. It handles PC maintenance—RAM upgrades, SSD swaps, PC assembly—while also tackling teardowns and repairs of PS4, Xbox, other game consoles, drones, smartphones, tablets (battery and screen replacements), and other electronics. Rare and specialty bits are included for servicing specialized devices.
- Maximize Repair Efficiency: Engineered for efficient repairs, the handle is ergonomically designed and non-slip, fitting comfortably in your hand and spinning smoothly. A 4.56-inch alloy-steel extension shaft offers high hardness and resists bending, while the spring-constructed flexible shaft flexes up to 180° to reach and turn tiny screws deep inside a chassis with ease.
- Dual-Magnet Design: The kit includes two magnetic tools. A magnetizer boosts bit magnetism to pick up screws, and a magnetic mat holds and organizes every tiny screw you remove. Used together, they slash the risk of loss or mix-ups, keeping every teardown and reassembly neat and orderly.
- Quality First: The bits are forged from Cr-V steel and heat-treated to 60 HRC for exceptional hardness, strength, and deformation resistance—ideal for long-term electronic repairs. Spare bits in the most common sizes are also included, so a lost tip never leaves you short, keeping the kit fully functional and extending its service life.
- Compact Storage: Every component is neatly labeled and organized in the case—ready for home, office, or on-the-go use. This all-in-one kit saves money and eliminates service appointments. It’s the perfect household essential and an ideal gift for husbands, dads, sons, or friends who love electronics repair and DIY projects.
Mount the cooler and connect its cables
- Check the cooler manual for support of the exact socket and install the specified backplate, brackets, standoffs, or spacers. Do not mix hardware from another socket.
- Remove the protective film from the cooler base if present.
- If the cooler does not have paste pre-applied, apply paste as its instructions specify.
- Set the cooler flat on the CPU without sliding it around. Start the screws and tighten gradually, alternating between sides or corners in a crosswise pattern when the cooler uses multiple screws. Do not exceed the maker’s instructions.
- Connect the air-cooler fan to the motherboard’s
CPU_FANheader. For a liquid cooler, connect the pump, radiator fans, and any required auxiliary cables to the headers or controller specified in its manual. - Check that no cable is trapped beneath the cooler or obstructing a fan.
Intel’s boxed cooler instructions specify connecting the cooler’s four-wire fan cable to the motherboard’s four-pin CPU-fan header. Header arrangements vary, so use the motherboard and cooler manuals for your actual setup.
An air cooler generally involves fewer connections than an AIO liquid cooler, which adds a pump, radiator, and fans. Neither type is mandatory for CPU installation: choose a cooler that suits the processor’s heat output, case clearance, noise goals, and your comfort with the installation. Check case height and memory clearance for air coolers, and radiator clearance and routing for an AIO.
Independent reader supportYour contribution helps us test, update, and keep practical guides available for everyone.First boot: check detection, power, and cooling
- For a new build or initial diagnosis, install one known-good memory module in the slot recommended by the motherboard manual.
- Connect the 24-pin motherboard power cable and the CPU EPS power cable near the socket. A missing EPS cable can prevent startup even when the CPU is correctly installed.
- Install a discrete graphics card if the processor lacks integrated graphics. Connect the monitor to the graphics card when required, not to an inactive motherboard video output.
- Power on and enter UEFI/BIOS. Confirm that the expected CPU model is recognized and that the CPU fan or pump is detected.
- Check the CPU temperature in firmware. Do not judge it against a universal idle-temperature threshold: readings depend on the CPU, firmware behavior, ambient conditions, and cooling setup.
- After the system starts reliably, install the operating system and appropriate chipset or platform drivers, then perform a short stability and temperature check before a long gaming or rendering session.
Troubleshoot by symptom
The CPU will not fit or the retention arm will not close
- Stop; do not push the CPU or force the lever.
- Confirm that the retention arm is fully open and that the CPU triangle and notches or keys match the socket.
- Check for a socket cover, packaging material, debris, or another obstruction.
- Lift the CPU by its edges and inspect for a tilted package or bent pins before trying again.
Some retention mechanisms need pressure to latch after the processor is correctly seated; that is different from using the mechanism to force a misaligned processor into place. If the resistance seems abnormal, reopen it and check the seating and board manual.
Recommended Free Tools
The PC does not boot or the CPU is not detected
- Switch off and unplug the system before inspecting the socket. Verify the exact CPU and motherboard models, then recheck the motherboard CPU support list and minimum BIOS version.
- Confirm that the 24-pin motherboard cable and CPU EPS cable are attached securely.
- Inspect the socket carefully for damaged pins; avoid touching or probing them.
- Reseat memory and try one module in the recommended slot. If settings may be at fault, clear CMOS using the board manual’s procedure.
- If the BIOS does not support the CPU, use the board’s documented BIOS Flashback or equivalent feature if available. Otherwise, use an older supported CPU temporarily or ask a retailer or service center to update it.
Update procedures and Flashback availability vary by motherboard. Check the board maker’s support page and instructions rather than assuming that every model can update without a working CPU.
Best Value
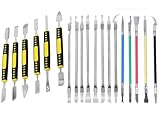
- Package: 19 pieces electronics repair kit contain 6 pieces double end metal pry tool plus 13 pieces thin blade CPU remover BGA maintenance knives
- Pry tools for electronics smartphones laptops computer tablets smart watches and all portable gadgets for full disassembly and maintenance work
- CPU IC chip repair tools support chip removal edge glue cleaning pad scraping edge adhesive peeling and motherboard component separation
- The spudger tool kit is sturdy and durable. The middle grip part adopts non slip plastic design to deliver stable and firm operation force during disassembly work
- The thin blade of IC chip repair tools is made of flexible steel material. It resists deformation under repeated bending with long lasting sturdy service life.
The PC starts but there is no display
- Check that the CPU is supported by the installed BIOS and that the CPU EPS power cable is connected.
- Confirm that memory is seated and that the display cable is connected to an active output. A CPU without integrated graphics needs a discrete graphics card for display.
- Consider a socket-pin problem or CMOS configuration issue if the basic connections are correct.
The CPU temperature rises rapidly or the board reports a fan error
- Shut down if the temperature continues climbing quickly.
- Check that any protective film was removed from the cooler base and that the cooler sits flat with the correct mounting hardware.
- Check whether paste is missing, disturbed, or incorrectly applied, and whether the cooler has full contact.
- Verify that the CPU fan is connected to the correct header or that the pump and other required AIO connections are powered and detected.
Temperature limits and fan-control behavior are model-specific; consult the CPU, motherboard, and cooler documentation rather than using a generic threshold.
You find a bent pin
Do not try to straighten a pin with a screwdriver, knife, or improvised tool. Photograph the socket or CPU before touching it further, then check warranty and return terms or consult a qualified repair specialist. Pin damage can affect memory, PCIe, USB, or whether the system boots at all; the outcome depends on the pin and damage.
Removing a CPU or cooler
For a CPU replacement, power down, switch off and unplug the power supply, and disconnect the fan or pump before removing the cooler. Clean old thermal compound from both mating surfaces with isopropyl alcohol and a lint-free wipe; let them dry before fitting another cooler. Keep the CPU and socket cover somewhere safe. Intel’s processor integration guidance includes protective-cover advice for handling and transport.
Quick wins for a faster PC:
Clear out junk files and repair common Windows errorsFree Scan →Fix the driver behind crashes, sound loss and screen glitchesFind Drivers →Repair Windows errors before they cause bigger problemsFix Now →Take extra care with an AM4 cooler
An AM4 processor can stick to its cooler when old thermal compound holds the surfaces together. Experienced repair practice is to warm the system briefly before shutdown, then disconnect power and gently twist the cooler to loosen the bond rather than pulling it straight up. If the processor has already come out attached to the cooler, do not bend or scrape its pins; let the compound soften and separate the parts carefully. This is a handling precaution, not a guarantee that a stuck processor can be removed without damage.
For a new installation, the safest sequence remains: confirm compatibility, align and seat the CPU without force, fit a compatible cooler, connect its required fan or pump leads, and verify detection before putting the system under sustained load.
Quick Recap
Product prices and availability are accurate as of the date/time indicated and are subject to change. Any price and availability information displayed on Amazon at the time of purchase will apply.

