What’s actually slowing this PC down?
Pick the symptom - the matching free tool is one click away.
Some links on this page are affiliate links: if you buy through them we may earn a commission, at no extra cost to you.
A useful screenshot tutorial lets a reader complete one task from a clearly stated starting point to a visible finished result. Build it around the reader’s goal, write one action per numbered step, identify controls by their labels, and use screenshots only where an image improves orientation or recognition. This guide shows how to plan, capture, write, check, and publish that kind of tutorial without making the images a requirement for understanding.
Define the task and the completion state
Start by writing the outcome in one sentence: “After following this tutorial, the reader will …” Make the sentence observable. “Configure a project” is vague; “Create a project, enable automatic backups, and verify that the backup status says Enabled” gives you a start and an end.


Choose a task-sized scope
Keep one tutorial focused on one reader goal. If the task has independent outcomes, split it into linked tutorials. A narrow scope makes screenshots easier to keep current and lets every step contribute to a single result.
Free tools Windows power users keep installed
One-click scans. No signup required.
Record the exact environment
- Application and edition, such as desktop, web, or mobile.
- Operating system and interface language when they affect labels.
- Version or release date if the controls may move.
- Required account, permission, sample file, or starting project.
State these details near the beginning. A reader who opens the wrong application or view can otherwise follow every instruction and still fail.
#1 Best Overall
Set the starting location and prerequisites
Tell readers where to begin before step 1. For example: “Open the web application, sign in, and open the existing project’s Settings page. The project must already contain at least one item.” If a step assumes a particular panel, mode, or selected object, name it explicitly.
Use a short prerequisites checklist
- Required access or role.
- Files, URLs, data, or credentials (never publish real secrets).
- Expected starting screen.
- A safe place to test changes or undo them.
Do not bury prerequisites in a screenshot caption. A reader should be able to prepare without seeing any image.
Outline the procedure before capturing images
Draft the complete path in plain text first. Each numbered step should contain one main action and use an imperative verb: “Open,” “Select,” “Enter,” “Enable,” or “Save.” Combine actions only when they occur in the same control or dialog and the order is obvious.
Recommended Free Tools
- Open the application and navigate to the named page.
- Select the control identified by its visible label.
- Enter or choose the required value.
- Apply or save the change.
- Verify the completion state.
Always include the finishing action. A procedure that ends at “change the value” leaves readers unsure whether the setting was committed.
Name controls, not their position
Write “In the Export format menu, choose PDF,” rather than “Choose the item on the right.” Labels survive window resizing, different display scales, and redesigned layouts. Mention a location first when it prevents confusion: “In the left navigation, open Projects, then select the project name.”
Include keyboard paths
Where a pointer instruction has a practical keyboard equivalent, include it in the same step or an accessibility note. For example, describe tab order, the shortcut that opens a command palette, or pressing Enter to activate a focused button. Do not make color, an icon, or screen position the only way to identify a control.
Decide where screenshots add information
A screenshot earns its place when the interface is hard to locate, the appearance confirms a state, or visual structure communicates something prose cannot. Do not capture every click. A text-only step is often clearer for a familiar, well-labeled control.
Rank #2
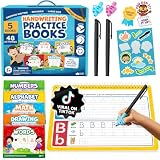
- All-in-One Complete Learning Toys Set for Handwriting Success. Start your child's journey with Magic Grooved Writing Practice for Kids Books, an all-inclusive kids writing practice book set designed for immediate learning. Includes 5 reusable kindergarten workbooks, 2 magic book pens, 10 disappearing ink refills, 2 ergonomic pen grips for kids handwriting, and a sticker sheet. The magic writing book for kids 3D groove design provides tactile guidance, making it a perfect tool for grooved handwriting practice for kids 5-7 to improve fine motor skills and master pen control.
- Fun & Engaging Toddler Books. Our grooved writing books for kids 3-5 make learning an adventure! This preschool workbook set features 48 pages across 5 magic books for kids, covering Alphabet, Numbers, Math, Drawing, and Words. Our letter tracing books for kids ages 3-5 transform writing practice for kids age 3-5 from a chore into a captivating activity. Ideal for classroom use or homeschool essentials, our writing books for kids age 6-8 develop key cognitive skills and ensure your child is ready for kindergarten.
- Unlimited Practice with Magic Disappearing Ink. The core of this magic writing book for kids is its revolutionary vanishing ink technology. The specially formulated, non-toxic ink disappears within minutes, allowing the books to be used again and again. This reusable feature makes it a cost-effective and eco-friendly choice for parents. It provides endless opportunities for handwriting practice and muscle memory development, ensuring mastery through repetition without the waste of paper or mess.
- Durable, Safe & Thoughtfully Designed. Built to last, these educational toys are crafted from thick, high-quality cardboard with vibrant printing and safety-tested rounded edges. Unlike other kids books, our books feature a durable top-spiral binding, making them equally easy to use for both right and left-handed children and preventing frustrating page flips. The sturdy construction ensures the books can withstand enthusiastic toddler use, making it a reliable Montessori tool for long-term skill building.
- The Perfect Screen-Free Educational Gift. Give the gift of learning with these engaging preschool learning activities and learning toys for 4 year old kids. An ideal screen-free alternative, this set keeps children quietly occupied during travel, summer break, or as a back to school tool. It helps build confidence, independence, and a strong foundation in early literacy and numeracy. A perfect birthday, holiday, or Christmas gift for children, grandchildren, nieces, and nephews. Add to Cart now.
High-value screenshot moments
- The first unfamiliar page, panel, or toolbar.
- A dialog with several similarly named fields.
- A visual state that confirms success, such as a status badge or preview.
- A spatial relationship the reader must recognize.
- A before-and-after change where the result is easier to identify visually.
Low-value moments
- Typing a value that is already stated in text.
- Every intermediate click in a simple menu.
- Large captures where the relevant control is tiny.
- Images that duplicate the sentence without helping recognition.
Plan a screenshot beside the step it supports. If one image covers several short actions in the same dialog, label those actions in the surrounding text rather than adding multiple nearly identical images.
Capture a clean, consistent image set
Use one operating-system presentation and one application version throughout a tutorial. Keep window scale, theme, zoom, and browser chrome consistent so readers do not mistake presentation changes for task changes.
Frame the demonstrated feature
Crop to the relevant panel while retaining enough surrounding context to identify where it is. Never cut off a field, button, error message, or value the instruction refers to. Remove unrelated tabs, personal data, notifications, and credentials before saving the image.
Windows example: Snipping Tool
On Windows, Microsoft Support documents this capture route:
The Tool Desk
Outbyte Driver Updater FREEFix the driver behind crashes, sound loss and screen glitchesFind Drivers →Outbyte PC Repair FREERepair Windows errors before they cause bigger problemsFix Now →- Prepare the screen so the target control or result is visible.
- Press Windows + Shift + S to open the capture overlay.
- Choose a capture mode and select the area containing the feature.
- Open the captured snip in the editor, then edit, save, or share it.
This is one platform example, not a requirement. macOS, Linux, browser developer tools, and built-in application capture commands can work when they preserve the same framing and clarity.
Annotate outside the interface
Use arrows, boxes, or numbered callouts sparingly. Put explanations in editable article text rather than embedding sentences inside the screenshot. An annotation should point to a control; it should not replace the control’s label or hide important content.
Write each step with an image-independent explanation
Put the action before or beside its screenshot. A reader who cannot load images must still know what to do and what should happen.
Rank #3
- Open Settings. From the project dashboard, select Settings in the left navigation. The Settings page opens.
- Open the backup options. Select Backups under Data management. The backup controls appear.
- Enable automatic backups. Turn on Automatic backups, choose the required frequency, and select Save.
- Verify the result. Confirm that the page shows the selected frequency and an Enabled status.
For each screenshot, provide descriptive alternative text that states the useful information, not the file name. “Backups page with Automatic backups enabled, Daily selected, and an Enabled status” is informative; “Screenshot 3” is not.
Do these 3 things before closing this tab:
1Scan for outdated or missing drivers - takes under a minute2Clear out junk files and repair common Windows errors3Fix the driver behind crashes, sound loss and screen glitchesUse captions for context, not duplicate instructions
A caption can identify the state or explain what the reader should notice: “The Enabled badge confirms that the setting was saved.” The numbered step should still contain the complete action and verification.
Make screenshots accessible and maintainable
Repeat every instructional fact in prose. Do not write “click the green button” or “look at the icon above” when the label or keyboard path can be stated. This supports screen-reader users, people with low vision, readers printing the page, and anyone whose images fail to load.
Choose useful dimensions and contrast
- Export at a size where labels remain legible on a phone and desktop.
- Use sufficient contrast for text and annotations.
- Do not rely on color alone; pair color with a label, shape, or status text.
- Keep callouts outside fields and controls so they do not obscure values.
Write robust alt text
Describe the screen, the relevant control, and the state that matters to the step. Omit decorative browser chrome. If the image is purely decorative, use empty alternative text rather than misleading description.
Review the complete path before publishing
Run the procedure from the stated starting location in a clean session. Check every label, value, screenshot, and completion state.
Procedure review checklist
- The title and headings describe the reader’s task.
- Prerequisites and starting view appear before the numbered procedure.
- Steps are in the order performed and use complete sentences.
- Each action identifies the control by its visible label.
- Apply, Save, Submit, or equivalent completion actions are included.
- Keyboard alternatives are documented where useful.
- Images are cropped consistently and do not expose private data.
- Every informative image has descriptive alt text.
- Text alone provides the same instructions and expected result.
- The final step verifies a visible completion state.
Test failure branches
Intentionally try an invalid value, missing permission, unsaved change, or slow connection. If the interface produces a recognizable error, add a short troubleshooting note with the message, likely cause, and recovery action. Avoid promising a label that varies by account or version; qualify it when necessary.
Or skip the browser setup
If you need repeatable captures for a tutorial, ScreenshotNeo can return a screenshot or PDF from one request. Before capture it accepts the cookie or consent banner as a visitor and removes more than 60 known consent platforms, newsletter popups, and chat widgets; each cleanup step can be turned off. Bot checks and CAPTCHAs, blank pages, timeouts, failed loads, and cache hits are not billed, and response headers identify the page verdict and billing result.
Use the API documentation at https://screenshotneo.com/docs/ for parameter details. Replace the example URL with the page you are documenting.
Rank #4

- This inspiring book makes drawing in a realistic style easier than you may think and more fun than you ever imagined
- Author: mark and Mary Willenbrink
- Made in china
cURL
curl -G "https://api.screenshotneo.com/v1/shot" -d access_key=YOUR_API_KEY --data-urlencode url=https://stripe.com -o shot.webpPython
import requests
r = requests.get("https://api.screenshotneo.com/v1/shot", params={"access_key": "YOUR_API_KEY", "url": "https://stripe.com"}, timeout=90)
open("shot.webp", "wb").write(r.content)
Node.js
const q = new URLSearchParams({ access_key: 'YOUR_API_KEY', url: 'https://stripe.com' });
const res = await fetch(`https://api.screenshotneo.com/v1/shot?${q}`);
ScreenshotNeo also supports full-page captures with lazy images loaded, CSS-selector element captures, dark mode, device presets and custom viewports, retina scale, PDF paper settings and page ranges, custom CSS or JavaScript, clicks before capture, selector hiding, waits for a selector, delay or network idle, request blocking, custom headers and cookies, user agents, authorization, timezone and geolocation, transparent backgrounds, resizing, chosen cache TTLs, signed image links, asynchronous jobs with signed webhooks, bulk capture of up to 100 URLs per call, a usage API, and an OpenAPI specification. Parameter names used by other screenshot APIs also work, which can simplify migration.
An MCP server provides take_screenshot, get_page_info, and capture_pdf tools for Claude, Cursor, and other MCP clients. The Free plan includes 1,000 shots per month without a card; paid plans start at $5 for 3,000 shots. Other listed plans are Starter $5/3,000, Growth $15/15,000, Pro $39/60,000, Scale $99/250,000, and Business $249/1,000,000; yearly billing provides two months free, and every feature is included on every plan.
Sign up for the free ScreenshotNeo plan to capture up to 1,000 screenshots a month with no card.
Independent reader supportYour contribution helps us test, update, and keep practical guides available for everyone.Troubleshoot common tutorial problems
The reader cannot find the control
Cause: the instruction relies on position, an icon, or a different view. Fix: name the page or panel first, quote the visible control label, and state any required selection or mode.
The screenshot and text disagree
Cause: the interface version, theme, zoom, or account state changed. Fix: recapture the image and update the step together. Record the version used and qualify labels that vary.
Quick wins for a faster PC:
Scan for outdated or missing drivers - takes under a minuteDriver Scan →Repair Windows errors before they cause bigger problemsFix Now →Fix the driver behind crashes, sound loss and screen glitchesFind Drivers →The image is unreadable on small screens
Cause: an overly wide capture or tiny annotation. Fix: crop to the feature, provide a second close-up only when necessary, and keep the full instruction in text.
The procedure appears to work but changes are lost
Cause: the final save or apply action is missing. Fix: add it as its own step and state the confirmation or status that proves persistence.
A sensitive value appears in an image
Cause: capture was taken from a real account or project. Fix: replace it with test data, crop it out, or redact it before publication. Recheck alternate image sizes and downloads for the same exposure.
FAQ
How many screenshots should a tutorial contain?
Use as many as needed to resolve genuine orientation or recognition problems, and no more. A short workflow may need one opening image and one completion image; a complex dialog may need an image for each distinct state.
Outdated Drivers Are Slowing You Down
One free scan finds every outdated or missing driver and matches the right update for your exact hardware.Free scan · exact hardware matchWindows Errors? Fix Them Before They Spread
Repair common Windows errors and clear accumulated junk for a smoother, more stable PC - no reinstall needed.Free scan · no reinstallShould screenshots show the whole screen?
Usually not. A focused crop is easier to read, provided it retains enough surrounding context to identify the page and the control.
What if the interface changes after publication?
Keep the application version and capture date in your editorial notes, monitor reader reports, and update the affected step and image together. Never leave a stale screenshot that contradicts the current label.
Frequently Asked Questions
Can I create a screenshot tutorial without a dedicated capture app?
Yes. Use the operating system’s built-in capture function, such as Windows Snipping Tool, while preserving the same framing, alt text, and image-independent instructions.
Should I put instructions inside the screenshot?
No. Keep explanations in editable text and use restrained callouts only to identify the relevant control.
Quick Recap
Product prices and availability are accurate as of the date/time indicated and are subject to change. Any price and availability information displayed on Amazon at the time of purchase will apply.

