Some links on this page are affiliate links: if you buy through them we may earn a commission, at no extra cost to you.
You can’t record your screen directly with Windows Media Player. It plays media; it does not provide a supported screen-recording workflow. For a quick recording of part of your screen, use Snipping Tool. For a game or app, try Xbox Game Bar. Choose Clipchamp if you want to edit the result, or OBS Studio for more control over sources and audio.
Why Windows Media Player can’t record your screen
Windows Media Player is a media player, not a desktop-capture tool. There is no supported “record screen” command to use inside it. Microsoft points Windows users to other tools—including Snipping Tool, Xbox Game Bar and Clipchamp—for screen recording. Microsoft’s alternatives to Steps Recorder are a useful starting point.
Choose based on what you need to capture: Snipping Tool for a selected screen area, Game Bar for a game or app, Clipchamp for recording followed by editing, or OBS Studio for advanced capture. These tools create a video file; you can play that file afterward in Windows Media Player if its format is supported.
Free tools Windows power users keep installed
One-click scans. No signup required.
Record part of the screen with Snipping Tool
Snipping Tool is usually the simplest option for a short demonstration or troubleshooting clip. Its video capture records a rectangular area that you select—not automatically every monitor or every part of the Windows desktop.
#1 Best Overall

- 360 Degree Position Adjustable Gooseneck Design --Plug and play USB microphone Pick up the sound from 360-degree with high sensitivity, in the best possible location for sound to your PC gaming, dragon voice dictation, and talk to Cortana
- Mute Button & LED Indicator --One-click to mute/unmute your microphone for pc, Build-in LED indicator tells you the working status at any time
- Intelligent Noise-Canceling Tech --Premium omnidirectional condenser microphone with noise-canceling technology can pick up your clear voice and reduce background noise and echo
- USB Plug&Play(1.8/6ft USB Cable) -- No driver required. Just need to plug & play for the microphone to start recording, well compatible with Windows(7, 8, 10 and 11) and macOS. (NOT compatible with Xbox/Raspberry Pi/Android)
- Solid Construction--Adopting premium metal pipe and heavy-duty ABS stand to make sure that you will be satisfied with our computer mic quality
- Open Snipping Tool from Start or Windows search.
- Select Record, then New. On supported versions, you can instead press Windows key + Shift + R to open the video-capture overlay.
- Drag to select the region you want to record. To capture the whole display, select a rectangle covering it.
- Select Start, perform the actions you want to show, then select Stop.
- Save the video, or choose Edit in Clipchamp if that option is available and you want to edit it.
Button names and feature availability can vary by Windows build, edition and Snipping Tool version. See Microsoft’s Snipping Tool instructions for the documented capture workflow. Snipping Tool is not a full-featured live audio mixer; if capturing system audio or a microphone reliably is essential, use Game Bar, Clipchamp or OBS and check their audio settings first.
Record a game or app with Xbox Game Bar
Game Bar is designed for recording an app or game, not for capturing every part of Windows. It may refuse to record the desktop, File Explorer, system dialogs or particular protected content. If the active window cannot be captured, switch to Snipping Tool for a region or OBS Studio for broader capture controls.
Enable Game Bar and record
- Press Windows key + I to open Settings and search for Xbox Game Bar. Enable the option that allows Game Bar to open and record game clips, if it is available.
- Open the app or game you want to capture and press Windows key + G to show Game Bar.
- Press Windows key + Alt + R to start recording. Press the same shortcut again to stop.
- To toggle the microphone while recording, press Windows key + Alt + M.
To include system audio, press Windows key + G, open Settings, go to Capturing, and choose the appropriate audio-capture option. Check the microphone control separately: system sound and microphone narration are different inputs. Microsoft documents these controls and shortcuts in its Xbox Game Bar recording guide.
Do these 3 things before closing this tab:
1Scan for outdated or missing drivers - takes under a minute2Clear out junk files and repair common Windows errors3Fix the driver behind crashes, sound loss and screen glitchesRank #2
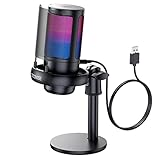
- Gradient RGB Symphony Lights: Cyclic and gradient RGB lights, in line with your live broadcast aesthetics. Bring you an immersive gaming experience and awaken all your senses. There's also a palpable sense of security, and when the COCONISE microphone is muted, the RGB lights go off to let you know you're working. Prevent accidents when you forget to mute your PC microphone for gaming.
- Practical and convenient function: It is equipped with a one-button mute touch sensor. When you want to close the microphone, you only need to touch it lightly to mute the sound, and the RGB light will go out to inform you that the microphone has been successfully closed. Equipped with a rotary control volume button at the bottom. There is a 3.5MM headphone jack in the middle, you can plug in the headphones to monitor your own voice in real-time and make adjustments in time when recording.
- Cardioid Polar Pattern: This microphone features a cardioid polar pattern that captures crisp, smooth, and clear sound in front of the microphone, reducing side pickup so it can focus on your voice. At the same time, it is equipped with a 25mm ultra-large capacitor diaphragm capsule, which can capture a wider range of audio with a sampling rate of up to 192kHz, and the pickup is delicate and noise-free.
- SOLID FIT: With a weighted carbon steel base, your big movements won't knock the mic down, even during intense gaming sessions. The detachable metal anti-splash screen is adopted. Compared with the sponge, the metal anti-splash screen can filter the plosive sound more effectively. And the rubber elastic band is firmly clamped on the shock mount, which can reduce the vibration noise caused by violent keyboard tapping and mouse clicking.
- Plug and Play:PC gaming microphone for streaming, compatible with PS4/PS4pro/PS5 desktop and laptop. You can quickly enter the game chat. The 180CM long detachable USB data cable can be extended from the back of the computer host to the main body of your gaming USB microphone without limitation.
Game Bar recordings are MP4 files saved in VideosCaptures. The filename includes the app or game name and the recording date and time. If your clip has no sound, check the capture setting, microphone toggle, Windows input device and microphone permissions before recording again.
Record and edit with Clipchamp
Clipchamp suits tutorials and presentations that need trimming, additional clips or other edits after capture. It can record a screen and webcam, subject to the available version, account and permissions. Microsoft says Clipchamp is built into Windows 11 devices and is also available on the web or through the Microsoft Store. Personal use and work or school access differ; organizational licensing or administrator settings may affect the work/school version. Check Microsoft’s Clipchamp account and product information for current details.
- Open Clipchamp and select Create new, then Screen recording.
- Allow camera and microphone access if prompted, then choose the devices and recording options you need.
- Select Start screen recording. Choose a browser tab, window or entire screen, then select Share.
- Stop sharing when you are done. Trim or otherwise edit the recording, then select Finish to export or share it using the available options.
For the documented work or school workflow and its controls, see Microsoft’s Clipchamp screen recorder guide. Grant microphone permission before recording if you want narration. Adding audio during editing is not the same as capturing live system audio during the screen recording.
Rank #3

- 【Crystal Clear Audio Quality】Our Omnidirectional pattern condenser microphone accurately captures your voice, making it perfect for dictation, online classrooms, and more.
- 【Active Noise-Cancelling】Come in CMTECK CCS2.0 SMART CHIP with Omnidirectional Polar Pattern, which can effectively block the background noise. The pop filter prevents plosives from overloading the microphone, ensuring only your voice is heard.7
- 【Convenient Mute Button with LED Indicator】You can quickly mute/un-mute the microphone with the Mute Button and the built-in LED light lets you know the working status(Greenlight: Connected; Red light: Mute mode).
- 【Easy to use】 No drivers needed, just plug and record without external power supply, directly connect the microphone to a USB compatible device, well compatible with Windows(7, 8 and 10), Mac OS and PS4 (NOT compatible with Raspberry Pi/Linux/Android)
- 【Mini size with Adjustable Gooseneck】Adopted flexible and adjustable gooseneck metal pipe, easily adjust position 360 degrees to suit user comfort. The compact and stable base maximizes your desktop space.
Use OBS Studio for advanced recording
OBS Studio is a better fit if you need multiple displays or sources, separate scenes, webcam overlays, detailed audio mixing, or settings for resolution and frame rate. It is more involved than the built-in tools, so it is unnecessary for a quick clip.
- Download OBS from the official OBS Project site.
- Run its automatic configuration wizard, then add a Display Capture or Window Capture source.
- If needed, add an Audio Input Capture source for your microphone. Check that the relevant audio meters move before you record.
- Select Start Recording, then Stop Recording when finished. Check Settings > Output > Recording for the output location and recording options.
If OBS shows a black capture, first test a non-protected window and confirm that you selected the correct display or window. Hardware acceleration or a GPU selection conflict can also affect capture. The OBS download page lists current compatibility and releases; avoid relying on a version number that may change.
Which recorder should you choose?
| Your goal | Recommended tool | Why |
|---|---|---|
| Quick clip of a selected area | Snipping Tool | Fast region selection with little setup. |
| Record a game or app | Xbox Game Bar | Quick keyboard controls and MP4 output, with app/game capture limits. |
| Record a tutorial and edit it | Clipchamp | Combines capture with editing and sharing options. |
| Combine displays, windows, webcam and audio sources | OBS Studio | Offers more control over sources, scenes and audio. |
You do not need to buy a recorder just because Windows Media Player cannot capture the screen. Try the built-in option that matches the task; use OBS when its additional control is worth the setup.
Rank #4

- HIGH SENSITIVITY for CLEAR CALL - This portable USB microphone adpots a 6*10mm high sensitivity condensor microphone to capture clear voice, the audio signal processed by multi levels of audio gain amplifier and advanced ADC module, it provides crystal clear voice, reliable compatibility and noise cancelling. It's able to capture voice in 10ft distance clearly -it's very small, but powerful. Plug it into the computer, you'll experience better con-call immediately.
- PLUG-and-PLAY - The USB 2.0 interface is widely compatible with the most computer devices (Windows, Mac, Raspberry Pi, Linux, Chromebook & etc ) and softwares (Google Meetings, Zoom, Team, Skype & etc). Just plug it into the USB port and done. No extra driver or settings are required.
- COMPACT & PORTABLE - Like a flash disk, you can put it in the pocket with ease. Carry it with your laptop, and plug it in when you need it. No more tangled cords or bulky bases hogging your desk space, This mic is on a mission to keep your workspace sleek and organized.
- IDEAL REPLACEMENT - If you are looking for a quality microphone for work at home, online conferencing, online class, live streaming and webinar, this is a great choice. It's not a recording studio grade microphone, but the sound quality is better than most of laptop built-in microphones, and it's completely enough to meet your general demand.
- WHAT YOU GET - Packed in a metal carrying box, and comes with 12 months waranty. For any concern, you can send us messages and we will respond in 24 hours.
Fix common screen-recording problems
The Snipping Tool Record button is missing
Search for Snipping Tool directly from Start. If the app is missing, try installing or updating it through Microsoft Store; also install pending Windows updates. Then try Windows key + Shift + R. If recording is still unavailable, use Game Bar for a supported app or OBS Studio. A Windows build, app version, organization policy or Windows edition can affect which controls appear.
On Windows N editions, some media components may be absent. Microsoft notes that screen recording may require the relevant media components; check its Media Feature Pack guidance for Windows N. Do not assume every N installation has identical limitations: installed components and updates matter.
Quick wins for a faster PC:
Scan for outdated or missing drivers - takes under a minuteDriver Scan →Repair Windows errors before they cause bigger problemsFix Now →Fix the driver behind crashes, sound loss and screen glitchesFind Drivers →Game Bar will not record the current window
Game Bar is intended for games and apps, not every Windows screen. If it cannot capture the desktop, File Explorer or a system dialog, use Snipping Tool for a selected area or OBS for broader capture. Some apps and protected content also restrict recording.
Best Value

- Studio-Quality Sound for Clear Podcast Recording – The K66 USB podcast microphone delivers studio-quality, broadcast-level audio using a high-performance condenser capsule and cardioid pickup pattern that focuses on your voice while reducing unwanted background noise. Designed as a reliable microphone for PC, it features a wide 40Hz–18kHz frequency response and a 46kHz sampling rate to reproduce rich lows, smooth mids, and clear highs for natural, detailed vocals. With –45dB ±3dB sensitivity, it captures balanced sound without distortion during expressive speaking. Ideal for podcasting, voice-over, online classes, meetings, and professional content creation.
- Intelligent Noise Reduction Mode for Cleaner Podcast Audio – This podcast microphone features an advanced Noise Reduction Mode designed for clearer, more focused voice recording in real-world environments. Press and hold the mute button to enable noise reduction (blue indicator). In this mode, the microphone helps reduce keyboard clicks, PC fan noise, air conditioner hum, and background chatter. Default Mode maintains a warm, natural vocal tone for quiet spaces. Designed as a reliable microphone for PC, it allows creators to identify the active mode instantly and adapt as needed, ensuring clear audio for podcasting, gaming, streaming, online classes, meetings, and recording.
- True Plug-and-Play USB Microphone with Wide Device Compatibility – Engineered for effortless plug-and-play use, the K66 USB microphone requires no drivers, apps, or software installation. Simply connect and start recording on Windows PC, Mac, laptops, PS4, PS5, and tablets. Included USB-C and Lightning adapters ensure seamless compatibility with iPhone, iPad, and modern USB-C phones and devices, making it easy to switch between desktop and mobile recording. Ideal for creators working across multiple platforms, this microphone delivers consistent, high-quality audio for YouTube, TikTok, Twitch, Zoom, Discord, OBS Studio, Streamlabs, podcasting, livestreaming, and professional voice recording.
- Real-Time Zero-Latency Monitoring with Adjustable Volume Control – This podcast microphone features real-time, zero-latency monitoring through a built-in 3.5mm headphone jack, allowing you to hear exactly what’s being recorded without delay. Designed as a reliable microphone for PC, it includes a dedicated monitoring volume control that lets you adjust headphone listening levels independently for accurate and comfortable audio monitoring. Real-time feedback helps identify distortion, background noise, or uneven volume before it affects your final recording, making this podcast microphone ideal for podcasting, streaming, online teaching, voice-over work, and professional content creation.
- Precision Audio Adjustment Knobs for Full Sound Control – This podcast microphone gives creators hands-on control with dedicated knobs for microphone volume, monitoring volume, and echo adjustment. Fine-tune mic gain to maintain clear, balanced vocal output, adjust headphone monitoring levels independently for comfortable listening, and add or reduce echo to enhance depth and presence. Designed as a reliable PC microphone, these intuitive physical controls allow fast, on-the-fly adjustments without software, helping identify distortion, background noise, or level inconsistencies instantly. Ideal for podcasting, streaming, ASMR, voice-overs, singing, and professional multi-platform recording.
The video has no microphone or system audio
For microphone audio, confirm that the device is connected and selected as the Windows input, permissions are enabled, and the microphone toggle is on. For Clipchamp, grant the browser or app microphone access. For system audio in Game Bar, select the desired option under Settings > Capturing before recording. In OBS, check the relevant mixer meter before you start. Snipping Tool is not the best choice when dependable live audio control is a requirement.
The recording is black or looks different from the screen
Test capture with an ordinary, non-protected window and verify the selected window or display. A black image can be caused by content protection, hardware acceleration, permissions or capture configuration; it does not mean every app behaves the same way. Some display-pipeline features may also not appear in a recording exactly as they do on screen—for example, Microsoft documents a capture limitation involving Automatic Super Resolution.
Be mindful of privacy and copyright
Before recording a meeting, chat or someone else’s screen, consider consent and applicable local law. A video that plays on your screen is not automatically yours to redistribute: check the service’s terms and the rights attached to the content. Protected streaming video may appear blank or be blocked, and a recorder should not be treated as a way to bypass those restrictions.
Recommended Free Tools
Quick Recap
Product prices and availability are accurate as of the date/time indicated and are subject to change. Any price and availability information displayed on Amazon at the time of purchase will apply.

